
XPS 27 2720 Owners Manual
Page 4
... 16 Removing the System-Board Shield 31 Prerequisites 31 Procedure 31 17 Replacing the System-Board Shield 32 Procedure 32 Postrequisites 32 18 Removing the Power-Supply Fan 33 Prerequisites 33 Procedure 33 19 Replacing the Power-Supply Fan 34 Procedure 34 Postrequisites 34 4 | Contents
... 16 Removing the System-Board Shield 31 Prerequisites 31 Procedure 31 17 Replacing the System-Board Shield 32 Procedure 32 Postrequisites 32 18 Removing the Power-Supply Fan 33 Prerequisites 33 Procedure 33 19 Replacing the Power-Supply Fan 34 Procedure 34 Postrequisites 34 4 | Contents
XPS 27 2720 Owners Manual
Page 7
... 58 Prerequisites 58 Procedure 59 41 Replacing the Power-Supply Unit 60 Procedure 60 Postrequisites 60 42 Removing the Wireless Keyboard/Mouse Receiver 61 Prerequisites 61 Procedure 62 43 Replacing the Wireless Keyboard/Mouse Receiver ...
... 58 Prerequisites 58 Procedure 59 41 Replacing the Power-Supply Unit 60 Procedure 60 Postrequisites 60 42 Removing the Wireless Keyboard/Mouse Receiver 61 Prerequisites 61 Procedure 62 43 Replacing the Wireless Keyboard/Mouse Receiver ...
XPS 27 2720 Owners Manual
Page 14
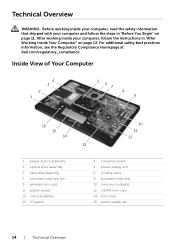
...at dell.com/regulatory_compliance. Inside View of Your Computer 4 3 2 1 5 67 8 9 16 15 14 1 power-button assembly 3 optical-drive assembly 5 hard-drive assembly 7 processor heat-sink fan 9 wireless mini-card 11 system board 13 coin-cell battery 15 I/O panel 10 11 12 13 2 converter board 4 power-supply unit... 6 cooling vents 8 processor heat-sink 10 memory module(s) 12 mSATA mini-card 14 trim cover 16 power-supply fan 14 | Technical Overview After working inside your computer and follow the instructions ...
...at dell.com/regulatory_compliance. Inside View of Your Computer 4 3 2 1 5 67 8 9 16 15 14 1 power-button assembly 3 optical-drive assembly 5 hard-drive assembly 7 processor heat-sink fan 9 wireless mini-card 11 system board 13 coin-cell battery 15 I/O panel 10 11 12 13 2 converter board 4 power-supply unit... 6 cooling vents 8 processor heat-sink 10 memory module(s) 12 mSATA mini-card 14 trim cover 16 power-supply fan 14 | Technical Overview After working inside your computer and follow the instructions ...

XPS 27 2720 Owners Manual
Page 33
... safety best practices information, see the Regulatory Compliance Homepage at dell.com/regulatory_compliance. Procedure 1 Lift the securing tab and disconnect the power-supply fan cable from under the I/O-board assembly. 4 Lift the power-supply fan and slide it off the tab on page 17. Removing the Power-Supply Fan WARNING: Before working inside your computer, read the...
... safety best practices information, see the Regulatory Compliance Homepage at dell.com/regulatory_compliance. Procedure 1 Lift the securing tab and disconnect the power-supply fan cable from under the I/O-board assembly. 4 Lift the power-supply fan and slide it off the tab on page 17. Removing the Power-Supply Fan WARNING: Before working inside your computer, read the...
XPS 27 2720 Owners Manual
Page 34
...connect the power-supply fan cable to the middle cover. After working inside your computer and follow the instructions in "After Working Inside Your Computer" on page 13. For additional safety best practices information, see the Regulatory Compliance Homepage at dell.com/regulatory_compliance.... See "Replacing the Back Cover" on page 18. 2 Follow the instructions in "After Working Inside Your Computer" on page 13. 34 | Replacing the Power-Supply Fan
...connect the power-supply fan cable to the middle cover. After working inside your computer and follow the instructions in "After Working Inside Your Computer" on page 13. For additional safety best practices information, see the Regulatory Compliance Homepage at dell.com/regulatory_compliance.... See "Replacing the Back Cover" on page 18. 2 Follow the instructions in "After Working Inside Your Computer" on page 13. 34 | Replacing the Power-Supply Fan
XPS 27 2720 Owners Manual
Page 58
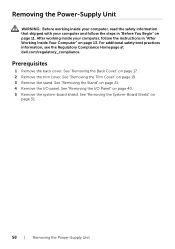
For additional safety best practices information, see the Regulatory Compliance Homepage at dell.com/regulatory_compliance. See "Removing the Trim Cover" on page 11. Removing the Power-Supply Unit WARNING: Before working inside your computer, read the safety information that shipped with your computer, follow the ...steps in "After Working Inside Your Computer" on page 13. See "Removing the Back Cover" on page 31. 58 | Removing the Power-Supply Unit See "Removing the System-Board Shield" on page 17. 2 Remove the trim cover. See "Removing the I/O Panel" on page 21. 4...
For additional safety best practices information, see the Regulatory Compliance Homepage at dell.com/regulatory_compliance. See "Removing the Trim Cover" on page 11. Removing the Power-Supply Unit WARNING: Before working inside your computer, read the safety information that shipped with your computer, follow the ...steps in "After Working Inside Your Computer" on page 13. See "Removing the Back Cover" on page 31. 58 | Removing the Power-Supply Unit See "Removing the System-Board Shield" on page 17. 2 Remove the trim cover. See "Removing the I/O Panel" on page 21. 4...
XPS 27 2720 Owners Manual
Page 59
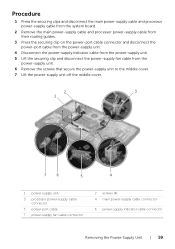
... the power-supply indicator cable from the power-supply unit. 5 Lift the securing clip and disconnect the power-supply fan cable from the power-supply unit. 6 Remove the screws that secure the power-supply unit to the middle cover. 7 Lift the power-supply unit off the middle cover. 2 3 1 7 6 5 4 1 power-supply unit 3 processor power-supply cable connector 5 power-port cable 7 power-supply fan cable connector 2 screws (4) 4 main power-supply cable connector 6 power-supply indicator...
... the power-supply indicator cable from the power-supply unit. 5 Lift the securing clip and disconnect the power-supply fan cable from the power-supply unit. 6 Remove the screws that secure the power-supply unit to the middle cover. 7 Lift the power-supply unit off the middle cover. 2 3 1 7 6 5 4 1 power-supply unit 3 processor power-supply cable connector 5 power-port cable 7 power-supply fan cable connector 2 screws (4) 4 main power-supply cable connector 6 power-supply indicator...
XPS 27 2720 Owners Manual
Page 60
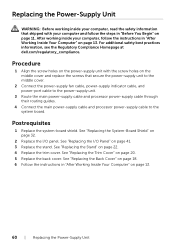
..., see the Regulatory Compliance Homepage at dell.com/regulatory_compliance. After working inside your computer and follow the instructions in "After Working Inside Your Computer" on page 13. See "Replacing the Back Cover" on page 18. 6 Follow the instructions in "After Working Inside Your Computer" on page 13. 60 | Replacing the Power-Supply Unit
..., see the Regulatory Compliance Homepage at dell.com/regulatory_compliance. After working inside your computer and follow the instructions in "After Working Inside Your Computer" on page 13. See "Replacing the Back Cover" on page 18. 6 Follow the instructions in "After Working Inside Your Computer" on page 13. 60 | Replacing the Power-Supply Unit
XPS 27 2720 Owners Manual
Page 68
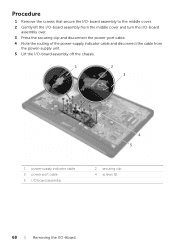
Procedure 1 Remove the screws that secure the I/O-board assembly to the middle cover. 2 Gently lift the I/O-board assembly from the middle cover and turn the I/O-board assembly over. 3 Press the securing clip and disconnect the power-port cable. 4 Note the routing of the power-supply indicator cable and disconnect the cable from the power-supply unit. 5 Lift the I/O-board assembly off the chassis. 1 2 3 4 5 1 power-supply indicator cable 3 power-port cable 5 I/O-board assembly 2 securing clip 4 screws (9) 68 | Removing the I/O-Board
Procedure 1 Remove the screws that secure the I/O-board assembly to the middle cover. 2 Gently lift the I/O-board assembly from the middle cover and turn the I/O-board assembly over. 3 Press the securing clip and disconnect the power-port cable. 4 Note the routing of the power-supply indicator cable and disconnect the cable from the power-supply unit. 5 Lift the I/O-board assembly off the chassis. 1 2 3 4 5 1 power-supply indicator cable 3 power-port cable 5 I/O-board assembly 2 securing clip 4 screws (9) 68 | Removing the I/O-Board
XPS 27 2720 Owners Manual
Page 70
...on page 13. 70 | Replacing the I/O Board Procedure 1 Slide the power-port cable and power-supply indicator cable through the routing guides and connect the cable to the power-supply unit. 4 Connect the power-port cable to the power-supply unit. 5 Align the screw holes on the I/O-board assembly with your computer...board assembly to the middle cover. For additional safety best practices information, see the Regulatory Compliance Homepage at dell.com/regulatory_compliance. After working inside your computer, follow the steps in "After Working Inside Your Computer" on page 11.
...on page 13. 70 | Replacing the I/O Board Procedure 1 Slide the power-port cable and power-supply indicator cable through the routing guides and connect the cable to the power-supply unit. 4 Connect the power-port cable to the power-supply unit. 5 Align the screw holes on the I/O-board assembly with your computer...board assembly to the middle cover. For additional safety best practices information, see the Regulatory Compliance Homepage at dell.com/regulatory_compliance. After working inside your computer, follow the steps in "After Working Inside Your Computer" on page 11.

XPS 27 2720 Owners Manual
Page 84
...the Hard Drive" on page 35. 5 Remove the hard-drive cage. For additional safety best practices information, see the Regulatory Compliance Homepage at dell.com/regulatory_compliance. Prerequisites 1 Remove the back cover. See "Removing the System-Board Shield" on page 51. 12 Remove the processor heat-sink.... replace the middle cover while the components are attached to step 5 in "After Working Inside Your Computer" on page 53. 13 Remove the power-supply fan. After working inside your computer and follow the instructions in "Removing the I /O Panel" on page 40. 8 Remove the system-board...
...the Hard Drive" on page 35. 5 Remove the hard-drive cage. For additional safety best practices information, see the Regulatory Compliance Homepage at dell.com/regulatory_compliance. Prerequisites 1 Remove the back cover. See "Removing the System-Board Shield" on page 51. 12 Remove the processor heat-sink.... replace the middle cover while the components are attached to step 5 in "After Working Inside Your Computer" on page 53. 13 Remove the power-supply fan. After working inside your computer and follow the instructions in "Removing the I /O Panel" on page 40. 8 Remove the system-board...
XPS 27 2720 Owners Manual
Page 88
...instructions from step 1 to step 3 in "Replacing the System Board" on page 79. 2 Replace the converter board. See "Replacing the Power-Supply Fan" on page 60. 4 Replace the power-supply fan. See "Replacing the Power-Supply Unit" on page 34. 5 Replace the processor heat-sink. See "Replacing the Inner Frame" on page 54. 6 Replace the processor... shield. See "Replacing the Converter Board" on page 32. 10 Replace the I/O panel. See "Replacing the System-Board Shield" on page 24. 3 Replace the power-supply unit. See "Replacing the Trim Cover" on page 20. 16 Replace the back cover.
...instructions from step 1 to step 3 in "Replacing the System Board" on page 79. 2 Replace the converter board. See "Replacing the Power-Supply Fan" on page 60. 4 Replace the power-supply fan. See "Replacing the Power-Supply Unit" on page 34. 5 Replace the processor heat-sink. See "Replacing the Inner Frame" on page 54. 6 Replace the processor... shield. See "Replacing the Converter Board" on page 32. 10 Replace the I/O panel. See "Replacing the System-Board Shield" on page 24. 3 Replace the power-supply unit. See "Replacing the Trim Cover" on page 20. 16 Replace the back cover.
Me and My Dell
Page 16
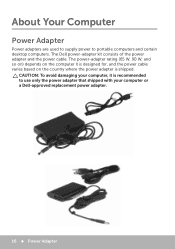
... is recommended to portable computers and certain desktop computers. CAUTION: To avoid damaging your computer or a Dell‑approved replacement power adapter. 16 Power Adapter About Your Computer Power Adapter Power adapters are used to supply power to use only the power adapter that shipped with your computer, it is shipped. The Dell power-adapter kit consists of the...
... is recommended to portable computers and certain desktop computers. CAUTION: To avoid damaging your computer or a Dell‑approved replacement power adapter. 16 Power Adapter About Your Computer Power Adapter Power adapters are used to supply power to use only the power adapter that shipped with your computer, it is shipped. The Dell power-adapter kit consists of the...
Me and My Dell
Page 24
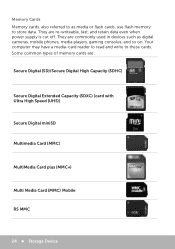
Some common types of memory cards are re-writeable, fast, and retain data even when power supply is cut off. They are commonly used in devices such as media or flash cards, use flash memory to store data. Your computer may have a ...
Some common types of memory cards are re-writeable, fast, and retain data even when power supply is cut off. They are commonly used in devices such as media or flash cards, use flash memory to store data. Your computer may have a ...

Me and My Dell
Page 97
... a virus scan regularly. • Check your computer for errors using My Dell and other tools available on your hard disk, and then turns off . Power Management Power management helps you to configure when the power supply to certain components should be reduced or cut off your computer. • ... 97 Hybrid sleep is turned on your internal hard drive. When hybrid sleep is a combination of your computer by regulating power supply to the various components. The system setup and the operating system allow dust to accumulate in degraded performance. • Enable automatic ...
... a virus scan regularly. • Check your computer for errors using My Dell and other tools available on your hard disk, and then turns off . Power Management Power management helps you to configure when the power supply to certain components should be reduced or cut off your computer. • ... 97 Hybrid sleep is turned on your internal hard drive. When hybrid sleep is a combination of your computer by regulating power supply to the various components. The system setup and the operating system allow dust to accumulate in degraded performance. • Enable automatic ...


