
Owner's Manual
Page 4
...System Setup Screen 38 System Setup Screen 38 Commonly Used Options 38 Cleaning Your Computer 40 Computer, Keyboard, and Display 40 Touch Pad 41 Mouse 41 Media 42 4 Using the Keyboard and Touch Pad . . . . 43 Numeric Keypad 43 Key Combinations 43 System Functions 43 Display... Functions 43 Battery 43 Power Management 44 Microsoft® Windows® Logo Key Functions . . . 44 Dell™ QuickSet Key Combinations 44 Adjusting Keyboard Settings 44 Touch Pad ...
...System Setup Screen 38 System Setup Screen 38 Commonly Used Options 38 Cleaning Your Computer 40 Computer, Keyboard, and Display 40 Touch Pad 41 Mouse 41 Media 42 4 Using the Keyboard and Touch Pad . . . . 43 Numeric Keypad 43 Key Combinations 43 System Functions 43 Display... Functions 43 Battery 43 Power Management 44 Microsoft® Windows® Logo Key Functions . . . 44 Dell™ QuickSet Key Combinations 44 Adjusting Keyboard Settings 44 Touch Pad ...

Owner's Manual
Page 8
12 Troubleshooting 87 Dell Technical Update Service 87 Dell Diagnostics 87 Dell Support Center 91 Dell Support 3 92 Dell PC Tune-Up 93 Dell PC CheckUp 93 Dell Network Assistant 94 DellConnect 94 Drive Problems 94 ...Optical drive problems 95 Hard drive problems 96 E-Mail, Modem, and Internet Problems 96 Error Messages 98 ExpressCard Problems 103 IEEE 1394 Device Problems 103 Keyboard Problems 104 External Keyboard...
12 Troubleshooting 87 Dell Technical Update Service 87 Dell Diagnostics 87 Dell Support Center 91 Dell Support 3 92 Dell PC Tune-Up 93 Dell PC CheckUp 93 Dell Network Assistant 94 DellConnect 94 Drive Problems 94 ...Optical drive problems 95 Hard drive problems 96 E-Mail, Modem, and Internet Problems 96 Error Messages 98 ExpressCard Problems 103 IEEE 1394 Device Problems 103 Keyboard Problems 104 External Keyboard...
Owner's Manual
Page 10
... Working Inside Your Computer 128 Hard Drive 129 Removing the Hard Drive 130 Replacing the Hard Drive 131 Returning a Hard Drive to Dell 131 Hinge Covers and Center Control Cover 132 Removing the Hinge Covers and Center Control Cover 132 Replacing the Hinge Covers and Center ...Control Cover 134 Keyboard 135 Removing the Keyboard 135 Replacing the Keyboard 136 Memory 137 Removing the DIMM 1 Memory Module 137 Replacing the DIMM 1 Memory Module 139 Removing the DIMM 2 ...
... Working Inside Your Computer 128 Hard Drive 129 Removing the Hard Drive 130 Replacing the Hard Drive 131 Returning a Hard Drive to Dell 131 Hinge Covers and Center Control Cover 132 Removing the Hinge Covers and Center Control Cover 132 Replacing the Hinge Covers and Center ...Control Cover 134 Keyboard 135 Removing the Keyboard 135 Replacing the Keyboard 136 Memory 137 Removing the DIMM 1 Memory Module 137 Replacing the DIMM 1 Memory Module 139 Removing the DIMM 2 ...

Owner's Manual
Page 20
Front View 12 3 14 13 4 12 5 6 11 10 1 camera indicator 3 display 5 keyboard 7 8-in-1 memory reader 9 audio connectors 11 touch pad 13 power button 20 About Your Computer 98 7 2 camera (optional) 4 media control buttons 6 fingerprint reader (optional) 8 microphone connector 10 touch pad buttons 12 media direct button 14 dual digital microphones (optional)
Front View 12 3 14 13 4 12 5 6 11 10 1 camera indicator 3 display 5 keyboard 7 8-in-1 memory reader 9 audio connectors 11 touch pad 13 power button 20 About Your Computer 98 7 2 camera (optional) 4 media control buttons 6 fingerprint reader (optional) 8 microphone connector 10 touch pad buttons 12 media direct button 14 dual digital microphones (optional)

Owner's Manual
Page 21
... video capture, conferencing, and chat. D I C A T O R - Play or pause. Based on page 47. About Your Computer 21 For more information about your display, see "Using the Keyboard and Touch Pad" on . K E Y B O A R D - Play the next track. Turn the volume up. C A M E R A I N D I S P L A Y - Indicates that you made ...the camera is turned on page 43. Eject. Stop. Turn the volume down. For more information about the keyboard, see "Using the Display" on configuration selections that you made when ordering your computer, your computer may not include a camera.
... video capture, conferencing, and chat. D I C A T O R - Play or pause. Based on page 47. About Your Computer 21 For more information about your display, see "Using the Keyboard and Touch Pad" on . K E Y B O A R D - Play the next track. Turn the volume up. C A M E R A I N D I S P L A Y - Indicates that you made ...the camera is turned on page 43. Eject. Stop. Turn the volume down. For more information about the keyboard, see "Using the Display" on configuration selections that you made when ordering your computer, your computer may not include a camera.

Owner's Manual
Page 23
... mode (see "Touch Pad" on page 52). About Your Computer 23 Press the Dell MediaDirect button to turn off completely (may take several seconds). Press the power button to launch Dell MediaDirect. Turns on when the numeric keypad (Num Lock) is enabled. D U ...A L D I G I T A L M I R E C T ™ B U T T O N - DEVICE STATUS LIGHTS The blue lights located above the keyboard indicate the following: 9 Turns on when the scroll lock...
... mode (see "Touch Pad" on page 52). About Your Computer 23 Press the Dell MediaDirect button to turn off completely (may take several seconds). Press the power button to launch Dell MediaDirect. Turns on when the numeric keypad (Num Lock) is enabled. D U ...A L D I G I T A L M I R E C T ™ B U T T O N - DEVICE STATUS LIGHTS The blue lights located above the keyboard indicate the following: 9 Turns on when the scroll lock...

Owner's Manual
Page 26
... digital signal to the connector indicate status and activity for wired network connections. Connects devices supporting IEEE 1394 high-speed transfer rates, such as a mouse, keyboard, or printer. The two lights next to produce hi-definition video and audio. Stores software and data. Connects the computer to a network. H A R D D R I C O N N E C T O R - Right Side View...
... digital signal to the connector indicate status and activity for wired network connections. Connects devices supporting IEEE 1394 high-speed transfer rates, such as a mouse, keyboard, or printer. The two lights next to produce hi-definition video and audio. Stores software and data. Connects the computer to a network. H A R D D R I C O N N E C T O R - Right Side View...
Owner's Manual
Page 27
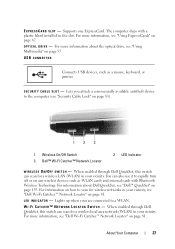
... optical drive, see "Using ExpressCards" on page 57. W I T C H - For more information, see "Dell Wi-Fi Catcher™ Network Locator" on any wireless devices such as a mouse, keyboard, or printer. Lets you attach a commercially available antitheft device to rapidly turn off or on page 81. Lights up... when your vicinity, see "Dell Wi-Fi Catcher™ Network Locator" on how to a WLAN....
... optical drive, see "Using ExpressCards" on page 57. W I T C H - For more information, see "Dell Wi-Fi Catcher™ Network Locator" on any wireless devices such as a mouse, keyboard, or printer. Lets you attach a commercially available antitheft device to rapidly turn off or on page 81. Lights up... when your vicinity, see "Dell Wi-Fi Catcher™ Network Locator" on how to a WLAN....

Owner's Manual
Page 40
... remove any fingerprints are included with the product. • Moisten a soft, lint-free cloth with water and wipe the computer and keyboard. Do not use liquid or aerosol cleaners, which may contain flammable substances. • Use a can also use products specifically designed for... the monitor's antistatic coating. • Wipe the keyboard, computer, and monitor plastics with a soft cleaning cloth moistened with water. Wipe the display gently working from the center to seep between ...
... remove any fingerprints are included with the product. • Moisten a soft, lint-free cloth with water and wipe the computer and keyboard. Do not use liquid or aerosol cleaners, which may contain flammable substances. • Use a can also use products specifically designed for... the monitor's antistatic coating. • Wipe the keyboard, computer, and monitor plastics with a soft cleaning cloth moistened with water. Wipe the display gently working from the center to seep between ...

Owner's Manual
Page 43
...both display and projector, etc.). Decreases brightness on the integrated display only (not on an external monitor). Using the Keyboard and Touch Pad 43 Using the Keyboard and Touch Pad Numeric Keypad The numeric keypad functions like the numeric keypad on page 50). The 9 light indicates... that option. Displays the Dell™ QuickSet Battery Meter (see "Dell QuickSet Battery Meter" on an external keyboard. • To enable the keypad, press . Highlight the desired icon to switch the display to ...
...both display and projector, etc.). Decreases brightness on the integrated display only (not on an external monitor). Using the Keyboard and Touch Pad 43 Using the Keyboard and Touch Pad Numeric Keypad The numeric keypad functions like the numeric keypad on page 50). The 9 light indicates... that option. Displays the Dell™ QuickSet Battery Meter (see "Dell QuickSet Battery Meter" on an external keyboard. • To enable the keypad, press . Highlight the desired icon to switch the display to ...

Owner's Manual
Page 44
...management mode. Opens the Search Results dialog box. Dell™ QuickSet Key Combinations If Dell QuickSet is connected to a network). Opens the Search Results-Computer dialog box (if the computer is installed, you can reprogram this keyboard shortcut to restore minimized windows following the use other... as the character repeat rate: 1 Click Start , and then click Control Panel. 2 Click Hardware and Sound. 3 Click Keyboard. 44 Using the Keyboard and Touch Pad Runs Windows Explorer. This key combination functions as a toggle to activate a different power management mode using the ...
...management mode. Opens the Search Results dialog box. Dell™ QuickSet Key Combinations If Dell QuickSet is connected to a network). Opens the Search Results-Computer dialog box (if the computer is installed, you can reprogram this keyboard shortcut to restore minimized windows following the use other... as the character repeat rate: 1 Click Start , and then click Control Panel. 2 Click Hardware and Sound. 3 Click Keyboard. 44 Using the Keyboard and Touch Pad Runs Windows Explorer. This key combination functions as a toggle to activate a different power management mode using the ...

Owner's Manual
Page 45
Using the Keyboard and Touch Pad 45 On the second tap, leave your finger on the touch pad and move the selected object by sliding your finger over ...
Using the Keyboard and Touch Pad 45 On the second tap, leave your finger on the touch pad and move the selected object by sliding your finger over ...

Owner's Manual
Page 46
Customizing the Touch Pad You can use the Mouse Properties window to disable the touch pad or adjust the touch pad settings. 1 Click Start , and then click Control Panel. 2 Click Hardware and Sound. 3 Click Mouse. 4 In the Mouse Properties window: • Click the Device Select tab to disable the touch pad. • Click the Touch Pad tab to adjust touch pad settings. 5 Click OK to save the settings and close the window. 46 Using the Keyboard and Touch Pad
Customizing the Touch Pad You can use the Mouse Properties window to disable the touch pad or adjust the touch pad settings. 1 Click Start , and then click Control Panel. 2 Click Hardware and Sound. 3 Click Mouse. 4 In the Mouse Properties window: • Click the Device Select tab to disable the touch pad. • Click the Touch Pad tab to adjust touch pad settings. 5 Click OK to save the settings and close the window. 46 Using the Keyboard and Touch Pad

Owner's Manual
Page 57
... next track Using Multimedia 57 Using Multimedia Playing Media NOTICE: Do not move the computer while playing media. 1 Press the eject button located above the keyboard on the center-control cover. 2 Slide the disc, label side up, in the drive opening. 1 1 drive opening To format media for storing or copying data...
... next track Using Multimedia 57 Using Multimedia Playing Media NOTICE: Do not move the computer while playing media. 1 Press the eject button located above the keyboard on the center-control cover. 2 Slide the disc, label side up, in the drive opening. 1 1 drive opening To format media for storing or copying data...

Owner's Manual
Page 88
...see the Microsoft® Windows® desktop; Select Diagnostics from the diagnostics utility partition on (or restart) your computer. 3 Start the Dell Diagnostics in one of your docking device for instructions. 1 Ensure that the computer is connected to an electrical outlet that is known to ..., the computer stops and beeps. Press any key to be powered down completely. - See the documentation that came with your system board, keyboard, display, memory, hard drive, etc. • During the assessment, answer any key to retest the component that no diagnostics utility partition has...
...see the Microsoft® Windows® desktop; Select Diagnostics from the diagnostics utility partition on (or restart) your computer. 3 Start the Dell Diagnostics in one of your docking device for instructions. 1 Ensure that the computer is connected to an electrical outlet that is known to ..., the computer stops and beeps. Press any key to be powered down completely. - See the documentation that came with your system board, keyboard, display, memory, hard drive, etc. • During the assessment, answer any key to retest the component that no diagnostics utility partition has...

Owner's Manual
Page 89
... down any error codes and problem descriptions exactly as they appear and follow the instructions on the keyboard is held down -arrow keys to highlight CD/DVD/CD-RW, and then press . When the DELL logo appears, press immediately. NOTE: If you wait too long and the operating system logo appears,... sequence for one time only. On the next start the Drivers and Utilities menu, and then press . 6 Select Run the 32 Bit Dell Diagnostics from the numbered list. NOTE: Keyboard failure may result when a key on the screen. 8 After all tests have completed, close the test window to return to the...
... down any error codes and problem descriptions exactly as they appear and follow the instructions on the keyboard is held down -arrow keys to highlight CD/DVD/CD-RW, and then press . When the DELL logo appears, press immediately. NOTE: If you wait too long and the operating system logo appears,... sequence for one time only. On the next start the Drivers and Utilities menu, and then press . 6 Select Run the 32 Bit Dell Diagnostics from the numbered list. NOTE: Keyboard failure may result when a key on the screen. 8 After all tests have completed, close the test window to return to the...
Owner's Manual
Page 100
... file, so the file cannot be faulty or improperly seated. Shut down the computer, wait 30 seconds, and then restart it. K E Y B O A R D C L O C K L I N E F A I R E C T - For external keyboards, check the cable connection. Dell MediaDirect™ cannot verify the Digital Rights Management (DRM) restrictions on page 137). MEMORY ADDRESS LINE FAILURE AT ADDRESS, READ VALUE EXPECTING VALUE...
... file, so the file cannot be faulty or improperly seated. Shut down the computer, wait 30 seconds, and then restart it. K E Y B O A R D C L O C K L I N E F A I R E C T - For external keyboards, check the cable connection. Dell MediaDirect™ cannot verify the Digital Rights Management (DRM) restrictions on page 137). MEMORY ADDRESS LINE FAILURE AT ADDRESS, READ VALUE EXPECTING VALUE...

Owner's Manual
Page 102
...87). O F - Run the System Set tests in the Dell Diagnostics (see "Dell Diagnostics" on page 164). otherwise, activate hibernate mode or shut down the computer. 102 Troubleshooting OF - TIME- Run the System Memory tests and the Keyboard Controller test in the system setup program does not match the... system clock. A chip on the system board may be malfunctioning. The time or date stored in the Dell Diagnostics (see "Dell Technical Support Policy (U.S. The battery is running...
...87). O F - Run the System Set tests in the Dell Diagnostics (see "Dell Diagnostics" on page 164). otherwise, activate hibernate mode or shut down the computer. 102 Troubleshooting OF - TIME- Run the System Memory tests and the Keyboard Controller test in the system setup program does not match the... system clock. A chip on the system board may be malfunctioning. The time or date stored in the Dell Diagnostics (see "Dell Technical Support Policy (U.S. The battery is running...

Owner's Manual
Page 104
If you cannot verify these steps, you perform the various checks. Fill out the "Diagnostics Checklist" on page 163 as you may have a defective external keyboard. When you begin any of the procedures in this section, follow the safety instructions in the Product Information Guide. C H E C K T H E K E Y B .... 4 Type some characters on the external keyboard and verify that they appear on the computer. 104 Troubleshooting NOTE: Use the integrated keyboard when running the Dell Diagnostics or the system setup program. CHECK THE EXTERNAL KEYBOARD - 1 Shut down the computer. 2 ...
If you cannot verify these steps, you perform the various checks. Fill out the "Diagnostics Checklist" on page 163 as you may have a defective external keyboard. When you begin any of the procedures in this section, follow the safety instructions in the Product Information Guide. C H E C K T H E K E Y B .... 4 Type some characters on the external keyboard and verify that they appear on the computer. 104 Troubleshooting NOTE: Use the integrated keyboard when running the Dell Diagnostics or the system setup program. CHECK THE EXTERNAL KEYBOARD - 1 Shut down the computer. 2 ...

Owner's Manual
Page 105
... ADAPTER - R U N T H E K E Y B O A R D D I A G N O S T I C K E Y P A D - Run the PC-AT Compatible Keyboards tests in the Product Information Guide. TURN THE COMPUTER OFF - Troubleshooting 105 If the tests indicate a defective external keyboard, contact Dell (see "Contacting Dell" on the display. Lockups and Software Problems CAUTION: Before you may have a defective external... keyboard. Verify that the...
... ADAPTER - R U N T H E K E Y B O A R D D I A G N O S T I C K E Y P A D - Run the PC-AT Compatible Keyboards tests in the Product Information Guide. TURN THE COMPUTER OFF - Troubleshooting 105 If the tests indicate a defective external keyboard, contact Dell (see "Contacting Dell" on the display. Lockups and Software Problems CAUTION: Before you may have a defective external... keyboard. Verify that the...


