Owner's Manual
Page 41
...of its original charge capacity remains. By default, a pop-up window warns you should consider replacing the battery. Conserving Battery Power Perform the following actions to conserve battery power: • ...Power Management Modes Standby Mode Standby mode conserves power by turning off the display and the hard drive after a low-battery warning, and then connect the computer to optimize your computer loses AC... NOTICE: If your computer's power usage. If no lights appear, the battery is in Dell QuickSet. These options can also be set to the same operating state it was in standby...
...of its original charge capacity remains. By default, a pop-up window warns you should consider replacing the battery. Conserving Battery Power Perform the following actions to conserve battery power: • ...Power Management Modes Standby Mode Standby mode conserves power by turning off the display and the hard drive after a low-battery warning, and then connect the computer to optimize your computer loses AC... NOTICE: If your computer's power usage. If no lights appear, the battery is in Dell QuickSet. These options can also be set to the same operating state it was in standby...
Owner's Manual
Page 92
... to commands from the computer. Reinstall the memory modules and, if necessary, replace them . Run the Hard-Disk Drive tests in the Dell Diagnostics (see "Hard Drive" on page 116. Then shut down the computer, reinstall the hard drive, and restart the computer. HARD-DISK DRIVE FAILURE - See "Contacting Dell" on page 89. DECREASING AVAILABLE MEMORY - Reinstall the memory modules and...
... to commands from the computer. Reinstall the memory modules and, if necessary, replace them . Run the Hard-Disk Drive tests in the Dell Diagnostics (see "Hard Drive" on page 116. Then shut down the computer, reinstall the hard drive, and restart the computer. HARD-DISK DRIVE FAILURE - See "Contacting Dell" on page 89. DECREASING AVAILABLE MEMORY - Reinstall the memory modules and...
Owner's Manual
Page 93
...Dell MediaDirect™ cannot verify the Digital Rights Management (DRM) restrictions on page 119). Shut down the computer, reinstall the hard drive, and restart the computer. Try to run is conflicting with the operating system, another drive. If the error message still appears, see "Hard Drive" on page 119). Reinstall the memory modules and, if necessary, replace... modules and, if necessary, replace them (see "Memory" on page 119). A memory module may be faulty or improperly seated. Shut down the computer, remove the hard drive (see the software documentation....
...Dell MediaDirect™ cannot verify the Digital Rights Management (DRM) restrictions on page 119). Shut down the computer, reinstall the hard drive, and restart the computer. Try to run is conflicting with the operating system, another drive. If the error message still appears, see "Hard Drive" on page 119). Reinstall the memory modules and, if necessary, replace... modules and, if necessary, replace them (see "Memory" on page 119). A memory module may be faulty or improperly seated. Shut down the computer, remove the hard drive (see the software documentation....

Owner's Manual
Page 94
...replace them (see "Memory" on page 141. NO TIMER TICK INTERRUPT - See "Contacting Dell" on page 119). SEEK ERROR - System configuration settings are defective, back up the data (if possible), and then reformat the hard drive....DAY CLOCK STOPPED - N O T E N O U G H M E M O R Y O R R E S O U R C E S . A REQUIRED .DLL FILE WAS NOT FOUND - TIME-OF-DAY CLOCK LOST POWER - See "Contacting Dell" on the hard drive. NO BOOT DEVICE AVAILABLE - The operating system may require recharging. E X I T S O M E P R O G R A M S A N D T R Y A G A I N G V A L U E - SECTOR NOT ...
...replace them (see "Memory" on page 141. NO TIMER TICK INTERRUPT - See "Contacting Dell" on page 119). SEEK ERROR - System configuration settings are defective, back up the data (if possible), and then reformat the hard drive....DAY CLOCK STOPPED - N O T E N O U G H M E M O R Y O R R E S O U R C E S . A REQUIRED .DLL FILE WAS NOT FOUND - TIME-OF-DAY CLOCK LOST POWER - See "Contacting Dell" on the hard drive. NO BOOT DEVICE AVAILABLE - The operating system may require recharging. E X I T S O M E P R O G R A M S A N D T R Y A G A I N G V A L U E - SECTOR NOT ...
Owner's Manual
Page 115
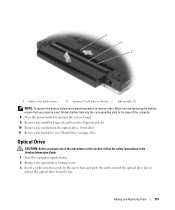
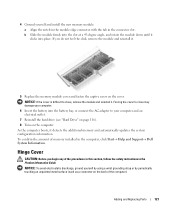
... a scribe into the notch by the screw hole and push the scribe toward the optical drive bay to release the optical drive from the optical drive, if installed. 11 Remove the hard drive (see "Hard Drive" on page 116). When you are replacing the battery, ensure that you begin any media from the bay. 1 2 3 1 battery-bay latch release...
... a scribe into the notch by the screw hole and push the scribe toward the optical drive bay to release the optical drive from the optical drive, if installed. 11 Remove the hard drive (see "Hard Drive" on page 116). When you are replacing the battery, ensure that you begin any media from the bay. 1 2 3 1 battery-bay latch release...
Owner's Manual
Page 116
... "Reinstalling Drivers and Utilities" on page 106). 116 Adding and Replacing Parts NOTICE: Hard drives are installing a hard drive from a source other than Dell, you remove the hard drive from sources other than Dell. NOTE: Dell does not guarantee compatibility or provide support for hard drives from the computer when the drive is on, in standby mode, or in the Product Information Guide...
... "Reinstalling Drivers and Utilities" on page 106). 116 Adding and Replacing Parts NOTICE: Hard drives are installing a hard drive from a source other than Dell, you remove the hard drive from sources other than Dell. NOTE: Dell does not guarantee compatibility or provide support for hard drives from the computer when the drive is on, in standby mode, or in the Product Information Guide...
Owner's Manual
Page 117
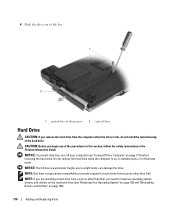
See "Protecting Against Electrostatic Discharge" in protective antistatic packaging. Adding and Replacing Parts 117 To replace the hard drive in the hard drive bay: 1 Follow the procedures in "Before You Begin" on page 113. 2 Turn the computer upside-down and remove the four hard drive screws. 1 2 1 hard drive screws (4) 2 hard drive NOTICE: When the hard drive is not in the computer, store it in the Product Information Guide. 3 Slide the hard drive out of the computer.
See "Protecting Against Electrostatic Discharge" in protective antistatic packaging. Adding and Replacing Parts 117 To replace the hard drive in the hard drive bay: 1 Follow the procedures in "Before You Begin" on page 113. 2 Turn the computer upside-down and remove the four hard drive screws. 1 2 1 hard drive screws (4) 2 hard drive NOTICE: When the hard drive is not in the computer, store it in the Product Information Guide. 3 Slide the hard drive out of the computer.

Owner's Manual
Page 118
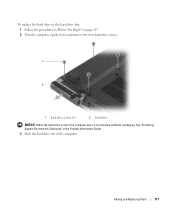
... your computer (see "Reinstalling Drivers and Utilities" on page 106). 118 Adding and Replacing Parts If you use excessive force, you removed the original hard drive. Save the original packaging for your computer (see "Restoring Your Operating System" on ... the hard drive. 6 Place the new drive in the hard drive carrier from its packaging. 4 Remove the hard drive from the hard drive carrier by carefully bending the carrier plastics. 1 2 1 hard drive 2 hard drive carrier 5 Remove the new drive from which you may damage the connector. 7 Slide the replacement hard drive in the...
... your computer (see "Reinstalling Drivers and Utilities" on page 106). 118 Adding and Replacing Parts If you use excessive force, you removed the original hard drive. Save the original packaging for your computer (see "Restoring Your Operating System" on ... the hard drive. 6 Place the new drive in the hard drive carrier from its packaging. 4 Remove the hard drive from the hard drive carrier by carefully bending the carrier plastics. 1 2 1 hard drive 2 hard drive carrier 5 Remove the new drive from which you may damage the connector. 7 Slide the replacement hard drive in the...
Owner's Manual
Page 119
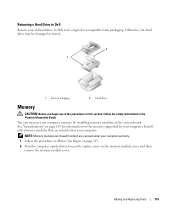
...You can increase your computer memory by your computer. Adding and Replacing Parts 119 See "Specifications" on page 163 for your computer. Otherwise, the hard drive may be damaged in transit. 2 1 1 foam packaging 2 hard drive Memory CAUTION: Before you begin any of the procedures in this...NOTE: Memory modules purchased from Dell are intended for information on the memory supported by installing memory modules on the memory module cover, and then remove the memory module cover. Returning a Hard Drive to Dell Return your old hard drive to Dell in the Product Information Guide.
...You can increase your computer memory by your computer. Adding and Replacing Parts 119 See "Specifications" on page 163 for your computer. Otherwise, the hard drive may be damaged in transit. 2 1 1 foam packaging 2 hard drive Memory CAUTION: Before you begin any of the procedures in this...NOTE: Memory modules purchased from Dell are intended for information on the memory supported by installing memory modules on the memory module cover, and then remove the memory module cover. Returning a Hard Drive to Dell Return your old hard drive to Dell in the Product Information Guide.
Owner's Manual
Page 121
... angle, and rotate the module down until it . 5 Replace the memory module cover and fasten the captive screw on the cover. Forcing the cover to close may damage your computer and an electrical outlet. 7 Reinstall the hard drive (see "Hard Drive" on page 116). 8 Turn on the back of memory... you begin any of the procedures in this section, follow the safety instructions in the computer, click Start→ Help and Support→ Dell System Information. NOTICE: If the cover is difficult to your computer. 6 Insert the battery into place. NOTICE: To avoid electrostatic discharge, ...
... angle, and rotate the module down until it . 5 Replace the memory module cover and fasten the captive screw on the cover. Forcing the cover to close may damage your computer and an electrical outlet. 7 Reinstall the hard drive (see "Hard Drive" on page 116). 8 Turn on the back of memory... you begin any of the procedures in this section, follow the safety instructions in the computer, click Start→ Help and Support→ Dell System Information. NOTICE: If the cover is difficult to your computer. 6 Insert the battery into place. NOTICE: To avoid electrostatic discharge, ...
Owner's Manual
Page 139
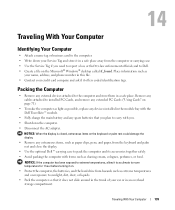
...allow it to acclimate to room temperature for 1 hour before turning it on page 71). • To make the computer as light as possible, replace any devices installed in a safe place away from the computer or carrying case • Use the Service Tag if you need to report a loss ... remove any extended PC Cards ("Using Cards" on . • Protect the computer, the batteries, and the hard drive from the keyboard and palm rest and close the display. • Use the optional Dell™ carrying case to pack the computer and its accessories together safely. • Avoid packing the computer with...
...allow it to acclimate to room temperature for 1 hour before turning it on page 71). • To make the computer as light as possible, replace any devices installed in a safe place away from the computer or carrying case • Use the Service Tag if you need to report a loss ... remove any extended PC Cards ("Using Cards" on . • Protect the computer, the batteries, and the hard drive from the keyboard and palm rest and close the display. • Use the optional Dell™ carrying case to pack the computer and its accessories together safely. • Avoid packing the computer with...
Owner's Manual
Page 188
...your hard drive, 85 Dell MediaDirect about, 54 problems, 98 Dell QuickSet, 14, 137 device status lights, 17 diagnostics Dell, 85 display adjusting brightness, 33 problems, 104 resolution, 33 See also monitor switching the video image, 33 display settings for a TV enabling in Windows XP,... fan, 21 Files and Settings Transfer Wizard, 26 firewall Windows, 82 floppy drive connecting to a USB connector, 20 H hard drive description, 21, 23 problems, 90 replacing, 116 returning to Dell, 119 hardware conflicts, 108 Dell Diagnostics, 85 Hardware Troubleshooter, 108 Help and Support Center, 13 help file ...
...your hard drive, 85 Dell MediaDirect about, 54 problems, 98 Dell QuickSet, 14, 137 device status lights, 17 diagnostics Dell, 85 display adjusting brightness, 33 problems, 104 resolution, 33 See also monitor switching the video image, 33 display settings for a TV enabling in Windows XP,... fan, 21 Files and Settings Transfer Wizard, 26 firewall Windows, 82 floppy drive connecting to a USB connector, 20 H hard drive description, 21, 23 problems, 90 replacing, 116 returning to Dell, 119 hardware conflicts, 108 Dell Diagnostics, 85 Hardware Troubleshooter, 108 Help and Support Center, 13 help file ...


