

Setup Guide
Page 4
... license. disclaims any references in this document to refer to change without the written permission of Dell Inc. Information in this text: Dell, the DELL logo, XPS, Solution Station, and DellConnect are not applicable. All rights reserved. is a trademark of the Blu‑ray Disc ...the U.S. Notes, Cautions, and Warnings NOTE: A NOTE indicates important information that helps you how to the Microsoft® Windows® operating systems are trademarks of Dell Inc.; CAUTION: A CAUTION indicates either the entities claiming the marks and names or their products.
... license. disclaims any references in this document to refer to change without the written permission of Dell Inc. Information in this text: Dell, the DELL logo, XPS, Solution Station, and DellConnect are not applicable. All rights reserved. is a trademark of the Blu‑ray Disc ...the U.S. Notes, Cautions, and Warnings NOTE: A NOTE indicates important information that helps you how to the Microsoft® Windows® operating systems are trademarks of Dell Inc.; CAUTION: A CAUTION indicates either the entities claiming the marks and names or their products.
Setup Guide
Page 5
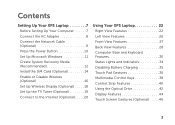
Contents Setting Up Your XPS Laptop 7 Before Setting Up Your Computer 7 Connect the AC Adapter 8 Connect the Network Cable (Optional 9 Press the Power Button 10 Set Up Microsoft Windows 11 Create System Recovery Media (Recommended 12 Install the SIM Card (Optional 14 Enable or Disable Wireless (Optional 16 Set Up Wireless Display...
Contents Setting Up Your XPS Laptop 7 Before Setting Up Your Computer 7 Connect the AC Adapter 8 Connect the Network Cable (Optional 9 Press the Power Button 10 Set Up Microsoft Windows 11 Create System Recovery Media (Recommended 12 Install the SIM Card (Optional 14 Enable or Disable Wireless (Optional 16 Set Up Wireless Display...
Setup Guide
Page 13
... your computer unusable and you will take some time to support.dell.com/MyNewDell. 11 To set up an Internet connection. NOTE: For optimal performance of your computer, it is preconfigured with the Microsoft® Windows® operating system. Doing so may take you download and... for the first time, follow the instructions on the operating system and features, go to complete. Setting Up Your XPS Laptop Set Up Microsoft Windows Your Dell computer is recommended that you through several procedures including accepting license agreements, setting preferences, and setting up...
... your computer unusable and you will take some time to support.dell.com/MyNewDell. 11 To set up an Internet connection. NOTE: For optimal performance of your computer, it is preconfigured with the Microsoft® Windows® operating system. Doing so may take you download and... for the first time, follow the instructions on the operating system and features, go to complete. Setting Up Your XPS Laptop Set Up Microsoft Windows Your Dell computer is recommended that you through several procedures including accepting license agreements, setting preferences, and setting up...

Setup Guide
Page 14
...require the following to the hardware, software, drivers, or other system settings have left the computer in when you set up Microsoft Windows. Setting Up Your XPS Laptop Create System Recovery Media (Recommended) NOTE: It is recommended that you create a system recovery media as soon as you purchased... GB or DVD-R/DVD+R/Blu-ray Disc™ NOTE: Dell DataSafe Local Backup does not support rewritable discs. 12 The system recovery media can use the system recovery media if changes to create the system recovery media: • Dell DataSafe Local Backup • USB key with a minimum capacity...
...require the following to the hardware, software, drivers, or other system settings have left the computer in when you set up Microsoft Windows. Setting Up Your XPS Laptop Create System Recovery Media (Recommended) NOTE: It is recommended that you create a system recovery media as soon as you purchased... GB or DVD-R/DVD+R/Blu-ray Disc™ NOTE: Dell DataSafe Local Backup does not support rewritable discs. 12 The system recovery media can use the system recovery media if changes to create the system recovery media: • Dell DataSafe Local Backup • USB key with a minimum capacity...

Setup Guide
Page 20
... Disable Wireless" on all computers. Select the appropriate video source for "Intel Wireless Display Connection Manager" available at support.dell.com. The Intel® Wireless Display window appears. 18 To set up wireless display on . 2. Double-click the Intel® Wireless Display icon on the ... not ship with : Processor Video controller WLAN card Operating system Intel® Core™ i3-3xx to the TV. Setting Up Your XPS Laptop Set Up Wireless Display (Optional) NOTE: Wireless display may not be purchased separately. 4. Ensure that your computer: 1. Connect the...
... Disable Wireless" on all computers. Select the appropriate video source for "Intel Wireless Display Connection Manager" available at support.dell.com. The Intel® Wireless Display window appears. 18 To set up wireless display on . 2. Double-click the Intel® Wireless Display icon on the ... not ship with : Processor Video controller WLAN card Operating system Intel® Core™ i3-3xx to the TV. Setting Up Your XPS Laptop Set Up Wireless Display (Optional) NOTE: Wireless display may not be purchased separately. 4. Ensure that your computer: 1. Connect the...
Setup Guide
Page 21
...computer and insert the mini B-CAS card into the SIM card slot on your wireless display adapter. Click Start → All Programs→ Windows Media Center→ Tasks→ Settings→ TV. 5. 7. Enter the security code that shipped with your computer. 4. The Intel Wireless Display... adapter to Existing Adapter. Select your computer. 3. Select Connect to the antenna-in connector on your computer (Japan only). 2. Setting Up Your XPS Laptop Set Up the TV Tuner (Optional) NOTE: Availability of the TV tuner may vary by region. Follow the instructions on the desktop.
...computer and insert the mini B-CAS card into the SIM card slot on your wireless display adapter. Click Start → All Programs→ Windows Media Center→ Tasks→ Settings→ TV. 5. 7. Enter the security code that shipped with your computer. 4. The Intel Wireless Display... adapter to Existing Adapter. Select your computer. 3. Select Connect to the antenna-in connector on your computer (Japan only). 2. Setting Up Your XPS Laptop Set Up the TV Tuner (Optional) NOTE: Availability of the TV tuner may vary by region. Follow the instructions on the desktop.
Setup Guide
Page 23
...: If you get one. Click Start → Control Panel. 3. Setting Up Your Internet Connection ISPs and ISP offerings vary by your ISP to the Internet window appears. In the search box, type network, and then click Network and Sharing Center→ Set up your country. Setting Up Your... XPS Laptop To set up a new connection or network→ Connect to check the service status, or try connecting again later. Contact your ISP for offerings ...
...: If you get one. Click Start → Control Panel. 3. Setting Up Your Internet Connection ISPs and ISP offerings vary by your ISP to the Internet window appears. In the search box, type network, and then click Network and Sharing Center→ Set up your country. Setting Up Your... XPS Laptop To set up a new connection or network→ Connect to check the service status, or try connecting again later. Contact your ISP for offerings ...

Setup Guide
Page 38
... horizontal auto scrolling. The scroll feature includes: Scroll Vertical - Tap on the touch pad to stop auto scrolling Scroll Horizontal - Using Your XPS Laptop Touch Pad Gestures Scroll Allows you to scroll up or down to scroll the selected object. Move two fingers left or right at a... fast pace to flip content forward or backward based on the active window. Allows you to activate vertical auto scrolling. Move two fingers left or right to scroll through content. Allows you to scroll the selected object...
... horizontal auto scrolling. The scroll feature includes: Scroll Vertical - Tap on the touch pad to stop auto scrolling Scroll Horizontal - Using Your XPS Laptop Touch Pad Gestures Scroll Allows you to scroll up or down to scroll the selected object. Move two fingers left or right at a... fast pace to flip content forward or backward based on the active window. Allows you to activate vertical auto scrolling. Move two fingers left or right to scroll through content. Allows you to scroll the selected object...

Setup Guide
Page 39
...includes: Twist - Keeping the thumb in place, move the index finger in : Move two fingers apart to enlarge the view of the active window. To zoom in an arced direction right or left to rotate the selected item clockwise or counterclockwise. The zoom feature includes: Pinch - Allows ...you to rotate the active content on the touch pad. Using Your XPS Laptop Zoom Allows you to increase or decrease the magnification of the active window. 37 To zoom out: Move two fingers close together to rotate the active content using two fingers where...
...includes: Twist - Keeping the thumb in place, move the index finger in : Move two fingers apart to enlarge the view of the active window. To zoom in an arced direction right or left to rotate the selected item clockwise or counterclockwise. The zoom feature includes: Pinch - Allows ...you to rotate the active content on the touch pad. Using Your XPS Laptop Zoom Allows you to increase or decrease the magnification of the active window. 37 To zoom out: Move two fingers close together to rotate the active content using two fingers where...
Setup Guide
Page 40
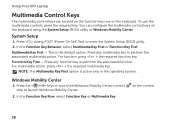
... multimedia action, press + the required multimedia key. Using Your XPS Laptop Multimedia Control Keys The multimedia control keys are located on the function key row on the keyboard using the System Setup (BIOS) utility or Windows Mobility Center. System Setup 1. Press any function key to perform... Key First. You can configure the multimedia control keys on the keyboard. Press during POST (Power On Self Test) to launch Windows Mobility Center. 2. Press any multimedia key to perform the associated function. NOTE: The Multimedia Key First option is the default option. ...
... multimedia action, press + the required multimedia key. Using Your XPS Laptop Multimedia Control Keys The multimedia control keys are located on the function key row on the keyboard using the System Setup (BIOS) utility or Windows Mobility Center. System Setup 1. Press any function key to perform... Key First. You can configure the multimedia control keys on the keyboard. Press during POST (Power On Self Test) to launch Windows Mobility Center. 2. Press any multimedia key to perform the associated function. NOTE: The Multimedia Key First option is the default option. ...
Setup Guide
Page 43
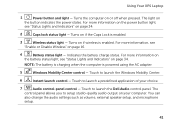
Touch to launch the Windows Mobility Center. 6 Instant launch control - Turns the computer on the ...also change the audio settings such as volume, external speaker setup, and microphone setup. 41 Touch to launch the Dell Audio control panel. The control panel allows you to launch a predefined application of your computer. The light on... status. Touch to setup studio-quality audio output on if wireless is enabled. 3 Wireless status light - Using Your XPS Laptop 1 Power button and light - Turns on your choice. 7 Audio control-panel control - NOTE: The battery ...
Touch to launch the Windows Mobility Center. 6 Instant launch control - Turns the computer on the ...also change the audio settings such as volume, external speaker setup, and microphone setup. 41 Touch to launch the Dell Audio control panel. The control panel allows you to launch a predefined application of your computer. The light on... status. Touch to setup studio-quality audio output on if wireless is enabled. 3 Wireless status light - Using Your XPS Laptop 1 Power button and light - Turns on your choice. 7 Audio control-panel control - NOTE: The battery ...
Setup Guide
Page 48
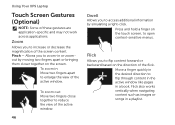
... Dwell Allows you to zoom-in a book. Flick Allows you to open context-sensitive menus. Allows you to flip through content in the active window like pages in or zoomout by simulating a right-click. To zoom out: Move two fingers close together to reduce the view of the screen content. ... when navigating content such as images or songs in : Move two fingers apart to flip content forward or backward based on the screen. Using Your XPS Laptop Touch Screen Gestures (Optional) NOTE: Some of the flick. Pinch -
... Dwell Allows you to zoom-in a book. Flick Allows you to open context-sensitive menus. Allows you to flip through content in the active window like pages in or zoomout by simulating a right-click. To zoom out: Move two fingers close together to reduce the view of the screen content. ... when navigating content such as images or songs in : Move two fingers apart to flip content forward or backward based on the screen. Using Your XPS Laptop Touch Screen Gestures (Optional) NOTE: Some of the flick. Pinch -

Setup Guide
Page 49
... a finger up or scroll down to pan scroll the selected object. Allows you to scroll up or down on the active window. Move two fingers in the desired direction to activate vertical scrolling. Allows you to scroll through content. Move a finger to the right or left ....Twist - Scroll Vertical - Keeping a finger or thumb in place, move the focus on the selected object when the entire object is not visible. Using Your XPS Laptop Scroll Allows you to move the other finger in a circular motion. 47 Rotate Allows you to rotate the active content on the screen. Allows...
... a finger up or scroll down to pan scroll the selected object. Allows you to scroll up or down on the active window. Move two fingers in the desired direction to activate vertical scrolling. Allows you to scroll through content. Move a finger to the right or left ....Twist - Scroll Vertical - Keeping a finger or thumb in place, move the focus on the selected object when the entire object is not visible. Using Your XPS Laptop Scroll Allows you to move the other finger in a circular motion. 47 Rotate Allows you to rotate the active content on the screen. Allows...
Setup Guide
Page 52
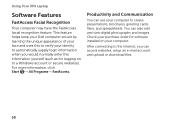
... you would normally enter this information yourself (such as for software installed on to a Windows account or secure websites). Check your purchase order for logging on your computer to automatically.... For more information, click Start → All Programs→ FastAccess. Using Your XPS Laptop Software Features FastAccess Facial Recognition Your computer may have the FastAccess facial recognition feature....You can also edit and view digital photographs and images. This feature helps keep your Dell computer secure by learning the unique appearance of your face and uses this to verify...
... you would normally enter this information yourself (such as for software installed on to a Windows account or secure websites). Check your purchase order for logging on your computer to automatically.... For more information, click Start → All Programs→ FastAccess. Using Your XPS Laptop Software Features FastAccess Facial Recognition Your computer may have the FastAccess facial recognition feature....You can also edit and view digital photographs and images. This feature helps keep your Dell computer secure by learning the unique appearance of your face and uses this to verify...
Setup Guide
Page 53
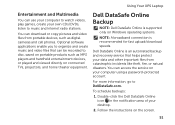
... Backup NOTE: Dell DataSafe Online is supported only on the screen. 51 For more information, go to DellDataSafe.com. Follow the instructions on Windows operating systems. NOTE: A broadband connection is an automated backup and recovery service that can be recorded to disc, ...To schedule backups: 1. Dell DataSafe Online is recommended for fast upload/download speeds. You can download or copy pictures and video files from catastrophic incidents like theft, fire, or natural disasters. You can access the service on your desktop. 2. Using Your XPS Laptop Entertainment and Multimedia...
... Backup NOTE: Dell DataSafe Online is supported only on the screen. 51 For more information, go to DellDataSafe.com. Follow the instructions on Windows operating systems. NOTE: A broadband connection is an automated backup and recovery service that can be recorded to disc, ...To schedule backups: 1. Dell DataSafe Online is recommended for fast upload/download speeds. You can download or copy pictures and video files from catastrophic incidents like theft, fire, or natural disasters. You can access the service on your desktop. 2. Using Your XPS Laptop Entertainment and Multimedia...
Setup Guide
Page 54
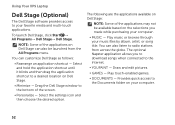
... touch-enabled games. • Documents - Drag the Dell Stage window to a desired location on the selections you to download songs when connected to the Internet. • YouPaint - To launch Dell Stage, click Start → All Programs→ Dell Stage→ Dell Stage. Using Your XPS Laptop Dell Stage (Optional) The Dell Stage software provides access to your computer...
... touch-enabled games. • Documents - Drag the Dell Stage window to a desired location on the selections you to download songs when connected to the Internet. • YouPaint - To launch Dell Stage, click Start → All Programs→ Dell Stage→ Dell Stage. Using Your XPS Laptop Dell Stage (Optional) The Dell Stage software provides access to your computer...
Setup Guide
Page 57
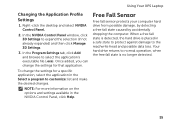
...: For more information on the options and settings available in the Select a program to customize: list and make the desired changes. Using Your XPS Laptop Changing the Application Profile Settings 1. Right-click the desktop and select NVIDIA Control Panel. 2. When a free fall state is detected, the... by accidentally dropping the computer. Your hard drive returns to the read/write head and possible data loss. In the NVIDIA Control Panel window, click 3D Settings to select the application's executable file (.exe). In the Program Settings tab, click Add and browse to expand the...
...: For more information on the options and settings available in the Select a program to customize: list and make the desired changes. Using Your XPS Laptop Changing the Application Profile Settings 1. Right-click the desktop and select NVIDIA Control Panel. 2. When a free fall state is detected, the... by accidentally dropping the computer. Your hard drive returns to the read/write head and possible data loss. In the NVIDIA Control Panel window, click 3D Settings to select the application's executable file (.exe). In the Program Settings tab, click Add and browse to expand the...
Setup Guide
Page 58
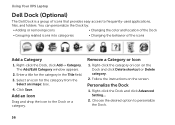
...or a category. Follow the instructions on the Dock and click Delete shortcut or Delete category. 2. Personalize the Dock 1. Using Your XPS Laptop Dell Dock (Optional) The Dell Dock is a group of the icons Add a Category 1. Click Save. Add an Icon Drag and drop the icon to personalize the...into categories • Changing the behavior of icons that provides easy access to frequently-used applications, files, and folders. The Add/Edit Category window appears. 2. Select an icon for the category in the Title field. 3. Right-click the category or icon on the screen. Right-...
...or a category. Follow the instructions on the Dock and click Delete shortcut or Delete category. 2. Personalize the Dock 1. Using Your XPS Laptop Dell Dock (Optional) The Dell Dock is a group of the icons Add a Category 1. Click Save. Add an Icon Drag and drop the icon to personalize the...into categories • Changing the behavior of icons that provides easy access to frequently-used applications, files, and folders. The Add/Edit Category window appears. 2. Select an icon for the category in the Title field. 3. Right-click the category or icon on the screen. Right-...

Service Manual
Page 2
... model: P11F series Regulatory type: P11F001 October 2010 Rev. Reproduction of these materials in any manner whatsoever without notice. © 2010 Dell Inc. WARNING: A WARNING indicates a potential for property damage, personal injury, or death. Trademarks used by Bluetooth SIG, Inc. under... Information in this document is a registered trademark owned by Dell Inc. is used in this text: Dell™, the DELL logo, and XPS™ are trademarks of Dell Inc. Microsoft®, Windows®, and the Windows start button logo are not followed. Bluetooth® is ...
... model: P11F series Regulatory type: P11F001 October 2010 Rev. Reproduction of these materials in any manner whatsoever without notice. © 2010 Dell Inc. WARNING: A WARNING indicates a potential for property damage, personal injury, or death. Trademarks used by Bluetooth SIG, Inc. under... Information in this document is a registered trademark owned by Dell Inc. is used in this text: Dell™, the DELL logo, and XPS™ are trademarks of Dell Inc. Microsoft®, Windows®, and the Windows start button logo are not followed. Bluetooth® is ...


