
Owner's Manual
Page 3
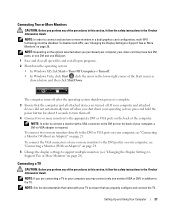
... Your Computer in an Enclosure 20 Connecting Monitors 22 Connecting a Monitor (Without an Adapter 23 Connecting a Monitor (With an Adapter 24 Connecting a Monitor in a Dual Graphics Card Configuration 25 Connecting Two or More Monitors 27 Connecting a TV 27 Changing the Display Settings to Support Two or More Monitors . . . . . 28 About Your RAID... Utility 33 Using NVIDIA MediaShield 34 Using Multimedia 37 Copying CD, DVD, and Blu-ray Disc™ (BD) Media 38 Helpful Tips 40 Using a Media Card Reader (Optional 41 Network Setup Wizard 42 Contents 3
... Your Computer in an Enclosure 20 Connecting Monitors 22 Connecting a Monitor (Without an Adapter 23 Connecting a Monitor (With an Adapter 24 Connecting a Monitor in a Dual Graphics Card Configuration 25 Connecting Two or More Monitors 27 Connecting a TV 27 Changing the Display Settings to Support Two or More Monitors . . . . . 28 About Your RAID... Utility 33 Using NVIDIA MediaShield 34 Using Multimedia 37 Copying CD, DVD, and Blu-ray Disc™ (BD) Media 38 Helpful Tips 40 Using a Media Card Reader (Optional 41 Network Setup Wizard 42 Contents 3
Owner's Manual
Page 6
... PCI and PCI Express Cards 95 Installing PCI and PCI Express Cards 97 Removing a PCI Express Graphics Card from a Dual Configuration . . . 100 Installing a PCI Express Graphics Card in a Dual Configuration . . . . . 102 Network Adapter and Sound Card Settings 105 Drives 106 About Serial ATA Drives 107 General Drive... Panel 114 Floppy Drive 115 Removing a Floppy Drive 115 Installing a Floppy Drive 117 Media Card Reader 119 Removing a Media Card Reader 119 Installing a Media Card Reader 121 Optical Drive 123 Removing an Optical Drive 123 Installing an Optical Drive 125 Processor ...
... PCI and PCI Express Cards 95 Installing PCI and PCI Express Cards 97 Removing a PCI Express Graphics Card from a Dual Configuration . . . 100 Installing a PCI Express Graphics Card in a Dual Configuration . . . . . 102 Network Adapter and Sound Card Settings 105 Drives 106 About Serial ATA Drives 107 General Drive... Panel 114 Floppy Drive 115 Removing a Floppy Drive 115 Installing a Floppy Drive 117 Media Card Reader 119 Removing a Media Card Reader 119 Installing a Media Card Reader 121 Optical Drive 123 Removing an Optical Drive 123 Installing an Optical Drive 125 Processor ...
Owner's Manual
Page 25
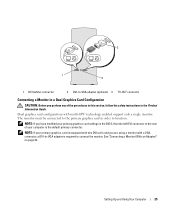
... a Monitor (With an Adapter)" on page 24. 2 1 3 1 DVI (white) connector 2 DVI-to connect the monitor. NOTE: If your primary graphics card is equipped with two DVI ports and you have modified your computer is required to -VGA adapter (optional) 3 TV-OUT connector Connecting a Monitor in a ...Dual Graphics Card Configuration CAUTION: Before you perform any of your primary graphics card settings in order to function. The monitor must be connected to the primary graphics card in the BIOS, then the left DVI connector at the rear of...
... a Monitor (With an Adapter)" on page 24. 2 1 3 1 DVI (white) connector 2 DVI-to connect the monitor. NOTE: If your primary graphics card is equipped with two DVI ports and you have modified your computer is required to -VGA adapter (optional) 3 TV-OUT connector Connecting a Monitor in a ...Dual Graphics Card Configuration CAUTION: Before you perform any of your primary graphics card settings in order to function. The monitor must be connected to the primary graphics card in the BIOS, then the left DVI connector at the rear of...
Owner's Manual
Page 26
...button for about 4 seconds to the appropriate connector on the computer's primary graphics card: To connect a monitor with a VGA connector, use the (white) DVI port on the primary graphics card. 26 Setting Up and Using Your Computer To connect a monitor with ...a DVI connector, use the (blue) VGA port on the primary graphics card. primary video card 1 Save and close all open files and exit all attached devices are turned off . • In... you shut down the operating system: • In Windows XP, click Start→ Turn Off Computer→ Turn off .
...button for about 4 seconds to the appropriate connector on the computer's primary graphics card: To connect a monitor with a VGA connector, use the (white) DVI port on the primary graphics card. 26 Setting Up and Using Your Computer To connect a monitor with ...a DVI connector, use the (blue) VGA port on the primary graphics card. primary video card 1 Save and close all open files and exit all attached devices are turned off . • In... you shut down the operating system: • In Windows XP, click Start→ Turn Off Computer→ Turn off .
Owner's Manual
Page 27
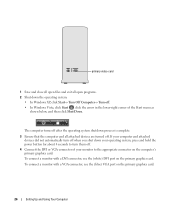
...DVI or VGA ports on your computer and attached devices did not automatically turn off when you shut down the operating system: • In Windows XP, click Start→ Turn Off Computer→ Turn off after the operating system shutdown process is required. NOTE: In order to connect a ...one DVI and one or more monitors directly to Support Two or More Monitors" on the back of your video card may connect only one monitor (VGA or DVI) in a dual graphics card configuration, multi-GPU technology must be disabled. NOTE: Depending on the back of the computer. NOTE: In order...
...DVI or VGA ports on your computer and attached devices did not automatically turn off when you shut down the operating system: • In Windows XP, click Start→ Turn Off Computer→ Turn off after the operating system shutdown process is required. NOTE: In order to connect a ...one DVI and one or more monitors directly to Support Two or More Monitors" on the back of your video card may connect only one monitor (VGA or DVI) in a dual graphics card configuration, multi-GPU technology must be disabled. NOTE: Depending on the back of the computer. NOTE: In order...
Owner's Manual
Page 28
...Computer The Microsoft® Windows® desktop displays on the primary monitor. 2 Disable multi-GPU technology in the display settings (applies only to dual graphics card configurations with multi-GPU technology enabled): 3 Enable clone mode or extended desktop mode in the display settings. • In clone mode, all attached... in "Connecting Monitors" on page 22. If you do not have an S-video cable, you shut down the operating system: • In Windows XP, click Start→ Turn Off Computer→ Turn off . To connect a TV to the other end of the S-video cable to the S-video...
...Computer The Microsoft® Windows® desktop displays on the primary monitor. 2 Disable multi-GPU technology in the display settings (applies only to dual graphics card configurations with multi-GPU technology enabled): 3 Enable clone mode or extended desktop mode in the display settings. • In clone mode, all attached... in "Connecting Monitors" on page 22. If you do not have an S-video cable, you shut down the operating system: • In Windows XP, click Start→ Turn Off Computer→ Turn off . To connect a TV to the other end of the S-video cable to the S-video...
Owner's Manual
Page 49
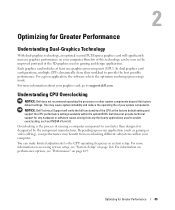
... gaming or video editing), your graphics card, go to the CPU operating frequency in gaming and design applications. Optimizing for any third party applications used in system setup. Benefits of this technology can make limited adjustments to support.dell.com. This may benefit from ...the CPU at least one graphics processing unit (GPU). Each graphics card includes at the factory default setting and support the CPU performance settings available within your computer. For more information on accessing system setup, see "Performance" on page 169. Dell does not provide technical ...
... gaming or video editing), your graphics card, go to the CPU operating frequency in gaming and design applications. Optimizing for any third party applications used in system setup. Benefits of this technology can make limited adjustments to support.dell.com. This may benefit from ...the CPU at least one graphics processing unit (GPU). Each graphics card includes at the factory default setting and support the CPU performance settings available within your computer. For more information on accessing system setup, see "Performance" on page 169. Dell does not provide technical ...
Owner's Manual
Page 61
... as a lamp. • Ensure that the voltage selection switch is in the Product Information Guide. NOTE: If you begin any expansion cards, including graphics cards (see "Removing PCI and PCI Express Cards" on page 89). See the printer documentation for your location (if applicable). Some possible causes of interference are properly installed and securely...
... as a lamp. • Ensure that the voltage selection switch is in the Product Information Guide. NOTE: If you begin any expansion cards, including graphics cards (see "Removing PCI and PCI Express Cards" on page 89). See the printer documentation for your location (if applicable). Some possible causes of interference are properly installed and securely...
Owner's Manual
Page 63
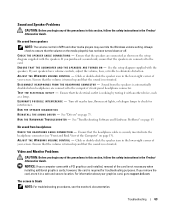
... headphone connector (see the monitor's documentation. If you remove the card, store it with the speakers. See "Troubleshooting Software and Hardware Problems" on page 75. See the setup diagram supplied with a PCI graphics card installed, removal of the Computer" on the media player(s) has... fans, fluorescent lights, or halogen lamps to the card. For information about your graphics card, go to the computer's front-panel headphone connector. If you purchased a sound card, ensure that the speakers are connected to support.dell.com. No sound from the speakers is not necessary...
... headphone connector (see the monitor's documentation. If you remove the card, store it with the speakers. See "Troubleshooting Software and Hardware Problems" on page 75. See the setup diagram supplied with a PCI graphics card installed, removal of the Computer" on the media player(s) has... fans, fluorescent lights, or halogen lamps to the card. For information about your graphics card, go to the computer's front-panel headphone connector. If you purchased a sound card, ensure that the speakers are connected to support.dell.com. No sound from the speakers is not necessary...
Owner's Manual
Page 64
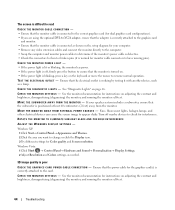
... missing pins). The screen is difficult to read CHECK THE MONITOR CABLE CONNECTION - • Ensure that the monitor cable is connected to the correct graphics card (for dual graphics card configurations). • If you want to change or click the Display icon. 3 Try different settings for Color quality and Screen resolution. M O V E T H E M O N I N G S - C H E C K T H E M O N I T O R S E T T I T O R A W A Y ...power light is positioned at least 60 centimeters (2 feet) away from the monitor. Windows XP: 1 Click Start→ Control Panel→ Appearance and Themes. 2 Click the ...
... missing pins). The screen is difficult to read CHECK THE MONITOR CABLE CONNECTION - • Ensure that the monitor cable is connected to the correct graphics card (for dual graphics card configurations). • If you want to change or click the Display icon. 3 Try different settings for Color quality and Screen resolution. M O V E T H E M O N I N G S - C H E C K T H E M O N I T O R S E T T I T O R A W A Y ...power light is positioned at least 60 centimeters (2 feet) away from the monitor. Windows XP: 1 Click Start→ Control Panel→ Appearance and Themes. 2 Click the ...
Owner's Manual
Page 66
... "Removing Memory" on page 93), then reinstall one at a time) until you begin any installed graphics cards (see "Cards" on page 94). • If available, install a working graphics card into your computer. • If the problem persists, contact Dell (see "Contacting Dell" on page 179). Memory modules are detected, but a memory failure has occurred. • If two...
... "Removing Memory" on page 93), then reinstall one at a time) until you begin any installed graphics cards (see "Cards" on page 94). • If available, install a working graphics card into your computer. • If the problem persists, contact Dell (see "Contacting Dell" on page 179). Memory modules are detected, but a memory failure has occurred. • If two...
Owner's Manual
Page 68
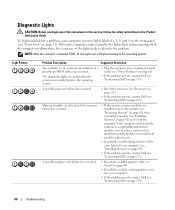
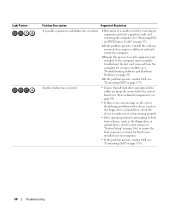
... is correct for the devices installed on your computer. • If the problem persists, contact Dell (see "Contacting Dell" on page 179). Light Pattern Problem Description Suggested Resolution A possible expansion card failure has occurred. 1 Determine if a conflict exists by removing an expansion card (not a graphics card) and restarting the computer (see "Removing PCI and PCI Express...
... is correct for the devices installed on your computer. • If the problem persists, contact Dell (see "Contacting Dell" on page 179). Light Pattern Problem Description Suggested Resolution A possible expansion card failure has occurred. 1 Determine if a conflict exists by removing an expansion card (not a graphics card) and restarting the computer (see "Removing PCI and PCI Express...

Owner's Manual
Page 94
... provides the following slots for PCI and PCI Express cards: • Three PCI card slots • Two PCI Express x16 card slots (can be used in a dual-graphics configuration) • One PCI Express x16 card slot (wired as x8) • One PCI Express x1 card slot NOTE: If a graphics card is installed in each of the procedures in...
... provides the following slots for PCI and PCI Express cards: • Three PCI card slots • Two PCI Express x16 card slots (can be used in a dual-graphics configuration) • One PCI Express x16 card slot (wired as x8) • One PCI Express x1 card slot NOTE: If a graphics card is installed in each of the procedures in...

Owner's Manual
Page 95
... touching an unpainted metal surface on the computer chassis. If you have the optional dual graphics card configuration, see "Removing a PCI Express Graphics Card from a Dual Configuration" on page 100 to remove or replace a graphics card. 1 Follow the procedures in "Before You Begin" on page 85. 2 Remove the... your computer came with a PCI graphics card installed, removal of the card retainer at the appropriate card slot and pivot the card retainer back through the chassis wall. 5 If present, press the tab on the card retention device that lays over the installed cards and lift it in a safe ...
... touching an unpainted metal surface on the computer chassis. If you have the optional dual graphics card configuration, see "Removing a PCI Express Graphics Card from a Dual Configuration" on page 100 to remove or replace a graphics card. 1 Follow the procedures in "Before You Begin" on page 85. 2 Remove the... your computer came with a PCI graphics card installed, removal of the card retainer at the appropriate card slot and pivot the card retainer back through the chassis wall. 5 If present, press the tab on the card retention device that lays over the installed cards and lift it in a safe ...

Owner's Manual
Page 97
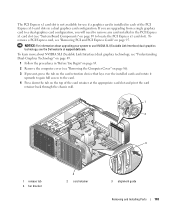
.... NOTICE: If your computer came with a PCI graphics card installed, removal of the card retainer at the appropriate card slot and pivot the card retainer back through the chassis wall. 1 2 3 1 release tab 4 fan bracket 4 2 card retainer 3 alignment guide Removing and Installing Parts 97 Installing PCI and PCI Express Cards NOTICE: To avoid electrostatic discharge and damage to...
.... NOTICE: If your computer came with a PCI graphics card installed, removal of the card retainer at the appropriate card slot and pivot the card retainer back through the chassis wall. 1 2 3 1 release tab 4 fan bracket 4 2 card retainer 3 alignment guide Removing and Installing Parts 97 Installing PCI and PCI Express Cards NOTICE: To avoid electrostatic discharge and damage to...

Owner's Manual
Page 100
... page 85. 2 Remove the computer cover (see "Network Adapter and Sound Card Settings" on the card retention device that lays over the installed cards and rotate it upwards to gain full access to the card. 4 Gently securing both graphics cards with one hand, remove the graphics card bridge (if present) with your other type of PCI Express x16...
... page 85. 2 Remove the computer cover (see "Network Adapter and Sound Card Settings" on the card retention device that lays over the installed cards and rotate it upwards to gain full access to the card. 4 Gently securing both graphics cards with one hand, remove the graphics card bridge (if present) with your other type of PCI Express x16...

Owner's Manual
Page 102
... only. NOTE: Installing filler brackets over or behind the cards. NOTICE: Do not route card cables over empty card-slot openings is not necessary in the empty card-slot opening. NOTE: The graphics card bridge (not present in all cards and filler brackets are replacing the card, see "Contacting Dell" on . This section pertains to the equipment. 9 Rotate the...
... only. NOTE: Installing filler brackets over or behind the cards. NOTICE: Do not route card cables over empty card-slot openings is not necessary in the empty card-slot opening. NOTE: The graphics card bridge (not present in all cards and filler brackets are replacing the card, see "Contacting Dell" on . This section pertains to the equipment. 9 Rotate the...
Owner's Manual
Page 103
... "Removing PCI and PCI Express Cards" on the top of the card retainer at support.dell.com. NOTICE: For information about NVIDIA SLI (Scalable Link Interface) dual graphics technology, see "Understanding Dual-Graphics Technology" on page 49. 1 Follow the procedures in a dual graphics card configuration. If you are upgrading from a single graphics card to a dual-graphics card configuration, you will need...
... "Removing PCI and PCI Express Cards" on the top of the card retainer at support.dell.com. NOTICE: For information about NVIDIA SLI (Scalable Link Interface) dual graphics technology, see "Understanding Dual-Graphics Technology" on page 49. 1 Follow the procedures in a dual graphics card configuration. If you are upgrading from a single graphics card to a dual-graphics card configuration, you will need...

Owner's Manual
Page 104
... are upgrading to a dual graphics card configuration and have a card installed in the PCI Express x1 card slot, remove the card (see "Removing a PCI Express Graphics Card from closing properly or cause damage to seat the card. 5 Remove the filler bracket or existing graphics card (see "Removing PCI and PCI Express Cards" on page 95). 6 Prepare the card for installation. See the...
... are upgrading to a dual graphics card configuration and have a card installed in the PCI Express x1 card slot, remove the card (see "Removing a PCI Express Graphics Card from closing properly or cause damage to seat the card. 5 Remove the filler bracket or existing graphics card (see "Removing PCI and PCI Express Cards" on page 95). 6 Prepare the card for installation. See the...
Owner's Manual
Page 105
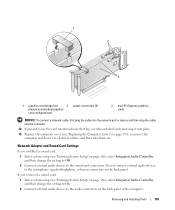
... the Computer Cover" on page 159), reconnect the computer and devices to electrical outlets, and then turn them on. 1 2 3 1 graphics card bridge (not 2 present on some dual graphics card configurations) power connectors (2) 3 dual-PCI Express graphics cards NOTICE: To connect a network cable, first plug the cable into the network port or device and then plug the...
... the Computer Cover" on page 159), reconnect the computer and devices to electrical outlets, and then turn them on. 1 2 3 1 graphics card bridge (not 2 present on some dual graphics card configurations) power connectors (2) 3 dual-PCI Express graphics cards NOTICE: To connect a network cable, first plug the cable into the network port or device and then plug the...


