Owners Manual
Page 1
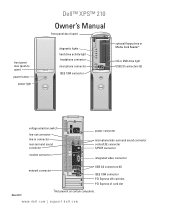
... front panel door (push to open) power button power light Dell™ XPS™ 210 Owner's Manual front panel door (open) diagnostic lights hard drive activity light headphone connector microphone connector IEEE 1394 connector optional floppy drive or Media Card ...
... front panel door (push to open) power button power light Dell™ XPS™ 210 Owner's Manual front panel door (open) diagnostic lights hard drive activity light headphone connector microphone connector IEEE 1394 connector optional floppy drive or Media Card ...

Owners Manual
Page 2
...and PowerConnect are registered trademarks of Intel Corporation; disclaims any manner whatsoever without notice. © 2006 Dell Inc. Model DCCY August 2006 P/N FJ055 Rev. If you purchased a Dell™ n Series computer, any references in this document to change without the written permission of your... in this document to refer to either potential damage to hardware or loss of data and tells you make better use of Dell Inc. Information in this document is strictly forbidden. Intel, Pentium, Intel SpeedStep, and Celeron are trademarks of Microsoft Corporation. ...
...and PowerConnect are registered trademarks of Intel Corporation; disclaims any manner whatsoever without notice. © 2006 Dell Inc. Model DCCY August 2006 P/N FJ055 Rev. If you purchased a Dell™ n Series computer, any references in this document to change without the written permission of your... in this document to refer to either potential damage to hardware or loss of data and tells you make better use of Dell Inc. Information in this document is strictly forbidden. Intel, Pentium, Intel SpeedStep, and Celeron are trademarks of Microsoft Corporation. ...

Owners Manual
Page 3
Contents Finding Information 9 1 Setting Up and Using Your Computer 13 Front and Back View of the Computer 13 Front View 13 Back View 15 Back I/O Connectors 16 Setting Up a Printer 17 Printer Cable 17 Connecting a USB Printer 18 Using a Media Card Reader (Optional 18 Connecting a TV (Optional 20 Changing the Display Settings 20 Setting Up a Home and Office Network 20 Connecting to a Network Adapter 20 Network Setup Wizard 21 Connecting to the Internet 22 Setting Up Your Internet Connection 22 Playing a CD or DVD 23 Adjusting the Volume 25 Adjusting the Picture 25 Copying ...
Contents Finding Information 9 1 Setting Up and Using Your Computer 13 Front and Back View of the Computer 13 Front View 13 Back View 15 Back I/O Connectors 16 Setting Up a Printer 17 Printer Cable 17 Connecting a USB Printer 18 Using a Media Card Reader (Optional 18 Connecting a TV (Optional 20 Changing the Display Settings 20 Setting Up a Home and Office Network 20 Connecting to a Network Adapter 20 Network Setup Wizard 21 Connecting to the Internet 22 Setting Up Your Internet Connection 22 Playing a CD or DVD 23 Adjusting the Volume 25 Adjusting the Picture 25 Copying ...
Owners Manual
Page 4
Intel® Viiv™ Technology (Optional 30 Using Intel® Viiv™ Quick Resume Technology (Optional 30 Enabling the QRT Feature in System Setup 31 Enabling the QRT feature in the Operating system 31 Hyper-Threading and Dual-Core Technology 31 2 Solving Problems 33 Troubleshooting Tips 33 Battery Problems 33 Drive Problems 34 CD and DVD drive problems 34 Hard drive problems 35 E-Mail, Modem, and Internet Problems 35 Error Messages 37 Media Card Reader Problems 38 IEEE 1394 Device Problems 38 Keyboard Problems 39 Lockups and Software Problems 39 The computer does ...
Intel® Viiv™ Technology (Optional 30 Using Intel® Viiv™ Quick Resume Technology (Optional 30 Enabling the QRT Feature in System Setup 31 Enabling the QRT feature in the Operating system 31 Hyper-Threading and Dual-Core Technology 31 2 Solving Problems 33 Troubleshooting Tips 33 Battery Problems 33 Drive Problems 34 CD and DVD drive problems 34 Hard drive problems 35 E-Mail, Modem, and Internet Problems 35 Error Messages 37 Media Card Reader Problems 38 IEEE 1394 Device Problems 38 Keyboard Problems 39 Lockups and Software Problems 39 The computer does ...
Owners Manual
Page 5
...47 The screen is blank 47 The screen is difficult to read 48 3 Troubleshooting Tools 49 Diagnostic Lights 49 Dell Diagnostics 52 When to Use the Dell Diagnostics 52 Drivers 54 What Is a Driver 54 Identifying Drivers 54 Reinstalling Drivers 55 Resolving Software and Hardware ...Incompatibilities 56 Restoring Your Operating System 56 Using Microsoft Windows XP System Restore 56 4 Removing and Installing Parts 61 Before You ...
...47 The screen is blank 47 The screen is difficult to read 48 3 Troubleshooting Tools 49 Diagnostic Lights 49 Dell Diagnostics 52 When to Use the Dell Diagnostics 52 Drivers 54 What Is a Driver 54 Identifying Drivers 54 Reinstalling Drivers 55 Resolving Software and Hardware ...Incompatibilities 56 Restoring Your Operating System 56 Using Microsoft Windows XP System Restore 56 4 Removing and Installing Parts 61 Before You ...
Owners Manual
Page 6
Cards 70 Drives 74 Connecting Drive Cables 75 Drive Interface Connectors 75 Power Cable Connector 75 Connecting and Disconnecting Drive Cables 76 Hard Drive 76 Removing a Hard Drive 76 Installing a Hard Drive 78 CD/DVD Drive 81 Removing a CD/DVD Drive 81 Installing a CD/DVD Drive 83 Media Card Reader 85 Removing a Media Card Reader 85 Installing a Media Card Reader 87 Floppy Drive (Optional 89 Removing a Floppy Drive 89 Installing a Floppy Drive 91 Modem 93 Replacing the Modem 93 Battery 94 Replacing the Battery 94 Replacing the Computer Cover 96 5 Specifications 97 ...
Cards 70 Drives 74 Connecting Drive Cables 75 Drive Interface Connectors 75 Power Cable Connector 75 Connecting and Disconnecting Drive Cables 76 Hard Drive 76 Removing a Hard Drive 76 Installing a Hard Drive 78 CD/DVD Drive 81 Removing a CD/DVD Drive 81 Installing a CD/DVD Drive 83 Media Card Reader 85 Removing a Media Card Reader 85 Installing a Media Card Reader 87 Floppy Drive (Optional 89 Removing a Floppy Drive 89 Installing a Floppy Drive 91 Modem 93 Replacing the Modem 93 Battery 94 Replacing the Battery 94 Replacing the Computer Cover 96 5 Specifications 97 ...

Owners Manual
Page 7
Cleaning Your Computer 109 Computer, Keyboard, and Monitor 109 Mouse 110 CDs and DVDs 110 Dell Technical Support Policy (U.S. Only 111 FCC Class B 111 Contacting Dell 112 Index 133 Contents 7 Only 110 Definition of "Dell-Installed" Software and Peripherals 111 Definition of "Third-Party" Software and Peripherals 111 FCC Notices (U.S.
Cleaning Your Computer 109 Computer, Keyboard, and Monitor 109 Mouse 110 CDs and DVDs 110 Dell Technical Support Policy (U.S. Only 111 FCC Class B 111 Contacting Dell 112 Index 133 Contents 7 Only 110 Definition of "Dell-Installed" Software and Peripherals 111 Definition of "Third-Party" Software and Peripherals 111 FCC Notices (U.S.
Owners Manual
Page 9
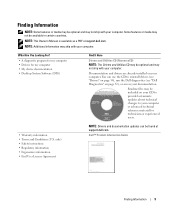
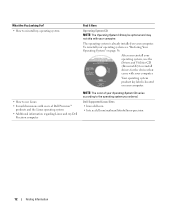
... your CD to provide last-minute updates about technical changes to reinstall drivers (see "Drivers" on page 54), run the Dell diagnostics (see "Dell Diagnostics" on your computer or advanced technical reference material for my computer • My device documentation • Desktop System Software... (DSS) Find It Here Drivers and Utilities CD (ResourceCD) NOTE: The Drivers and Utilities CD may be found at support.dell.com. only) • Safety instructions • Regulatory information • Ergonomics information • End User License Agreement NOTE: Drivers and ...
... your CD to provide last-minute updates about technical changes to reinstall drivers (see "Drivers" on page 54), run the Dell diagnostics (see "Dell Diagnostics" on your computer or advanced technical reference material for my computer • My device documentation • Desktop System Software... (DSS) Find It Here Drivers and Utilities CD (ResourceCD) NOTE: The Drivers and Utilities CD may be found at support.dell.com. only) • Safety instructions • Regulatory information • Ergonomics information • End User License Agreement NOTE: Drivers and ...
Owners Manual
Page 10
What Are You Looking For? • How to set up my computer Find It Here Setup Diagram • Service Tag and Express Service Code • Microsoft® Windows® Product Key Label Service Tag and Microsoft Windows Product Key These labels are located on your computer. • Use the Service Tag to identify your computer when you use support.dell.com or contact support. • Enter the Express Service Code to direct your call when contacting support. 10 Finding Information
What Are You Looking For? • How to set up my computer Find It Here Setup Diagram • Service Tag and Express Service Code • Microsoft® Windows® Product Key Label Service Tag and Microsoft Windows Product Key These labels are located on your computer. • Use the Service Tag to identify your computer when you use support.dell.com or contact support. • Enter the Express Service Code to direct your call when contacting support. 10 Finding Information
Owners Manual
Page 11
support.dell.com NOTE: Select your problem. 4 Follow the instructions on the screen. Online discussion with support • Reference - Computer documentation, details on your selections. • How to use Windows XP • How to work with programs and files • How to personalize my desktop Windows Help and Support Center 1 Click Start→...
support.dell.com NOTE: Select your problem. 4 Follow the instructions on the screen. Online discussion with support • Reference - Computer documentation, details on your selections. • How to use Windows XP • How to work with programs and files • How to personalize my desktop Windows Help and Support Center 1 Click Start→...
Owners Manual
Page 12
...To reinstall your computer. The operating system is located on page 56. NOTE: The color of Dell Precision™ products and the Linux operating system • Additional information regarding Linux and my Dell Precision computer Find It Here Operating System CD NOTE: The Operating System CD may be optional .... Your operating system product key label is already installed on your operating system see "Restoring Your Operating System" on your computer. Dell Supported Linux Sites • linux.dell.com • lists.us.dell.com/mailman/listinfo/linux-precision 12 Finding Information
...To reinstall your computer. The operating system is located on page 56. NOTE: The color of Dell Precision™ products and the Linux operating system • Additional information regarding Linux and my Dell Precision computer Find It Here Operating System CD NOTE: The Operating System CD may be optional .... Your operating system product key label is already installed on your operating system see "Restoring Your Operating System" on your computer. Dell Supported Linux Sites • linux.dell.com • lists.us.dell.com/mailman/listinfo/linux-precision 12 Finding Information
Owners Manual
Page 13
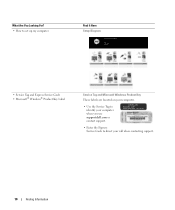
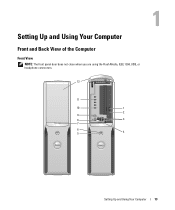
Setting Up and Using Your Computer Front and Back View of the Computer Front View NOTE: The front panel door does not close when you are using the Flash Media, IEEE 1394, USB, or headphone connectors. 12 11 10 1 2 9 8 3 7 6 5 4 Setting Up and Using Your Computer 13
Setting Up and Using Your Computer Front and Back View of the Computer Front View NOTE: The front panel door does not close when you are using the Flash Media, IEEE 1394, USB, or headphone connectors. 12 11 10 1 2 9 8 3 7 6 5 4 Setting Up and Using Your Computer 13
Owners Manual
Page 14
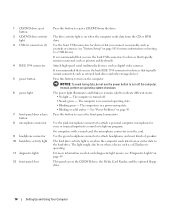
NOTICE: To avoid losing data, do not use the power button to turn on the computer. The computer is on page 49. On computers with a sound card, the microphone connector is in a normal operating state. • Blinking green - The hard drive activity light is in a power-saving state. • Blinking or solid amber - Attach high-speed serial multimedia devices, such as joysticks or cameras (see "Diagnostic Lights" on the card. For more information on when the computer reads data from or writes data to the hard drive. The computer is on booting to a USB device...
NOTICE: To avoid losing data, do not use the power button to turn on the computer. The computer is on page 49. On computers with a sound card, the microphone connector is in a normal operating state. • Blinking green - The hard drive activity light is in a power-saving state. • Blinking or solid amber - Attach high-speed serial multimedia devices, such as joysticks or cameras (see "Diagnostic Lights" on the card. For more information on when the computer reads data from or writes data to the hard drive. The computer is on booting to a USB device...

Owners Manual
Page 15
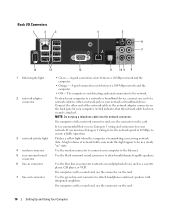
Plug IEEE 1394, USB and other devices into the appropriate connector. Setting Up and Using Your Computer 15 Back View 1 2 3 1 voltage selection switch 2 power connector 3 back panel connectors 4 card slots 4 See the safety instructions in the Product Information Guide for any installed PCI Express cards. Insert the power cable. Access connectors for more information.
Plug IEEE 1394, USB and other devices into the appropriate connector. Setting Up and Using Your Computer 15 Back View 1 2 3 1 voltage selection switch 2 power connector 3 back panel connectors 4 card slots 4 See the safety instructions in the Product Information Guide for any installed PCI Express cards. Insert the power cable. Access connectors for more information.
Owners Manual
Page 16
The computer is transmitting or receiving network data. Connect the other end of the network cable to the network adapter connector on the back panel of your computer to the Internet. On computers with integrated amplifiers. If you use Category 5 wiring and connectors for your network or broadband device. Use the black surround sound connector to attach headphones and most speakers with a network connector card, use Category 3 wiring, force the network speed to 10 Mbps to the network. Use the green line-out connector to attach multichannel-capable speakers. A click indicates that ...
The computer is transmitting or receiving network data. Connect the other end of the network cable to the network adapter connector on the back panel of your computer to the Internet. On computers with integrated amplifiers. If you use Category 5 wiring and connectors for your network or broadband device. Use the black surround sound connector to attach headphones and most speakers with a network connector card, use Category 3 wiring, force the network speed to 10 Mbps to the network. Use the green line-out connector to attach multichannel-capable speakers. A click indicates that ...

Owners Manual
Page 17
Use the grey surround sound connector to provide extremely low bass extension. Systems not using subwoofers can shunt the LFE information to the main speakers in digital surround sound audio schemes that carries only low frequency information of 80 Hz and below. See the documentation that came with a sound card, the microphone connector is recommended that you purchase a cable separately, ensure that it into a sound or telephony program. Printer Cable Your printer connects to your printer. Setting Up and Using Your Computer 17 This connector is compatible with your computer ...
Use the grey surround sound connector to provide extremely low bass extension. Systems not using subwoofers can shunt the LFE information to the main speakers in digital surround sound audio schemes that carries only low frequency information of 80 Hz and below. See the documentation that came with a sound card, the microphone connector is recommended that you purchase a cable separately, ensure that it into a sound or telephony program. Printer Cable Your printer connects to your printer. Setting Up and Using Your Computer 17 This connector is compatible with your computer ...
Owners Manual
Page 18
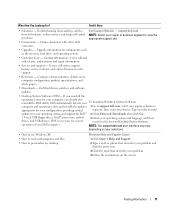
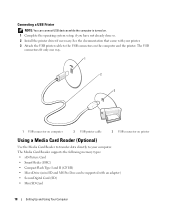
See the documentation that came with an adapter) • SecureDigital Card (SD) • Mini SD Card 18 Setting Up and Using Your Computer The USB connectors fit only one way. 1 2 3 1 USB connector on computer 2 USB printer cable 3 USB connector on printer Using a Media Card Reader (Optional) Use the Media Card Reader to transfer data directly to the USB connectors on . 1 Complete the operating system setup, if you have not already done so. 2 Install the printer driver if necessary. Connecting a USB Printer NOTE: You can be supported with your printer. 3 Attach the USB printer ...
See the documentation that came with an adapter) • SecureDigital Card (SD) • Mini SD Card 18 Setting Up and Using Your Computer The USB connectors fit only one way. 1 2 3 1 USB connector on computer 2 USB printer cable 3 USB connector on printer Using a Media Card Reader (Optional) Use the Media Card Reader to transfer data directly to the USB connectors on . 1 Complete the operating system setup, if you have not already done so. 2 Install the printer driver if necessary. Connecting a USB Printer NOTE: You can be supported with your printer. 3 Attach the USB printer ...
Owners Manual
Page 19
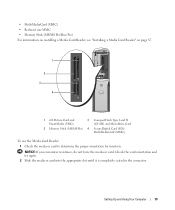
NOTICE: If you encounter resistance, do not force the media or card. Check the card orientation and try again. 2 Slide the media or card into the appropriate slot until it is completely seated in the connector. Setting Up and Using Your Computer 19 • MultiMediaCard (MMC) • Reduced size MMC • Memory Stick (MS/MS Pro/Duo Pro) For information on installing a Media Card Reader, see "Installing a Media Card Reader" on page 87. 1 2 3 4 1 xD-Picture Card and 2 SmartMedia (SMC) 3 Memory Stick (MS/MS Pro) 4 CompactFlash Type I and II (CF I/II) and MicroDrive Card ...
NOTICE: If you encounter resistance, do not force the media or card. Check the card orientation and try again. 2 Slide the media or card into the appropriate slot until it is completely seated in the connector. Setting Up and Using Your Computer 19 • MultiMediaCard (MMC) • Reduced size MMC • Memory Stick (MS/MS Pro/Duo Pro) For information on installing a Media Card Reader, see "Installing a Media Card Reader" on page 87. 1 2 3 4 1 xD-Picture Card and 2 SmartMedia (SMC) 3 Memory Stick (MS/MS Pro) 4 CompactFlash Type I and II (CF I/II) and MicroDrive Card ...
Owners Manual
Page 20
Do not plug a network cable into place, and then gently pull it to ensure that has TV-out functionality and an S-video cable, which is available at most consumer electronics stores. Connecting a TV (Optional) NOTE: To connect a TV to the network adapter connector on the back of your computer. For information on the computer. Insert the cable until it clicks into a telephone wall jack. 1 Connect the network cable to your computer, you must have a video card that it is not included with your computer. 1 Follow the procedures in "Before You Begin" on page 61. 2 Connect one ...
Do not plug a network cable into place, and then gently pull it to ensure that has TV-out functionality and an S-video cable, which is available at most consumer electronics stores. Connecting a TV (Optional) NOTE: To connect a TV to the network adapter connector on the back of your computer. For information on the computer. Insert the cable until it clicks into a telephone wall jack. 1 Connect the network cable to your computer, you must have a video card that it is not included with your computer. 1 Follow the procedures in "Before You Begin" on page 61. 2 Connect one ...
Owners Manual
Page 21
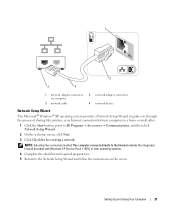
... adapter connector on computer 3 network cable 2 network adapter connector 4 network device Network Setup Wizard The Microsoft® Windows® XP operating system provides a Network Setup Wizard to guide you through the process of sharing files, printers, or an Internet connection between ... Using Your Computer 21 NOTE: Selecting the connection method This computer connects directly to the Internet enables the integrated firewall provided with Windows XP Service Pack 1 (SP1) or later operating systems. 4 Complete the checklist and required preparations. 5 Return to All Programs→...
... adapter connector on computer 3 network cable 2 network adapter connector 4 network device Network Setup Wizard The Microsoft® Windows® XP operating system provides a Network Setup Wizard to guide you through the process of sharing files, printers, or an Internet connection between ... Using Your Computer 21 NOTE: Selecting the connection method This computer connects directly to the Internet enables the integrated firewall provided with Windows XP Service Pack 1 (SP1) or later operating systems. 4 Complete the checklist and required preparations. 5 Return to All Programs→...