
User's Manual
Page 6
... charge the battery. Provides audio output for transferring or synchronizing data, music, photos, videos, contacts, and so on your computer. 8 9 10 7 6 5 4 3 2 1 Feature 1 Power-adapter port 2 USB 3.0 ports (2) 3 Audio port (3.5 mm) 4 SD-card slot 5 Left speaker 11 Functionality Connect the supplied power adapter to provide power to stereo sound, record audio, or make calls...
... charge the battery. Provides audio output for transferring or synchronizing data, music, photos, videos, contacts, and so on your computer. 8 9 10 7 6 5 4 3 2 1 Feature 1 Power-adapter port 2 USB 3.0 ports (2) 3 Audio port (3.5 mm) 4 SD-card slot 5 Left speaker 11 Functionality Connect the supplied power adapter to provide power to stereo sound, record audio, or make calls...

User's Manual
Page 8
Connect to use on-screen controls including buttons, menu items, and the on or off. Provides audio output for video and music playback. Press and release to secure your computer on -screen keyboard. Allows you to turn your computer using a Noble lock. Indicates the power/battery charge status. (see battery status table) 8 │ Features 6 5 4 3 1 2 Feature 1 Touchscreen display 2 Docking port 3 Noble lock port 4 Right speaker 5 Power and sleep/wake button 6 Power/Battery-status indicator Functionality Touch the display to a Dell Powered Stand (optional).
Connect to use on-screen controls including buttons, menu items, and the on or off. Provides audio output for video and music playback. Press and release to secure your computer on -screen keyboard. Allows you to turn your computer using a Noble lock. Indicates the power/battery charge status. (see battery status table) 8 │ Features 6 5 4 3 1 2 Feature 1 Touchscreen display 2 Docking port 3 Noble lock port 4 Right speaker 5 Power and sleep/wake button 6 Power/Battery-status indicator Functionality Touch the display to a Dell Powered Stand (optional).

User's Manual
Page 10
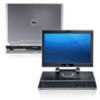
Accessories Your computer package includes the following accessories: • Power adapter and cable - Allows your computer using a USB port. • Powered stand (optional) - Allows you to connect a RJ45 (network) cable to your computer to ethernet adapter (optional) - Provides power to your computer and charges the battery. • USB to be placed upright with adjustable viewing angles and battery charging capabilities. 10 │ Accessories
Accessories Your computer package includes the following accessories: • Power adapter and cable - Allows your computer using a USB port. • Powered stand (optional) - Allows you to connect a RJ45 (network) cable to your computer to ethernet adapter (optional) - Provides power to your computer and charges the battery. • USB to be placed upright with adjustable viewing angles and battery charging capabilities. 10 │ Accessories

User's Manual
Page 26
.... WARNING: Listening to loud music for extended periods of time can lead to the audio port. Using Headphones/Microphones Your computer has a headphone/microphone combo port that supports a headphone, a microphone, or a combo device to listen to the audio port. 2 Insert the headphones in your computer, pull the connector and not the cable. 26...
.... WARNING: Listening to loud music for extended periods of time can lead to the audio port. Using Headphones/Microphones Your computer has a headphone/microphone combo port that supports a headphone, a microphone, or a combo device to listen to the audio port. 2 Insert the headphones in your computer, pull the connector and not the cable. 26...

User's Manual
Page 32
Connects the computer to the docking port to provide power to the powered stand). Powered Stand (optional) Features 2 1 Feature 1 Docking status light 2 Docking connector Functionality Turns on when your computer is successfully docked (if the power adapter is attached to your computer and charge the battery 32 │ Powered Stand (optional)
Connects the computer to the docking port to provide power to the powered stand). Powered Stand (optional) Features 2 1 Feature 1 Docking status light 2 Docking connector Functionality Turns on when your computer is successfully docked (if the power adapter is attached to your computer and charge the battery 32 │ Powered Stand (optional)

User's Manual
Page 33
Connect the power adapter to provide power to adjust the angle of your computer between 10 degrees and 70 degrees. Powered Stand (optional) │ 33 Holds the adapter cable in place. 1 2 3 Feature 1 Powered stand hinge 2 Power-adapter port 3 Adapter cable clip Functionality Allows you to the computer, and charge the battery.
Connect the power adapter to provide power to adjust the angle of your computer between 10 degrees and 70 degrees. Powered Stand (optional) │ 33 Holds the adapter cable in place. 1 2 3 Feature 1 Powered stand hinge 2 Power-adapter port 3 Adapter cable clip Functionality Allows you to the computer, and charge the battery.

User's Manual
Page 34
Using the Powered Stand Connect the Power Adapter to an electrical outlet. 34 │ Powered Stand (optional) Using unauthorized power adapters or power cables may cause severe damage to your computer and powered stand. 1 Connect the power adapter to the power-adapter port on your powered stand. 2 Connect the power adapter to the Powered Stand CAUTION: Use only the supplied power adapter and power cable.
Using the Powered Stand Connect the Power Adapter to an electrical outlet. 34 │ Powered Stand (optional) Using unauthorized power adapters or power cables may cause severe damage to your computer and powered stand. 1 Connect the power adapter to the power-adapter port on your powered stand. 2 Connect the power adapter to the Powered Stand CAUTION: Use only the supplied power adapter and power cable.

User's Manual
Page 36
Dock Your Computer on the Powered Stand 1 Align the docking port on your computer onto the powered stand. NOTE: The docking status light turns on when your computer is correctly seated on the powered stand. 2 Place your computer to the docking connector on the powered stand and the powered stand is properly connected to a power source. 36 │ Powered Stand (optional)
Dock Your Computer on the Powered Stand 1 Align the docking port on your computer onto the powered stand. NOTE: The docking status light turns on when your computer is correctly seated on the powered stand. 2 Place your computer to the docking connector on the powered stand and the powered stand is properly connected to a power source. 36 │ Powered Stand (optional)

User's Manual
Page 38
... use liquid or aerosol cleaners, that are included with water. Cleaning Your Computer CAUTION: Disconnect all cables from the cloth to seep into the computer ports.
... use liquid or aerosol cleaners, that are included with water. Cleaning Your Computer CAUTION: Disconnect all cables from the cloth to seep into the computer ports.

User's Manual
Page 45
...Brightness Viewing angle Contrast ratio Color depth Ports and connectors Audio SD card Dock USB Power Adapter Input voltage Input current (maximum) Input frequency Output power Output current Rated output voltage Temperature range: Operating Storage 18.4" Full HD with multi-point capacitive touch... 1920 × 1080 16:9 350 nits 89 degrees 1000:1 262.144 bits 1 3.5mm audio jack/port 1 SD card slot 1 docking port 2 USB 3.0 ports 1 internal USB 2.0 port for wireless keyboard and mouse receiver 90...
...Brightness Viewing angle Contrast ratio Color depth Ports and connectors Audio SD card Dock USB Power Adapter Input voltage Input current (maximum) Input frequency Output power Output current Rated output voltage Temperature range: Operating Storage 18.4" Full HD with multi-point capacitive touch... 1920 × 1080 16:9 350 nits 89 degrees 1000:1 262.144 bits 1 3.5mm audio jack/port 1 SD card slot 1 docking port 2 USB 3.0 ports 1 internal USB 2.0 port for wireless keyboard and mouse receiver 90...


