

Owners Manual
Page 5
... the Thermal-Cooling Assembly 35 Prerequisites 35 Procedure 35 Replacing the Thermal-Cooling Assembly 36 Procedure 36 Postrequisites 36 Removing the Power-Adapter Port 37 Prerequisites 37 Procedure 37 Replacing the Power-Adapter Port 38 Procedure 38 Postrequisites 38 Removing the I/O Board 39 Prerequisites 39 Procedure 39 Replacing the I/O Board 41 Procedure 41 Postrequisites...
... the Thermal-Cooling Assembly 35 Prerequisites 35 Procedure 35 Replacing the Thermal-Cooling Assembly 36 Procedure 36 Postrequisites 36 Removing the Power-Adapter Port 37 Prerequisites 37 Procedure 37 Replacing the Power-Adapter Port 38 Procedure 38 Postrequisites 38 Removing the I/O Board 39 Prerequisites 39 Procedure 39 Replacing the I/O Board 41 Procedure 41 Postrequisites...
Owners Manual
Page 37
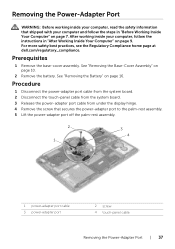
... page 9. For more safety best practices, see the Regulatory Compliance home page at dell.com/regulatory_compliance. See "Removing the Battery" on page 10. 2 Remove the battery. See "Removing the Base-Cover Assembly" on page 16. Procedure 1 Disconnect the power-adapter port cable from the system board. 2 Disconnect the touch-panel cable from the...
... page 9. For more safety best practices, see the Regulatory Compliance home page at dell.com/regulatory_compliance. See "Removing the Battery" on page 10. 2 Remove the battery. See "Removing the Base-Cover Assembly" on page 16. Procedure 1 Disconnect the power-adapter port cable from the system board. 2 Disconnect the touch-panel cable from the...

Owners Manual
Page 38
...secures the power-adapter port to the palm-rest assembly. 3 Route the power-adapter port cable under the display hinge. 4 Connect the touch-panel cable to the system board. 5 Connect power-adapter port cable ...page 17. 2 Replace the base-cover assembly. Procedure 1 Align the screw hole on the power-adapter port with the screw hole on the palm-rest assembly. 2 Replace the screw that shipped... on page 7. See "Replacing the Battery" on page 12. 38 | Replacing the Power-Adapter Port After working inside your computer and follow the instructions in "Before Working Inside Your Computer...
...secures the power-adapter port to the palm-rest assembly. 3 Route the power-adapter port cable under the display hinge. 4 Connect the touch-panel cable to the system board. 5 Connect power-adapter port cable ...page 17. 2 Replace the base-cover assembly. Procedure 1 Align the screw hole on the power-adapter port with the screw hole on the palm-rest assembly. 2 Replace the screw that shipped... on page 7. See "Replacing the Battery" on page 12. 38 | Replacing the Power-Adapter Port After working inside your computer and follow the instructions in "Before Working Inside Your Computer...
Owners Manual
Page 46
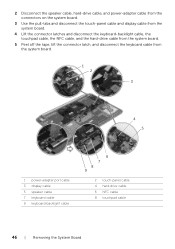
2 Disconnect the speaker cable, hard-drive cable, and power-adapter cable from the connectors on the system board. 3 Use the pull-tabs and disconnect the touch-panel cable and display cable from the system board. 4 ... the hard-drive cable from the system board. 5 Peel off the tape, lift the connector latch, and disconnect the keyboard cable from the system board. 1 2 3 4 5 1 power-adapter port cable 3 display cable 5 speaker cable 7 keyboard cable 9 keyboard-backlight cable 6 7 8 9 2 touch-panel cable 4 hard-drive cable 6 NFC cable 8 touchpad cable 46 | Removing the System...
2 Disconnect the speaker cable, hard-drive cable, and power-adapter cable from the connectors on the system board. 3 Use the pull-tabs and disconnect the touch-panel cable and display cable from the system board. 4 ... the hard-drive cable from the system board. 5 Peel off the tape, lift the connector latch, and disconnect the keyboard cable from the system board. 1 2 3 4 5 1 power-adapter port cable 3 display cable 5 speaker cable 7 keyboard cable 9 keyboard-backlight cable 6 7 8 9 2 touch-panel cable 4 hard-drive cable 6 NFC cable 8 touchpad cable 46 | Removing the System...

Owners Manual
Page 48
.... For more safety best practices, see the Regulatory Compliance home page at dell.com/regulatory_compliance. See "Replacing the Thermal-Cooling Assembly" on the connector latches to secure the cables. 8 Connect the speaker cable, hard-drive cable, touch-panel cable, power-adapter port cable, and display cable to the keyboard-cable connector. 7 Slide the...
.... For more safety best practices, see the Regulatory Compliance home page at dell.com/regulatory_compliance. See "Replacing the Thermal-Cooling Assembly" on the connector latches to secure the cables. 8 Connect the speaker cable, hard-drive cable, touch-panel cable, power-adapter port cable, and display cable to the keyboard-cable connector. 7 Slide the...

Owners Manual
Page 59
... page 20. 4 Remove the speakers. For more safety best practices, see the Regulatory Compliance home page at dell.com/regulatory_compliance. See "Removing the Hard Drive" on page 35. 10 Remove the power-adapter port. See "Removing the Power-Adapter Port" on page 10. 2 Remove the battery. See "Removing the Base-Cover Assembly" on page 37...
... page 20. 4 Remove the speakers. For more safety best practices, see the Regulatory Compliance home page at dell.com/regulatory_compliance. See "Removing the Hard Drive" on page 35. 10 Remove the power-adapter port. See "Removing the Power-Adapter Port" on page 10. 2 Remove the battery. See "Removing the Base-Cover Assembly" on page 37...

Owners Manual
Page 62
...the battery. See "Replacing the Base-Cover Assembly" on page 58. For more safety best practices, see the Regulatory Compliance home page at dell.com/regulatory_compliance. Procedure Follow step 1 to step 4 from "Replacing the Display Assembly" on page 12. 62 | Replacing the Palm-Rest ...working inside your computer and follow the instructions in "Before Working Inside Your Computer" on page 27. 11 Replace the speakers. See "Replacing the Power-Adapter Port" on page 32. 9 Replace the coin-cell battery. See "Replacing the mSATA Card" on page 38. 6 Replace the thermal-cooling...
...the battery. See "Replacing the Base-Cover Assembly" on page 58. For more safety best practices, see the Regulatory Compliance home page at dell.com/regulatory_compliance. Procedure Follow step 1 to step 4 from "Replacing the Display Assembly" on page 12. 62 | Replacing the Palm-Rest ...working inside your computer and follow the instructions in "Before Working Inside Your Computer" on page 27. 11 Replace the speakers. See "Replacing the Power-Adapter Port" on page 32. 9 Replace the coin-cell battery. See "Replacing the mSATA Card" on page 38. 6 Replace the thermal-cooling...

Specifications
Page 6
Also measured with hard drive in head-parked position and a 2-ms half-sine pulse for operating. Power Adapter Type Input voltage Input current (maximum) Input frequency Output current (continuous) Rated output voltage Temperature range: Operating Storage 130 W 100 VAC-240 VAC 1.80 A 50...Measured with hard drive in operating status and a 2-ms half-sine pulse for storage Operating 110 G Storage 160 G Altitude (maximum): Operating -15.2 m to 3048 m (-50 ft to 10,000 ft) Storage -15.2 m to 10,668 m (-50 ft to 35,000 ft) Airborne contaminant level G1 as defined by ISA-S71.04-1985
Also measured with hard drive in head-parked position and a 2-ms half-sine pulse for operating. Power Adapter Type Input voltage Input current (maximum) Input frequency Output current (continuous) Rated output voltage Temperature range: Operating Storage 130 W 100 VAC-240 VAC 1.80 A 50...Measured with hard drive in operating status and a 2-ms half-sine pulse for storage Operating 110 G Storage 160 G Altitude (maximum): Operating -15.2 m to 3048 m (-50 ft to 10,000 ft) Storage -15.2 m to 10,668 m (-50 ft to 35,000 ft) Airborne contaminant level G1 as defined by ISA-S71.04-1985


