
Owner's Manual
Page 4
... a Computer 48 Using the Cradle 48 Using the Sync Cable 50 Connecting to a Projector 51 Using Cards 52 CompactFlash Cards 52 Secure Digital Memory Cards 53 Resetting the Axim 53 Soft Reset 53 Hard Reset 54 Using Microsoft® Windows Mobile™ Version 5.0 Software for Pocket PC Premium Edition Mobile 5.0 56 Status Icons 56...
... a Computer 48 Using the Cradle 48 Using the Sync Cable 50 Connecting to a Projector 51 Using Cards 52 CompactFlash Cards 52 Secure Digital Memory Cards 53 Resetting the Axim 53 Soft Reset 53 Hard Reset 54 Using Microsoft® Windows Mobile™ Version 5.0 Software for Pocket PC Premium Edition Mobile 5.0 56 Status Icons 56...

Owner's Manual
Page 37
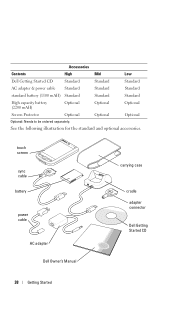
... you find any item missing, contact Dell support. Axim X51 refers to the low and mid configurations while Axim X51v refers to the high configuration which has VGA support. See, "Contacting Dell" on the packing slip. Contents Axim X51 Cradle USB Sync cable Adapter Connector standard carrying case Dell Owner's Manual Accessories High 624 MHz, Wireless, Bluetooth Standard Optional Standard...
... you find any item missing, contact Dell support. Axim X51 refers to the low and mid configurations while Axim X51v refers to the high configuration which has VGA support. See, "Contacting Dell" on the packing slip. Contents Axim X51 Cradle USB Sync cable Adapter Connector standard carrying case Dell Owner's Manual Accessories High 624 MHz, Wireless, Bluetooth Standard Optional Standard...
Owner's Manual
Page 38
See the following illustration for the standard and optional accessories. touch screen sync cable battery power cable AC adapter Dell Owner's Manual carrying case cradle adapter connector Dell Getting Started CD 38 Getting Started Accessories Contents High Mid Low Dell Getting Started CD Standard Standard Standard AC adapter & power cable Standard Standard Standard standard battery (1100 mAH) Standard Standard Standard High capacity battery (2200 mAH) Optional Optional Optional Screen Protector Optional Optional Optional Optional: Needs to be ordered separately.
See the following illustration for the standard and optional accessories. touch screen sync cable battery power cable AC adapter Dell Owner's Manual carrying case cradle adapter connector Dell Getting Started CD 38 Getting Started Accessories Contents High Mid Low Dell Getting Started CD Standard Standard Standard AC adapter & power cable Standard Standard Standard standard battery (1100 mAH) Standard Standard Standard High capacity battery (2200 mAH) Optional Optional Optional Screen Protector Optional Optional Optional Optional: Needs to be ordered separately.

Owner's Manual
Page 41
B A T T E R Y - See "Using the Battery" on page 42 for information on using it. C R A D L E / S Y N C C A B L E C O N N E C T O R - Connect a cradle or sync cable. See "Connecting to a Computer" on the screen. Getting Started 41 Back View stylus (extended) reset button battery (inside) battery lock in the ... stylus is oriented correctly when you are not using the reset button. See "Installing and Removing the Battery" on the main battery. See "Resetting the Axim" on page 53 for information on page 42. To avoid losing the stylus, store the stylus in locked position...
B A T T E R Y - See "Using the Battery" on page 42 for information on using it. C R A D L E / S Y N C C A B L E C O N N E C T O R - Connect a cradle or sync cable. See "Connecting to a Computer" on the screen. Getting Started 41 Back View stylus (extended) reset button battery (inside) battery lock in the ... stylus is oriented correctly when you are not using the reset button. See "Installing and Removing the Battery" on the main battery. See "Resetting the Axim" on page 53 for information on page 42. To avoid losing the stylus, store the stylus in locked position...

Owner's Manual
Page 44
...charger adapter to the device. • Connect the AC adapter to the sync cable and then connect the sync cable to the device. The Dell Express Service Code is critically low, the device enters "sleep" mode and the device turns off. 44 Getting Started Charging the Battery You must... charge your Service Tag to access Dell Support at support.dell.com or to the cradle, and insert the device into the cradle. The standard battery pack (1100mAh) completely charges within 10 hours. pull-tab battery NOTE: Your Service ...
...charger adapter to the device. • Connect the AC adapter to the sync cable and then connect the sync cable to the device. The Dell Express Service Code is critically low, the device enters "sleep" mode and the device turns off. 44 Getting Started Charging the Battery You must... charge your Service Tag to access Dell Support at support.dell.com or to the cradle, and insert the device into the cradle. The standard battery pack (1100mAh) completely charges within 10 hours. pull-tab battery NOTE: Your Service ...

Owner's Manual
Page 48
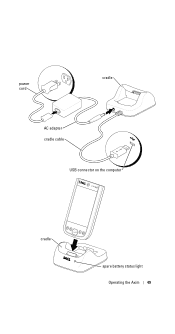
...Connect your device to a computer to: • Add programs to your computer. 3 Connect the USB sync cable to the cradle and the computer. 48 Operating the Axim See "Using the Battery" on page 42 for more information. • Synchronize data on your device with the data on ... 2 Place the Axim in the docking cradle near your device. Connecting to a Computer You can use the cradle to: • Synchronize the data on your device with data on your computer. You can either connect your device to a computer using a cradle or directly to a computer using the Dell™ Getting Started...
...Connect your device to a computer to: • Add programs to your computer. 3 Connect the USB sync cable to the cradle and the computer. 48 Operating the Axim See "Using the Battery" on page 42 for more information. • Synchronize data on your device with the data on ... 2 Place the Axim in the docking cradle near your device. Connecting to a Computer You can use the cradle to: • Synchronize the data on your device with data on your computer. You can either connect your device to a computer using a cradle or directly to a computer using the Dell™ Getting Started...
Owner's Manual
Page 49
power cord cradle AC adapter cradle cable USB connector on the computer cradle spare battery status light Operating the Axim 49
power cord cradle AC adapter cradle cable USB connector on the computer cradle spare battery status light Operating the Axim 49

Owner's Manual
Page 50
...release the lock before inserting or pulling out the connector. 50 Operating the Axim The spare battery is charging. To remove the device from the cradle, pull the device straight up and out of your computer. Ensure that the Dell logo is facing upwards. 2 Connect the USB connector of the main battery.... NOTE: The power button on the cradle operates as follows: • Green - NOTE: The sync cable is optional depending on the sides of the power...
...release the lock before inserting or pulling out the connector. 50 Operating the Axim The spare battery is charging. To remove the device from the cradle, pull the device straight up and out of your computer. Ensure that the Dell logo is facing upwards. 2 Connect the USB connector of the main battery.... NOTE: The power button on the cradle operates as follows: • Green - NOTE: The sync cable is optional depending on the sides of the power...
Owner's Manual
Page 104
.... 6 Tap Next and enter your device, tap IPSec or PPTP next to remove, and tap Delete. • When connected through a cable or cradle, detach your device from the cable or cradle. • When connected through the infrared sensor, move the device away from the computer. • When connected through a network (Ethernet) card...
.... 6 Tap Next and enter your device, tap IPSec or PPTP next to remove, and tap Delete. • When connected through a cable or cradle, detach your device from the cable or cradle. • When connected through the infrared sensor, move the device away from the computer. • When connected through a network (Ethernet) card...
Owner's Manual
Page 130
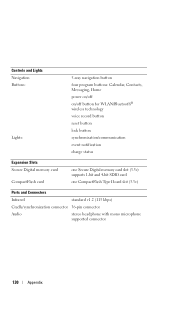
... memory card slot (3.3v) supports 1-bit and 4-bit SDIO card one CompactFlash Type II card slot (3.3v) Ports and Connectors Infrared standard v1.2 (115 kbps) Cradle/synchronization connector 36-pin connector Audio stereo headphone with mono microphone supported connector 130 Appendix
... memory card slot (3.3v) supports 1-bit and 4-bit SDIO card one CompactFlash Type II card slot (3.3v) Ports and Connectors Infrared standard v1.2 (115 kbps) Cradle/synchronization connector 36-pin connector Audio stereo headphone with mono microphone supported connector 130 Appendix
Owner's Manual
Page 137
..., 59 communicating with other devices, 93 CompactFlash about, 52 installing, 52 slot, 39 computer connecting to, 48, 51 Contacts about, 82 creating, 82 finding, 83 cradle connecting to a computer, 48 D data backing up, 62 delete Using File Explorer, 92 Index 137
..., 59 communicating with other devices, 93 CompactFlash about, 52 installing, 52 slot, 39 computer connecting to, 48, 51 Contacts about, 82 creating, 82 finding, 83 cradle connecting to a computer, 48 D data backing up, 62 delete Using File Explorer, 92 Index 137
Owner's Manual
Page 138
..., 114 delete a file in PowerPoint, 116 delete a file in Word, 112 device Buttons and the Stylus, 47 disconnecting dial-up connection, 104 from a cable or cradle, 104 from a network, 104 infrared sensor, 104 drawing creating, 72 drawing on the Screen, 72 E editing written text, 69 e-mail composing messages, 88 connecting to..., 105 I icons program, 58 status, 56 infrared using, 100 input panel, 65 Internet connecting to, 93 Internet Explorer browsing the web, 121 favorite links, 121 mobile favorites, 119-120 138 Index
..., 114 delete a file in PowerPoint, 116 delete a file in Word, 112 device Buttons and the Stylus, 47 disconnecting dial-up connection, 104 from a cable or cradle, 104 from a network, 104 infrared sensor, 104 drawing creating, 72 drawing on the Screen, 72 E editing written text, 69 e-mail composing messages, 88 connecting to..., 105 I icons program, 58 status, 56 infrared using, 100 input panel, 65 Internet connecting to, 93 Internet Explorer browsing the web, 121 favorite links, 121 mobile favorites, 119-120 138 Index
Setup Guide
Page 1
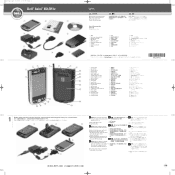
...Getting Started Getting Started 0NC393A01 1. Press the power button and follow the safety instructions in the battery slot. 3. NC393ap1.qxd 3/3/2006 3:06 PM Page 1 Dell™ Axim™ X51/X51v 1 2 4 5 7 8 3 4 5 6 7 2 1 22 21 18 19 20 3 6 9 8 9 10 11 12 13 14 ... the battery. NOTICE: After the battery is charged, to avoid damaging the connector, press the two buttons on the sides of Accessories 1. cradle* 8. wireless light 6. navigator button 21. Charge the device for at least 8 hours for at least 8 hours. 8 PDA 8 1 2 3 6 4 5...
...Getting Started Getting Started 0NC393A01 1. Press the power button and follow the safety instructions in the battery slot. 3. NC393ap1.qxd 3/3/2006 3:06 PM Page 1 Dell™ Axim™ X51/X51v 1 2 4 5 7 8 3 4 5 6 7 2 1 22 21 18 19 20 3 6 9 8 9 10 11 12 13 14 ... the battery. NOTICE: After the battery is charged, to avoid damaging the connector, press the two buttons on the sides of Accessories 1. cradle* 8. wireless light 6. navigator button 21. Charge the device for at least 8 hours for at least 8 hours. 8 PDA 8 1 2 3 6 4 5...
Setup Guide
Page 2
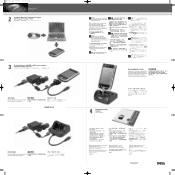
... DELL logo, and Axim are registered trademarks of Dell Inc.; NC393ap1.qxd 3/3/2006 3:06 PM Page 2 What's Next? 2 Install the Microsoft® ActiveSync® Program ᅝ㺙 Microsoft® ActiveSync® ᑣ Microsoft® ActiveSync 3 Connect the sync cable OR cradle to synchronize the data on your device with the front of the cradle...
... DELL logo, and Axim are registered trademarks of Dell Inc.; NC393ap1.qxd 3/3/2006 3:06 PM Page 2 What's Next? 2 Install the Microsoft® ActiveSync® Program ᅝ㺙 Microsoft® ActiveSync® ᑣ Microsoft® ActiveSync 3 Connect the sync cable OR cradle to synchronize the data on your device with the front of the cradle...