
Owner's Manual
Page 2
...personal injury, or death. is incorporated under license from SRS Labs, Inc. Trademarks PowerVault, uEsMedCi®n tahnisd text: Dell, the DELL Dimension, OptiPlex, Dell Precision, logo are trademarks of SRS Labs, Inc. TruSurround XT technology is strictly forbidden. February 2006 Rev. Information in...Reproduction in this document to refer to either potential damage to hardware or loss of your LCD TV display. Latitude, Inspiron, DellNet, PowerApp, TruSurround XT, SRS, and PowerEdge. Dell Inc. All rights reserved. Other trademarks and trade names may be used in trademarks and...
...personal injury, or death. is incorporated under license from SRS Labs, Inc. Trademarks PowerVault, uEsMedCi®n tahnisd text: Dell, the DELL Dimension, OptiPlex, Dell Precision, logo are trademarks of SRS Labs, Inc. TruSurround XT technology is strictly forbidden. February 2006 Rev. Information in...Reproduction in this document to refer to either potential damage to hardware or loss of your LCD TV display. Latitude, Inspiron, DellNet, PowerApp, TruSurround XT, SRS, and PowerEdge. Dell Inc. All rights reserved. Other trademarks and trade names may be used in trademarks and...

Owner's Manual
Page 3
... Side View 6 Left Side View 7 Bottom View 8 Package Contents 9 2 Setting Up Your LCD TV Display 11 Proper Location for Your LCD TV Display 11 Connecting Your LCD TV Display 11 Connecting Your Computer to the LCD TV Display 13 3 Your Remote Control 19 Installing Batteries 19 Using Your Remote Control 20 Using Your LCD TV Display With a Universal or Learning Remote Control. . . 22 4 Using the...
... Side View 6 Left Side View 7 Bottom View 8 Package Contents 9 2 Setting Up Your LCD TV Display 11 Proper Location for Your LCD TV Display 11 Connecting Your LCD TV Display 11 Connecting Your Computer to the LCD TV Display 13 3 Your Remote Control 19 Installing Batteries 19 Using Your Remote Control 20 Using Your LCD TV Display With a Universal or Learning Remote Control. . . 22 4 Using the...

Owner's Manual
Page 4
Parental Control 27 Setup Menu 28 Sleep Timer 29 Closed Caption 29 5 Troubleshooting Your LCD TV Display 30 Troubleshooting Tips 30 General Problems 31 TV Menu Messages 35 Remote Control Problems 36 Using the Self-Test Feature When Your LCD TV Display is Connected to Your Computer 36 Problems When Using the LCD TV Display as a Monitor 37 6 Specifications for Your LCD TV Display 38 7 Contacting Dell 42 Index 59 4 Contents
Parental Control 27 Setup Menu 28 Sleep Timer 29 Closed Caption 29 5 Troubleshooting Your LCD TV Display 30 Troubleshooting Tips 30 General Problems 31 TV Menu Messages 35 Remote Control Problems 36 Using the Self-Test Feature When Your LCD TV Display is Connected to Your Computer 36 Problems When Using the LCD TV Display as a Monitor 37 6 Specifications for Your LCD TV Display 38 7 Contacting Dell 42 Index 59 4 Contents

Owner's Manual
Page 5
About Your LCD TV Display 5 The light is blue when the LCD TV display is on and amber when the LCD TV display is in power save mode. 1 About Your LCD TV Display Front View 2 1 1 IR receiver 2 Power indicator light (LED) Senses the signal from the remote control.
About Your LCD TV Display 5 The light is blue when the LCD TV display is on and amber when the LCD TV display is in power save mode. 1 About Your LCD TV Display Front View 2 1 1 IR receiver 2 Power indicator light (LED) Senses the signal from the remote control.

Owner's Manual
Page 6
www.dell.com | support.dell.com Right Side View 7 6 5 4 3 2 1 1 Power button Press to turn the LCD TV display on and amber when it is in power saving mode. 2 OK TV Menu menu button Press to enable the TV Menu. 3 Volume button Press to decrease the volume. 4 Volume button Press to increase ... to select the previous channel or navigate through the TV Menu. 6 Channel button Press to select the next channel or navigate through the TV Menu. 7 Input Select button Press to display the Input Select menu. 6 About Your LCD TV Display The power button is blue when it is on and...
www.dell.com | support.dell.com Right Side View 7 6 5 4 3 2 1 1 Power button Press to turn the LCD TV display on and amber when it is in power saving mode. 2 OK TV Menu menu button Press to enable the TV Menu. 3 Volume button Press to decrease the volume. 4 Volume button Press to increase ... to select the previous channel or navigate through the TV Menu. 6 Channel button Press to select the next channel or navigate through the TV Menu. 7 Input Select button Press to display the Input Select menu. 6 About Your LCD TV Display The power button is blue when it is on and...

Owner's Manual
Page 7
About Your LCD TV Display 7 Use the audio connector if you have connected a device to AV SIDE connectors. Left Side View 1 2 3 4 1 AV SIDE (S-Video 2) 2 AV SIDE (Composite 2) 3 AV SIDE audio connector 4 Headphone connector Connect devices such as a VCR or DVD player. Connect headphones. Connect devices such as a video game system or a VCR.
About Your LCD TV Display 7 Use the audio connector if you have connected a device to AV SIDE connectors. Left Side View 1 2 3 4 1 AV SIDE (S-Video 2) 2 AV SIDE (Composite 2) 3 AV SIDE audio connector 4 Headphone connector Connect devices such as a VCR or DVD player. Connect headphones. Connect devices such as a video game system or a VCR.

Owner's Manual
Page 8
www.dell.com | support.dell.com Bottom View 12 57 9 11 13 34 6 8 10 12 1 DVI audio connector (L / R) Use the DVI audio connector if you have connected a device such as a ... a DVD player. 4 Audio connector for VGA or DVI Connect the audio cable from your computer to the LCD TV Display. 5 NTSC/Analog Cable Connect analog cable TV box or an analog antenna. 6 HDTV/Digital Cable Connect digital cable TV box or a digital antenna. 7 Composite out/Audio Out (L/R) Connect to VCR (L/R) audio inputs. 8 Composite out/Video...
www.dell.com | support.dell.com Bottom View 12 57 9 11 13 34 6 8 10 12 1 DVI audio connector (L / R) Use the DVI audio connector if you have connected a device such as a ... a DVD player. 4 Audio connector for VGA or DVI Connect the audio cable from your computer to the LCD TV Display. 5 NTSC/Analog Cable Connect analog cable TV box or an analog antenna. 6 HDTV/Digital Cable Connect digital cable TV box or a digital antenna. 7 Composite out/Audio Out (L/R) Connect to VCR (L/R) audio inputs. 8 Composite out/Video...

Owner's Manual
Page 10
www.dell.com | support.dell.com Coaxial cable Documentation: Setup Guide Product Information Guide Owner's Manual 10 About Your LCD TV Display
www.dell.com | support.dell.com Coaxial cable Documentation: Setup Guide Product Information Guide Owner's Manual 10 About Your LCD TV Display

Owner's Manual
Page 11
... with extreme temperature differences. To order additional cables, contact Dell. Do not place the LCD TV display inside a car trunk. • Do not store or use the LCD TV display in locations that are exposed to high heat, direct sunlight, or extreme cold. • Avoid moving the LCD TV display between locations with the device you have all the proper...
... with extreme temperature differences. To order additional cables, contact Dell. Do not place the LCD TV display inside a car trunk. • Do not store or use the LCD TV display in locations that are exposed to high heat, direct sunlight, or extreme cold. • Avoid moving the LCD TV display between locations with the device you have all the proper...

Owner's Manual
Page 12
... connector, see "Left Side View" page 7. www.dell.com | support.dell.com Quality Good Cable and Connector When to connect composite audio connectors. Better S-Video splits the video signal into three signals, two color and one black-and-white. Best 12 Setting Up Your LCD TV Display Component splits the video signal into two signals...
... connector, see "Left Side View" page 7. www.dell.com | support.dell.com Quality Good Cable and Connector When to connect composite audio connectors. Better S-Video splits the video signal into three signals, two color and one black-and-white. Best 12 Setting Up Your LCD TV Display Component splits the video signal into two signals...

Owner's Manual
Page 13
Better A digital signal that can support digital and convert analog to the LCD TV Display Audio connector for VGA or DVI. Connect the audio cable from your computer. NOTE: The type of connector you use depends on the ... computer to digital. Quality Good Cable and Connector When to Use A standard graphic display system for high resolution display and can support resolutions up to 1360 x 768. Setting Up Your LCD TV Display 13 Connecting Your Computer to the LCD TV Display Your LCD TV display has two standard connectors that can be used to 1360 x 768. For additional ...
Better A digital signal that can support digital and convert analog to the LCD TV Display Audio connector for VGA or DVI. Connect the audio cable from your computer. NOTE: The type of connector you use depends on the ... computer to digital. Quality Good Cable and Connector When to Use A standard graphic display system for high resolution display and can support resolutions up to 1360 x 768. Setting Up Your LCD TV Display 13 Connecting Your Computer to the LCD TV Display Your LCD TV display has two standard connectors that can be used to 1360 x 768. For additional ...

Owner's Manual
Page 14
... the LCD TV display. 3 Plug in the power cord for the LCD TV display and turn on the LCD TV display. 4 Enter the TV Menu and select TV Analog. For additional information about the Input Select menu, see "Input Selection Menu" page 24. 14 Setting Up Your LCD TV Display www.dell.com | support.dell.com Using NTSC/Analog and HDTV/Digital 1 Turn off the LCD TV display and...
... the LCD TV display. 3 Plug in the power cord for the LCD TV display and turn on the LCD TV display. 4 Enter the TV Menu and select TV Analog. For additional information about the Input Select menu, see "Input Selection Menu" page 24. 14 Setting Up Your LCD TV Display www.dell.com | support.dell.com Using NTSC/Analog and HDTV/Digital 1 Turn off the LCD TV display and...

Owner's Manual
Page 15
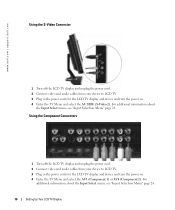
Setting Up Your LCD TV Display 15 Using the Composite Connector 1 Turn off the LCD TV display and unplug the power cord. 2 Connect video and audio cables from your device to LCD TV. 3 Plug in the power cords for the LCD TV display and device and turn the power on. 4 Enter the TV Menu and select the AV SIDE (Composite 2). For additional information about the Input Select menu, see "Input Selection Menu" page 24.
Setting Up Your LCD TV Display 15 Using the Composite Connector 1 Turn off the LCD TV display and unplug the power cord. 2 Connect video and audio cables from your device to LCD TV. 3 Plug in the power cords for the LCD TV display and device and turn the power on. 4 Enter the TV Menu and select the AV SIDE (Composite 2). For additional information about the Input Select menu, see "Input Selection Menu" page 24.
Owner's Manual
Page 16
... Input Select menu, see "Input Selection Menu" page 24. www.dell.com | support.dell.com Using the S-Video Connector 1 Turn off the LCD TV display and unplug the power cord. 2 Connect video and audio cables from your device to LCD TV. 3 Plug in the power cords for the LCD TV display and device and turn the power on . 4 Enter the...
... Input Select menu, see "Input Selection Menu" page 24. www.dell.com | support.dell.com Using the S-Video Connector 1 Turn off the LCD TV display and unplug the power cord. 2 Connect video and audio cables from your device to LCD TV. 3 Plug in the power cords for the LCD TV display and device and turn the power on . 4 Enter the...

Owner's Manual
Page 17
... 24. Setting Up Your LCD TV Display 17 For more information, contact your computer. 3 Connect the audio cables. Connecting a Video Device Connecting a Computer 1 Turn off the LCD TV display and unplug the power cord. 2 Connect the white DVI cable to your LCD display TV and to the video device... or your cable TV company. 4 Plug in the power cords for a computer, either VGA or ...
... 24. Setting Up Your LCD TV Display 17 For more information, contact your computer. 3 Connect the audio cables. Connecting a Video Device Connecting a Computer 1 Turn off the LCD TV display and unplug the power cord. 2 Connect the white DVI cable to your LCD display TV and to the video device... or your cable TV company. 4 Plug in the power cords for a computer, either VGA or ...

Owner's Manual
Page 18
... Menu" page 24. 18 Setting Up Your LCD TV Display www.dell.com | support.dell.com Using the VGA Connector NOTE: Only one connector can be used for a computer, either VGA or DVI. 1 Turn off the LCD TV display and unplug the power cord. 2 Connect the blue VGA cable to your LCD TV display and to your computer. 3 Connect the green...
... Menu" page 24. 18 Setting Up Your LCD TV Display www.dell.com | support.dell.com Using the VGA Connector NOTE: Only one connector can be used for a computer, either VGA or DVI. 1 Turn off the LCD TV display and unplug the power cord. 2 Connect the blue VGA cable to your LCD TV display and to your computer. 3 Connect the green...

Owner's Manual
Page 21
... 20 Vol - 21 Prev CH 22 23 Input Turns the LCD TV display on and off . Turns on Second Audio Program (SAP). Display information about your TV display (for the Picture menu. Selects an TV Menu option, confirms a channel selection. Press to select a channel. In the TV Menu, use the channel button to navigate through the menus in...
... 20 Vol - 21 Prev CH 22 23 Input Turns the LCD TV display on and off . Turns on Second Audio Program (SAP). Display information about your TV display (for the Picture menu. Selects an TV Menu option, confirms a channel selection. Press to select a channel. In the TV Menu, use the channel button to navigate through the menus in...
Owner's Manual
Page 22
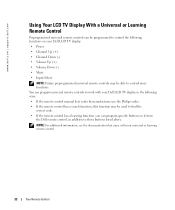
...a learning function, you can program universal remote controls to work with your Dell LCD TV display in addition to control more functions. You can program specific buttons on it from the Dell remote control, in the following functions on your universal or learning remote control.... 22 Your Remote Control NOTE: For additional information, see the documentation that came with your Dell LCD TV display: • Power • Channel Up (+) • Channel Down (-) • Volume Up (+) • Volume Down (-) • Mute...
...a learning function, you can program universal remote controls to work with your Dell LCD TV display in addition to control more functions. You can program specific buttons on it from the Dell remote control, in the following functions on your universal or learning remote control.... 22 Your Remote Control NOTE: For additional information, see the documentation that came with your Dell LCD TV display: • Power • Channel Up (+) • Channel Down (-) • Volume Up (+) • Volume Down (-) • Mute...

Owner's Manual
Page 23
...\DELL LCD TV\W2607C TV Monitor\W2607C DAO OM\12-13-2005\W2607C DAO OM\W2607C_27A0e40.fm Using the TV Menu 23 Use the up and down buttons (channel buttons) to the image and audio settings and set parental controls. NOTE: A red arrow appears next to the setting as you move through the options. 4 Using the TV Menu Your LCD TV display...
...\DELL LCD TV\W2607C TV Monitor\W2607C DAO OM\12-13-2005\W2607C DAO OM\W2607C_27A0e40.fm Using the TV Menu 23 Use the up and down buttons (channel buttons) to the image and audio settings and set parental controls. NOTE: A red arrow appears next to the setting as you move through the options. 4 Using the TV Menu Your LCD TV display...

Owner's Manual
Page 24
...LCD TV display. TV Digital - AV1 (Composite 1) - AV4 ( C o m p o n en t 2 ) - Select when you to choose the proper source based on the side of the coaxial connector. See "Bottom View" on page 8 for the location of the DVI connector. FILE LOCATION: F:\OEM MODELS\DELL LCD TV\W2607C TV Monitor\W2607C DAO OM\12-13-2005\W2607C DAO www.dell.com | support.dell.com Selecting Your TV... Menu Language 1 Press Menu to enter the TV Menu. 2 Select...
...LCD TV display. TV Digital - AV1 (Composite 1) - AV4 ( C o m p o n en t 2 ) - Select when you to choose the proper source based on the side of the coaxial connector. See "Bottom View" on page 8 for the location of the DVI connector. FILE LOCATION: F:\OEM MODELS\DELL LCD TV\W2607C TV Monitor\W2607C DAO OM\12-13-2005\W2607C DAO www.dell.com | support.dell.com Selecting Your TV... Menu Language 1 Press Menu to enter the TV Menu. 2 Select...


