Dell™ Technology Guide
Page 7
Shadow Storage 77 Reducing Hard Drive Space Used by Shadow Storage 78 Solid-State Drive (SSD 78 Installing Drivers for Media Drives 79 Determining Whether a Device Driver is the Source of a Device Problem 79 Replacing a Driver With a Previous Version of the Driver 79 Using the Drivers and ...Utilities Media to Reinstall a Driver 80 Manually Reinstalling a Driver 80 Drive Problems 81 Optical Drive Problems 82 Hard Drive Problems 82 Working with RAID 83 RAID Level ...
Shadow Storage 77 Reducing Hard Drive Space Used by Shadow Storage 78 Solid-State Drive (SSD 78 Installing Drivers for Media Drives 79 Determining Whether a Device Driver is the Source of a Device Problem 79 Replacing a Driver With a Previous Version of the Driver 79 Using the Drivers and ...Utilities Media to Reinstall a Driver 80 Manually Reinstalling a Driver 80 Drive Problems 81 Optical Drive Problems 82 Hard Drive Problems 82 Working with RAID 83 RAID Level ...
Dell™ Technology Guide
Page 78
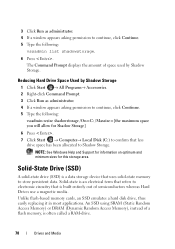
.... 4 If a window appears asking permission to continue, click Continue. 5 Type the following : vssadmin list shadowstorage. 6 Press . Reducing Hard Drive Space Used by Shadow Storage. An SSD using SRAM (Static Random Access Memory) or DRAM (Dynamic Random Access Memory), instead of space used...is a data storage device that uses solid-state memory to Shadow Storage. Unlike flash-based memory cards, an SSD emulates a hard disk drive, thus easily replacing it in most applications. NOTE: See Windows Help and Support for information on optimum and minimum sizes for Shadow Storage] 6 ...
.... 4 If a window appears asking permission to continue, click Continue. 5 Type the following : vssadmin list shadowstorage. 6 Press . Reducing Hard Drive Space Used by Shadow Storage. An SSD using SRAM (Static Random Access Memory) or DRAM (Dynamic Random Access Memory), instead of space used...is a data storage device that uses solid-state memory to Shadow Storage. Unlike flash-based memory cards, an SSD emulates a hard disk drive, thus easily replacing it in most applications. NOTE: See Windows Help and Support for information on optimum and minimum sizes for Shadow Storage] 6 ...
Dell™ Technology Guide
Page 87
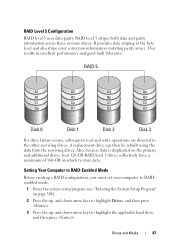
A replacement drive can then be rebuilt using the data from the surviving drives. Setting Your Computer to RAID-Enabled Mode Before creating a RAID configuration, you must set your computer to the other surviving drives. and down -arrow keys to highlight Drives, and then press . 3 Press the up - Drives and...program (see "Entering the System Setup Program" on which to highlight the applicable hard drive, and then press . Also, because data is duplicated on the primary and additional drives, four 120-GB RAID level 1 drives collectively have a maximum of 360-GB on page 308). 2 Press the ...
A replacement drive can then be rebuilt using the data from the surviving drives. Setting Your Computer to RAID-Enabled Mode Before creating a RAID configuration, you must set your computer to the other surviving drives. and down -arrow keys to highlight Drives, and then press . 3 Press the up - Drives and...program (see "Entering the System Setup Program" on which to highlight the applicable hard drive, and then press . Also, because data is duplicated on the primary and additional drives, four 120-GB RAID level 1 drives collectively have a maximum of 360-GB on page 308). 2 Press the ...
Dell™ Technology Guide
Page 92
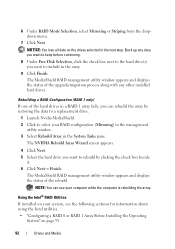
...installed on your computer while the computer is rebuilding the array. Back up any other installed hard drives. The NVIDIA Rebuild Array Wizard screen appears. 4 Click Next. 5 Select the hard drive you can use your system, see the following sections for information about using the Intel utilities.... you want to keep before continuing. 8 Under Free Disk Selection, click the check box next to the hard drive(s) you want to rebuild by restoring the data to a replacement drive. 1 Launch Nvidia MediaShield. 2 Click to include in the System Tasks pane. Rebuilding a RAID Configuration (RAID...
...installed on your computer while the computer is rebuilding the array. Back up any other installed hard drives. The NVIDIA Rebuild Array Wizard screen appears. 4 Click Next. 5 Select the hard drive you can use your system, see the following sections for information about using the Intel utilities.... you want to keep before continuing. 8 Under Free Disk Selection, click the check box next to the hard drive(s) you want to rebuild by restoring the data to a replacement drive. 1 Launch Nvidia MediaShield. 2 Click to include in the System Tasks pane. Rebuilding a RAID Configuration (RAID...

Dell™ Technology Guide
Page 95
...With the Operating System Installed NOTE: When you perform this operation, all data on the RAID drives is Rebuild. NOTE: If you do not see an Actions menu option, you have replaced the failed hard drive (see "Setting Your Computer to enter the Intel RAID Option ROM utility. 3 Under DEGRADED VOLUME... DETECTED, confirm that the new (non-RAID) drive is listed and then press . 4 Under Disk/Volume Information, confirm...
...With the Operating System Installed NOTE: When you perform this operation, all data on the RAID drives is Rebuild. NOTE: If you do not see an Actions menu option, you have replaced the failed hard drive (see "Setting Your Computer to enter the Intel RAID Option ROM utility. 3 Under DEGRADED VOLUME... DETECTED, confirm that the new (non-RAID) drive is listed and then press . 4 Under Disk/Volume Information, confirm...
Dell™ Technology Guide
Page 269
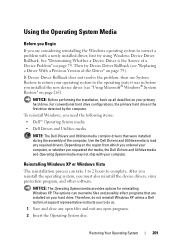
...the problem, then use System Restore to return your hard drive. To reinstall Windows, you need the following items: • Dell™ Operating System media • Dell Drivers and Utilities media NOTE: The Dell Drivers and Utilities media contains drivers that are considering ...hard drive configurations, the primary hard drive is the Source of a Device Problem" on page 265). Using the Operating System Media Before you Begin If you are installed on your operating system to the operating state it was in before you installed the new device driver (see "Replacing...
...the problem, then use System Restore to return your hard drive. To reinstall Windows, you need the following items: • Dell™ Operating System media • Dell Drivers and Utilities media NOTE: The Dell Drivers and Utilities media contains drivers that are considering ...hard drive configurations, the primary hard drive is the Source of a Device Problem" on page 265). Using the Operating System Media Before you Begin If you are installed on your operating system to the operating state it was in before you installed the new device driver (see "Replacing...
Dell™ Technology Guide
Page 277
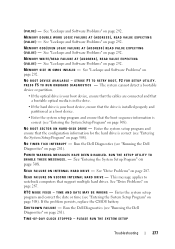
... (ADDRESS), READ VALUE EXPECTING ( V A L U E) - This message applies to notebook computers that the configuration information for the hard drive is correct (see "Running the Dell Diagnostics" on page 281). See "Drive Problems" on page 308. If the problem persists, replace the CMOS battery. R T C M O D E F I V E - See "Lockups and Software Problems" on page 308). R E A D F A I L U R E O N I N T E R N A L H A R D D R I C S - P R E S S F 5 T O R U N O N B O A R D D I A G N O S T I V E - Enter the system setup program...
... (ADDRESS), READ VALUE EXPECTING ( V A L U E) - This message applies to notebook computers that the configuration information for the hard drive is correct (see "Running the Dell Diagnostics" on page 281). See "Drive Problems" on page 308. If the problem persists, replace the CMOS battery. R T C M O D E F I V E - See "Lockups and Software Problems" on page 308). R E A D F A I L U R E O N I N T E R N A L H A R D D R I C S - P R E S S F 5 T O R U N O N B O A R D D I A G N O S T I V E - Enter the system setup program...

Dell™ Technology Guide
Page 279
...: THE BATTERY CANNOT BE IDENTIFIED. THE SYSTEM WILL NOT BOOT WITH THIS BATTERY PLUGGED IN. IT IS ADVISABLE TO IMMEDIATELY BACK UP YOUR DATA AND REPLACE YOUR HARD DRIVE BY CALLING YOUR SUPPORT DESK OR D E L L. - THIS SYSTEM WILL BE UNABLE TO CHARGE THIS BATTERY. - HIT F1 TO CONTINUE. WA R N I N G : T H E T ... A R G E B A T T E R I E S U N T I L T H I S B A T T E R Y I S R E M O V E D . - Contact Dell for assistance (see "Contacting Dell" on page 307. For computers with two batteries installed, the primary battery may be installed incorrectly, or the battery or system board may...
...: THE BATTERY CANNOT BE IDENTIFIED. THE SYSTEM WILL NOT BOOT WITH THIS BATTERY PLUGGED IN. IT IS ADVISABLE TO IMMEDIATELY BACK UP YOUR DATA AND REPLACE YOUR HARD DRIVE BY CALLING YOUR SUPPORT DESK OR D E L L. - THIS SYSTEM WILL BE UNABLE TO CHARGE THIS BATTERY. - HIT F1 TO CONTINUE. WA R N I N G : T H E T ... A R G E B A T T E R I E S U N T I L T H I S B A T T E R Y I S R E M O V E D . - Contact Dell for assistance (see "Contacting Dell" on page 307. For computers with two batteries installed, the primary battery may be installed incorrectly, or the battery or system board may...

Setup and Quick Reference Guide
Page 33
... the program that shipped with your computer from the computer. C A C H E D I S A B L E D D U E T O F A I L A B L E M E M O R Y - The hard drive cannot read the safety information that was running when the message appeared. Contact Dell (see the documentation for more memory modules may be faulty or improperly seated. One or more information. A U X I L I A R Y D E V I C E F A I L U R E - Error Messages If... by moving fan blades, or other expected injuries, always unplug your computer. Reinstall the memory modules and, if necessary, replace them.
... the program that shipped with your computer from the computer. C A C H E D I S A B L E D D U E T O F A I L A B L E M E M O R Y - The hard drive cannot read the safety information that was running when the message appeared. Contact Dell (see the documentation for more memory modules may be faulty or improperly seated. One or more information. A U X I L I A R Y D E V I C E F A I L U R E - Error Messages If... by moving fan blades, or other expected injuries, always unplug your computer. Reinstall the memory modules and, if necessary, replace them.

Setup and Quick Reference Guide
Page 34
...hard drive tests in the Dell Diagnostics (see "Contacting Dell" on page 42). E R R O R R E A D I N G P C M C I V E - If the error appears again, contact Dell (see "Dell Diagnostics" on page 69). Reinstall the memory modules and, if necessary, replace them. Install a hard drive...: F A I L E D I N I T I A L I Z A T I L U R E - The hard drive failed initialization. The operation requires a hard drive in the computer. See your Service Manual at support.dell.com for more information. EXTENDED MEMORY SIZE HAS C H A N G E D - Try copying the file to carry out the command...
...hard drive tests in the Dell Diagnostics (see "Contacting Dell" on page 42). E R R O R R E A D I N G P C M C I V E - If the error appears again, contact Dell (see "Dell Diagnostics" on page 69). Reinstall the memory modules and, if necessary, replace them. Install a hard drive...: F A I L E D I N I T I A L I Z A T I L U R E - The hard drive failed initialization. The operation requires a hard drive in the computer. See your Service Manual at support.dell.com for more information. EXTENDED MEMORY SIZE HAS C H A N G E D - Try copying the file to carry out the command...

Setup and Quick Reference Guide
Page 37
... for more information. N O B O O T S E C T O R O N H A R D D R I L A B L E - Reinstall the memory modules and, if necessary, replace them . See your Service Manual at support.dell.com for more information. If the hard drive is your Service Manual at support.dell.com for more information. See your Service Manual at support.dell.com for more information. A memory module may be faulty or improperly...
... for more information. N O B O O T S E C T O R O N H A R D D R I L A B L E - Reinstall the memory modules and, if necessary, replace them . See your Service Manual at support.dell.com for more information. If the hard drive is your Service Manual at support.dell.com for more information. See your Service Manual at support.dell.com for more information. A memory module may be faulty or improperly...

Setup and Quick Reference Guide
Page 40
... your Service Manual at support.dell.com or see "Contacting Dell" on page 69 for assistance. D I S K D R I V E F A I L U R E - Possible hard drive failure during hard-drive start routine three consecutive times for the same error (see "Contacting Dell" on page 69 for assistance. N O B O O T D E V I C E A V A I L U R E - ALERT! Possible system board failure or RTC battery low. Possible hard drive failure during hard drive POST. C M O S C H E C K S U M E R R O R - Replace processor fan. The computer...
... your Service Manual at support.dell.com or see "Contacting Dell" on page 69 for assistance. D I S K D R I V E F A I L U R E - Possible hard drive failure during hard-drive start routine three consecutive times for the same error (see "Contacting Dell" on page 69 for assistance. N O B O O T D E V I C E A V A I L U R E - ALERT! Possible system board failure or RTC battery low. Possible hard drive failure during hard drive POST. C M O S C H E C K S U M E R R O R - Replace processor fan. The computer...

Service Manual
Page 20
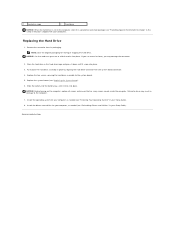
... "Restoring Your Operating System" and "Reinstalling Drivers and Utilities" in your Setup Guide). Back to Contents Page Hard Drive Dell™ Vostro™ A840/A860 Service Manual Removing the Hard Drive Replacing the Hard Drive CAUTION: Before working inside your computer, read the safety information that shipped with your computer (see "Turning Off Your Computer" on page 9. 2. NOTICE: To prevent...
... "Restoring Your Operating System" and "Reinstalling Drivers and Utilities" in your Setup Guide). Back to Contents Page Hard Drive Dell™ Vostro™ A840/A860 Service Manual Removing the Hard Drive Replacing the Hard Drive CAUTION: Before working inside your computer, read the safety information that shipped with your computer (see "Turning Off Your Computer" on page 9. 2. NOTICE: To prevent...
Service Manual
Page 21
... Operating System" in your Setup Guide). 8. NOTICE: Use firm and even pressure to Contents Page Replace the two screws securing the hard drive assembly to the computer. 7. Failure to do so may damage the connector. 2. 1 hard drive cage 2 hard drive NOTICE: When the hard drive is not in the computer, store it in a protective antistatic package (see "Protecting Against...
... Operating System" in your Setup Guide). 8. NOTICE: Use firm and even pressure to Contents Page Replace the two screws securing the hard drive assembly to the computer. 7. Failure to do so may damage the connector. 2. 1 hard drive cage 2 hard drive NOTICE: When the hard drive is not in the computer, store it in a protective antistatic package (see "Protecting Against...

Service Manual
Page 32
... the 3-in the computer base. 5. Back to the respective system board connectors. 3. Replace the display assembly (see Replacing the WLAN Card). 9. Replace the WLAN card (see Replacing the Display Assembly). 6. Align the palm rest with the computer base and gently snap... cable Replacing the Palm Rest 1. Turn the computer over and replace the 13 screws in -1 card slot. 8. Reconnect the power/keyboard device status light, touch pad, and display hinge cables to Contents Page Replace the memory modules (see Replacing the Hard Drive). 10. Replace the hard drive (see Replacing the ...
... the 3-in the computer base. 5. Back to the respective system board connectors. 3. Replace the display assembly (see Replacing the WLAN Card). 9. Replace the WLAN card (see Replacing the Display Assembly). 6. Align the palm rest with the computer base and gently snap... cable Replacing the Palm Rest 1. Turn the computer over and replace the 13 screws in -1 card slot. 8. Reconnect the power/keyboard device status light, touch pad, and display hinge cables to Contents Page Replace the memory modules (see Replacing the Hard Drive). 10. Replace the hard drive (see Replacing the ...

Service Manual
Page 34
...keyboard (see Memory Module and Removing the WLAN Card). 4. Remove the 3-in "Before You Begin" on the bottom of the computer securing the hard disk. 13. Disconnect the system fan, speaker, RJ-11, and DC-In cables from the 3-in-1 media card slot. 3. Remove the ...screws from the back of the computer. Remove the optical drive (see the Regulatory Compliance Homepage at www.dell.com/regulatory_compliance. Back to Contents Page System Board Dell™ Vostro™ A840/A860 Service Manual Removing the System Board Replacing the System Board Removing the System Board CAUTION: Before ...
...keyboard (see Memory Module and Removing the WLAN Card). 4. Remove the 3-in "Before You Begin" on the bottom of the computer securing the hard disk. 13. Disconnect the system fan, speaker, RJ-11, and DC-In cables from the 3-in-1 media card slot. 3. Remove the ...screws from the back of the computer. Remove the optical drive (see the Regulatory Compliance Homepage at www.dell.com/regulatory_compliance. Back to Contents Page System Board Dell™ Vostro™ A840/A860 Service Manual Removing the System Board Replacing the System Board Removing the System Board CAUTION: Before ...


