
Handling swollen Lithium-ion batteries
Page 1
... not be used and should be trademarks of fire or explosion. Replace the battery only with your computer. or its subsidiaries. One type of the battery. ● Do not bend the battery. ● Do not use a battery from Dell. 1 Inherent to lithium-ion polymer battery technology is fully discharged. ● Do not crush, drop, mutilate, or penetrate...
... not be used and should be trademarks of fire or explosion. Replace the battery only with your computer. or its subsidiaries. One type of the battery. ● Do not bend the battery. ● Do not use a battery from Dell. 1 Inherent to lithium-ion polymer battery technology is fully discharged. ● Do not crush, drop, mutilate, or penetrate...
Ownerss Manual
Page 8
... as an ExpressCard. 2. Press and hold the power button for this particular Dell computer. Remove any replacement procedure, ensure that your computer 1. CAUTION: To avoid damage to the computer, use batteries designed for other Dell computers. 1. Connect any cards, such as touching a connector on the back... or Smart Cards from the computer (if available). Connect any external devices, such as a port replicator or media base, and replace any telephone or network cables to your computer. 5. Connect your computer. After working inside your computer After you connect external devices,...
... as an ExpressCard. 2. Press and hold the power button for this particular Dell computer. Remove any replacement procedure, ensure that your computer 1. CAUTION: To avoid damage to the computer, use batteries designed for other Dell computers. 1. Connect any cards, such as touching a connector on the back... or Smart Cards from the computer (if available). Connect any external devices, such as a port replicator or media base, and replace any telephone or network cables to your computer. 5. Connect your computer. After working inside your computer After you connect external devices,...
Ownerss Manual
Page 10
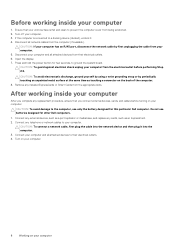
... [1] from the connector on the system board. Align the base cover with the screw holders on the system board. Battery Removing the battery 1. Follow the procedure in After working inside your computer. 2. b) Lift the latch and disconnect the hard disk drive cable [2] from... the connector on the computer. 2. c) Peel the hard disk drive cable from the battery [3]. 10 Removing and installing components Installing the base cover 1. Follow the procedure in Before working inside your computer. Remove the base cover. 3....
... [1] from the connector on the system board. Align the base cover with the screw holders on the system board. Battery Removing the battery 1. Follow the procedure in After working inside your computer. 2. b) Lift the latch and disconnect the hard disk drive cable [2] from... the connector on the computer. 2. c) Peel the hard disk drive cable from the battery [3]. 10 Removing and installing components Installing the base cover 1. Follow the procedure in Before working inside your computer. Remove the base cover. 3....
Ownerss Manual
Page 12
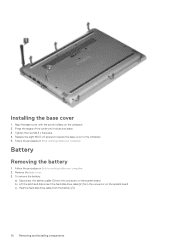
Replace the four M2.0 x 3 screws to secure the battery to the connector on the system board and close the latch. 4. Follow the procedure in After working inside your computer. 2. Install the base cover. 6. Follow ... in Before working inside your computer. Lift the speakers, along with the speaker cable, and remove it away from routing channel [2]. 4. Remove the: a) base cover b) battery 3. b) Unroute the cable from the back cover. 12 Removing and installing components 3. To remove the speaker: a) Disconnect the speaker cable [1]. Connect the hard disk drive...
Replace the four M2.0 x 3 screws to secure the battery to the connector on the system board and close the latch. 4. Follow the procedure in After working inside your computer. 2. Install the base cover. 6. Follow ... in Before working inside your computer. Lift the speakers, along with the speaker cable, and remove it away from routing channel [2]. 4. Remove the: a) base cover b) battery 3. b) Unroute the cable from the back cover. 12 Removing and installing components 3. To remove the speaker: a) Disconnect the speaker cable [1]. Connect the hard disk drive...
Ownerss Manual
Page 26
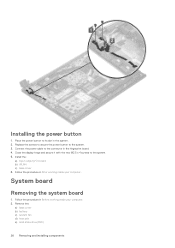
... inside your computer. 2. Install the: a) Input output(I/O) board b) WLAN c) base cover 6. Remove the: a) base cover b) battery c) system fan d) heat sink e) solid-state drive(SSD) 26 Removing and installing components System board Removing the system board 1. Replace the screws to secure the power button to the system. 5. Close the display hinge and secure...
... inside your computer. 2. Install the: a) Input output(I/O) board b) WLAN c) base cover 6. Remove the: a) base cover b) battery c) system fan d) heat sink e) solid-state drive(SSD) 26 Removing and installing components System board Removing the system board 1. Replace the screws to secure the power button to the system. 5. Close the display hinge and secure...
Ownerss Manual
Page 29
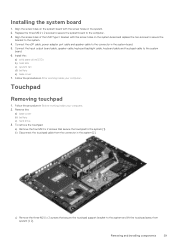
...system. 2. Follow the procedure in the system [2]. Remove the: a) base cover b) battery c) hard drive 3. Align the screw holes of the USB Type C bracket with the screw holes on the system board and replace the two screws to secure the bracket to the system and lift the touchpad away... keyboard backlight cable, keyboard cable and touchpad cable to the computer. 3. Install the: a) solid state drive(SSD) b) heat sink c) system fan d) battery e) base cover 7. c) Remove the three M2.0 x 2 screws that secure the touchpad to the connector in Before working inside your computer.
...system. 2. Follow the procedure in the system [2]. Remove the: a) base cover b) battery c) hard drive 3. Align the screw holes of the USB Type C bracket with the screw holes on the system board and replace the two screws to secure the bracket to the system and lift the touchpad away... keyboard backlight cable, keyboard cable and touchpad cable to the computer. 3. Install the: a) solid state drive(SSD) b) heat sink c) system fan d) battery e) base cover 7. c) Remove the three M2.0 x 2 screws that secure the touchpad to the connector in Before working inside your computer.
Ownerss Manual
Page 30
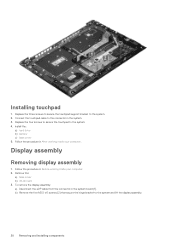
...a) hard drive b) battery c) base cover 5. To remove the display assembly: a) Disconnect the eDP cable from the connector in Before working inside your computer. Installing touchpad 1. Follow the procedure in the system board [1]. Connect the touchpad cable to the system. 2. Replace the four screws to... the procedure in the system. 3. b) Remove the five M2.5 x 6 screws [2] that secure the hinge bracket to the system. 4. Replace the three screws to secure the touchpad support bracket to the connector in After working inside your computer. 2. Remove the: a) base cover b) WLAN...
...a) hard drive b) battery c) base cover 5. To remove the display assembly: a) Disconnect the eDP cable from the connector in Before working inside your computer. Installing touchpad 1. Follow the procedure in the system board [1]. Connect the touchpad cable to the system. 2. Replace the four screws to... the procedure in the system. 3. b) Remove the five M2.5 x 6 screws [2] that secure the hinge bracket to the system. 4. Replace the three screws to secure the touchpad support bracket to the connector in After working inside your computer. 2. Remove the: a) base cover b) WLAN...
Ownerss Manual
Page 65
... Table 14. For laptops, ensure that your BIOS (System Setup), when you replace the system board or if an update is available. This option is set ...Auto OS Recovery Threshold setup option controls the automatic boot flow for Support Assist System Resolution Console and Dell OS Recovery tool. Click one of the system firmware. • Allow BIOS Downgrade This option is... not set by default. Allows you to update your computer battery is completed. Always Perform Integrity Check-Performs integrity check on the HDD or an external USB key. ...
... Table 14. For laptops, ensure that your BIOS (System Setup), when you replace the system board or if an update is available. This option is set ...Auto OS Recovery Threshold setup option controls the automatic boot flow for Support Assist System Resolution Console and Dell OS Recovery tool. Click one of the system firmware. • Allow BIOS Downgrade This option is... not set by default. Allows you to update your computer battery is completed. Always Perform Integrity Check-Performs integrity check on the HDD or an external USB key. ...
Ownerss Manual
Page 77
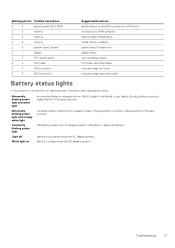
... light Constantly blinking amber light Light off White light on An unauthenticated or unsupported non-Dell AC adapter is connected to your laptop. Fatal battery failure with AC adapter present. Re-plug battery connector, replace battery if the issue reoccurs. Temporary battery failure with AC adapter present. Troubleshooting 77 Blinking pattern Problem Description 2 2 system board, BIOS...
... light Constantly blinking amber light Light off White light on An unauthenticated or unsupported non-Dell AC adapter is connected to your laptop. Fatal battery failure with AC adapter present. Re-plug battery connector, replace battery if the issue reoccurs. Temporary battery failure with AC adapter present. Troubleshooting 77 Blinking pattern Problem Description 2 2 system board, BIOS...


