Owner's Manual
Page 3
... Installing The Hard Disk Drive...16 7 Removing The Memory Card Reader 19 Installing The Memory Card Reader...20 8 Removing The Rear System Fan 21 Installing The Rear System Fan...22 9 Removing The Coin-Cell Battery 23 Installing The Coin-Cell Battery...23 10 Removing The Heat Sink...25 Installing The Heat Sink...
... Installing The Hard Disk Drive...16 7 Removing The Memory Card Reader 19 Installing The Memory Card Reader...20 8 Removing The Rear System Fan 21 Installing The Rear System Fan...22 9 Removing The Coin-Cell Battery 23 Installing The Coin-Cell Battery...23 10 Removing The Heat Sink...25 Installing The Heat Sink...
Owner's Manual
Page 21
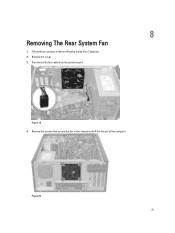
Disconnect the fan cable from the system board. Remove the screws that secure the fan to the chassis and lift the fan out of the computer. Figure 20. 21 Remove the cover. 3. Figure 19. 4. Follow the procedures in Before Working Inside Your Computer. 2. 8 Removing The Rear System Fan 1.
Disconnect the fan cable from the system board. Remove the screws that secure the fan to the chassis and lift the fan out of the computer. Figure 20. 21 Remove the cover. 3. Figure 19. 4. Follow the procedures in Before Working Inside Your Computer. 2. 8 Removing The Rear System Fan 1.
Owner's Manual
Page 22
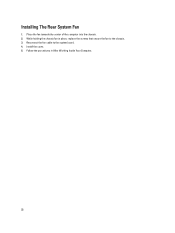
Install the cover. 5. Follow the procedures in place, replace the screws that secure the fan to the system board. 4. Installing The Rear System Fan 1. Place the fan towards the center of the computer into the chassis. 2. Reconnect the fan cable to the chassis. 3. While holding the chassis fan in After Working Inside Your Computer. 22
Install the cover. 5. Follow the procedures in place, replace the screws that secure the fan to the system board. 4. Installing The Rear System Fan 1. Place the fan towards the center of the computer into the chassis. 2. Reconnect the fan cable to the chassis. 3. While holding the chassis fan in After Working Inside Your Computer. 22
Owner's Manual
Page 25
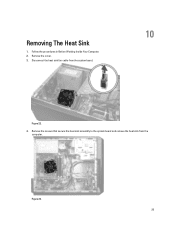
Follow the procedures in Before Working Inside Your Computer. 2. Removing The Heat Sink 1. Remove the cover. 3. Figure 23. 25 Remove the screws that secure the heat sink assembly to the system board and remove the heat sink from the system board. 10 Figure 22. 4. Disconnect the heat sink fan cable from the computer.
Follow the procedures in Before Working Inside Your Computer. 2. Removing The Heat Sink 1. Remove the cover. 3. Figure 23. 25 Remove the screws that secure the heat sink assembly to the system board and remove the heat sink from the system board. 10 Figure 22. 4. Disconnect the heat sink fan cable from the computer.
Owner's Manual
Page 26
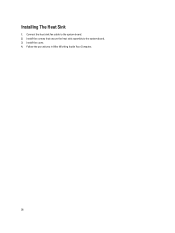
Install the cover. 4. Installing The Heat Sink 1. Connect the heat sink fan cable to the system board. 3. Install the screws that secure the heat sink assembly to the system board. 2. Follow the procedures in After Working Inside Your Computer. 26
Install the cover. 4. Installing The Heat Sink 1. Connect the heat sink fan cable to the system board. 3. Install the screws that secure the heat sink assembly to the system board. 2. Follow the procedures in After Working Inside Your Computer. 26
Owner's Manual
Page 55
... to complete the boot routine three at booting this checkpoint and contact Dell Technical Support. Hard Drive SELF MONITORING SYSTEM has reported that the boot sequence information is your data regularly. Dell recommends that will help in the following examples, see the documentation for.... Keyboard failure Keyboard failure or loose cable. No timer tick interrupt USB over current error CAUTION - System fan failure Possible fan failure CPU fan failure CPU fan has failed Hard-disk drive failure Possible hard disk drive failure during HDD boot test. A parameter out of...
... to complete the boot routine three at booting this checkpoint and contact Dell Technical Support. Hard Drive SELF MONITORING SYSTEM has reported that the boot sequence information is your data regularly. Dell recommends that will help in the following examples, see the documentation for.... Keyboard failure Keyboard failure or loose cable. No timer tick interrupt USB over current error CAUTION - System fan failure Possible fan failure CPU fan failure CPU fan has failed Hard-disk drive failure Possible hard disk drive failure during HDD boot test. A parameter out of...
Owner's Manual
Page 56
Video card failure. 7 Processor failure. Previous attempts at booting this checkpoint and contact Dell Technical Support The computer failed to resolve the issue. CPU fan failure CPU fan has failed. No memory detected 3 Chipset Error (North and South Bridge Chipset, DMA/IMR/ ... note this system have failed at checkpoint [nnnn]. System board failure. 4 RAM Read/Write failure. Processor failure. System fan failure System fan has failed. CMOS battery failure. 6 Video BIOS test failure. System Messages System Message Description Alert! Memory failure. 5 ...
Video card failure. 7 Processor failure. Previous attempts at booting this checkpoint and contact Dell Technical Support The computer failed to resolve the issue. CPU fan failure CPU fan has failed. No memory detected 3 Chipset Error (North and South Bridge Chipset, DMA/IMR/ ... note this system have failed at checkpoint [nnnn]. System board failure. 4 RAM Read/Write failure. Processor failure. System fan failure System fan has failed. CMOS battery failure. 6 Video BIOS test failure. System Messages System Message Description Alert! Memory failure. 5 ...


