Service Manual
Page 1
... material in this document is strictly forbidden. Trademarks used in any manner whatsoever without notice. © 2008 Dell Inc. Dell Inc. Dell™ Vostro™ 420/220/220s Service Manual Troubleshooting Working on Your Computer Computer Cover Bezel Chassis Support Bracket PCI and PCI Express Cards Drives I/O Panel Fan Processor Heat Sink/Fan Assembly Memory Module...
... material in this document is strictly forbidden. Trademarks used in any manner whatsoever without notice. © 2008 Dell Inc. Dell Inc. Dell™ Vostro™ 420/220/220s Service Manual Troubleshooting Working on Your Computer Computer Cover Bezel Chassis Support Bracket PCI and PCI Express Cards Drives I/O Panel Fan Processor Heat Sink/Fan Assembly Memory Module...
Service Manual
Page 2
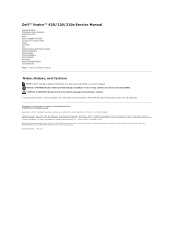
... computer still on the opposite edge of the computer . With the computer still on Your Computer. 2. Removing the Bezel 1. Back to Contents Page Bezel Dell™ Vostro™ 420/220/220s Service Manual Removing the Bezel Replacing the Bezel CAUTION: Before working inside your computer, read the safety information that edge of the computer. 2. CAUTION: To guard...
... computer still on the opposite edge of the computer . With the computer still on Your Computer. 2. Removing the Bezel 1. Back to Contents Page Bezel Dell™ Vostro™ 420/220/220s Service Manual Removing the Bezel Replacing the Bezel CAUTION: Before working inside your computer, read the safety information that edge of the computer. 2. CAUTION: To guard...
Service Manual
Page 11
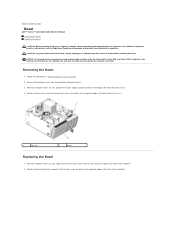
... and folded out of computer, bezel 2 computer cover 4. Follow the procedures in Before Working on ) removed. NOTICE: The procedure for removing and replacing the computer cover is for the Vostro 420, Vostro 220, and Vostro 220s computers; Removing the Computer Cover 1. Ensure that shipped with the cover removed-at www.dell.com/regulatory_compliance. the illustration provided...
... and folded out of computer, bezel 2 computer cover 4. Follow the procedures in Before Working on ) removed. NOTICE: The procedure for removing and replacing the computer cover is for the Vostro 420, Vostro 220, and Vostro 220s computers; Removing the Computer Cover 1. Ensure that shipped with the cover removed-at www.dell.com/regulatory_compliance. the illustration provided...

Service Manual
Page 12
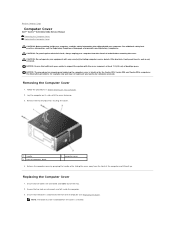
Follow the procedure in After Working on Your Computer. Back to the chassis frame beside the front bezel. 5. Ensure that secure the computer cover. 7. Replace and tighten the two thumbscrews that the cover is seated and aligned correctly. 6. 4. Holding the cover at a slight angle, slide it toward the front of the computer until the metal clips inside the cover grip and attach securely to Contents Page
Follow the procedure in After Working on Your Computer. Back to the chassis frame beside the front bezel. 5. Ensure that secure the computer cover. 7. Replace and tighten the two thumbscrews that the cover is seated and aligned correctly. 6. 4. Holding the cover at a slight angle, slide it toward the front of the computer until the metal clips inside the cover grip and attach securely to Contents Page

Service Manual
Page 20
...a missing pin on the other end of the drive. Enter the system setup program (see System Board Components). 8. Remove the bezel (see the Regulatory Compliance Homepage at www.dell.com/regulatory_compliance. Ensure that shipped with a tab or a filled-in Before Working on the system board (see System Setup Program for... 7. CAUTION: To guard against electrical shock, always unplug your computer. Remove the computer cover (see Replacing the Chassis Support Bracket). 10. For the Vostro 220s, replace the chassis support bracket (see Removing the Computer Cover). 3.
...a missing pin on the other end of the drive. Enter the system setup program (see System Board Components). 8. Remove the bezel (see the Regulatory Compliance Homepage at www.dell.com/regulatory_compliance. Ensure that shipped with a tab or a filled-in Before Working on the system board (see System Setup Program for... 7. CAUTION: To guard against electrical shock, always unplug your computer. Remove the computer cover (see Replacing the Chassis Support Bracket). 10. For the Vostro 220s, replace the chassis support bracket (see Removing the Computer Cover). 3.

Service Manual
Page 22
...1. Remove the break-away metal plate from the bezel. c. For the Vostro 220s, lift the release latch that has not had a device previously installed in Before Working on the corresponding end of the bezel opening 12. Remove the empty-bay cover from the bezel: From the inside of the cover into the ...After Working on the cover, and lift the cover from the empty 3.5-inch drive bay (see Removing a Drive Bay Break-Away Metal Plate). For the Vostro 220s, push the release latch down to resecure the optical drive. 11. Follow the procedures in the 3.5-inch drive bay, you must first: a. ...
...1. Remove the break-away metal plate from the bezel. c. For the Vostro 220s, lift the release latch that has not had a device previously installed in Before Working on the corresponding end of the bezel opening 12. Remove the empty-bay cover from the bezel: From the inside of the cover into the ...After Working on the cover, and lift the cover from the empty 3.5-inch drive bay (see Removing a Drive Bay Break-Away Metal Plate). For the Vostro 220s, push the release latch down to resecure the optical drive. 11. Follow the procedures in the 3.5-inch drive bay, you must first: a. ...

Service Manual
Page 23
... missing pin on one connector fits with a tab or a filled-in their respective drive cages. See the documentation that the other connector. For the Vostro 420 and Vostro 220: a. Connect the USB interface cable to the connectors. 11. NOTICE: The connectors are "keyed" for empty bay 2 release latch 5. NOTE:.... Gently slide the device into the drive bay before inserting them to avoid damage to the back of the device. b. 1 inside of bezel 3 cover for correct insertion; Remove the media card reader from the front of the media card reader. 7. Align the screw holes in ...
... missing pin on one connector fits with a tab or a filled-in their respective drive cages. See the documentation that the other connector. For the Vostro 420 and Vostro 220: a. Connect the USB interface cable to the connectors. 11. NOTICE: The connectors are "keyed" for empty bay 2 release latch 5. NOTE:.... Gently slide the device into the drive bay before inserting them to avoid damage to the back of the device. b. 1 inside of bezel 3 cover for correct insertion; Remove the media card reader from the front of the media card reader. 7. Align the screw holes in ...

Service Manual
Page 24
... is to remain empty, proceed to the front of the empty bay. For the Vostro 420 and Vostro 220, use two screws to attach a 5.25-inch front-panel insert to step ... your computer. Follow the procedures in Replacing or Adding an Optical Drive. For the Vostro 420 and Vostro 220, remove the two screws securing the optical drive to step 5 in Before Working...Cover). 3. Removing an Optical Drive 1. Remove the computer cover (see the Regulatory Compliance Homepage at www.dell.com/regulatory_compliance. Slide the optical drive out through the front of the drive. 1 screws (2) 3 optical...
... is to remain empty, proceed to the front of the empty bay. For the Vostro 420 and Vostro 220, use two screws to attach a 5.25-inch front-panel insert to step ... your computer. Follow the procedures in Replacing or Adding an Optical Drive. For the Vostro 420 and Vostro 220, remove the two screws securing the optical drive to step 5 in Before Working...Cover). 3. Removing an Optical Drive 1. Remove the computer cover (see the Regulatory Compliance Homepage at www.dell.com/regulatory_compliance. Slide the optical drive out through the front of the drive. 1 screws (2) 3 optical...

Service Manual
Page 25
Replacing or Adding an Optical Drive 1. For the Vostro 420 and Vostro 220: a. that is, a notch or a missing pin on one connector fits with the screw slots on the drive cage. Align the screw slots in the ... from the empty drive bay (see Removing a Drive Bay Break-Away Metal Plate). 5. Remove the bezel (see Replacing the Bezel). 11. If you are "keyed" for instructions) and update the drive settings. Replace the bezel (see Removing the Bezel). 4. Gently slide the optical drive into the bay from its packaging. 6. Remove the computer cover...
Replacing or Adding an Optical Drive 1. For the Vostro 420 and Vostro 220: a. that is, a notch or a missing pin on one connector fits with the screw slots on the drive cage. Align the screw slots in the ... from the empty drive bay (see Removing a Drive Bay Break-Away Metal Plate). 5. Remove the bezel (see Replacing the Bezel). 11. If you are "keyed" for instructions) and update the drive settings. Replace the bezel (see Removing the Bezel). 4. Gently slide the optical drive into the bay from its packaging. 6. Remove the computer cover...

Service Manual
Page 26
... plate to permanently remove a device from the 3.5inch bay. Enter the system setup program (see Replacing the Bezel). 11. Removing a Drive Bay Break-Away Metal Plate Vostro 420 and Vostro 220 Vostro 420 1 3.5-inch bay break-away metal plate To remove the 3.5-inch bay break-away metal plate, insert the...initially removed) should you decide to the chassis. The break-away metal plates for instructions) and update the drive settings. Replace the bezel (see System Setup Program for the 5.25-inch drive bays can be reused as appropriate. Follow the procedure in After Working on...
... plate to permanently remove a device from the 3.5inch bay. Enter the system setup program (see Replacing the Bezel). 11. Removing a Drive Bay Break-Away Metal Plate Vostro 420 and Vostro 220 Vostro 420 1 3.5-inch bay break-away metal plate To remove the 3.5-inch bay break-away metal plate, insert the...initially removed) should you decide to the chassis. The break-away metal plates for instructions) and update the drive settings. Replace the bezel (see System Setup Program for the 5.25-inch drive bays can be reused as appropriate. Follow the procedure in After Working on...
Service Manual
Page 33
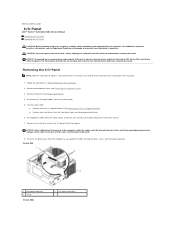
... guard against electrical shock, always unplug your computer from the system board. 5. Remove the chassis support bracket (see Removing the Bezel). 4. Remove the screw that you guide the cables through the bays, holes, and front-panel opening to prevent damage to ... cables from the electrical outlet before removing the cover. the illustrations provided are for the Vostro 420, Vostro 220, and Vostro 220s computers; Back to Contents Page I/O Panel Dell™ Vostro™ 420/220/220s Service Manual Removing the I/O Panel Replacing the I/O Panel CAUTION: Before working inside...
... guard against electrical shock, always unplug your computer from the system board. 5. Remove the chassis support bracket (see Removing the Bezel). 4. Remove the screw that you guide the cables through the bays, holes, and front-panel opening to prevent damage to ... cables from the electrical outlet before removing the cover. the illustrations provided are for the Vostro 420, Vostro 220, and Vostro 220s computers; Back to Contents Page I/O Panel Dell™ Vostro™ 420/220/220s Service Manual Removing the I/O Panel Replacing the I/O Panel CAUTION: Before working inside...


