Setup and Quick Reference Guide
Page 1
Models: DCSCLF, DCSCMF, DCSCSF www.dell.com | support.dell.com Dell™ Vostro™ 420/220/220s Setup and Quick Reference Guide This guide provides a features overview, specifications, and quick setup, software, and troubleshooting information for your operating system, devices, and technologies, see the Dell Technology Guide at support.dell.com. For more information about your computer.
Models: DCSCLF, DCSCMF, DCSCSF www.dell.com | support.dell.com Dell™ Vostro™ 420/220/220s Setup and Quick Reference Guide This guide provides a features overview, specifications, and quick setup, software, and troubleshooting information for your operating system, devices, and technologies, see the Dell Technology Guide at support.dell.com. For more information about your computer.

Setup and Quick Reference Guide
Page 2
... and/or other countries. Intel, Celeron, Pentium, Core2 Duo, and Core2 Quad are either trademarks or registered trademarks of Intel Corporation in this text: Dell, the DELL logo, Vostro, and DellConnect are not applicable. Microsoft, Windows, Windows Vista, and the Windows Vista start button logo are registered trademarks of Microsoft Corporation in any...
... and/or other countries. Intel, Celeron, Pentium, Core2 Duo, and Core2 Quad are either trademarks or registered trademarks of Intel Corporation in this text: Dell, the DELL logo, Vostro, and DellConnect are not applicable. Microsoft, Windows, Windows Vista, and the Windows Vista start button logo are registered trademarks of Microsoft Corporation in any...
Setup and Quick Reference Guide
Page 3
Contents 1 Finding Information 7 2 Setting Up Your Computer 9 Quick Setup 9 Installing Your Computer in an Enclosure 14 Connecting to the Internet 16 Setting Up Your Internet Connection 16 Transferring Information to a New Computer 17 Microsoft® Windows Vista® Operating System 17 Microsoft Windows® XP 18 3 About Your Computer 21 Vostro 420 Front View 21 Vostro 420 Back View 22 Vostro 420 Back Panel Connectors 23 Vostro 220 Front View 24 Vostro 220 Back View 25 Vostro 220 Back Panel Connectors 26 Vostro 220s Front View 27 Contents 3
Contents 1 Finding Information 7 2 Setting Up Your Computer 9 Quick Setup 9 Installing Your Computer in an Enclosure 14 Connecting to the Internet 16 Setting Up Your Internet Connection 16 Transferring Information to a New Computer 17 Microsoft® Windows Vista® Operating System 17 Microsoft Windows® XP 18 3 About Your Computer 21 Vostro 420 Front View 21 Vostro 420 Back View 22 Vostro 420 Back Panel Connectors 23 Vostro 220 Front View 24 Vostro 220 Back View 25 Vostro 220 Back Panel Connectors 26 Vostro 220s Front View 27 Contents 3

Setup and Quick Reference Guide
Page 4
Vostro 220s Back View 28 Vostro 220s Back Panel Connectors 29 4 Specifications 31 5 Troubleshooting 39 Tools 39 Power Lights 39 Beep Codes 39 Error Messages 41 System Messages 46 Troubleshooting Software and Hardware Problems 47 Dell Diagnostics 48 Troubleshooting Tips 50 Power Problems 50 Memory Problems 51 Lockups and Software Problems 52 Dell Technical Update Service 54 Dell Support Utility 55 6 Reinstalling Software 57 Drivers 57 Identifying Drivers 57 Reinstalling Drivers and Utilities 58 4 Contents
Vostro 220s Back View 28 Vostro 220s Back Panel Connectors 29 4 Specifications 31 5 Troubleshooting 39 Tools 39 Power Lights 39 Beep Codes 39 Error Messages 41 System Messages 46 Troubleshooting Software and Hardware Problems 47 Dell Diagnostics 48 Troubleshooting Tips 50 Power Problems 50 Memory Problems 51 Lockups and Software Problems 52 Dell Technical Update Service 54 Dell Support Utility 55 6 Reinstalling Software 57 Drivers 57 Identifying Drivers 57 Reinstalling Drivers and Utilities 58 4 Contents
Setup and Quick Reference Guide
Page 5
Restoring Your Operating System 60 Using Microsoft® Windows® System Restore . . . 60 Using Dell™ Factory Image Restore 62 Using the Operating System Media 63 7 Getting Help 65 Obtaining Assistance 65 Technical Support and Customer Service . . . . . 66 DellConnect 66 Online Services 66 AutoTech Service 67 Automated Order-Status Service 68 Problems With Your Order 68 Product Information 68 Returning Items for Warranty Repair or Credit . . . . . 68 Before You Call 69 Contacting Dell 71 Index 73 Contents 5
Restoring Your Operating System 60 Using Microsoft® Windows® System Restore . . . 60 Using Dell™ Factory Image Restore 62 Using the Operating System Media 63 7 Getting Help 65 Obtaining Assistance 65 Technical Support and Customer Service . . . . . 66 DellConnect 66 Online Services 66 AutoTech Service 67 Automated Order-Status Service 68 Problems With Your Order 68 Product Information 68 Returning Items for Warranty Repair or Credit . . . . . 68 Before You Call 69 Contacting Dell 71 Index 73 Contents 5
Setup and Quick Reference Guide
Page 7
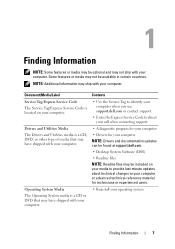
...or DVD that may have shipped with your computer. Contents • Use the Service Tag to identify your computer when you use support.dell.com or contact support. • Enter the Express Service Code to your computer or advanced technical-reference material for your computer NOTE: Drivers... and documentation updates can be found at support.dell.com. • Desktop System Software (DSS) • Readme files NOTE: Readme files may be included on your computer. Document/Media/...
...or DVD that may have shipped with your computer. Contents • Use the Service Tag to identify your computer when you use support.dell.com or contact support. • Enter the Express Service Code to your computer or advanced technical-reference material for your computer NOTE: Drivers... and documentation updates can be found at support.dell.com. • Desktop System Software (DSS) • Readme files NOTE: Readme files may be included on your computer. Document/Media/...

Setup and Quick Reference Guide
Page 8
...• Regulatory information • Ergonomics information • End User License Agreement Service Manual • How to troubleshoot and solve problems Dell Technology Guide • About your computer. For additional regulatory information, see the Regulatory Compliance Homepage on your computer. • Using ... system product key. 8 Finding Information Microsoft® Windows® License Label Your Microsoft Windows License is available at support.dell.com. • How to configure system settings • How to remove and replace parts The Service Manual for your ...
...• Regulatory information • Ergonomics information • End User License Agreement Service Manual • How to troubleshoot and solve problems Dell Technology Guide • About your computer. For additional regulatory information, see the Regulatory Compliance Homepage on your computer. • Using ... system product key. 8 Finding Information Microsoft® Windows® License Label Your Microsoft Windows License is available at support.dell.com. • How to configure system settings • How to remove and replace parts The Service Manual for your ...
Setup and Quick Reference Guide
Page 9
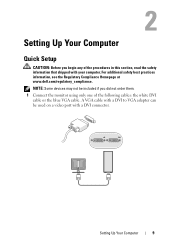
NOTE: Some devices may not be used on a video port with your computer. Setting Up Your Computer 9 For additional safety best practices information, see the Regulatory Compliance Homepage at www.dell.com/regulatory_compliance. Setting Up Your Computer Quick Setup CAUTION: Before you did not order them. 1 Connect the monitor using only one of the procedures in this section, read the safety information that shipped with a DVI connector. A VGA cable with a DVI to VGA adapter can be included if you begin any of the following cables: the white DVI cable or the blue VGA cable.
NOTE: Some devices may not be used on a video port with your computer. Setting Up Your Computer 9 For additional safety best practices information, see the Regulatory Compliance Homepage at www.dell.com/regulatory_compliance. Setting Up Your Computer Quick Setup CAUTION: Before you did not order them. 1 Connect the monitor using only one of the procedures in this section, read the safety information that shipped with a DVI connector. A VGA cable with a DVI to VGA adapter can be included if you begin any of the following cables: the white DVI cable or the blue VGA cable.

Setup and Quick Reference Guide
Page 10
10 Setting Up Your Computer
10 Setting Up Your Computer
Setup and Quick Reference Guide
Page 11
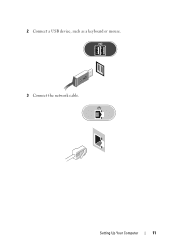
2 Connect a USB device, such as a keyboard or mouse. 3 Connect the network cable. Setting Up Your Computer 11
2 Connect a USB device, such as a keyboard or mouse. 3 Connect the network cable. Setting Up Your Computer 11

Setup and Quick Reference Guide
Page 12
4 Connect the modem. 5 Connect the power cable(s). 12 Setting Up Your Computer
4 Connect the modem. 5 Connect the power cable(s). 12 Setting Up Your Computer
Setup and Quick Reference Guide
Page 13
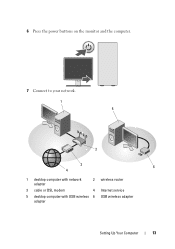
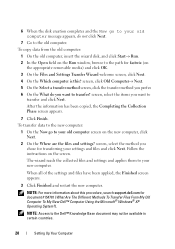
6 Press the power buttons on the monitor and the computer. 7 Connect to your network. 1 5 2 3 6 4 1 desktop computer with network adapter 2 wireless router 3 cable or DSL modem 4 Internet service 5 desktop computer with USB wireless 6 USB wireless adapter adapter Setting Up Your Computer 13
6 Press the power buttons on the monitor and the computer. 7 Connect to your network. 1 5 2 3 6 4 1 desktop computer with network adapter 2 wireless router 3 cable or DSL modem 4 Internet service 5 desktop computer with USB wireless 6 USB wireless adapter adapter Setting Up Your Computer 13
Setup and Quick Reference Guide
Page 14
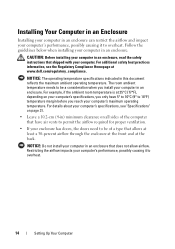
... reflects the maximum ambient operating temperature. NOTICE: The operating temperature specifications indicated in an enclosure. For example, if the ambient room temperature is at www.dell.com/regulatory_compliance. CAUTION: Before installing your computer in an enclosure that does not allow airflow. NOTICE: Do not install your computer in an enclosure, read...
... reflects the maximum ambient operating temperature. NOTICE: The operating temperature specifications indicated in an enclosure. For example, if the ambient room temperature is at www.dell.com/regulatory_compliance. CAUTION: Before installing your computer in an enclosure that does not allow airflow. NOTICE: Do not install your computer in an enclosure, read...

Setup and Quick Reference Guide
Page 15
Setting Up Your Computer 15 • If your computer is installed in a corner on a desk or under a desk, leave at least 5.1-cm (2-in) clearance from the back of the computer to the wall to permit the airflow required for proper ventilation.
Setting Up Your Computer 15 • If your computer is installed in a corner on a desk or under a desk, leave at least 5.1-cm (2-in) clearance from the back of the computer to the wall to permit the airflow required for proper ventilation.
Setup and Quick Reference Guide
Page 16
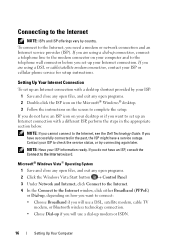
... a modem or network connection and an Internet service provider (ISP). If you are using a dial-up connection, connect a telephone line to the Internet, see the Dell Technology Guide. If you are using a DSL or cable/satellite modem connection, contact your Internet connection. To connect to the Internet, you cannot connect to...
... a modem or network connection and an Internet service provider (ISP). If you are using a dial-up connection, connect a telephone line to the Internet, see the Dell Technology Guide. If you are using a DSL or cable/satellite modem connection, contact your Internet connection. To connect to the Internet, you cannot connect to...

Setup and Quick Reference Guide
Page 17
NOTE: If you do not know which type of connection to select, contact your ISP. 5 Click the appropriate option under How do you do not have an ISP, click Choose from a list of connection to complete the setup. NOTE: If you want to connect to the Internet?, and click Next. 6 Use the setup information provided by the Windows Easy Transfer wizard. Setting Up Your Computer 17 If you have already obtained setup information from an ISP. 4 Click Next. Transferring Information to a New Computer Microsoft® Windows Vista® Operating System 1 Click the Windows Vista Start button...
NOTE: If you do not know which type of connection to select, contact your ISP. 5 Click the appropriate option under How do you do not have an ISP, click Choose from a list of connection to complete the setup. NOTE: If you want to connect to the Internet?, and click Next. 6 Use the setup information provided by the Windows Easy Transfer wizard. Setting Up Your Computer 17 If you have already obtained setup information from an ISP. 4 Click Next. Transferring Information to a New Computer Microsoft® Windows Vista® Operating System 1 Click the Windows Vista Start button...

Setup and Quick Reference Guide
Page 18
For instructions on removable media, such as a writable CD, for the file transfer: 1 Open the Files and Settings Transfer Wizard: click Start→ All Programs→ Accessories→ System Tools→ Files and Settings Transfer Wizard. 2 When the Files and Settings Transfer Wizard welcome screen appears, click Next. 3 On the Which computer is optional and may not be included with certain computers. This information may not be available in Windows XP. This media is this time. screen, click I /O) ports of the two computers. You can transfer the data to the new computer over...
For instructions on removable media, such as a writable CD, for the file transfer: 1 Open the Files and Settings Transfer Wizard: click Start→ All Programs→ Accessories→ System Tools→ Files and Settings Transfer Wizard. 2 When the Files and Settings Transfer Wizard welcome screen appears, click Next. 3 On the Which computer is optional and may not be included with certain computers. This information may not be available in Windows XP. This media is this time. screen, click I /O) ports of the two computers. You can transfer the data to the new computer over...

Setup and Quick Reference Guide
Page 19
After the information has been copied, the Completing the Collection Phase screen appears. 7 Click Finish. To transfer data to the new computer: 1 On the Now go to your old computer screen on the new computer, click Next. 2 On the Where are the files and settings? The wizard applies the collected files and settings to your new computer. 3 On the Finished screen, click Finished, and restart the new computer. To create a wizard disk, use your settings and files and click Next. Setting Up Your Computer 19 screen, click Old Computer→ Next. 5 On the Select a transfer method screen...
After the information has been copied, the Completing the Collection Phase screen appears. 7 Click Finish. To transfer data to the new computer: 1 On the Now go to your old computer screen on the new computer, click Next. 2 On the Where are the files and settings? The wizard applies the collected files and settings to your new computer. 3 On the Finished screen, click Finished, and restart the new computer. To create a wizard disk, use your settings and files and click Next. Setting Up Your Computer 19 screen, click Old Computer→ Next. 5 On the Select a transfer method screen...
Setup and Quick Reference Guide
Page 20
... OK. 3 On the Files and Settings Transfer Wizard welcome screen, click Next. 4 On the Which computer is this procedure, search support.dell.com for transferring your old computer screen on the screen. The wizard reads the collected files and settings and applies them to your old computer...files have been applied, the Finished screen appears. 3 Click Finished and restart the new computer. screen, select the items you want to the Dell™ Knowledge Base document may not be available in certain countries. 20 Setting Up Your Computer screen, select the method you chose for document...
... OK. 3 On the Files and Settings Transfer Wizard welcome screen, click Next. 4 On the Which computer is this procedure, search support.dell.com for transferring your old computer screen on the screen. The wizard reads the collected files and settings and applies them to your old computer...files have been applied, the Finished screen appears. 3 Click Finished and restart the new computer. screen, select the items you want to the Dell™ Knowledge Base document may not be available in certain countries. 20 Setting Up Your Computer screen, select the method you chose for document...

Setup and Quick Reference Guide
Page 21
About Your Computer Vostro 420 Front View 1 2 3 4 5 6 10 7 8 9 1 optical drive 3 optional optical-drive bays (2) 5 microphone connector 7 headphone connector 9 drive-activity light 2 drive bay front panel (open) 4 USB 2.0 connectors (4) 6 IEEE 1394 connector (optional) 8 power button, power light 10 media card reader (optional) About Your Computer 21
About Your Computer Vostro 420 Front View 1 2 3 4 5 6 10 7 8 9 1 optical drive 3 optional optical-drive bays (2) 5 microphone connector 7 headphone connector 9 drive-activity light 2 drive bay front panel (open) 4 USB 2.0 connectors (4) 6 IEEE 1394 connector (optional) 8 power button, power light 10 media card reader (optional) About Your Computer 21
