Setup and Features Information Tech Sheet
Page 2
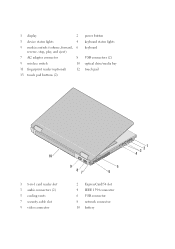
1 display 2 3 device status lights 4 5 media controls (volume, forward, 6 reverse, stop, play, and eject) 7 AC adapter connector 8 9 wireless switch 10 11 fingerprint reader (optional) 12 13 touch pad buttons (2) power button keyboard status lights keyboard USB connectors (2) optical drive/media bay touch pad 10 1 8-in-1 card reader slot 3 audio connectors (2) 5 cooling vents 7 security cable slot 9 video connector 9 87 5 6 2 ExpressCard/54 slot 4 IEEE 1394 connector 6 USB connector 8 network connector 10 battery 3 21 4
1 display 2 3 device status lights 4 5 media controls (volume, forward, 6 reverse, stop, play, and eject) 7 AC adapter connector 8 9 wireless switch 10 11 fingerprint reader (optional) 12 13 touch pad buttons (2) power button keyboard status lights keyboard USB connectors (2) optical drive/media bay touch pad 10 1 8-in-1 card reader slot 3 audio connectors (2) 5 cooling vents 7 security cable slot 9 video connector 9 87 5 6 2 ExpressCard/54 slot 4 IEEE 1394 connector 6 USB connector 8 network connector 10 battery 3 21 4
Setup and Features Information Tech Sheet
Page 4
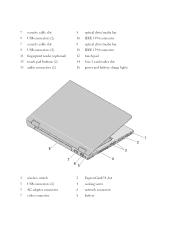
7 security cable slot 9 USB connectors (2) 7 security cable slot 9 USB connectors (2) 11 fingerprint reader (optional) 13 touch pad buttons (2) 15 audio connectors (2) 8 optical drive/media bay 10 IEEE 1394 connector 8 optical drive/media bay 10 IEEE 1394 connector 12 touch pad 14 8-in-1 card reader slot 16 power and battery charge lights 8 7 4 65 1 wireless switch 3 USB connectors (2) 5 AC adapter connector 7 video connector 2 ExpressCard/54 slot 4 cooling vents 6 network connector 8 battery 1 2 3
7 security cable slot 9 USB connectors (2) 7 security cable slot 9 USB connectors (2) 11 fingerprint reader (optional) 13 touch pad buttons (2) 15 audio connectors (2) 8 optical drive/media bay 10 IEEE 1394 connector 8 optical drive/media bay 10 IEEE 1394 connector 12 touch pad 14 8-in-1 card reader slot 16 power and battery charge lights 8 7 4 65 1 wireless switch 3 USB connectors (2) 5 AC adapter connector 7 video connector 2 ExpressCard/54 slot 4 cooling vents 6 network connector 8 battery 1 2 3
Setup and Features Information Tech Sheet
Page 5
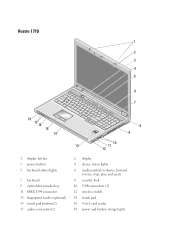
Vostro 1710 1 2 3 4 5 6 9 7 A 18 17 16 15 14 8 9 10 13 11 12 1 display latches 3 power button 5 keyboard status lights 7 keyboard 9 optical drive/media bay 11 IEEE 1394 connector 13 fingerprint reader (optional) 15 touch pad buttons(2) 17 audio connectors(2) 2 display 4 device status lights 6 media controls (volume, forward, reverse, stop, play, and eject) 8 security lock 10 USB connectors (2) 12 wireless switch 14 touch pad 16 8-in-1 card reader 18 power and battery charge lights
Vostro 1710 1 2 3 4 5 6 9 7 A 18 17 16 15 14 8 9 10 13 11 12 1 display latches 3 power button 5 keyboard status lights 7 keyboard 9 optical drive/media bay 11 IEEE 1394 connector 13 fingerprint reader (optional) 15 touch pad buttons(2) 17 audio connectors(2) 2 display 4 device status lights 6 media controls (volume, forward, reverse, stop, play, and eject) 8 security lock 10 USB connectors (2) 12 wireless switch 14 touch pad 16 8-in-1 card reader 18 power and battery charge lights

Setup and Features Information Tech Sheet
Page 6
... indicate a problem with the fan or the computer. Do not store your computer. For additional best practices information see www.dell.com/regulatory_compliance. 9 8 7 4 5 6 1 2 3 1 USB connector 3 USB connectors (2) 5 USB connector 7 network connector 9 battery 2 ExpressCard/54 slot 4 cooling vents 6 AC adapter connector 8 video connector WARNING: Do not block, push objects into, or allow dust... turns on the fan when the computer gets hot. However, power connectors and power strips vary among countries. WARNING: The AC adapter works with your Dell™ computer in the air vents.
... indicate a problem with the fan or the computer. Do not store your computer. For additional best practices information see www.dell.com/regulatory_compliance. 9 8 7 4 5 6 1 2 3 1 USB connector 3 USB connectors (2) 5 USB connector 7 network connector 9 battery 2 ExpressCard/54 slot 4 cooling vents 6 AC adapter connector 8 video connector WARNING: Do not block, push objects into, or allow dust... turns on the fan when the computer gets hot. However, power connectors and power strips vary among countries. WARNING: The AC adapter works with your Dell™ computer in the air vents.
Setup and Features Information Tech Sheet
Page 9
... 9-cell 8-cell Coin-cell battery "smart lithium ion" Vostro 1310 - 4-cell, 6-cell and 9-cell Vostro 1510 and Vostro 2510 - 6-cell and 9-cell Vostro 1710 - 6-cell and 8-cell 50.3 mm (1.980 inches) 72 mm (2.835 inches) Vostro 1310 - 19.9 mm (0.783 inch) Vostro 1310 - 20.7 mm (0.815 inch) Vostro 1510 and 2510 - 19.9 mm (0.783 inch) Vostro 1510 and 2510 - 20.7 mm (0.815...
... 9-cell 8-cell Coin-cell battery "smart lithium ion" Vostro 1310 - 4-cell, 6-cell and 9-cell Vostro 1510 and Vostro 2510 - 6-cell and 9-cell Vostro 1710 - 6-cell and 8-cell 50.3 mm (1.980 inches) 72 mm (2.835 inches) Vostro 1310 - 19.9 mm (0.783 inch) Vostro 1310 - 20.7 mm (0.815 inch) Vostro 1510 and 2510 - 19.9 mm (0.783 inch) Vostro 1510 and 2510 - 20.7 mm (0.815...
Setup and Features Information Tech Sheet
Page 11
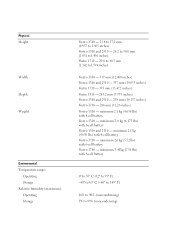
... (1.142 to1.594 inches) Vostro 1310 - 317 mm (12.480 inches) Vostro 1510 and 2510 - 357 mm (14.055 inches) Vostro 1710 - 393 mm (15.472 inches) Vostro 1310 - 243.2 mm (9.575 inches) Vostro 1510 and 2510 - 258 mm (10.157 inches) Vostro 1710 - 286 mm (11.26 inches) Vostro 1310 - minimum 2.1 kg (4.630 lbs) with 6-cell battery Vostro 1510 and...
... (1.142 to1.594 inches) Vostro 1310 - 317 mm (12.480 inches) Vostro 1510 and 2510 - 357 mm (14.055 inches) Vostro 1710 - 393 mm (15.472 inches) Vostro 1310 - 243.2 mm (9.575 inches) Vostro 1510 and 2510 - 258 mm (10.157 inches) Vostro 1710 - 286 mm (11.26 inches) Vostro 1310 - minimum 2.1 kg (4.630 lbs) with 6-cell battery Vostro 1510 and...
Setup and Quick Reference Guide
Page 3
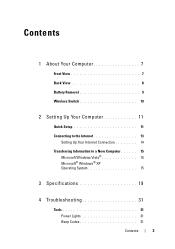
Contents 1 About Your Computer 7 Front View 7 Back View 8 Battery Removal 9 Wireless Switch 10 2 Setting Up Your Computer 11 Quick Setup 11 Connecting to the Internet 13 Setting Up Your Internet Connection 14 Transferring Information to a New Computer 15 Microsoft Windows Vista 15 Microsoft® Windows® XP Operating System 15 3 Specifications 19 4 Troubleshooting 31 Tools 31 Power Lights 31 Beep Codes 31 Contents 3
Contents 1 About Your Computer 7 Front View 7 Back View 8 Battery Removal 9 Wireless Switch 10 2 Setting Up Your Computer 11 Quick Setup 11 Connecting to the Internet 13 Setting Up Your Internet Connection 14 Transferring Information to a New Computer 15 Microsoft Windows Vista 15 Microsoft® Windows® XP Operating System 15 3 Specifications 19 4 Troubleshooting 31 Tools 31 Power Lights 31 Beep Codes 31 Contents 3
Setup and Quick Reference Guide
Page 8
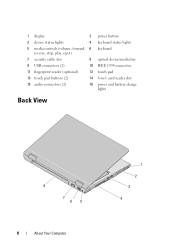
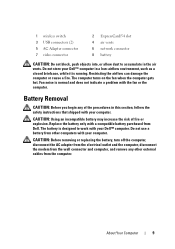
1 display 2 3 device status lights 4 5 media controls (volume, forward, 6 reverse, stop, play, eject) 7 security cable slot 8 9 USB connectors (2) 10 11 fingerprint reader (optional) 12 13 touch pad buttons (2) 14 15 audio connectors (2) 16 power button keyboard status lights keyboard optical device/media bay IEEE 1394 connector touch pad 8-in-1 card reader slot power and battery charge lights Back View 8 7 65 8 About Your Computer 1 2 3 4
1 display 2 3 device status lights 4 5 media controls (volume, forward, 6 reverse, stop, play, eject) 7 security cable slot 8 9 USB connectors (2) 10 11 fingerprint reader (optional) 12 13 touch pad buttons (2) 14 15 audio connectors (2) 16 power button keyboard status lights keyboard optical device/media bay IEEE 1394 connector touch pad 8-in-1 card reader slot power and battery charge lights Back View 8 7 65 8 About Your Computer 1 2 3 4
Setup and Quick Reference Guide
Page 9
... computer gets hot. CAUTION: Using an incompatible battery may increase the risk of the procedures in this section, follow the safety instructions that shipped with your Dell™ computer. Replace the battery only with your computer. The battery is designed to accumulate in a low-airflow ... and computer, and remove any of fire or explosion. Fan noise is running. Do not use a battery from Dell. CAUTION: Before removing or replacing the battery, turn off the computer, disconnect the AC adapter from the electrical outlet and the computer, disconnect the modem...
... computer gets hot. CAUTION: Using an incompatible battery may increase the risk of the procedures in this section, follow the safety instructions that shipped with your Dell™ computer. Replace the battery only with your computer. The battery is designed to accumulate in a low-airflow ... and computer, and remove any of fire or explosion. Fan noise is running. Do not use a battery from Dell. CAUTION: Before removing or replacing the battery, turn off the computer, disconnect the AC adapter from the electrical outlet and the computer, disconnect the modem...
Setup and Quick Reference Guide
Page 10
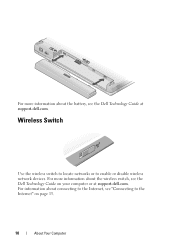
For more information about the wireless switch, see the Dell Technology Guide on page 13. 10 About Your Computer Wireless Switch Use the wireless switch to locate networks or to the Internet" on your computer or at support.dell.com. For more information about connecting to the Internet, see the Dell Technology Guide at support.dell.com. For information about the battery, see "Connecting to enable or disable wireless network devices.
For more information about the wireless switch, see the Dell Technology Guide on page 13. 10 About Your Computer Wireless Switch Use the wireless switch to locate networks or to the Internet" on your computer or at support.dell.com. For more information about connecting to the Internet, see the Dell Technology Guide at support.dell.com. For information about the battery, see "Connecting to enable or disable wireless network devices.
Setup and Quick Reference Guide
Page 26
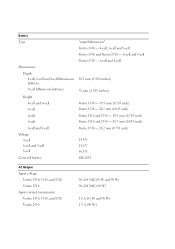
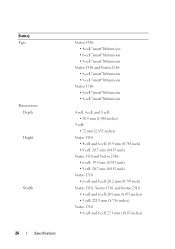
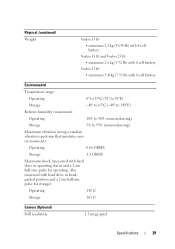
Battery Type Dimensions: Depth Height Width 26 Specifications Vostro 1310: • 4-cell "smart" lithium ion • 6-cell "smart" lithium ion • 9-cell "smart" lithium ion Vostro 1510 and Vostro 2510: • 6-cell "smart" lithium ion • 9-cell "smart" lithium ion Vostro 1710: • 6-cell "smart" lithium ion • 8-cell "smart" lithium ion 4 cell, 6 cell, and 8 cell: •...
Battery Type Dimensions: Depth Height Width 26 Specifications Vostro 1310: • 4-cell "smart" lithium ion • 6-cell "smart" lithium ion • 9-cell "smart" lithium ion Vostro 1510 and Vostro 2510: • 6-cell "smart" lithium ion • 9-cell "smart" lithium ion Vostro 1710: • 6-cell "smart" lithium ion • 8-cell "smart" lithium ion 4 cell, 6 cell, and 8 cell: •...
Setup and Quick Reference Guide
Page 27
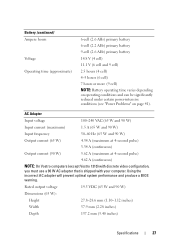
...(1.10-1.12 inches) Width 57.9 mm (2.28 inches) Depth 137.2 mm (5.40 inches) Specifications 27 Battery (continued) Ampere hours Voltage Operating time (approximate) 6-cell (2.6 AHr) primary battery 6-cell (2.2 AHr) primary battery 9-cell (2.6 AHr) primary battery 14.8 V (4 cell) 11.1 V (6 cell and 9 cell) 2.5 hours (4 cell) 4-5 ... pulse) 3.34 A (continuous) Output current (90 W) 5.62 A (maximum at 4-second pulse) 4.62 A (continuous) NOTE: On Vostro computers (except Vostro 1310) with discrete video configuration, you must use a 90 W AC adapter that is shipped with your computer.
...(1.10-1.12 inches) Width 57.9 mm (2.28 inches) Depth 137.2 mm (5.40 inches) Specifications 27 Battery (continued) Ampere hours Voltage Operating time (approximate) 6-cell (2.6 AHr) primary battery 6-cell (2.2 AHr) primary battery 9-cell (2.6 AHr) primary battery 14.8 V (4 cell) 11.1 V (6 cell and 9 cell) 2.5 hours (4 cell) 4-5 ... pulse) 3.34 A (continuous) Output current (90 W) 5.62 A (maximum at 4-second pulse) 4.62 A (continuous) NOTE: On Vostro computers (except Vostro 1310) with discrete video configuration, you must use a 90 W AC adapter that is shipped with your computer.
Setup and Quick Reference Guide
Page 29
...: • minimum 2.1 kg (4.630 lb) with 4-cell battery Vostro 1510 and Vostro 2510: • minimum 2.6 kg (5.72 lb) with 6-cell battery Vostro 1710: • minimum 3.41kg (7.51 lb) with 8-cell battery Environmental Temperature range: Operating 0° to 35°C (32° to 95°F) Storage -40° to 65°C (-40° to 149°F) Relative ...
...: • minimum 2.1 kg (4.630 lb) with 4-cell battery Vostro 1510 and Vostro 2510: • minimum 2.6 kg (5.72 lb) with 6-cell battery Vostro 1710: • minimum 3.41kg (7.51 lb) with 8-cell battery Environmental Temperature range: Operating 0° to 35°C (32° to 95°F) Storage -40° to 65°C (-40° to 149°F) Relative ...
Setup and Quick Reference Guide
Page 33
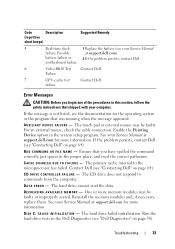
For an external mouse, check the cable connection. If the problem persists, contact Dell (see "Contacting Dell" on page 38). BA D C O M M A N D O R FILE N A M E - C D D R I V E C O N T R O L L E R F A I L A B L E M E M O R Y - battery failure or 2 If the problem persists, contact Dell. failure Error Messages CAUTION: Before you have spelled the command correctly, put spaces in this section, follow the safety instructions that was running when...
For an external mouse, check the cable connection. If the problem persists, contact Dell (see "Contacting Dell" on page 38). BA D C O M M A N D O R FILE N A M E - C D D R I V E C O N T R O L L E R F A I L A B L E M E M O R Y - battery failure or 2 If the problem persists, contact Dell. failure Error Messages CAUTION: Before you have spelled the command correctly, put spaces in this section, follow the safety instructions that was running when...
Setup and Quick Reference Guide
Page 38
... Y C L O C K L O S T P O W E R - If the message reappears, contact Dell (see "Dell Diagnostics" on page 43) and run the Dell Diagnostics before you begin any of charge. Replace the battery, or connect the computer to restore the data by entering the system setup program, then immediately exit...Software Problems" on page 38). O F - System configuration settings are corrupted. TI M E- The reserve battery that shipped with your Service Manual at support.dell.com for more information. See your computer. Insert a disk into the drive and try to an electrical outlet...
... Y C L O C K L O S T P O W E R - If the message reappears, contact Dell (see "Dell Diagnostics" on page 43) and run the Dell Diagnostics before you begin any of charge. Replace the battery, or connect the computer to restore the data by entering the system setup program, then immediately exit...Software Problems" on page 38). O F - System configuration settings are corrupted. TI M E- The reserve battery that shipped with your Service Manual at support.dell.com for more information. See your computer. Insert a disk into the drive and try to an electrical outlet...
Service Manual
Page 1
...Corporation in trademarks and trade names other countries. All rights reserved. Dell Inc. Dell™ Vostro™ 2510 Service Manual Troubleshooting Before Working on Your Computer Hard Drive Wireless ...Local Area Network (WLAN) Card Fan Processor Heat Sink Processor Module Memory Hinge Cover Keyboard Display Palm Rest Fingerprint Reader Internal Card With Bluetooth® Wireless Technology Optical Drive System Board Assembly Speaker Assembly USB Daughter Card Battery...
...Corporation in trademarks and trade names other countries. All rights reserved. Dell Inc. Dell™ Vostro™ 2510 Service Manual Troubleshooting Before Working on Your Computer Hard Drive Wireless ...Local Area Network (WLAN) Card Fan Processor Heat Sink Processor Module Memory Hinge Cover Keyboard Display Palm Rest Fingerprint Reader Internal Card With Bluetooth® Wireless Technology Optical Drive System Board Assembly Speaker Assembly USB Daughter Card Battery...
Service Manual
Page 8
.... Windows Vista: Click Start and click Computer. Viruses can sometimes prevent Windows from recognizing the drive. See Dell Diagnostics. NOTE: Because of a new battery exploding if it is not listed, perform a full scan with your computer, read the safety information that ... Insert another disc to the manufacturer's instructions. Clean the drive or disk - Run the Dell Diagnostics - Test the drive - See Hardware Troubleshooter. Discard used batteries according to eliminate the possibility that shipped with the same or equivalent type recommended by the manufacturer...
.... Windows Vista: Click Start and click Computer. Viruses can sometimes prevent Windows from recognizing the drive. See Dell Diagnostics. NOTE: Because of a new battery exploding if it is not listed, perform a full scan with your computer, read the safety information that ... Insert another disc to the manufacturer's instructions. Clean the drive or disk - Run the Dell Diagnostics - Test the drive - See Hardware Troubleshooter. Discard used batteries according to eliminate the possibility that shipped with the same or equivalent type recommended by the manufacturer...
Service Manual
Page 17
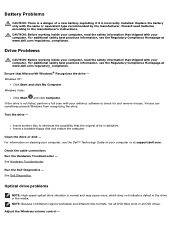
... network wall jack. 4. In Windows XP, click Start Shutdown Shutdown. Do not use only the battery designed for this particular Dell computer. Slide the battery release latch to the open position. (You may need to turn off and not in the open position. 8. .... , click the arrow icon, and then click Shut Down to hold the power button for other Dell computers. 6. Slide the battery out of the battery bay. 1 battery 2 battery lock 3 battery latch release Remove any telephone or network cables from the ExpressCard slot and the 8-in-1 memory card reader...
... network wall jack. 4. In Windows XP, click Start Shutdown Shutdown. Do not use only the battery designed for this particular Dell computer. Slide the battery release latch to the open position. (You may need to turn off and not in the open position. 8. .... , click the arrow icon, and then click Shut Down to hold the power button for other Dell computers. 6. Slide the battery out of the battery bay. 1 battery 2 battery lock 3 battery latch release Remove any telephone or network cables from the ExpressCard slot and the 8-in-1 memory card reader...
Service Manual
Page 32
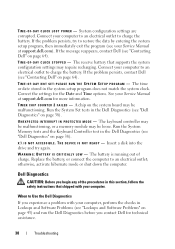
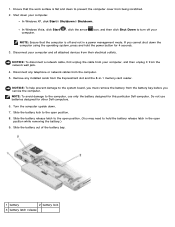
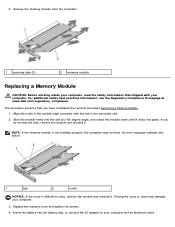
... computer may damage your computer, read the safety information that you do not feel the click, remove the module and reinstall it. Insert the battery into the battery bay, or connect the AC adapter to close may not boot. If you have completed the removal procedure Removing a Memory Module. 1. Align the notch... angle, and rotate the module down until it . 5. Forcing the cover to close , remove the module and reinstall it clicks into the slot at www.dell.com/regulatory_compliance.
... computer may damage your computer, read the safety information that you do not feel the click, remove the module and reinstall it. Insert the battery into the battery bay, or connect the AC adapter to close may not boot. If you have completed the removal procedure Removing a Memory Module. 1. Align the notch... angle, and rotate the module down until it . 5. Forcing the cover to close , remove the module and reinstall it clicks into the slot at www.dell.com/regulatory_compliance.
Service Manual
Page 66
... button is not secured to the latch assembly and can be reinstalled. 14. Back to Contents Page Battery Latch Assembly Dell™ Vostro™ 2510 Service Manual Removing the Battery Latch Assembly Replacing the Battery Latch Assembly Removing the Battery Latch Assembly CAUTION: Before working inside your computer. For additional safety best practices information, see Removing the...
... button is not secured to the latch assembly and can be reinstalled. 14. Back to Contents Page Battery Latch Assembly Dell™ Vostro™ 2510 Service Manual Removing the Battery Latch Assembly Replacing the Battery Latch Assembly Removing the Battery Latch Assembly CAUTION: Before working inside your computer. For additional safety best practices information, see Removing the...


