Setup and Quick Reference Guide
Page 34
... out of memory recorded in nonvolatile memory (NVRAM) does not match the memory installed in the hard drive bay. H A R D - Run the Hard Disk Drive tests in the bay before it can continue. Shut down the computer, remove the hard drive (see "Dell Diagnostics" on page 64). The computer cannot identify the ExpressCard. Restart the computer. GATE A20 FAILURE...
... out of memory recorded in nonvolatile memory (NVRAM) does not match the memory installed in the hard drive bay. H A R D - Run the Hard Disk Drive tests in the bay before it can continue. Shut down the computer, remove the hard drive (see "Dell Diagnostics" on page 64). The computer cannot identify the ExpressCard. Restart the computer. GATE A20 FAILURE...
Setup and Quick Reference Guide
Page 35
... cable connection. Restart the computer, and avoid touching the keyboard or keys during the boot routine. HA R D -DISK DRIVE FAILURE - If the problem persists, try another drive. Then, shut down the computer, remove the hard drive (see "Dell Diagnostics" on page 38). The operating system is trying to boot to occur after a memory module is most...
... cable connection. Restart the computer, and avoid touching the keyboard or keys during the boot routine. HA R D -DISK DRIVE FAILURE - If the problem persists, try another drive. Then, shut down the computer, remove the hard drive (see "Dell Diagnostics" on page 38). The operating system is trying to boot to occur after a memory module is most...
Setup and Quick Reference Guide
Page 37
... to check the file structure on page 38). A chip on the hard drive. Reinstall the hard drive (see "Dell Diagnostics" on page 38). The operating system cannot find a specific track on the hard drive. The optional ROM has failed. run the Dell Diagnostics (see "Dell Diagnostics" on page 38). A R E Q U I R E D . Remove and then reinstall the program. SECTOR NOT FOUND - The operating...
... to check the file structure on page 38). A chip on the hard drive. Reinstall the hard drive (see "Dell Diagnostics" on page 38). The operating system cannot find a specific track on the hard drive. The optional ROM has failed. run the Dell Diagnostics (see "Dell Diagnostics" on page 38). A R E Q U I R E D . Remove and then reinstall the program. SECTOR NOT FOUND - The operating...
Setup and Quick Reference Guide
Page 49
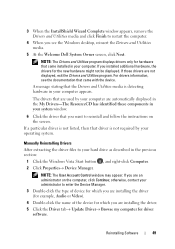
...-click Computer. 2 Click Properties→ Device Manager. Reinstalling Software 49 otherwise, contact your hard drive as described in your operating system. If you want to reinstall and follow the instructions on...see the Windows desktop, reinsert the Drivers and Utilities media. 5 At the Welcome Dell System Owner screen, click Next. NOTE: The Drivers and Utilities program displays drivers ... are an administrator on the screen. 3 When the InstallShield Wizard Complete window appears, remove the Drivers and Utilities media and click Finish to restart the computer. 4 When you...
...-click Computer. 2 Click Properties→ Device Manager. Reinstalling Software 49 otherwise, contact your hard drive as described in your operating system. If you want to reinstall and follow the instructions on...see the Windows desktop, reinsert the Drivers and Utilities media. 5 At the Welcome Dell System Owner screen, click Next. NOTE: The Drivers and Utilities program displays drivers ... are an administrator on the screen. 3 When the InstallShield Wizard Complete window appears, remove the Drivers and Utilities media and click Finish to restart the computer. 4 When you...
Setup and Quick Reference Guide
Page 50
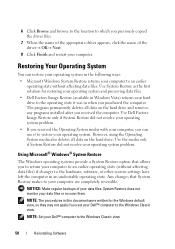
... all data on the hard drive and removes any programs installed after you previously copied the driver files. 7 When the name of the appropriate driver appears, click the name of your data files or recover them. 6 Click Browse and browse to the location to which you received the computer. Use Dell Factory Image Restore...
... all data on the hard drive and removes any programs installed after you previously copied the driver files. 7 When the name of the appropriate driver appears, click the name of your data files or recover them. 6 Click Browse and browse to the location to which you received the computer. Use Dell Factory Image Restore...
Setup and Quick Reference Guide
Page 52
... Restore did not resolve your operating system. NOTE: Dell Factory Image Restore may not be available in when you received your hard drive to Windows XP. Therefore, the steps below apply only to the operating state it was in certain countries or on the hard drive and removes any programs or drivers installed after you purchased...
... Restore did not resolve your operating system. NOTE: Dell Factory Image Restore may not be available in when you received your hard drive to Windows XP. Therefore, the steps below apply only to the operating state it was in certain countries or on the hard drive and removes any programs or drivers installed after you purchased...

Service Manual
Page 19
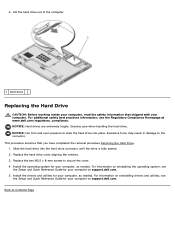
.... 2. Pull the mylar tab to Contents Page Hard Drive Dell™ Vostro™ 2510 Service Manual Removing the Hard Drive Replacing the Hard Drive NOTE: Dell does not guarantee compatibility or provide support for hard drives obtained from the computer while the drive is not in the computer, store the drive in protective antistatic packaging. 5. NOTICE: Hard drives are extremely fragile. Remove the two M2.5 x 8-mm screws that...
.... 2. Pull the mylar tab to Contents Page Hard Drive Dell™ Vostro™ 2510 Service Manual Removing the Hard Drive Replacing the Hard Drive NOTE: Dell does not guarantee compatibility or provide support for hard drives obtained from the computer while the drive is not in the computer, store the drive in protective antistatic packaging. 5. NOTICE: Hard drives are extremely fragile. Remove the two M2.5 x 8-mm screws that...
Service Manual
Page 20
... inside your computer, read the safety information that you have completed the removal procedure Removing the Hard Drive. 1. Exercise care when handling the hard drive. Install the operating system for your computer on reinstalling drivers and utilities, see the Regulatory Compliance Homepage at www.dell.com/regulatory_compliance. Back to the connector. Excessive force may result in damage...
... inside your computer, read the safety information that you have completed the removal procedure Removing the Hard Drive. 1. Exercise care when handling the hard drive. Install the operating system for your computer on reinstalling drivers and utilities, see the Regulatory Compliance Homepage at www.dell.com/regulatory_compliance. Back to the connector. Excessive force may result in damage...
Service Manual
Page 21
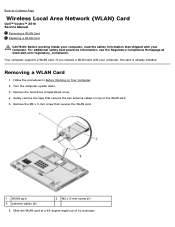
...hard drive compartment cover. 4. Your computer supports a WLAN card. Follow the procedures in Before Working on top of its connector. Slide the WLAN card at www.dell.com/regulatory_compliance. Removing a WLAN Card 1. Turn the computer upside down. 3. Gently remove the tape that secures the WLAN card. 1 WLAN card 3 antenna cables (2) 2 M2 x 3-mm screw (1) 6. Remove... the M2 x 3-mm screw that secures the two antenna cables on Your Computer. 2. Back to Contents Page Wireless Local Area Network (WLAN) Card Dell™ Vostro™ 2510 Service Manual Removing a ...
...hard drive compartment cover. 4. Your computer supports a WLAN card. Follow the procedures in Before Working on top of its connector. Slide the WLAN card at www.dell.com/regulatory_compliance. Removing a WLAN Card 1. Turn the computer upside down. 3. Gently remove the tape that secures the WLAN card. 1 WLAN card 3 antenna cables (2) 2 M2 x 3-mm screw (1) 6. Remove... the M2 x 3-mm screw that secures the two antenna cables on Your Computer. 2. Back to Contents Page Wireless Local Area Network (WLAN) Card Dell™ Vostro™ 2510 Service Manual Removing a ...
Service Manual
Page 22
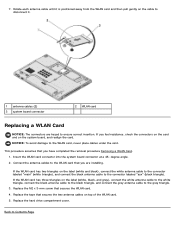
... and on the cable to ensure correct insertion. NOTICE: To avoid damage to Contents Page This procedure assumes that you have completed the removal procedure Removing a WLAN Card. 1. Insert the WLAN card connector into the system board connector at a 45- Connect the antenna cables to the ... WLAN card Replacing a WLAN Card NOTICE: The connectors are installing. Back to the WLAN card, never place cables under the card. Replace the hard drive compartment cover. degree angle. 2. Replace the tape that secures the WLAN card. 4. If the WLAN card has two triangles on top of the...
... and on the cable to ensure correct insertion. NOTICE: To avoid damage to Contents Page This procedure assumes that you have completed the removal procedure Removing a WLAN Card. 1. Insert the WLAN card connector into the system board connector at a 45- Connect the antenna cables to the ... WLAN card Replacing a WLAN Card NOTICE: The connectors are installing. Back to the WLAN card, never place cables under the card. Replace the hard drive compartment cover. degree angle. 2. Replace the tape that secures the WLAN card. 4. If the WLAN card has two triangles on top of the...
Service Manual
Page 38
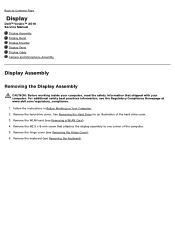
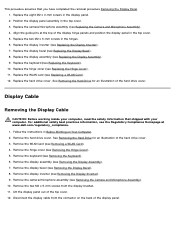
... cover (see Removing the Keyboard). Remove the keyboard (see Removing the Hinge Cover). 6. Remove the hard drive cover. Remove the M2.5 x 8-mm screw that attaches the display assembly to Contents Page Display Dell™ Vostro™ 2510 Service Manual Display Assembly Display Bezel Display Inverter Display Panel Display Cable Camera and Microphone Assembly Display Assembly Removing the Display Assembly CAUTION: Before...
... cover (see Removing the Keyboard). Remove the keyboard (see Removing the Hinge Cover). 6. Remove the hard drive cover. Remove the M2.5 x 8-mm screw that attaches the display assembly to Contents Page Display Dell™ Vostro™ 2510 Service Manual Display Assembly Display Bezel Display Inverter Display Panel Display Cable Camera and Microphone Assembly Display Assembly Removing the Display Assembly CAUTION: Before...
Service Manual
Page 39
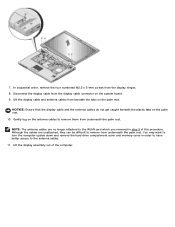
...display cable from underneath the palm rest. You may want to turn the computer upside down and remove the hard drive compartment cover and memory cover in step 3 of the computer. In sequential order, remove the four numbered M2.5 x 5-mm screws from underneath the palm rest. NOTICE: Ensure that the...and the antenna cables do not get caught beneath the plastic tabs on the system board. 9. Although the cables are no longer attached to remove from the display hinges. 8. Lift the display assembly out of this procedure. Gently tug on the palm rest. 7. NOTE: The antenna cables...
...display cable from underneath the palm rest. You may want to turn the computer upside down and remove the hard drive compartment cover and memory cover in step 3 of the computer. In sequential order, remove the four numbered M2.5 x 5-mm screws from underneath the palm rest. NOTICE: Ensure that the...and the antenna cables do not get caught beneath the plastic tabs on the system board. 9. Although the cables are no longer attached to remove from the display hinges. 8. Lift the display assembly out of this procedure. Gently tug on the palm rest. 7. NOTE: The antenna cables...
Service Manual
Page 41
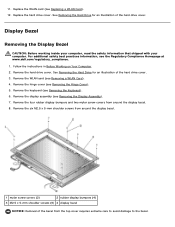
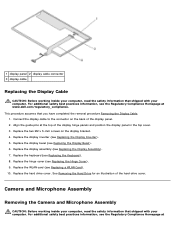
...the Regulatory Compliance Homepage at www.dell.com/regulatory_compliance. 1. Replace the hard drive cover. For additional safety best practices information, see Replacing a WLAN Card). 12. Remove the hinge cover (see Removing the Keyboard). 6. Display Bezel Removing the Display Bezel CAUTION: Before working.... Follow the instructions in Before Working on Your Computer. 2. See Removing the Hard Drive for an illustration of the hard drive cover. 3. Remove the WLAN card (see Removing the Display Assembly). 7. Remove the four rubber display-bumpers and two mylar screw-covers from around...
...the Regulatory Compliance Homepage at www.dell.com/regulatory_compliance. 1. Replace the hard drive cover. For additional safety best practices information, see Replacing a WLAN Card). 12. Remove the hinge cover (see Removing the Keyboard). 6. Display Bezel Removing the Display Bezel CAUTION: Before working.... Follow the instructions in Before Working on Your Computer. 2. See Removing the Hard Drive for an illustration of the hard drive cover. 3. Remove the WLAN card (see Removing the Display Assembly). 7. Remove the four rubber display-bumpers and two mylar screw-covers from around...
Service Manual
Page 42
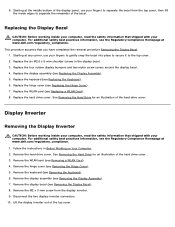
... in Before Working on Your Computer. 2. Lift the display inverter out of the hard drive cover. 3. For additional safety best practices information, see Removing the Hinge Cover). 5. Remove the display assembly (see Removing the Keyboard). 6. Starting at www.dell.com/regulatory_compliance. See Removing the Hard Drive for an illustration of the display panel, use your computer, read the safety...
... in Before Working on Your Computer. 2. Lift the display inverter out of the hard drive cover. 3. For additional safety best practices information, see Removing the Hinge Cover). 5. Remove the display assembly (see Removing the Keyboard). 6. Starting at www.dell.com/regulatory_compliance. See Removing the Hard Drive for an illustration of the display panel, use your computer, read the safety...
Service Manual
Page 43
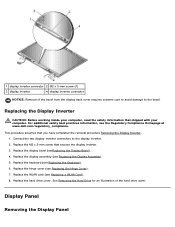
...Replace the M2 x 3-mm screw that you have completed the removal procedure Removing the Display Inverter. 1. Replace the hinge cover (see Replacing the Display Assembly). 5. Replace the hard drive cover. See Removing the Hard Drive for an illustration of the bezel from the display back cover ... the Keyboard). 6. Replace the keyboard (see the Regulatory Compliance Homepage at www.dell.com/regulatory_compliance. Replace the WLAN card (see Replacing a WLAN Card). 8. Display Panel Removing the Display Panel Replacing the Display Inverter CAUTION: Before working inside your computer, read...
...Replace the M2 x 3-mm screw that you have completed the removal procedure Removing the Display Inverter. 1. Replace the hinge cover (see Replacing the Display Assembly). 5. Replace the hard drive cover. See Removing the Hard Drive for an illustration of the bezel from the display back cover ... the Keyboard). 6. Replace the keyboard (see the Regulatory Compliance Homepage at www.dell.com/regulatory_compliance. Replace the WLAN card (see Replacing a WLAN Card). 8. Display Panel Removing the Display Panel Replacing the Display Inverter CAUTION: Before working inside your computer, read...
Service Manual
Page 44
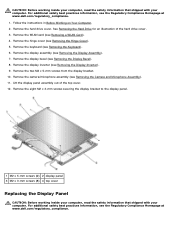
... additional safety best practices information, see the Regulatory Compliance Homepage at www.dell.com/regulatory_compliance. Follow the instructions in Before Working on Your Computer. 2. Remove the display bezel (see Removing the Hinge Cover). 5. Lift the display panel assembly out of the hard drive cover. 3. Remove the eight M2 x 3-mm screws securing the display bracket to the...
... additional safety best practices information, see the Regulatory Compliance Homepage at www.dell.com/regulatory_compliance. Follow the instructions in Before Working on Your Computer. 2. Remove the display bezel (see Removing the Hinge Cover). 5. Lift the display panel assembly out of the hard drive cover. 3. Remove the eight M2 x 3-mm screws securing the display bracket to the...
Service Manual
Page 45
...dell.com/regulatory_compliance. 1. Replace the display assembly (see Removing the Display Bezel). 8. Replace the hard drive cover. See Removing the Hard Drive for an illustration of the hard drive cover. 3. For additional safety best practices information, see the Regulatory Compliance Homepage at the top of the hard drive...the top cover. 3. Replace the display bezel (see Removing the Camera and Microphone Assembly). 10. Remove the two M2 x 5-mm screws from the connector on Your Computer. 2. See Removing the Hard Drive for an illustration of the display hinge panels and ...
...dell.com/regulatory_compliance. 1. Replace the display assembly (see Removing the Display Bezel). 8. Replace the hard drive cover. See Removing the Hard Drive for an illustration of the hard drive cover. 3. For additional safety best practices information, see the Regulatory Compliance Homepage at the top of the hard drive...the top cover. 3. Replace the display bezel (see Removing the Camera and Microphone Assembly). 10. Remove the two M2 x 5-mm screws from the connector on Your Computer. 2. See Removing the Hard Drive for an illustration of the display hinge panels and ...
Service Manual
Page 46
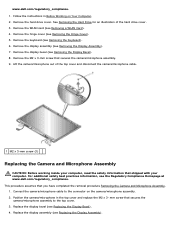
.... Replace the display inverter (see Replacing the Keyboard). 8. Replace the hard drive cover. For additional safety best practices information, see the Regulatory Compliance Homepage at www.dell.com/regulatory_compliance. Replace the display bezel (see Replacing a WLAN Card). 10. Camera and Microphone Assembly Removing the Camera and Microphone Assembly CAUTION: Before working inside your computer...
.... Replace the display inverter (see Replacing the Keyboard). 8. Replace the hard drive cover. For additional safety best practices information, see the Regulatory Compliance Homepage at www.dell.com/regulatory_compliance. Replace the display bezel (see Replacing a WLAN Card). 10. Camera and Microphone Assembly Removing the Camera and Microphone Assembly CAUTION: Before working inside your computer...
Service Manual
Page 47
This procedure assumes that secures the camera/microphone assembly. 9. Replace the display assembly (see the Regulatory Compliance Homepage at www.dell.com/regulatory_compliance. Remove the hard drive cover. For additional safety best practices information, see Replacing the Display Assembly). Follow the instructions in the top cover and replace the M2 x 3- Replace the ...
This procedure assumes that secures the camera/microphone assembly. 9. Replace the display assembly (see the Regulatory Compliance Homepage at www.dell.com/regulatory_compliance. Remove the hard drive cover. For additional safety best practices information, see Replacing the Display Assembly). Follow the instructions in the top cover and replace the M2 x 3- Replace the ...

Service Manual
Page 48
5. See Removing the Hard Drive for an illustration of the hard drive cover. Replace the WLAN card (see Replacing the Keyboard). 6. Replace the hard drive cover. Replace the keyboard (see Replacing a WLAN Card). 8. Replace the hinge cover (see Replacing the Hinge Cover). 7. Back to Contents Page
5. See Removing the Hard Drive for an illustration of the hard drive cover. Replace the WLAN card (see Replacing the Keyboard). 6. Replace the hard drive cover. Replace the keyboard (see Replacing a WLAN Card). 8. Replace the hinge cover (see Replacing the Hinge Cover). 7. Back to Contents Page


