

Dell Vostro 143458 Owners Manual
Page 3
...the Battery...8 Installing the Battery...9 Removing the Optical Drive...9 Installing the Optical Drive...9 Removing the Access Panel...9 Installing the Access Panel...10 Removing the Hard Drive...10 Installing the Hard Drive...11 Removing the Memory Module...12 Installing the Memory Module...12 Removing the WLAN Card...12 Installing the WLAN Card...13 Removing the Coin-Cell Battery...13 Installing the Coin-cell battery...13 Removing the Keyboard...13 Installing the Keyboard...15 Removing the Base Cover...15 Installing the Base Cover...16 Removing the Input/Output (I/O) Board 17 Installing the...
...the Battery...8 Installing the Battery...9 Removing the Optical Drive...9 Installing the Optical Drive...9 Removing the Access Panel...9 Installing the Access Panel...10 Removing the Hard Drive...10 Installing the Hard Drive...11 Removing the Memory Module...12 Installing the Memory Module...12 Removing the WLAN Card...12 Installing the WLAN Card...13 Removing the Coin-Cell Battery...13 Installing the Coin-cell battery...13 Removing the Keyboard...13 Installing the Keyboard...15 Removing the Base Cover...15 Installing the Base Cover...16 Removing the Input/Output (I/O) Board 17 Installing the...
Dell Vostro 143458 Owners Manual
Page 5
... or on its pull-tab, not on the cable itself. if you finish working inside the computer, replace all power sources before you connect a cable, ensure that shipped with your computer. Do not touch the components or contacts on a card. Turn off Your Computer). 5 1 Working on Your Computer Before Working Inside Your Computer Use the following safety guidelines to help protect your...
... or on its pull-tab, not on the cable itself. if you finish working inside the computer, replace all power sources before you connect a cable, ensure that shipped with your computer. Do not touch the components or contacts on a card. Turn off Your Computer). 5 1 Working on Your Computer Before Working Inside Your Computer Use the following safety guidelines to help protect your...
Dell Vostro 143458 Owners Manual
Page 6
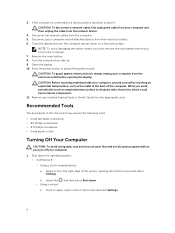
... and close all open files and exit all open programs before opening the Charms menu and select Settings. Remove the main battery. 8. b. CAUTION: To disconnect a network cable, first unplug the cable from your computer and then unplug the cable from the right edge of the screen, opening the display. While you service the computer. 7. Using a mouse: and then select Shut down the operating system: • In Windows 8: - Disconnect your...
... and close all open files and exit all open programs before opening the Charms menu and select Settings. Remove the main battery. 8. b. CAUTION: To disconnect a network cable, first unplug the cable from your computer and then unplug the cable from the right edge of the screen, opening the display. While you service the computer. 7. Using a mouse: and then select Shut down the operating system: • In Windows 8: - Disconnect your...

Dell Vostro 143458 Owners Manual
Page 7
... 1. Connect any telephone or network cables to turn off . Replace the battery. 4. Click Shut Down. After Working Inside Your Computer After you complete any replacement procedure, ensure you shut down . 1. Connect any external devices, such as a port replicator or media base, and replace any external devices, cards, and cables before turning on your operating system, press and hold the power button for about 4 seconds to your computer. Turn on your computer. b. Click Start . 2. Click Start...
... 1. Connect any telephone or network cables to turn off . Replace the battery. 4. Click Shut Down. After Working Inside Your Computer After you complete any replacement procedure, ensure you shut down . 1. Connect any external devices, such as a port replicator or media base, and replace any external devices, cards, and cables before turning on your operating system, press and hold the power button for about 4 seconds to your computer. Turn on your computer. b. Click Start . 2. Click Start...

Dell Vostro 143458 Owners Manual
Page 12
... system board. Install the access panel. 3. Install the battery. 4. Remove the screw that secure the WLAN card to the system board [3]. Follow the procedures in After Working Inside Your computer. Remove: a. Perform the following steps as shown in Before Working Inside Your Computer. 2. Remove the two connectors that secures the WLAN card to lock the securing clips. 2. Removing the WLAN Card 1. battery b. access panel 3. Remove the memory module from its socket [4]. 12 Installing the Memory Module...
... system board. Install the access panel. 3. Install the battery. 4. Remove the screw that secure the WLAN card to the system board [3]. Follow the procedures in After Working Inside Your computer. Remove: a. Perform the following steps as shown in Before Working Inside Your Computer. 2. Remove the two connectors that secures the WLAN card to lock the securing clips. 2. Removing the WLAN Card 1. battery b. access panel 3. Remove the memory module from its socket [4]. 12 Installing the Memory Module...

Dell Vostro 143458 Owners Manual
Page 15
.... 2. b. Connect the keyboard cable to release the cable from the palmrest [3]. 15 Follow the procedures in the illustration: a. access panel d. Press along the top edges to lock the keyboard in After Working Inside Your computer. battery b. hard drive f. Installing the Keyboard 1. Lift the tab to the connector on the system board. 2. Remove: a. keyboard 3. Remove the screws from the connector [1]. Removing the Base Cover 1. c. Follow the procedures in place. 4. optical disk-drive c. Disconnect...
.... 2. b. Connect the keyboard cable to release the cable from the palmrest [3]. 15 Follow the procedures in the illustration: a. access panel d. Press along the top edges to lock the keyboard in After Working Inside Your computer. battery b. hard drive f. Installing the Keyboard 1. Lift the tab to the connector on the system board. 2. Remove: a. keyboard 3. Remove the screws from the connector [1]. Removing the Base Cover 1. c. Follow the procedures in place. 4. optical disk-drive c. Disconnect...

Dell Vostro 143458 Owners Manual
Page 21
... steps as shown in Before Working Inside Your Computer. 2. Insert the speakers into the system board and press along the retention clips to release the locking tab [1]. memory module g. access panel g. Follow the procedures in the illustration: a. Remove: a. hard drive f. WLAN card e. base cover 3. hard drive e. Follow the procedures in place. 2. Guide the speaker cable through the tabs. 4. Connect the speaker cable to the system board. 3. Install: a. Installing the Speakers 1. base cover b. memory module d. keyboard h. battery b.
... steps as shown in Before Working Inside Your Computer. 2. Insert the speakers into the system board and press along the retention clips to release the locking tab [1]. memory module g. access panel g. Follow the procedures in the illustration: a. Remove: a. hard drive f. WLAN card e. base cover 3. hard drive e. Follow the procedures in place. 2. Guide the speaker cable through the tabs. 4. Connect the speaker cable to the system board. 3. Install: a. Installing the Speakers 1. base cover b. memory module d. keyboard h. battery b.

Dell Vostro 143458 Owners Manual
Page 24
...Install: a. memory module e. access panel h. optical disk-drive c. memory module f. Connect the power connector cable to the chassis [2]. 24 base cover c. battery 4. Remove: a. keyboard g. Perform the following steps as shown in After Working Inside Your computer. hard drive f. Removing the Display Assembly 1. access panel d. hard drive e. WLAN card g. Remove the screws that secure the display hinges to the system board. 3. keyboard d. optical disk-drive i. system board b. system board 3. Follow the procedures in the illustration: a. battery...
...Install: a. memory module e. access panel h. optical disk-drive c. memory module f. Connect the power connector cable to the chassis [2]. 24 base cover c. battery 4. Remove: a. keyboard g. Perform the following steps as shown in After Working Inside Your computer. hard drive f. Removing the Display Assembly 1. access panel d. hard drive e. WLAN card g. Remove the screws that secure the display hinges to the system board. 3. keyboard d. optical disk-drive i. system board b. system board 3. Follow the procedures in the illustration: a. battery...

Dell Vostro 143458 Owners Manual
Page 30
Connect the eDP cable to secure the eDP cable. 3. keyboard f. memory module g. Follow the procedures in After Working Inside Your computer. 30 system board e. access panel i. Place the display panel on the display assembly. 4. display hinges b. Installing the Display Panel 1. optical disk-drive j. display bezel c. battery 6. Affix the tape to the display panel. 2. Install: a. hard drive h. Tighten the screws to secure the display panel to the display assembly. 5. display assembly d.
Connect the eDP cable to secure the eDP cable. 3. keyboard f. memory module g. Follow the procedures in After Working Inside Your computer. 30 system board e. access panel i. Place the display panel on the display assembly. 4. display hinges b. Installing the Display Panel 1. optical disk-drive j. display bezel c. battery 6. Affix the tape to the display panel. 2. Install: a. hard drive h. Tighten the screws to secure the display panel to the display assembly. 5. display assembly d.
Dell Vostro 143458 Owners Manual
Page 31
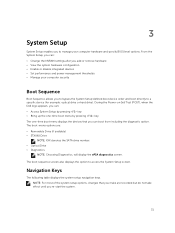
... or remove hardware • View the system hardware configuration • Enable or disable integrated devices • Set performance and power management thresholds • Manage your computer hardware and specify BIOS‐level options. 3 System Setup System Setup enables you to manage your computer security Boot Sequence Boot Sequence allows you to bypass the System Setup‐defined boot device order and boot directly to access the System Setup screen. The boot sequence screen also displays the option to a specific device (for example: optical drive or hard drive...
... or remove hardware • View the system hardware configuration • Enable or disable integrated devices • Set performance and power management thresholds • Manage your computer hardware and specify BIOS‐level options. 3 System Setup System Setup enables you to manage your computer security Boot Sequence Boot Sequence allows you to bypass the System Setup‐defined boot device order and boot directly to access the System Setup screen. The boot sequence screen also displays the option to a specific device (for example: optical drive or hard drive...
Dell Vostro 143458 Owners Manual
Page 32
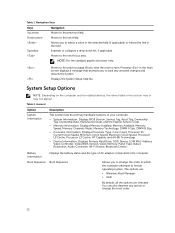
... Cache, HT Capable, and 64-Bit Technology. • Device Information: Displays Primary Hard Drive, ODD Device, LOM MAC Address, Video Controller, Video BIOS Version, Video Memory, Panel Type, Native Resolution, Audio Controller, Wi-Fi Device, Bluetooth Device. Pressing in the main screen displays a message that prompts you to save any option or change the order in which the computer attempts to find an operating system. Displays the System Setup help file. Table 2. Table 1. Down arrow Moves...
... Cache, HT Capable, and 64-Bit Technology. • Device Information: Displays Primary Hard Drive, ODD Device, LOM MAC Address, Video Controller, Video BIOS Version, Video Memory, Panel Type, Native Resolution, Audio Controller, Wi-Fi Device, Bluetooth Device. Pressing in the main screen displays a message that prompts you to save any option or change the order in which the computer attempts to find an operating system. Displays the System Setup help file. Table 2. Table 1. Down arrow Moves...

Dell Vostro 143458 Owners Manual
Page 33
... NIC Allows you the legacy option ROMs to configure the SATA drives on board. The options are : • Disabled • AHCI: This option is enabled by default. • Enable SMART Reporting USB Configuration This field configures the integrated USB controller. Drives Allows you to load. This technology is disabled, the OS cannot see any type of the SMART (Self Monitoring Analysis and Reporting Technology) specification. If USB port is part of USB Mass Storage Devices (HDD, memory key, floppy).
... NIC Allows you the legacy option ROMs to configure the SATA drives on board. The options are : • Disabled • AHCI: This option is enabled by default. • Enable SMART Reporting USB Configuration This field configures the integrated USB controller. Drives Allows you to load. This technology is disabled, the OS cannot see any type of the SMART (Self Monitoring Analysis and Reporting Technology) specification. If USB port is part of USB Mass Storage Devices (HDD, memory key, floppy).
Dell Vostro 143458 Owners Manual
Page 34
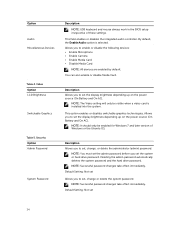
... a video card is selected. Video Option LCD Brightness Switchable Graphics Table 5. Security Option Admin Password System Password Description NOTE: USB keyboard and mouse always work in the BIOS setup irrespective of Windows or the Ubuntu OS. This field enables or disables the integrated audio controller. Description Allows you to set 34 NOTE: The Video setting will only be enabled for Windows 7 and later version of these settings. Default Setting: Not set the display brightness depending up on the power source (On Battery and...
... a video card is selected. Video Option LCD Brightness Switchable Graphics Table 5. Security Option Admin Password System Password Description NOTE: USB keyboard and mouse always work in the BIOS setup irrespective of Windows or the Ubuntu OS. This field enables or disables the integrated audio controller. Description Allows you to set 34 NOTE: The Video setting will only be enabled for Windows 7 and later version of these settings. Default Setting: Not set the display brightness depending up on the power source (On Battery and...

Dell Vostro 143458 Owners Manual
Page 35
... disable the permission to bypass the System and the Internal HDD password, when they are locked by the admin password. NOTE: If Strong Password is not selected. Allows you to enable the Execute Disable mode of Administrator and System passwords. Option Internal HDD-0 Password Description Allows you to set strong passwords. Default Setting: Not set Strong Password Password Configuration Password Bypass Allows you to enforce the option to always set , change or delete the password on the system's internal hard-disk drive...
... disable the permission to bypass the System and the Internal HDD password, when they are locked by the admin password. NOTE: If Strong Password is not selected. Allows you to enable the Execute Disable mode of Administrator and System passwords. Option Internal HDD-0 Password Description Allows you to set strong passwords. Default Setting: Not set Strong Password Password Configuration Password Bypass Allows you to enforce the option to always set , change or delete the password on the system's internal hard-disk drive...
Dell Vostro 143458 Owners Manual
Page 37
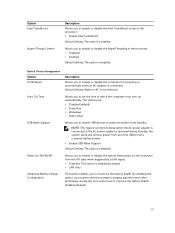
... to enable USB devices to enable or disable the computer from the Off state when triggered by default • LAN Only Advanced Battery Charge Configuration This option enables you to set the time at which the computer must turn on automatically when an AC adapter is not selected. By enabling this option, your system uses the standard charging algorithm and other techniques, during Standby, the system setup will remove power from Standby. Disabled (default...
... to enable USB devices to enable or disable the computer from the Off state when triggered by default • LAN Only Advanced Battery Charge Configuration This option enables you to set the time at which the computer must turn on automatically when an AC adapter is not selected. By enabling this option, your system uses the standard charging algorithm and other techniques, during Standby, the system setup will remove power from Standby. Disabled (default...
Dell Vostro 143458 Owners Manual
Page 38
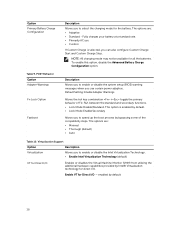
.... • Primarily AC use certain power adapters. Virtualization Support Option Description Virtualization Allows you to enable or disable the Intel Virtualization Technology. • Enable Intel Virtualization Technology (default) VT for Direct I /O. Enable VT for direct I /O Enables or disables the Virtual Machine Monitor (VMM) from utilizing the additional hardware capabilities provided by default. 38 NOTE: All charging mode may not be available for the battery. Default Setting: Enable Adapter Warnings Allows the hot key combination + toggle...
.... • Primarily AC use certain power adapters. Virtualization Support Option Description Virtualization Allows you to enable or disable the Intel Virtualization Technology. • Enable Intel Virtualization Technology (default) VT for Direct I /O. Enable VT for direct I /O Enables or disables the Virtual Machine Monitor (VMM) from utilizing the additional hardware capabilities provided by default. 38 NOTE: All charging mode may not be available for the battery. Default Setting: Enable Adapter Warnings Allows the hot key combination + toggle...
Dell Vostro 143458 Owners Manual
Page 39
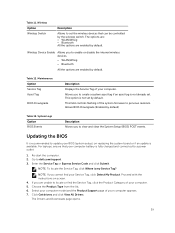
... Drivers. Wireless Option Wireless Switch Description Allows to a power outlet 1. Maintenance Option Service Tag Asset Tag BIOS Downgrade Description Displays the Service Tag of your computer. This option is fully charged and connected to set by default. Allows BIOS Downgrade (Enabled by the wireless switch. Updating the BIOS It is available. If you to view and clear the System Setup (BIOS) POST events. For laptops, ensure that can be controlled by default) Table 13. This field controls flashing of your computer battery...
... Drivers. Wireless Option Wireless Switch Description Allows to a power outlet 1. Maintenance Option Service Tag Asset Tag BIOS Downgrade Description Displays the Service Tag of your computer. This option is fully charged and connected to set by default. Allows BIOS Downgrade (Enabled by the wireless switch. Updating the BIOS It is available. If you to view and clear the System Setup (BIOS) POST events. For laptops, ensure that can be controlled by default) Table 13. This field controls flashing of your computer battery...

Dell Vostro 143458 Owners Manual
Page 40
... enter to access and make changes to secure your download method below window, click Download File. To enter a system setup, press immediately after a power-on the screen. The System Security screen appears. 2. In the System Security screen, verify that you need an update. Use the following special characters are allowed: space Re-enter the system password when prompted. 40 On the Drivers and Downloads screen, under the Operating System drop-down list, select BIOS...
... enter to access and make changes to secure your download method below window, click Download File. To enter a system setup, press immediately after a power-on the screen. The System Security screen appears. 2. In the System Security screen, verify that you need an update. Use the following special characters are allowed: space Re-enter the system password when prompted. 40 On the Drivers and Downloads screen, under the Operating System drop-down list, select BIOS...

Dell Vostro 143458 Owners Manual
Page 42
... computer. On the boot menu screen, select the Diagnostics option. If you of options for specific devices require user interaction. Power-on a specific device, press and click Yes to provide extra information about the failed device(s) • View status messages that inform you if tests are completed successfully • View error messages that you to test only your hardware. The diagnostics starts running the tests...
... computer. On the boot menu screen, select the Diagnostics option. If you of options for specific devices require user interaction. Power-on a specific device, press and click Yes to provide extra information about the failed device(s) • View status messages that inform you if tests are completed successfully • View error messages that you to test only your hardware. The diagnostics starts running the tests...

Dell Vostro 143458 Owners Manual
Page 44
... Video type Video Controller: UMA Discrete Data bus: External display support Table 19. Communication Feature Network adapter Wireless Table 21. Audio Feature Type Controller Stereo conversion Interface Speakers Volume controls Table 18. Ports and Connectors Feature Audio Video Network adapter USB: 44 Description 2 channel high-definition audio Realtek ALC3234 with Waves Maxx Audio 24-bit (analog-to-digital and digital-to-analog) Intel HDA bus 2 x 2 W program menu and keyboard media-control keys Description eDP Intel HD Graphics (shared memory...
... Video type Video Controller: UMA Discrete Data bus: External display support Table 19. Communication Feature Network adapter Wireless Table 21. Audio Feature Type Controller Stereo conversion Interface Speakers Volume controls Table 18. Ports and Connectors Feature Audio Video Network adapter USB: 44 Description 2 channel high-definition audio Realtek ALC3234 with Waves Maxx Audio 24-bit (analog-to-digital and digital-to-analog) Intel HDA bus 2 x 2 W program menu and keyboard media-control keys Description eDP Intel HD Graphics (shared memory...


