Dell Vostro 14 Support and Manuals
Get Help and Manuals for this Dell item
View All Support Options Below
Free Dell Vostro 14 manuals!
Problems with Dell Vostro 14?
Ask a Question
Free Dell Vostro 14 manuals!
Problems with Dell Vostro 14?
Ask a Question
Dell Vostro 14 Videos

Dell Vostro 14 V3446 Review
Duration: 14:08
Total Views: 30
Duration: 14:08
Total Views: 30
Dell vostro 14 v3446 Notebook
Duration: 1:32
Total Views: 2,175
Duration: 1:32
Total Views: 2,175
Popular Dell Vostro 14 Manual Pages
Owners Manual - Page 3

... Inside Your Computer 7
2 Removing and Installing Components 9
System Overview...9 Removing the Battery...11 Installing the Battery...12 Removing the Optical-Disk Drive...12 Installing the Optical-Disk Drive...12 Removing the Access Panel...12 Installing the Access Panel...13 Removing the Hard Drive...13 Installing the Hard Drive...14 Removing the Memory Module...14 Installing the Memory Module...
Owners Manual - Page 6
...Remove any installed ExpressCards or Smart Cards from the network device.
4. If the computer is connected to ground the system board. Turn the computer top-side up. 9.
CAUTION: To disconnect a network... and all network cables from the electrical outlet before you work surface. 3. Disconnect all attached devices from their electrical outlets. 6. Remove the main battery. 8. CAUTION...
Owners Manual - Page 7

... your computer.
1. Do not use only the battery designed for other Dell computers.
1. b. Click Start . 2.
If your computer and attached
devices did not automatically turn off when you connect any telephone or network cables to upper-right corner of the screen, opening the Charms menu and select Settings. Replace the battery. 4. Using a mouse:
and then select Shut...
Owners Manual - Page 12
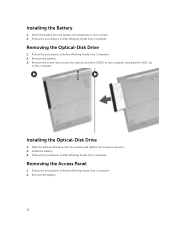
... the Battery
1.
Follow the procedures in Before Working Inside Your Computer. 2. Follow the procedures in After Working Inside Your Computer.
Remove the battery. 3. Slide the optical-disk drive into the battery slot and press to the computer and slide the ODD out
of the computer. Install the battery. 3. Remove the battery.
12 Installing the Optical-Disk Drive
1. Removing the...
Owners Manual - Page 13
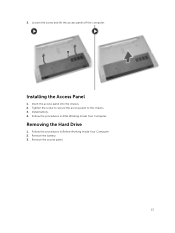
... to the chassis. 3.
Removing the Hard Drive
1. Insert the access panel into the chassis. 2. Follow the procedures in Before Working Inside Your Computer. 2. Follow the procedures in After Working Inside Your Computer. Install battery. 4. Loosen the screw and lift the access panel off the computer. 3. Remove the access panel.
13 Remove the battery. 3. Installing the Access Panel...
Owners Manual - Page 14

... the screw that secures the hard drive to the chassis. 2. access panel b. access panel
14 Installing the Hard Drive
1.
4. Install:
a. Removing the Memory Module
1. Slide the hard drive into the connector and then tighten the screw to secure it to the computer and slide the hard drive from the computer. battery 3. battery b.
Follow the procedures in After Working Inside Your...
Owners Manual - Page 20
... Working Inside Your Computer. 2. optical- Remove:
a. palmrest assembly 3. hard drive e. palmrest assembly
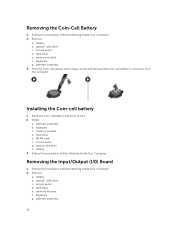
20 disk drive c. hard drive e. keyboard c. Removing the Input/Output (I/0) Board
1. battery b. memory module d. access panel g. battery 3. hard drive e. Installing the Coin-cell battery
1. Install:
a. optical-disk drive h. Follow the procedures in After Working...
Owners Manual - Page 21
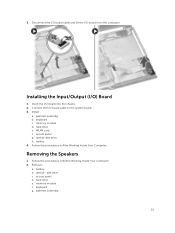
Connect the I /O board into the chassis. 2. hard drive e. Remove:
a. disk drive c. memory module f. keyboard g. palmrest assembly
21 Insert the I /O board cable to the system board. 3. Install:
a. access panel g. Removing the Speakers
1. battery b. 3. Installing the Input/Output (I /O board from the computer. palmrest assembly b. Follow the procedures in After Working ...
Owners Manual - Page 23
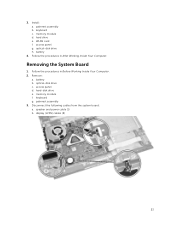
Install: a. keyboard c. battery
4. hard-disk drive e. speaker and power cable (1) b. display (LVDS) cables (2)
23 Follow the procedures in Before Working Inside Your Computer. 2.
Removing the System Board
1. battery b. hard drive e. memory module f. Remove:
a. Disconnect the following cables from the system board: a. memory module d. optical-disk drive h. optical-disk ...
Owners Manual - Page 25

... WLAN cable and remove the screws that secure the display panel to the system board. 6. Tighten the screws to secure the system board to the computer. 7. battery 8. Follow the procedures in After Working Inside Your Computer. Remove:
a. hard drive e. optical-disk drive g. memory module f. Install:
a. keyboard c. memory module d.
hard drive e. keyboard g. 5.
Owners Manual - Page 29
... in Before Working Inside Your Computer. 2.
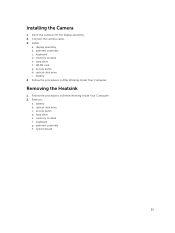
memory module e. access panel h. Follow the procedures in After Working Inside Your Computer. Remove:
a. hard drive f. access panel d. keyboard g. palmrest assembly h. display assembly b. keyboard d. battery b. memory module f. WLAN card g. battery 4. hard drive e. optical-disk drive i. Installing the Camera
1.
Owners Manual - Page 30

... heatsink to the system board and lift it to the system board. 3. Installing the Heatsink
1. Follow the procedures in Before Working Inside Your Computer. 2. Removing the Power Connector
1. palmrest assembly
30
palmrest assembly c. keyboard d. access panel h. hard drive f. WLAN card g. optical-disk drive i. optical- memory module f. system board b. memory module e. disk...
Owners Manual - Page 33

... sequence screen also displays the option to a specific device (for example: optical drive or hard drive). NOTE: For most of the system setup options, changes that you to manage your computer security
Boot Sequence
Boot Sequence allows you re-start the system.
33
From the System Setup, you can: • Change the NVRAM settings after you add or remove...
Owners Manual - Page 37

...Service Tag, click Where is fully charged and connected to a power outlet
1.
Allows you to select the File Browser Del Boot Option
Allows you to enable or disable Legacy Options ROM. Proceed with the instructions on replacing the system board or if an update is recommended to update your BIOS (system setup), on screen...For laptops, ensure that your computer battery is my Service Tag...
Owners Manual - Page 38

.... Click Run to install the updated BIOS settings on your product, click Analyze System for the data on to your computer. Password that you must enter to the BIOS settings of security for Updates and follow the instructions on your computer. Choose the Product Type from the list. 6. Select your computer model and the Product Support page of your...
Dell Vostro 14 Reviews
We have not received any reviews for Dell yet.