
Setup and Features Information Tech Sheet
Page 3
... a mouse or keyboard (optional). 4 Connect IEEE 1394 devices, such as a DVD player (optional). For additional best practices information, see www.dell.com/regulatory_compliance. WARNING: The AC adapter works with your computer. Using an incompatible cable or improperly connecting the cable to the power strip or electrical outlet may not be included if...
... a mouse or keyboard (optional). 4 Connect IEEE 1394 devices, such as a DVD player (optional). For additional best practices information, see www.dell.com/regulatory_compliance. WARNING: The AC adapter works with your computer. Using an incompatible cable or improperly connecting the cable to the power strip or electrical outlet may not be included if...

Setup and Features Information Tech Sheet
Page 4
...for balanced graphics and system performance. 5 Open the computer display and press the power button to turn on and shut down your computer at least once before you install any cards or connect the computer to view information about your computer. The following specifications are only those required by ...1294 MB 1550 MB NOTE: DVMT dynamically responds to system requirements and application's demands by allocating the optimum amount of your computer, click StartHelp and Support and select the option to a docking device or other external device, such as a printer.
...for balanced graphics and system performance. 5 Open the computer display and press the power button to turn on and shut down your computer at least once before you install any cards or connect the computer to view information about your computer. The following specifications are only those required by ...1294 MB 1550 MB NOTE: DVMT dynamically responds to system requirements and application's demands by allocating the optimum amount of your computer, click StartHelp and Support and select the option to a docking device or other external device, such as a printer.
Setup and Features Information Tech Sheet
Page 7
Finding More Information and Resources See the safety and regulatory documents that shipped with your computer and the regulatory compliance website at www.dell.com/regulatory_compliance for more information on recycled paper. All rights reserved. Other trademarks and trade names may be used in this document... are trademarks of Intel Corporation in any proprietary interest in China. and other than its own. Trademarks used in this text: Dell, the DELL logo, and Vostro are registered trademarks and Core is a trademark of Dell Inc.; Reproduction of these materials in the...
Finding More Information and Resources See the safety and regulatory documents that shipped with your computer and the regulatory compliance website at www.dell.com/regulatory_compliance for more information on recycled paper. All rights reserved. Other trademarks and trade names may be used in this document... are trademarks of Intel Corporation in any proprietary interest in China. and other than its own. Trademarks used in this text: Dell, the DELL logo, and Vostro are registered trademarks and Core is a trademark of Dell Inc.; Reproduction of these materials in the...
Service Manual
Page 1
... any proprietary interest in any references in this document to either the entities claiming the marks and names or their products. Dell™ Vostro™ 1014/1015 Service Manual Working on Your Computer Adding and Replacing Parts Specifications Diagnostics System Setup Notes, Cautions, and Warnings NOTE: A NOTE indicates important information that helps you purchased...
... any proprietary interest in any references in this document to either the entities claiming the marks and names or their products. Dell™ Vostro™ 1014/1015 Service Manual Working on Your Computer Adding and Replacing Parts Specifications Diagnostics System Setup Notes, Cautions, and Warnings NOTE: A NOTE indicates important information that helps you purchased...
Service Manual
Page 2
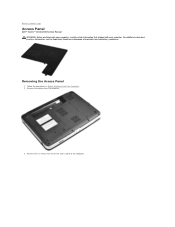
Follow the procedures in Before Working Inside Your Computer. 2. Remove the battery from the computer. 3. Remove the six screws that shipped with your computer, read the safety information that secure the access panel to Contents Page Access Panel Dell™ Vostro™ 1014/1015 Service Manual WARNING: Before working inside your computer. For additional safety best practices information, see the Regulatory Compliance Homepage at www.dell.com/regulatory_compliance. Removing the Access Panel 1. Back to the computer.
Follow the procedures in Before Working Inside Your Computer. 2. Remove the battery from the computer. 3. Remove the six screws that shipped with your computer, read the safety information that secure the access panel to Contents Page Access Panel Dell™ Vostro™ 1014/1015 Service Manual WARNING: Before working inside your computer. For additional safety best practices information, see the Regulatory Compliance Homepage at www.dell.com/regulatory_compliance. Removing the Access Panel 1. Back to the computer.

Service Manual
Page 3
Replacing the Access Panel Perform the above steps in the reverse order to Contents Page 4. Back to replace the access panel. Remove the access panel from the computer.
Replacing the Access Panel Perform the above steps in the reverse order to Contents Page 4. Back to replace the access panel. Remove the access panel from the computer.
Service Manual
Page 4
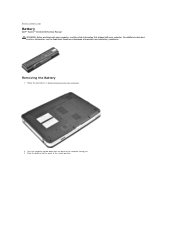
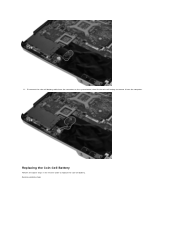
Removing the Battery 1. Follow the procedures in Before Working Inside Your Computer. 2. For additional safety best practices information, see the Regulatory Compliance Homepage at www.dell.com/regulatory_compliance. Turn the computer upside-down with your computer. Slide the battery latches apart to Contents Page Battery Dell™ Vostro™ 1014/1015 Service Manual WARNING: Before working inside your computer, read the safety information that shipped with the back of the computer facing you. 3. Back to the unlock position.
Removing the Battery 1. Follow the procedures in Before Working Inside Your Computer. 2. For additional safety best practices information, see the Regulatory Compliance Homepage at www.dell.com/regulatory_compliance. Turn the computer upside-down with your computer. Slide the battery latches apart to Contents Page Battery Dell™ Vostro™ 1014/1015 Service Manual WARNING: Before working inside your computer, read the safety information that shipped with the back of the computer facing you. 3. Back to the unlock position.
Service Manual
Page 5
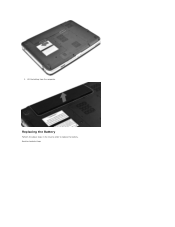
Back to replace the battery. Lift the battery from the computer. 3. Replacing the Battery Perform the above steps in the reverse order to Contents Page
Back to replace the battery. Lift the battery from the computer. 3. Replacing the Battery Perform the above steps in the reverse order to Contents Page
Service Manual
Page 6
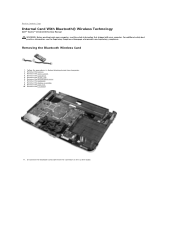
... the WLAN card. 6. Back to Contents Page Internal Card With Bluetooth® Wireless Technology Dell™ Vostro™ 1014/1015 Service Manual WARNING: Before working inside your computer, read the safety information that shipped with your computer. Remove the I/O board. 11. Remove the display assembly. 9. Remove the control panel cover. 7. Disconnect the Bluetooth card cable...
... the WLAN card. 6. Back to Contents Page Internal Card With Bluetooth® Wireless Technology Dell™ Vostro™ 1014/1015 Service Manual WARNING: Before working inside your computer, read the safety information that shipped with your computer. Remove the I/O board. 11. Remove the display assembly. 9. Remove the control panel cover. 7. Disconnect the Bluetooth card cable...

Service Manual
Page 7
Back to remove it from its routing groove and lift the Bluetooth card to Contents Page Release the Bluetooth card cable from the computer. Replacing the Bluetooth Card Perform the above steps in the reverse order to replace the Bluetooth card. 12.
Back to remove it from its routing groove and lift the Bluetooth card to Contents Page Release the Bluetooth card cable from the computer. Replacing the Bluetooth Card Perform the above steps in the reverse order to replace the Bluetooth card. 12.
Service Manual
Page 8
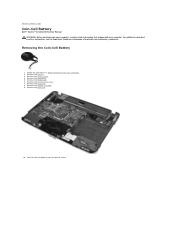
... Inside Your Computer. 2. Remove the control panel cover. 7. Remove the WLAN card. 6. Remove the display assembly. 9. Remove the palm rest. 10. Pull the coin-cell battery from the plastic sleeve. Remove the access panel. 4. Back to Contents Page Coin-Cell Battery Dell™ Vostro™ 1014/1015 Service Manual... WARNING: Before working inside your computer, read the safety information that shipped with your...
... Inside Your Computer. 2. Remove the control panel cover. 7. Remove the WLAN card. 6. Remove the display assembly. 9. Remove the palm rest. 10. Pull the coin-cell battery from the plastic sleeve. Remove the access panel. 4. Back to Contents Page Coin-Cell Battery Dell™ Vostro™ 1014/1015 Service Manual... WARNING: Before working inside your computer, read the safety information that shipped with your...
Service Manual
Page 9
Replacing the Coin-Cell Battery Perform the above steps in the reverse order to Contents Page Back to replace the coin-cell battery. Disconnect the coin-cell battery cable from the connector on the system board, then lift the coin-cell battery to remove it from the computer. 11.
Replacing the Coin-Cell Battery Perform the above steps in the reverse order to Contents Page Back to replace the coin-cell battery. Disconnect the coin-cell battery cable from the connector on the system board, then lift the coin-cell battery to remove it from the computer. 11.
Service Manual
Page 10
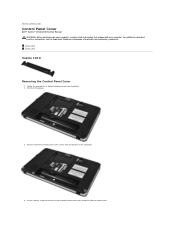
...the four control panel cover clips located inside your computer, read the safety information that shipped with your computer. Insert a plastic scribe to Contents Page Control Panel Cover Dell™ Vostro™ 1014/1015 Service Manual WARNING: Before working inside the..., see the Regulatory Compliance Homepage at www.dell.com/regulatory_compliance. Remove the three control panel cover screws from the bottom of the computer. 4. Follow the procedures in Before Working Inside Your Computer. 2. Vostro 1014 Vostro 1015 Vostro 1014 Removing the Control Panel Cover 1. Remove the...
...the four control panel cover clips located inside your computer, read the safety information that shipped with your computer. Insert a plastic scribe to Contents Page Control Panel Cover Dell™ Vostro™ 1014/1015 Service Manual WARNING: Before working inside the..., see the Regulatory Compliance Homepage at www.dell.com/regulatory_compliance. Remove the three control panel cover screws from the bottom of the computer. 4. Follow the procedures in Before Working Inside Your Computer. 2. Vostro 1014 Vostro 1015 Vostro 1014 Removing the Control Panel Cover 1. Remove the...

Service Manual
Page 11
Turn the computer over and open the display. 6. Replacing the Control Panel Cover Perform the above steps in Before Working Inside Your Computer. 2. Remove the control panel cover from the computer. Remove the battery. Follow the procedures in the reverse order to replace the control panel cover. 5. Vostro 1015 Removing the Control Panel Cover 1.
Turn the computer over and open the display. 6. Replacing the Control Panel Cover Perform the above steps in Before Working Inside Your Computer. 2. Remove the control panel cover from the computer. Remove the battery. Follow the procedures in the reverse order to replace the control panel cover. 5. Vostro 1015 Removing the Control Panel Cover 1.

Service Manual
Page 12
Remove the control panel cover from the bottom of the computer. 4. Replacing the Control Panel Cover 3. Remove the eight control panel cover screws from the computer. Turn the computer over and open the display. 5.
Remove the control panel cover from the bottom of the computer. 4. Replacing the Control Panel Cover 3. Remove the eight control panel cover screws from the computer. Turn the computer over and open the display. 5.
Service Manual
Page 14
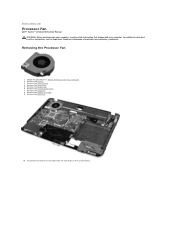
... palm rest. 10. Remove the hard drive. 5. Removing the Processor Fan 1. Remove the battery. 3. Back to Contents Page Processor Fan Dell™ Vostro™ 1014/1015 Service Manual WARNING: Before working inside your computer, read the safety information that shipped with your computer. Remove the access panel. 4. Follow the procedures in Before Working Inside Your...
... palm rest. 10. Remove the hard drive. 5. Removing the Processor Fan 1. Remove the battery. 3. Back to Contents Page Processor Fan Dell™ Vostro™ 1014/1015 Service Manual WARNING: Before working inside your computer, read the safety information that shipped with your computer. Remove the access panel. 4. Follow the procedures in Before Working Inside Your...
Service Manual
Page 15
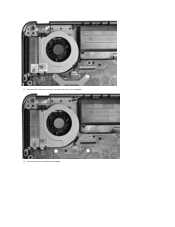
Lift the processor fan from the computer. Remove the screw that secures the processor fan to the computer. 12. 11.
Lift the processor fan from the computer. Remove the screw that secures the processor fan to the computer. 12. 11.
Service Manual
Page 17
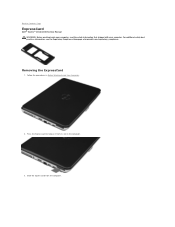
Removing the ExpressCard 1. Press the ExpressCard to Contents Page ExpressCard Dell™ Vostro™ 1014/1015 Service Manual WARNING: Before working inside your computer, read the safety information that shipped with your computer. For additional safety best practices information, see the Regulatory Compliance Homepage at www.dell.com/regulatory_compliance. Follow the procedures in the computer. 3. Slide the ExpressCard from its slot in Before Working Inside Your Computer. 2. Back to release it from the computer.
Removing the ExpressCard 1. Press the ExpressCard to Contents Page ExpressCard Dell™ Vostro™ 1014/1015 Service Manual WARNING: Before working inside your computer, read the safety information that shipped with your computer. For additional safety best practices information, see the Regulatory Compliance Homepage at www.dell.com/regulatory_compliance. Follow the procedures in the computer. 3. Slide the ExpressCard from its slot in Before Working Inside Your Computer. 2. Back to release it from the computer.
Service Manual
Page 19
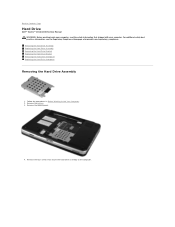
...the four screws that shipped with your computer, read the safety information that secure the hard drive assembly to Contents Page Hard Drive Dell™ Vostro™ 1014/1015 Service Manual WARNING: Before working inside your computer. For additional safety best practices information,... see the Regulatory Compliance Homepage at www.dell.com/regulatory_compliance. Back to the computer. Remove the battery. 3. ...
...the four screws that shipped with your computer, read the safety information that secure the hard drive assembly to Contents Page Hard Drive Dell™ Vostro™ 1014/1015 Service Manual WARNING: Before working inside your computer. For additional safety best practices information,... see the Regulatory Compliance Homepage at www.dell.com/regulatory_compliance. Back to the computer. Remove the battery. 3. ...
Service Manual
Page 20
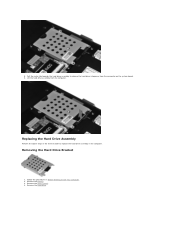
Lift the hard drive assembly from the connector on the system board. 6. Remove the access panel. 4. Remove the hard drive. Replacing the Hard Drive Assembly Perform the above steps in the reverse order to release the hard drive interposer from the computer. Remove the battery. 3. Removing the Hard Drive Bracket 1. Pull the mylar tab towards the hard drive assembly to replace the hard drive assembly in Before Working Inside Your Computer. 2. Follow the procedures in the computer. 5.
Lift the hard drive assembly from the connector on the system board. 6. Remove the access panel. 4. Remove the hard drive. Replacing the Hard Drive Assembly Perform the above steps in the reverse order to release the hard drive interposer from the computer. Remove the battery. 3. Removing the Hard Drive Bracket 1. Pull the mylar tab towards the hard drive assembly to replace the hard drive assembly in Before Working Inside Your Computer. 2. Follow the procedures in the computer. 5.


