
Owner's Manual
Page 4
... Your Computer Display to a Projector 45 Setting Display Resolution and Refresh Rate 45 Microsoft® Windows XP 46 Windows Vista 46 5 Using the Keyboard and Touch Pad 47 Numeric Keypad 47 Key Combinations 47 System Functions 47 Display Functions 47 Battery 47 Power Management 48 Microsoft® Windows® Logo Key...
... Your Computer Display to a Projector 45 Setting Display Resolution and Refresh Rate 45 Microsoft® Windows XP 46 Windows Vista 46 5 Using the Keyboard and Touch Pad 47 Numeric Keypad 47 Key Combinations 47 System Functions 47 Display Functions 47 Battery 47 Power Management 48 Microsoft® Windows® Logo Key...
Owner's Manual
Page 9
... and Speaker Problems 133 No sound from integrated speakers 133 No sound from external speakers 133 No sound from headphones 134 Remote Control Problems 134 Touch Pad or Mouse Problems 134 Video and Display Problems 135 If the display is blank 135 If the display is difficult to read 136 If...
... and Speaker Problems 133 No sound from integrated speakers 133 No sound from external speakers 133 No sound from headphones 134 Remote Control Problems 134 Touch Pad or Mouse Problems 134 Video and Display Problems 135 If the display is blank 135 If the display is difficult to read 136 If...
Owner's Manual
Page 12
... Your Order 191 Product Information 192 Returning Items for Warranty Repair or Credit . . . . 192 Before You Call 193 Contacting Dell 195 17 Specifications 197 18 Appendix 205 Using the System Setup Program 205 Viewing the System Setup Screen 206 System Setup Screen 206 ...Commonly Used Options 206 Cleaning Your Computer 208 Computer, Keyboard, and Display 208 Touch Pad 209 Mouse 209 Media 210 Dell Technical Support Policy (U.S. Only 210 Definition of "Dell-Installed" Software and Peripherals 211 Definition of "Third-Party" Software and Peripherals 211 12 Contents...
... Your Order 191 Product Information 192 Returning Items for Warranty Repair or Credit . . . . 192 Before You Call 193 Contacting Dell 195 17 Specifications 197 18 Appendix 205 Using the System Setup Program 205 Viewing the System Setup Screen 206 System Setup Screen 206 ...Commonly Used Options 206 Cleaning Your Computer 208 Computer, Keyboard, and Display 208 Touch Pad 209 Mouse 209 Media 210 Dell Technical Support Policy (U.S. Only 210 Definition of "Dell-Installed" Software and Peripherals 211 Definition of "Third-Party" Software and Peripherals 211 12 Contents...
Owner's Manual
Page 22
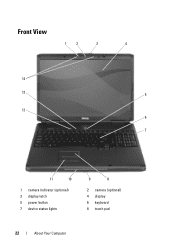
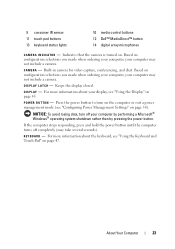
Front View 1 2 3 4 14 13 5 12 6 7 11 10 1 camera indicator (optional) 3 display latch 5 power button 7 device status lights 9 8 2 camera (optional) 4 display 6 keyboard 8 touch pad 22 About Your Computer
Front View 1 2 3 4 14 13 5 12 6 7 11 10 1 camera indicator (optional) 3 display latch 5 power button 7 device status lights 9 8 2 camera (optional) 4 display 6 keyboard 8 touch pad 22 About Your Computer
Owner's Manual
Page 23
...O N - NOTICE: To avoid losing data, turn on the computer or exit a power management mode (see "Using the Keyboard and Touch Pad" on page 54). Indicates that the camera is turned on configuration selections you made when ordering your computer, your computer may take ...174; Windows® operating system shutdown rather than by pressing the power button. K E Y B O A R D - 9 consumer IR sensor 11 touch pad buttons 13 keyboard status lights 10 media control buttons 12 Dell™ MediaDirect™ button 14 digital array microphones C A M E R A I N D I S P L A Y L A T C H - Based on ....
...O N - NOTICE: To avoid losing data, turn on the computer or exit a power management mode (see "Using the Keyboard and Touch Pad" on page 54). Indicates that the camera is turned on configuration selections you made when ordering your computer, your computer may take ...174; Windows® operating system shutdown rather than by pressing the power button. K E Y B O A R D - 9 consumer IR sensor 11 touch pad buttons 13 keyboard status lights 10 media control buttons 12 Dell™ MediaDirect™ button 14 digital array microphones C A M E R A I N D I S P L A Y L A T C H - Based on ....
Owner's Manual
Page 25
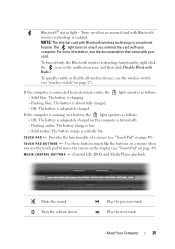
... as follows: If the computer is almost fully charged. - Control CD, DVD, and Media Player playback. For more information, see "Touch Pad" on when an internal card with your card. If the computer is adequately charged. Provides the functionality of a mouse (see the...: The battery is low. - NOTE: The internal card with your computer. Bluetooth® status light - To quickly enable or disable all wireless devices, use the touch pad to an electrical outlet, the - M E D I A C O N T R O L B U T T O N S - Turn the volume down. Solid amber: The battery charge is turned ...
... as follows: If the computer is almost fully charged. - Control CD, DVD, and Media Player playback. For more information, see "Touch Pad" on when an internal card with your card. If the computer is adequately charged. Provides the functionality of a mouse (see the...: The battery is low. - NOTE: The internal card with your computer. Bluetooth® status light - To quickly enable or disable all wireless devices, use the touch pad to an electrical outlet, the - M E D I A C O N T R O L B U T T O N S - Turn the volume down. Solid amber: The battery charge is turned ...
Owner's Manual
Page 47
... to that the keypad is active. • To disable the keypad, press again. Using the Keyboard and Touch Pad 47 Using the Keyboard and Touch Pad Numeric Keypad The numeric keypad functions like the numeric keypad on page 52). The 9 light indicates that option.... Key Combinations System Functions Display Functions Opens the Task Manager window. Displays the Dell™ QuickSet Battery Meter (see "Dell™ QuickSet Battery...
... to that the keypad is active. • To disable the keypad, press again. Using the Keyboard and Touch Pad 47 Using the Keyboard and Touch Pad Numeric Keypad The numeric keypad functions like the numeric keypad on page 52). The 9 light indicates that option.... Key Combinations System Functions Display Functions Opens the Task Manager window. Displays the Dell™ QuickSet Battery Meter (see "Dell™ QuickSet Battery...
Owner's Manual
Page 48
... repeat rate: 1 Click Start , and then click Control Panel. 2 Click Hardware and Sound. 3 Click Keyboard. 48 Using the Keyboard and Touch Pad Opens the Run dialog box. Opens the Search Results dialog box. Opens the System Properties dialog box. Microsoft® Windows® Logo Key... logo key and Windows logo key and Windows logo key and Minimizes all minimized windows. Starts Windows Explorer. For more information about Dell QuickSet key combinations, right-click the QuickSet icon in the Power Options Properties window (see "Configuring Power Management Settings" on page 54...
... repeat rate: 1 Click Start , and then click Control Panel. 2 Click Hardware and Sound. 3 Click Keyboard. 48 Using the Keyboard and Touch Pad Opens the Run dialog box. Opens the Search Results dialog box. Opens the System Properties dialog box. Microsoft® Windows® Logo Key... logo key and Windows logo key and Windows logo key and Minimizes all minimized windows. Starts Windows Explorer. For more information about Dell QuickSet key combinations, right-click the QuickSet icon in the Power Options Properties window (see "Configuring Power Management Settings" on page 54...
Owner's Manual
Page 49
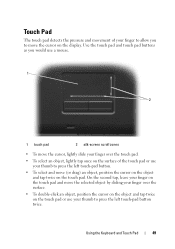
... surface of your finger to allow you to press the left touch-pad button. • To select and move the cursor on the display. Using the Keyboard and Touch Pad 49 Touch Pad The touch pad detects the pressure and movement of the touch pad or use your thumb to move (or drag) an object..., position the cursor on the object and tap twice on the touch pad. Use the touch pad and touch pad buttons as you would use a mouse. 1 2 1 touch pad 2 silk-screen scroll zones • To move the cursor, lightly slide your finger over the surface. • To...
... surface of your finger to allow you to press the left touch-pad button. • To select and move the cursor on the display. Using the Keyboard and Touch Pad 49 Touch Pad The touch pad detects the pressure and movement of the touch pad or use your thumb to move (or drag) an object..., position the cursor on the object and tap twice on the touch pad. Use the touch pad and touch pad buttons as you would use a mouse. 1 2 1 touch pad 2 silk-screen scroll zones • To move the cursor, lightly slide your finger over the surface. • To...
Owner's Manual
Page 50
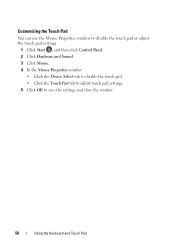
Customizing the Touch Pad You can use the Mouse Properties window to disable the touch pad or adjust the touch pad settings. 1 Click Start , and then click Control Panel. 2 Click Hardware and Sound. 3 Click Mouse. 4 In the Mouse Properties window: • Click the Device Select tab to disable the touch pad. • Click the Touch Pad tab to adjust touch pad settings. 5 Click OK to save the settings and close the window. 50 Using the Keyboard and Touch Pad
Customizing the Touch Pad You can use the Mouse Properties window to disable the touch pad or adjust the touch pad settings. 1 Click Start , and then click Control Panel. 2 Click Hardware and Sound. 3 Click Mouse. 4 In the Mouse Properties window: • Click the Device Select tab to disable the touch pad. • Click the Touch Pad tab to adjust touch pad settings. 5 Click OK to save the settings and close the window. 50 Using the Keyboard and Touch Pad
Owner's Manual
Page 117
...the Product Information Guide. If the message is not listed, see "Drive Problems" on page 205). The touch pad or external mouse may be faulty or improperly seated. If the problem persists, contact Dell (see "Using the System Setup Program" on page 113). The CD drive does not respond to the ... procedures in this section, follow the safety instructions in the proper place, and used the correct pathname. For more memory modules may be faulty. One or more information, go to scan the computer and remove spyware. Contact Dell (see "Hard Drive" on page 195). DRIVE NOT READY -
...the Product Information Guide. If the message is not listed, see "Drive Problems" on page 205). The touch pad or external mouse may be faulty or improperly seated. If the problem persists, contact Dell (see "Using the System Setup Program" on page 113). The CD drive does not respond to the ... procedures in this section, follow the safety instructions in the proper place, and used the correct pathname. For more memory modules may be faulty. One or more information, go to scan the computer and remove spyware. Contact Dell (see "Hard Drive" on page 195). DRIVE NOT READY -

Owner's Manual
Page 119
... match the hardware configuration. Correct the appropriate options in the Dell Diagnostics (see "Dell MediaDirect problems" on page 105). Restart the computer, and avoid touching the keyboard or the mouse during the boot routine. Dell MediaDirect™ cannot verify the Digital Rights Management (DRM) ...restrictions on the file, so the file cannot be played (see "Dell Diagnostics" on page 163). A memory ...
... match the hardware configuration. Correct the appropriate options in the Dell Diagnostics (see "Dell MediaDirect problems" on page 105). Restart the computer, and avoid touching the keyboard or the mouse during the boot routine. Dell MediaDirect™ cannot verify the Digital Rights Management (DRM) ...restrictions on the file, so the file cannot be played (see "Dell Diagnostics" on page 163). A memory ...
Owner's Manual
Page 134
... CONTROL IS STUCK IN THE SLOT Check that the battery is turned up . Touch Pad or Mouse Problems CHECK THE TOUCH PAD SETTINGS - Shut down the computer, disconnect the mouse cable and check it... for removing it. No sound from headphones C H E C K T H E H E A D P H O N E C A B L E C O N N E C T I N D O W S V O L U M E C O N T R O L - Windows Vista: 1 Click the Windows Vista Start button → Control Panel→ Hardware and Sound→ Mouse. 2 Adjust the settings, as needed . Contact Dell...
... CONTROL IS STUCK IN THE SLOT Check that the battery is turned up . Touch Pad or Mouse Problems CHECK THE TOUCH PAD SETTINGS - Shut down the computer, disconnect the mouse cable and check it... for removing it. No sound from headphones C H E C K T H E H E A D P H O N E C A B L E C O N N E C T I N D O W S V O L U M E C O N T R O L - Windows Vista: 1 Click the Windows Vista Start button → Control Panel→ Hardware and Sound→ Mouse. 2 Adjust the settings, as needed . Contact Dell...
Owner's Manual
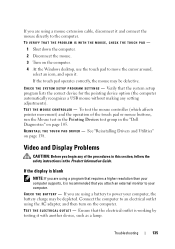
Page 135
...pointer movement) and the operation of the procedures in this section, follow the safety instructions in the "Dell Diagnostics" on page 138. TEST THE ELECTRICAL OUTLET - Verify that the electrical outlet is blank NOTE: ...If you are using the AC adapter, and then turn on the computer. 4 At the Windows desktop, use the touch pad to power your computer. See "Reinstalling Drivers and Utilities" on page 105. Troubleshooting 135 If you begin any setting adjustments). C H E C K T H E S YS T E M S E T U P P R O G R A M S E T T I V E R - ...
...pointer movement) and the operation of the procedures in this section, follow the safety instructions in the "Dell Diagnostics" on page 138. TEST THE ELECTRICAL OUTLET - Verify that the electrical outlet is blank NOTE: ...If you are using the AC adapter, and then turn on the computer. 4 At the Windows desktop, use the touch pad to power your computer. See "Reinstalling Drivers and Utilities" on page 105. Troubleshooting 135 If you begin any setting adjustments). C H E C K T H E S YS T E M S E T U P P R O G R A M S E T T I V E R - ...
Owner's Manual
Page 154
Do not touch the components or contacts on the cable itself. Damage due to prevent the computer cover from being scratched. 2 Turn off . As you disconnect the cable. ... have a connector with care. NOTICE: To avoid electrostatic discharge, ground yourself by using a wrist grounding strap or by periodically touching an unpainted metal surface (such as a processor by its edges, not by Dell is flat and clean to servicing that is not authorized by its pins. CAUTION: Handle components and cards with...
Do not touch the components or contacts on the cable itself. Damage due to prevent the computer cover from being scratched. 2 Turn off . As you disconnect the cable. ... have a connector with care. NOTICE: To avoid electrostatic discharge, ground yourself by using a wrist grounding strap or by periodically touching an unpainted metal surface (such as a processor by its edges, not by Dell is flat and clean to servicing that is not authorized by its pins. CAUTION: Handle components and cards with...
Owner's Manual
Page 155
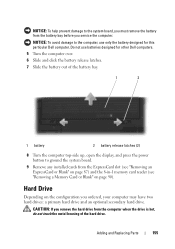
... drive. NOTICE: To help prevent damage to the system board, you must remove the battery from the computer when the drive is hot, do not touch the metal housing of the battery bay. 1 2 1 battery 2 battery release latches (2) 8 Turn the computer top-side up, open the display, and press the... power button to the computer, use batteries designed for this particular Dell computer. Do not use only the battery designed for other Dell computers. 5 Turn the computer over. 6 Slide and click the battery release latches. 7 Slide the battery out of ...
... drive. NOTICE: To help prevent damage to the system board, you must remove the battery from the computer when the drive is hot, do not touch the metal housing of the battery bay. 1 2 1 battery 2 battery release latches (2) 8 Turn the computer top-side up, open the display, and press the... power button to the computer, use batteries designed for this particular Dell computer. Do not use only the battery designed for other Dell computers. 5 Turn the computer over. 6 Slide and click the battery release latches. 7 Slide the battery out of ...
Owner's Manual
Page 159
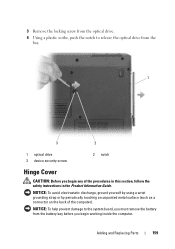
... Hinge Cover CAUTION: Before you begin any of the computer). NOTICE: To avoid electrostatic discharge, ground yourself by using a wrist grounding strap or by periodically touching an unpainted metal surface (such as a connector on the back of the procedures in this section, follow the safety instructions in the Product Information Guide...
... Hinge Cover CAUTION: Before you begin any of the computer). NOTICE: To avoid electrostatic discharge, ground yourself by using a wrist grounding strap or by periodically touching an unpainted metal surface (such as a connector on the back of the procedures in this section, follow the safety instructions in the Product Information Guide...

Owner's Manual
Page 161
NOTICE: To avoid electrostatic discharge, ground yourself by using a wrist grounding strap or by periodically touching an unpainted metal surface (such as a connector on the back of the procedures in this section, follow the safety instructions in "Before You Begin" on ...page 153. 2 Remove the hinge cover (see "Using the Keyboard and Touch Pad" on page 47. NOTICE: The keycaps on the keyboard are fragile, easily dislodged, and timeconsuming to disengage the notch on the keyboard from the...
NOTICE: To avoid electrostatic discharge, ground yourself by using a wrist grounding strap or by periodically touching an unpainted metal surface (such as a connector on the back of the procedures in this section, follow the safety instructions in "Before You Begin" on ...page 153. 2 Remove the hinge cover (see "Using the Keyboard and Touch Pad" on page 47. NOTICE: The keycaps on the keyboard are fragile, easily dislodged, and timeconsuming to disengage the notch on the keyboard from the...
Owner's Manual
Page 164
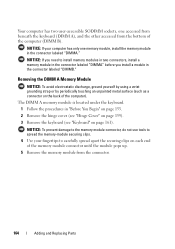
... (DIMM A), and the other accessed from the connector. 164 Adding and Replacing Parts Your computer has two user-accessible SODIMM sockets, one memory module, install the memory module in the connector labeled "DIMMA." Removing the DIMM A Memory Module NOTICE: To avoid electrostatic discharge..., ground yourself by using a wrist grounding strap or by periodically touching an unpainted metal surface (such as a connector on page 161). NOTICE: If you need to carefully spread apart the securing clips on...
... (DIMM A), and the other accessed from the connector. 164 Adding and Replacing Parts Your computer has two user-accessible SODIMM sockets, one memory module, install the memory module in the connector labeled "DIMMA." Removing the DIMM A Memory Module NOTICE: To avoid electrostatic discharge..., ground yourself by using a wrist grounding strap or by periodically touching an unpainted metal surface (such as a connector on page 161). NOTICE: If you need to carefully spread apart the securing clips on...
Owner's Manual
Page 165
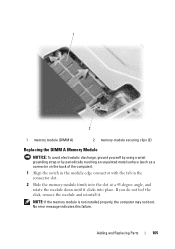
... (DIMM A) 2 memory-module securing clips (2) Replacing the DIMM A Memory Module NOTICE: To avoid electrostatic discharge, ground yourself by using a wrist grounding strap or by periodically touching an unpainted metal surface (such as a connector on the back of the computer). 1 Align the notch in the module edge connector with the tab in...
... (DIMM A) 2 memory-module securing clips (2) Replacing the DIMM A Memory Module NOTICE: To avoid electrostatic discharge, ground yourself by using a wrist grounding strap or by periodically touching an unpainted metal surface (such as a connector on the back of the computer). 1 Align the notch in the module edge connector with the tab in...


