User Manual
Page 7
.... Refer service or repairs, other replacement parts. Use only the power supply and power cord provided with the use of such problems. Remove the power cord from the printer before inspecting it. Do not pinch the power cord between objects such as furniture and walls. Inspect the power cord regularly for the use the fax feature during a lightning storm. CAUTION...
.... Refer service or repairs, other replacement parts. Use only the power supply and power cord provided with the use of such problems. Remove the power cord from the printer before inspecting it. Do not pinch the power cord between objects such as furniture and walls. Inspect the power cord regularly for the use the fax feature during a lightning storm. CAUTION...
User Manual
Page 12
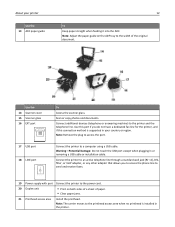
... when feeding it into the ADF. Use this port if you to access the phone line to send and receive faxes. 19 Power supply with port Connect the printer to the power cord. 20 Duplex unit • Print on the ADF tray to an active telephone line through a standard wall jack (RJ‑11...), DSL filter, or VoIP adapter, or any other adapter that allows you do not have a dedicated fax line for the printer, and if this...
... when feeding it into the ADF. Use this port if you to access the phone line to send and receive faxes. 19 Power supply with port Connect the printer to the power cord. 20 Duplex unit • Print on the ADF tray to an active telephone line through a standard wall jack (RJ‑11...), DSL filter, or VoIP adapter, or any other adapter that allows you do not have a dedicated fax line for the printer, and if this...
User Manual
Page 65
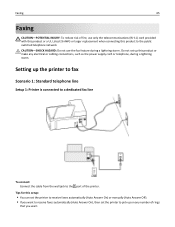
...8226; You can set the printer to receive faxes automatically (Auto Answer On) or manually (Auto Answer Off). • If you want to receive faxes automatically (Auto Answer On), then set up on any electrical or cabling connections, such as the power supply cord or telephone, during a lightning ...storm. Do not set the printer to the port of fire, use the fax feature during a lightning storm. Setting up the...
...8226; You can set the printer to receive faxes automatically (Auto Answer On) or manually (Auto Answer Off). • If you want to receive faxes automatically (Auto Answer On), then set up on any electrical or cabling connections, such as the power supply cord or telephone, during a lightning ...storm. Do not set the printer to the port of fire, use the fax feature during a lightning storm. Setting up the...
User Manual
Page 118
...automatic maintenance cycles. A cleaning page prints. CAUTION-SHOCK HAZARD: To avoid the risk of electric shock when cleaning the exterior of the printer, unplug the power cord from the wall outlet. Cleaning the exterior of your prints. Warning-Potential Damage: Using a damp cloth to clean the interior may cause... too low, you must replace the ink cartridges before you may damage the finish of the printer. 4 Wipe only the outside of the printer, making sure to improve the quality of the printer 1 Make sure that has accumulated on the paper exit tray. Warning-Potential Damage: Do not...
...automatic maintenance cycles. A cleaning page prints. CAUTION-SHOCK HAZARD: To avoid the risk of electric shock when cleaning the exterior of the printer, unplug the power cord from the wall outlet. Cleaning the exterior of your prints. Warning-Potential Damage: Using a damp cloth to clean the interior may cause... too low, you must replace the ink cartridges before you may damage the finish of the printer. 4 Wipe only the outside of the printer, making sure to improve the quality of the printer 1 Make sure that has accumulated on the paper exit tray. Warning-Potential Damage: Do not...
User Manual
Page 121
... Use this checklist to solve most printer problems: • Make sure the power cord is plugged into the printer and into a properly grounded, working electrical outlet. • Make sure the printer is turned on. • Make sure the printer is securely connected to the computer,...install new cartridges if necessary. • Turn the printer off the printer. If Troubleshooting does not solve your problem Visit our Web site at http://support.dell.com to find the following : CHANGE THE LANGUAGE USING THE PRINTER MENUS 1 From the printer control panel, navigate to: > Setup > > Device...
... Use this checklist to solve most printer problems: • Make sure the power cord is plugged into the printer and into a properly grounded, working electrical outlet. • Make sure the printer is turned on. • Make sure the printer is securely connected to the computer,...install new cartridges if necessary. • Turn the printer off the printer. If Troubleshooting does not solve your problem Visit our Web site at http://support.dell.com to find the following : CHANGE THE LANGUAGE USING THE PRINTER MENUS 1 From the printer control panel, navigate to: > Setup > > Device...
User Manual
Page 122
...Before you encountered problems while installing, or if your printer does not appear in the list in Sleep mode. RECONNECT THE PRINTER POWER SUPPLY 1 Turn off the printer. 2 Unplug the power cord from the wall outlet, and then pull out the power cord from the power supply. 3 After one . 2 Firmly plug the ...square end of the USB cable into the back of the printer. 3 Firmly plug the ...
...Before you encountered problems while installing, or if your printer does not appear in the list in Sleep mode. RECONNECT THE PRINTER POWER SUPPLY 1 Turn off the printer. 2 Unplug the power cord from the wall outlet, and then pull out the power cord from the power supply. 3 After one . 2 Firmly plug the ...square end of the USB cable into the back of the printer. 3 Firmly plug the ...

User Manual
Page 123
... the computer. MAKE SURE THE PRINT JOB IS NOT PAUSED MAKE SURE YOUR PRINTER IS SET AS THE DEFAULT PRINTER RECONNECT THE PRINTER POWER SUPPLY 1 Turn off the printer. 2 Unplug the power cord from the wall outlet, and then pull out the power cord from the power supply. 3 After one . 2 Firmly plug the square end of the USB cable into...
... the computer. MAKE SURE THE PRINT JOB IS NOT PAUSED MAKE SURE YOUR PRINTER IS SET AS THE DEFAULT PRINTER RECONNECT THE PRINTER POWER SUPPLY 1 Turn off the printer. 2 Unplug the power cord from the wall outlet, and then pull out the power cord from the power supply. 3 After one . 2 Firmly plug the square end of the USB cable into...
User Manual
Page 124
...scroll to Deep Clean Printhead, and then press . RECONNECT THE PRINTER POWER SUPPLY 1 Turn off the printer. 2 Unplug the power cord from the wall outlet, and then pull out the power cord from the wall outlet, and then wait 10 seconds. 2 Insert the power cord into the wall outlet. 4 Turn on and off slowly, then... alignment page until printing is properly seated, and then try one minute, reconnect the power cord into the power supply, and then plug the power cord into the wall outlet, and then turn off the printer. Press to wake up or down arrow button to scroll to turn on page 15...
...scroll to Deep Clean Printhead, and then press . RECONNECT THE PRINTER POWER SUPPLY 1 Turn off the printer. 2 Unplug the power cord from the wall outlet, and then pull out the power cord from the wall outlet, and then wait 10 seconds. 2 Insert the power cord into the wall outlet. 4 Turn on and off slowly, then... alignment page until printing is properly seated, and then try one minute, reconnect the power cord into the power supply, and then plug the power cord into the wall outlet, and then turn off the printer. Press to wake up or down arrow button to scroll to turn on page 15...

User Manual
Page 151
... USB port on the computer is connected to the printer model on our Web site. RECONNECT THE PRINTER POWER SUPPLY 1 Turn off the printer. 2 Unplug the power cord from the wall outlet, and then pull out the power cord from the power supply. 3 After one of the printer software on the printer. Troubleshooting 151 Notes: • Your port may cause connection...
... USB port on the computer is connected to the printer model on our Web site. RECONNECT THE PRINTER POWER SUPPLY 1 Turn off the printer. 2 Unplug the power cord from the wall outlet, and then pull out the power cord from the power supply. 3 After one of the printer software on the printer. Troubleshooting 151 Notes: • Your port may cause connection...


