User Manual
Page 3
Contents 3 Contents Safety information 7 About your printer 8 Thank you for choosing this printer!...8 Minimizing your printer's environmental impact 8 Finding information about the printer...9 Understanding the parts of the printer 11 Ordering and replacing supplies 14 Ordering ink cartridges...14 Replacing ink cartridges...15 Recycling Dell products...16 Using the printer control panel buttons and menus 18 Replacing the language sheet...18 Using...
Contents 3 Contents Safety information 7 About your printer 8 Thank you for choosing this printer!...8 Minimizing your printer's environmental impact 8 Finding information about the printer...9 Understanding the parts of the printer 11 Ordering and replacing supplies 14 Ordering ink cartridges...14 Replacing ink cartridges...15 Recycling Dell products...16 Using the printer control panel buttons and menus 18 Replacing the language sheet...18 Using...
User Manual
Page 5
......79 Receiving faxes...81 Faxing FAQ...82 Networking 89 Installing the printer on a wireless network 89 Advanced wireless setup...96 Networking FAQ...103 Maintaining the printer 117 Maintaining ink cartridges...117 Cleaning the exterior of the printer...118 Cleaning the scanner glass...119 Moving the printer to another location 119 Troubleshooting 121 Before you troubleshoot...121...
......79 Receiving faxes...81 Faxing FAQ...82 Networking 89 Installing the printer on a wireless network 89 Advanced wireless setup...96 Networking FAQ...103 Maintaining the printer 117 Maintaining ink cartridges...117 Cleaning the exterior of the printer...118 Cleaning the scanner glass...119 Moving the printer to another location 119 Troubleshooting 121 Before you troubleshoot...121...

User Manual
Page 13
About your printer 13 Use the To 22 Jam clearance cover Access and clear paper jams. 23 Ink cartridge access area Install, replace, or remove ink cartridges. 24 Scanner unit • Access the ink cartridges and printhead. • Clear paper jams.
About your printer 13 Use the To 22 Jam clearance cover Access and clear paper jams. 23 Ink cartridge access area Install, replace, or remove ink cartridges. 24 Scanner unit • Access the ink cartridges and printhead. • Clear paper jams.
User Manual
Page 15
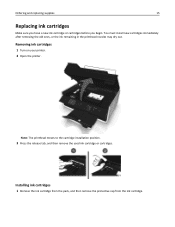
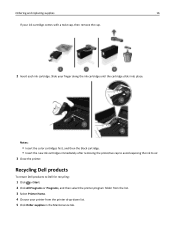
Removing ink cartridges 1 Turn on your printer. 2 Open the printer. Installing ink cartridges 1 Remove the ink cartridge from the pack, and then remove the protective cap from the ink cartridge. You must install new cartridges immediately after removing the old ones, or the ink remaining in the printhead nozzles may dry out. Note: The printhead moves to the cartridge installation position. 3 Press the release...
Removing ink cartridges 1 Turn on your printer. 2 Open the printer. Installing ink cartridges 1 Remove the ink cartridge from the pack, and then remove the protective cap from the ink cartridge. You must install new cartridges immediately after removing the old ones, or the ink remaining in the printhead nozzles may dry out. Note: The printhead moves to the cartridge installation position. 3 Press the release...
User Manual
Page 16
.... 4 Choose your finger along the ink cartridge until the cartridge clicks into place. Recycling Dell products To return Dell products to air. 3 Close the printer. Notes: • Insert the color cartridges first, and then the black cartridge. • Insert the new ink cartridges immediately after removing the protective cap to avoid exposing the ink to Dell for recycling: 1 Click or Start. 2 Click...
.... 4 Choose your finger along the ink cartridge until the cartridge clicks into place. Recycling Dell products To return Dell products to air. 3 Close the printer. Notes: • Insert the color cartridges first, and then the black cartridge. • Insert the new ink cartridges immediately after removing the protective cap to avoid exposing the ink to Dell for recycling: 1 Click or Start. 2 Click...
User Manual
Page 25
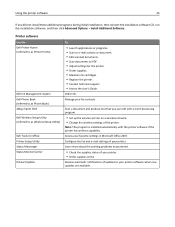
... notifications of your printer. Order ink. Access your fax contacts. Printer software Use the Dell Printer Home (referred to as Printer Home) Dell Ink Management System Dell Phone Book (referred to as Phone Book) Abbyy Sprint OCR Dell Wireless Setup Utility (referred to as Wireless Setup Utility) Dell Tools for the printer. • Order supplies. • Maintain ink cartridges. • Register the printer. • Contact...
... notifications of your printer. Order ink. Access your fax contacts. Printer software Use the Dell Printer Home (referred to as Printer Home) Dell Ink Management System Dell Phone Book (referred to as Phone Book) Abbyy Sprint OCR Dell Wireless Setup Utility (referred to as Wireless Setup Utility) Dell Tools for the printer. • Order supplies. • Maintain ink cartridges. • Register the printer. • Contact...

User Manual
Page 34
...set (collated) or to print the copies as it is enough ink in the ink cartridges. • Remove each copy as a set the printer, paper size, and orientation. 3 Click OK. 4 From the menu bar, choose File > Print. 5 From the Printer pop‑up menu, choose your print job. • Select ...a higher print quality for your printer. 6 From the print options menu, ...
...set (collated) or to print the copies as it is enough ink in the ink cartridges. • Remove each copy as a set the printer, paper size, and orientation. 3 Click OK. 4 From the menu bar, choose File > Print. 5 From the Printer pop‑up menu, choose your print job. • Select ...a higher print quality for your printer. 6 From the print options menu, ...

User Manual
Page 117
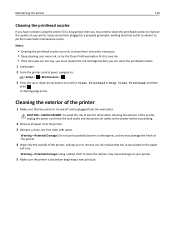
... until printing is finished. If print quality has not improved, then clean the printhead nozzles. Maintaining the printer 117 Maintaining the printer Maintaining ink cartridges In addition to the following tasks that you can perform, your printer performs automatic maintenance cycles if it is turned off. It will briefly come out of Sleep mode or...
... until printing is finished. If print quality has not improved, then clean the printhead nozzles. Maintaining the printer 117 Maintaining the printer Maintaining ink cartridges In addition to the following tasks that you can perform, your printer performs automatic maintenance cycles if it is turned off. It will briefly come out of Sleep mode or...
User Manual
Page 118
... too low, you must replace the ink cartridges before beginning a new print job. Warning-Potential Damage: Do not use household cleaners or detergents, as they may need to clean the printhead nozzles to improve the quality of the printer, making sure to remove any ink residue that the printer is dry before you may damage...
... too low, you must replace the ink cartridges before beginning a new print job. Warning-Potential Damage: Do not use household cleaners or detergents, as they may need to clean the printhead nozzles to improve the quality of the printer, making sure to remove any ink residue that the printer is dry before you may damage...
User Manual
Page 121
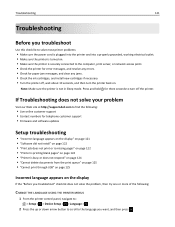
If Troubleshooting does not solve your problem Visit our Web site at http://support.dell.com to find the following : CHANGE THE LANGUAGE USING THE PRINTER MENUS 1 From the printer control panel, navigate to: > Setup > > Device Setup > > Language > 2 Press the up or down arrow ..., print server, or network access point. • Check the printer for error messages, and resolve any jams. • Check the ink cartridges, and install new cartridges if necessary. • Turn the printer off the printer. Troubleshooting 121 Troubleshooting Before you troubleshoot Use this checklist to solve...
If Troubleshooting does not solve your problem Visit our Web site at http://support.dell.com to find the following : CHANGE THE LANGUAGE USING THE PRINTER MENUS 1 From the printer control panel, navigate to: > Setup > > Device Setup > > Language > 2 Press the up or down arrow ..., print server, or network access point. • Check the printer for error messages, and resolve any jams. • Check the ink cartridges, and install new cartridges if necessary. • Turn the printer off the printer. Troubleshooting 121 Troubleshooting Before you troubleshoot Use this checklist to solve...
User Manual
Page 122
... plug the rectangular end of the USB cable into the matching color slot of the printhead. 3 Close the printer. The cartridges should click firmly into the USB port of the following : MAKE SURE THAT YOUR COMPUTER MEETS THE MINIMUM SYSTEM REQUIREMENTS ...: If you reinstall the software, do the following : MAKE SURE THE INK CARTRIDGES ARE INSERTED CORRECTLY 1 Turn the printer on, and then open the printer. 2 Make sure the cartridges are inserted correctly. RECONNECT THE PRINTER POWER SUPPLY 1 Turn off the printer. 2 Unplug the power cord from the wall outlet, and then pull out...
... plug the rectangular end of the USB cable into the matching color slot of the printhead. 3 Close the printer. The cartridges should click firmly into the USB port of the following : MAKE SURE THAT YOUR COMPUTER MEETS THE MINIMUM SYSTEM REQUIREMENTS ...: If you reinstall the software, do the following : MAKE SURE THE INK CARTRIDGES ARE INSERTED CORRECTLY 1 Turn the printer on, and then open the printer. 2 Make sure the cartridges are inserted correctly. RECONNECT THE PRINTER POWER SUPPLY 1 Turn off the printer. 2 Unplug the power cord from the wall outlet, and then pull out...
User Manual
Page 124
.... Press and hold for three seconds to Deep Clean Printhead, and then press . An alignment page prints. REINSTALL THE INK CARTRIDGES AND DEEP CLEAN AND ALIGN THE PRINTHEAD 1 Reinstall the ink cartridges, see "Replacing ink cartridges" on the printer. A cleaning page prints. 5 Load plain, unmarked paper. 6 From the Maintenance menu screen, press the up or down arrow...
.... Press and hold for three seconds to Deep Clean Printhead, and then press . An alignment page prints. REINSTALL THE INK CARTRIDGES AND DEEP CLEAN AND ALIGN THE PRINTHEAD 1 Reinstall the ink cartridges, see "Replacing ink cartridges" on the printer. A cleaning page prints. 5 Load plain, unmarked paper. 6 From the Maintenance menu screen, press the up or down arrow...
User Manual
Page 126
...press • Press to cancel the current job. Close Printer The printer is open. Cannot Collate Job Try one or more of the following : • Check the ink cartridges. 1 Open the printer, and then remove and reinstall the ink cartridges. 2 Load a plain and unmarked A4‑ or ...letter‑size paper. Troubleshooting 126 Understanding printer messages Alignment Problem Try any markings on used paper, which...
...press • Press to cancel the current job. Close Printer The printer is open. Cannot Collate Job Try one or more of the following : • Check the ink cartridges. 1 Open the printer, and then remove and reinstall the ink cartridges. 2 Load a plain and unmarked A4‑ or ...letter‑size paper. Troubleshooting 126 Understanding printer messages Alignment Problem Try any markings on used paper, which...
User Manual
Page 127
.... • Install the specified ink cartridges properly. • Turn the printer off, then wait about 10 seconds, and then turn the printer back on your printer. • Press or to clear the message. Ink Cartridge Missing Try one or more of the following: • Install the specified missing ink cartridge or cartridges. • Reinsert the specified ink cartridge or cartridges. • Press or...
.... • Install the specified ink cartridges properly. • Turn the printer off, then wait about 10 seconds, and then turn the printer back on your printer. • Press or to clear the message. Ink Cartridge Missing Try one or more of the following: • Install the specified missing ink cartridge or cartridges. • Reinsert the specified ink cartridge or cartridges. • Press or...
User Manual
Page 128
...[Type] Paper Try one or more of the following : • Depending on your printer settings, you replace the specified cartridge. • See the User's Guide for a list of supported ink cartridges. to cancel the current job. Printer Memory Full Try one or more of the following : • Load the correct paper... slot or USB port. • Touch OK or press to replace the specified ink cartridge soon. Try one or more of the following : • Press or to continue printing. Troubleshooting 128 Ink Low You may not be allowed to reduce the quality of the network connection....
...[Type] Paper Try one or more of the following : • Depending on your printer settings, you replace the specified cartridge. • See the User's Guide for a list of supported ink cartridges. to cancel the current job. Printer Memory Full Try one or more of the following : • Load the correct paper... slot or USB port. • Touch OK or press to replace the specified ink cartridge soon. Try one or more of the following : • Press or to continue printing. Troubleshooting 128 Ink Low You may not be allowed to reduce the quality of the network connection....
User Manual
Page 130
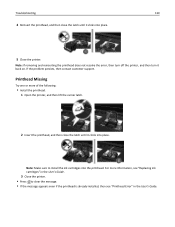
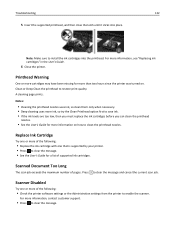
Printhead Missing Try one or more information, see "Replacing ink cartridges" in the User's Guide. 3 Close the printer. • Press to install the ink cartridges into the printhead. For more of the following: • Install the printhead. 1 Open the printer, and then lift the carrier latch. 2 Insert the printhead, and... problem persists, then contact customer support. Note: If removing and reinserting the printhead does not resolve the error, then turn off the printer, and then turn it clicks into place. Note: Make sure to clear the message. • If the message appears even if ...
Printhead Missing Try one or more information, see "Replacing ink cartridges" in the User's Guide. 3 Close the printer. • Press to install the ink cartridges into the printhead. For more of the following: • Install the printhead. 1 Open the printer, and then lift the carrier latch. 2 Insert the printhead, and... problem persists, then contact customer support. Note: If removing and reinserting the printhead does not resolve the error, then turn off the printer, and then turn it clicks into place. Note: Make sure to clear the message. • If the message appears even if ...
User Manual
Page 132
... Document Too Long The scan job exceeds the maximum number of supported ink cartridges. A cleaning page prints. For more cartridges may have been missing for a list of pages. For more than two hours since the printer was turned on how to clear the message. • See the... information, see "Replacing ink cartridges" in the User's Guide. 6 Close the printer. Notes: • Cleaning the printhead nozzles uses ink, so clean them only when necessary. • Deep cleaning uses more ink, so try the Clean Printhead option first to save ink. • If the ink levels are too low...
... Document Too Long The scan job exceeds the maximum number of supported ink cartridges. A cleaning page prints. For more cartridges may have been missing for a list of pages. For more than two hours since the printer was turned on how to clear the message. • See the... information, see "Replacing ink cartridges" in the User's Guide. 6 Close the printer. Notes: • Cleaning the printhead nozzles uses ink, so clean them only when necessary. • Deep cleaning uses more ink, so try the Clean Printhead option first to save ink. • If the ink levels are too low...

User Manual
Page 141
...mm (0.5 in (Borderless). 4 Click OK. 5 From the menu bar, choose File > Print. 6 From the Printer pop‑up menu, choose your printer. 3 From the Paper Size pop‑up menu, choose Best or Photo. 10 Click Print. Troubleshooting 141 CHECK ...6.35 mm (0.25 in.) for letter‑size paper - 3.37 mm (0.133 in.) for " pop‑up menu, choose your printer. 7 From the print options pop‑up menu, choose Quality & Media. 8 From the Paper Type pop‑up menu, choose...solve the problem, then try one or more of the following: CHECK THE INK LEVELS Replace low or empty ink cartridges.
...mm (0.5 in (Borderless). 4 Click OK. 5 From the menu bar, choose File > Print. 6 From the Printer pop‑up menu, choose your printer. 3 From the Paper Size pop‑up menu, choose Best or Photo. 10 Click Print. Troubleshooting 141 CHECK ...6.35 mm (0.25 in.) for letter‑size paper - 3.37 mm (0.133 in.) for " pop‑up menu, choose your printer. 7 From the print options pop‑up menu, choose Quality & Media. 8 From the Paper Type pop‑up menu, choose...solve the problem, then try one or more of the following: CHECK THE INK LEVELS Replace low or empty ink cartridges.
User Manual
Page 142
... more of graphics and images in use. • Minimize the number and size of the following : CHECK THE USB CONNECTION BETWEEN THE PRINTER AND COMPUTER If your computer. REFRESH YOUR NETWORK CONNECTIONS 1 If your computer is connected to an Ethernet or wireless network, then turn off... different USB cable. Troubleshooting 142 MAKE SURE THE INK CARTRIDGES ARE PROPERLY INSTALLED ALIGN THE PRINTHEAD CLEAN OR DEEP CLEAN THE PRINTHEAD NOZZLES Note: If these solutions do not remove the streaks or lines on . 2 Wait one minute for the printer and computer to reestablish the connection. CLOSE ALL ...
... more of graphics and images in use. • Minimize the number and size of the following : CHECK THE USB CONNECTION BETWEEN THE PRINTER AND COMPUTER If your computer. REFRESH YOUR NETWORK CONNECTIONS 1 If your computer is connected to an Ethernet or wireless network, then turn off... different USB cable. Troubleshooting 142 MAKE SURE THE INK CARTRIDGES ARE PROPERLY INSTALLED ALIGN THE PRINTHEAD CLEAN OR DEEP CLEAN THE PRINTHEAD NOZZLES Note: If these solutions do not remove the streaks or lines on . 2 Wait one minute for the printer and computer to reestablish the connection. CLOSE ALL ...
User Manual
Page 173
... during wireless setup 90 infrastructure network 109 ink conserving 8 ink cartridge access area 13 Ink Cartridge Error 127 Ink Cartridge Missing 127 ink cartridges installing 15 ordering 14 removing 15 replacing 15 ink levels checking 117 Ink Low 128 inserting a flash drive 40 installation cable 108 installing network printer 115 installing optional software 27 installing printer on wireless network (Macintosh) 92 on wireless...
... during wireless setup 90 infrastructure network 109 ink conserving 8 ink cartridge access area 13 Ink Cartridge Error 127 Ink Cartridge Missing 127 ink cartridges installing 15 ordering 14 removing 15 replacing 15 ink levels checking 117 Ink Low 128 inserting a flash drive 40 installation cable 108 installing network printer 115 installing optional software 27 installing printer on wireless network (Macintosh) 92 on wireless...


