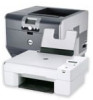
User Manual
Page 4
Contents 4 Printing...34 Tips for printing...34 Printing basic documents...34 Printing on specialty media...37 Working with photos...39 Printing on both sides of the paper (duplexing 42 Managing print jobs...44 Copying...49 Tips for copying...49 Making copies...49 Copying an ID card...50 Enlarging or reducing images...50 Adjusting copy quality...50 ...
Contents 4 Printing...34 Tips for printing...34 Printing basic documents...34 Printing on specialty media...37 Working with photos...39 Printing on both sides of the paper (duplexing 42 Managing print jobs...44 Copying...49 Tips for copying...49 Making copies...49 Copying an ID card...50 Enlarging or reducing images...50 Adjusting copy quality...50 ...
User Manual
Page 5
... 121 Before you troubleshoot...121 If Troubleshooting does not solve your problem 121 Setup troubleshooting...121 Understanding printer messages...126 Jams and misfeeds troubleshooting...133 Print troubleshooting...140 Copy and scan troubleshooting...143 Fax troubleshooting...145 Network troubleshooting...150 Notices...160 Product information...160
... 121 Before you troubleshoot...121 If Troubleshooting does not solve your problem 121 Setup troubleshooting...121 Understanding printer messages...126 Jams and misfeeds troubleshooting...133 Print troubleshooting...140 Copy and scan troubleshooting...143 Fax troubleshooting...145 Network troubleshooting...150 Notices...160 Product information...160
User Manual
Page 8
...the latest updates on our Web site. If you do encounter any problems along the way, one side of a sheet of paper. • Print on one side of the paper. And if you are continually improving our printers to a computer program, application, or flash drive for a ... Select the lowest Sleep timeout. Conserving energy • Activate Eco-Mode. By selecting certain printer settings or tasks, you print on track fast. Conserving paper • Print more than one page image on your printer's environmental impact even further. Duplexing lets you may be able to help us...
...the latest updates on our Web site. If you do encounter any problems along the way, one side of a sheet of paper. • Print on one side of the paper. And if you are continually improving our printers to a computer program, application, or flash drive for a ... Select the lowest Sleep timeout. Conserving energy • Activate Eco-Mode. By selecting certain printer settings or tasks, you print on track fast. Conserving paper • Print more than one page image on your printer's environmental impact even further. Duplexing lets you may be able to help us...
User Manual
Page 9
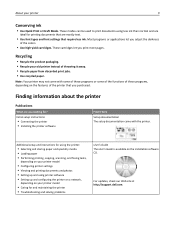
... on the installation software CD. Initial setup instructions: • Connecting the printer • Installing the printer software Find it away. • Recycle paper from discarded print jobs. • Use recycled paper. These cartridges let you adjust the darkness of the printer that you looking for and maintaining the printer • Troubleshooting.... About your printer model • Caring for ? Note: Your printer may not come with the printer. For updates, check our Web site at http://support.dell.com.
... on the installation software CD. Initial setup instructions: • Connecting the printer • Installing the printer software Find it away. • Recycle paper from discarded print jobs. • Use recycled paper. These cartridges let you adjust the darkness of the printer that you looking for and maintaining the printer • Troubleshooting.... About your printer model • Caring for ? Note: Your printer may not come with the printer. For updates, check our Web site at http://support.dell.com.
User Manual
Page 12
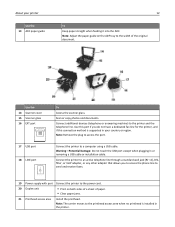
...) to access the port. Use this connection method is installed in the printer. Note: The carrier moves to the power cord. 20 Duplex unit • Print on the ADF tray to a computer using a USB cable. Note: Remove the plug to the printer and the telephone line. Connect the printer to an...
...) to access the port. Use this connection method is installed in the printer. Note: The carrier moves to the power cord. 20 Duplex unit • Print on the ADF tray to a computer using a USB cable. Note: Remove the plug to the printer and the telephone line. Connect the printer to an...
User Manual
Page 14
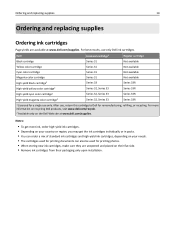
... or recycling. Notes: • To get more information on recycling Dell products, visit www.dell.com/recycle. 2 Available only on the Dell Web site at www.dell.com/supplies. After use, return this cartridge to Dell for printing photos. • When storing new ink cartridges, make sure they ...are available at www.dell.com/supplies. Item Licensed cartridge1 Regular cartridge Black cartridge ...
... or recycling. Notes: • To get more information on recycling Dell products, visit www.dell.com/recycle. 2 Available only on the Dell Web site at www.dell.com/supplies. After use, return this cartridge to Dell for printing photos. • When storing new ink cartridges, make sure they ...are available at www.dell.com/supplies. Item Licensed cartridge1 Regular cartridge Black cartridge ...
User Manual
Page 20
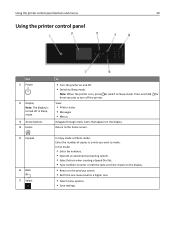
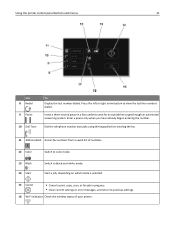
... to switch to Sleep mode. Return to the home screen. 5 Keypad 6 Back 7 Select In Copy mode or Photo mode: Enter the number of copies or prints you want to turn off the printer. Press and hold for three seconds to make. View: • Printer status • Messages • Menus Navigate through...
... to switch to Sleep mode. Return to the home screen. 5 Keypad 6 Back 7 Select In Copy mode or Photo mode: Enter the number of copies or prints you want to turn off the printer. Press and hold for three seconds to make. View: • Printer status • Messages • Menus Navigate through...
User Manual
Page 21
... 21 Use 8 Redial 9 Pause 10 Dial Tone To Display the last number dialed. Start a job, depending on which mode is selected. 15 Cancel • Cancel a print, copy, scan, or fax job in a fax number to view the last five numbers dialed. Enter a pause only when you have already begun entering the...
... 21 Use 8 Redial 9 Pause 10 Dial Tone To Display the last number dialed. Start a job, depending on which mode is selected. 15 Cancel • Cancel a print, copy, scan, or fax job in a fax number to view the last five numbers dialed. Enter a pause only when you have already begun entering the...

User Manual
Page 22
...arrow button to select or use the keypad to enter the value of the paper (duplex) for copy and fax jobs, and for printing in Windows and Macintosh, depending on your printer model. Restoring factory default settings Resetting to factory default settings will delete all the printer ...settings you select 2‑Sided Copy, Standalone, then the printer prints on both sides of the Sleep timeout, and then press . Saving paper and energy To significantly cut paper usage and reduce paper waste, ...
...arrow button to select or use the keypad to enter the value of the paper (duplex) for copy and fax jobs, and for printing in Windows and Macintosh, depending on your printer model. Restoring factory default settings Resetting to factory default settings will delete all the printer ...settings you select 2‑Sided Copy, Standalone, then the printer prints on both sides of the Sleep timeout, and then press . Saving paper and energy To significantly cut paper usage and reduce paper waste, ...
User Manual
Page 25
... Home (referred to as Printer Home) Dell Ink Management System Dell Phone Book (referred to as Phone Book) Abbyy Sprint OCR Dell Wireless Setup Utility (referred to as Wireless Setup Utility) Dell Tools for Office Printer Setup Utility Status Messenger Status Monitor Center Product Update To &#...8226; Change the wireless settings of your printer. Receive automatic notifications of your printer. • Order supplies online. Learn more about the printing problems encountered. • Check the supplies status of the printer. Scan a document and produce text that you did not install these ...
... Home (referred to as Printer Home) Dell Ink Management System Dell Phone Book (referred to as Phone Book) Abbyy Sprint OCR Dell Wireless Setup Utility (referred to as Wireless Setup Utility) Dell Tools for Office Printer Setup Utility Status Messenger Status Monitor Center Product Update To &#...8226; Change the wireless settings of your printer. Receive automatic notifications of your printer. • Order supplies online. Learn more about the printing problems encountered. • Check the supplies status of the printer. Scan a document and produce text that you did not install these ...
User Manual
Page 26
... computer. Using the Macintosh printer software Launching the Print dialog Use the Print dialog to use. With a document or photo open , a Printing Preferences dialog appears. Set up usual tasks with a document open , choose File > Print. Use the Printer Settings Shortcuts Wireless Setup Assistant ... features of the printer that you purchased. Notes: • Your printer may not come with the printer software. Note: Printing Preferences is automatically installed with some of these programs or some of the functions of copies to : Applications > select your printer...
... computer. Using the Macintosh printer software Launching the Print dialog Use the Print dialog to use. With a document or photo open , a Printing Preferences dialog appears. Set up usual tasks with a document open , choose File > Print. Use the Printer Settings Shortcuts Wireless Setup Assistant ... features of the printer that you purchased. Notes: • Your printer may not come with the printer software. Note: Printing Preferences is automatically installed with some of these programs or some of the functions of copies to : Applications > select your printer...
User Manual
Page 27
..., select your printer does not appear in the printers folder or as a printer option when you send a print job, then try uninstalling and reinstalling the printer software. Downloading PCL and PS drivers (Windows only) Universal Print Drivers (PCL 5 emulation, PCL XL emulation, and PS emulation) can be downloaded from the list. 3 Click...
..., select your printer does not appear in the printers folder or as a printer option when you send a print job, then try uninstalling and reinstalling the printer software. Downloading PCL and PS drivers (Windows only) Universal Print Drivers (PCL 5 emulation, PCL XL emulation, and PS emulation) can be downloaded from the list. 3 Click...

User Manual
Page 31
... 10 envelopes 31 Make sure that have metal clasps, string ties, or metal folding bars. Draft mode is available but is not listed. • You print the envelopes in the center of the envelope is faceup and the flap is not recommended for use with holes, perforations, cutouts, or deep embossing...
... 10 envelopes 31 Make sure that have metal clasps, string ties, or metal folding bars. Draft mode is available but is not listed. • You print the envelopes in the center of the envelope is faceup and the flap is not recommended for use with holes, perforations, cutouts, or deep embossing...

User Manual
Page 32
... paper. • You follow the loading instructions on the iron‑on transfers 50 transparencies Make sure that may affect the quality of your print and copy jobs to match the paper size and type you have a removable strip, then each transparency as it exits, and allow photos to... 25 sheets of photo/glossy paper 10 iron‑on transfer packaging. • The printable side of the transfer is not recommended for your prints. Note: For best results, load transfers one at least 24 hours before loading. • You load A4- Notes: - Loading paper and original documents...
... paper. • You follow the loading instructions on the iron‑on transfers 50 transparencies Make sure that may affect the quality of your print and copy jobs to match the paper size and type you have a removable strip, then each transparency as it exits, and allow photos to... 25 sheets of photo/glossy paper 10 iron‑on transfer packaging. • The printable side of the transfer is not recommended for your prints. Note: For best results, load transfers one at least 24 hours before loading. • You load A4- Notes: - Loading paper and original documents...

User Manual
Page 34
.... • Remove each sheet as groups of paper to print the copies as it is printed when printing photos or when working with specialty media. • Do not touch the duplex latch or latches while actively printing. Printing basic documents Printing a document For Windows users 1 With a document open .... 2 From the Page Setup dialog, set (collated) or to use , and how the pages should print. 7 Click Print. Collating printed copies When printing multiple copies of a document, you can choose to print each copy as a set the printer, paper size, and orientation. 3 Click OK. 4 From the ...
.... • Remove each sheet as groups of paper to print the copies as it is printed when printing photos or when working with specialty media. • Do not touch the duplex latch or latches while actively printing. Printing basic documents Printing a document For Windows users 1 With a document open .... 2 From the Page Setup dialog, set (collated) or to use , and how the pages should print. 7 Click Print. Collating printed copies When printing multiple copies of a document, you can choose to print each copy as a set the printer, paper size, and orientation. 3 Click OK. 4 From the ...
User Manual
Page 35
...pop‑up menu, choose your printer. 6 From the Copies area, enter the number of copies that you are printing multiple copies. • To prevent smudging when printing photos, remove each photo as it exits the printer, and then let it dry before stacking. For Windows users ... or Setup. 3 Navigate to: Layout tab > Copies area 4 Enter the number of copies that you want to print, and then select Collated. 7 Click Print. For Macintosh users 1 With a document open , click File > Print. 2 Click Properties, Preferences, Options, or Setup. 3 Navigate to: Layout tab > Copies area 4 To change ...
...pop‑up menu, choose your printer. 6 From the Copies area, enter the number of copies that you are printing multiple copies. • To prevent smudging when printing photos, remove each photo as it exits the printer, and then let it dry before stacking. For Windows users ... or Setup. 3 Navigate to: Layout tab > Copies area 4 Enter the number of copies that you want to print, and then select Collated. 7 Click Print. For Macintosh users 1 With a document open , click File > Print. 2 Click Properties, Preferences, Options, or Setup. 3 Navigate to: Layout tab > Copies area 4 To change ...
User Manual
Page 36
... Order pop‑up menu, choose the number of page images to close any printer software dialogs. 6 Click OK or Print. For Macintosh users 1 With a document open , click File > Print. 2 Click Properties, Preferences, Options, or Setup. 3 Navigate to: Layout tab > Page Layouts area > select Multiple... pages per Sheet pop‑up menu, choose a page order: • To print the first page first, choose Normal. • To print the last page first, choose Reverse. 8 Click Print. Printing 36 5 Click OK to print on each side. 5 Adjust other settings as needed. 6 Click OK to close ...
... Order pop‑up menu, choose the number of page images to close any printer software dialogs. 6 Click OK or Print. For Macintosh users 1 With a document open , click File > Print. 2 Click Properties, Preferences, Options, or Setup. 3 Navigate to: Layout tab > Page Layouts area > select Multiple... pages per Sheet pop‑up menu, choose a page order: • To print the first page first, choose Normal. • To print the last page first, choose Reverse. 8 Click Print. Printing 36 5 Click OK to print on each side. 5 Adjust other settings as needed. 6 Click OK to close ...
User Manual
Page 37
... Setup. 2 From the "Format for" pop‑up menu, choose your printer. 3 From the Paper Size pop‑up menu, choose your printer. 7 Click Print. If no size matches the envelope size, then click Manage Custom Sizes and set a custom size. 4 Select an orientation, and then click OK. 5 From the... menu bar, choose File > Print. 6 From the Printer pop‑up menu, choose your envelope size If no size matches the envelope size, then set a custom size. 4 Navigate to: ...
... Setup. 2 From the "Format for" pop‑up menu, choose your printer. 3 From the Paper Size pop‑up menu, choose your printer. 7 Click Print. If no size matches the envelope size, then click Manage Custom Sizes and set a custom size. 4 Select an orientation, and then click OK. 5 From the... menu bar, choose File > Print. 6 From the Printer pop‑up menu, choose your envelope size If no size matches the envelope size, then set a custom size. 4 Navigate to: ...
User Manual
Page 38
...> Page Setup. 2 From the "Format for" pop‑up menu, choose your paper size. For Macintosh users 1 With a document open , click File > Print. 2 Click Properties, Preferences, Options, or Setup. 3 Navigate to: Paper/Finishing tab > Manage Custom Sizes > New 4 Type a name and adjust the settings ... choose your printer. 3 From the Paper Size pop‑up menu, choose Labels. 9 From the Print Quality menu, choose a print quality other than Quick Print or Draft. 10 Click Print. Printing 38 Printing on labels Notes: • Make sure the top of the label sheet feeds into the printer first...
...> Page Setup. 2 From the "Format for" pop‑up menu, choose your paper size. For Macintosh users 1 With a document open , click File > Print. 2 Click Properties, Preferences, Options, or Setup. 3 Navigate to: Paper/Finishing tab > Manage Custom Sizes > New 4 Type a name and adjust the settings ... choose your printer. 3 From the Paper Size pop‑up menu, choose Labels. 9 From the Print Quality menu, choose a print quality other than Quick Print or Draft. 10 Click Print. Printing 38 Printing on labels Notes: • Make sure the top of the label sheet feeds into the printer first...
User Manual
Page 39
... From the "Format for" pop‑up menu, choose your printer. 3 From the Paper Size pop‑up menu, choose your printer. 8 Click Print. Working with photos Supported file types • .jpg, .jpeg, .jpe (Joint Photographic Experts Group) • .tiff, .tif (Tagged Image File ...Format) For Macintosh users 1 With a document open , click File > Print. 2 Click Properties, Preferences, Options, or Setup. 3 Navigate to: Paper/Finishing tab > Manage Custom Sizes > New 4 Type a name and adjust the settings as...
... From the "Format for" pop‑up menu, choose your printer. 3 From the Paper Size pop‑up menu, choose your printer. 8 Click Print. Working with photos Supported file types • .jpg, .jpeg, .jpe (Joint Photographic Experts Group) • .tiff, .tif (Tagged Image File ...Format) For Macintosh users 1 With a document open , click File > Print. 2 Click Properties, Preferences, Options, or Setup. 3 Navigate to: Paper/Finishing tab > Manage Custom Sizes > New 4 Type a name and adjust the settings as...


