User Guide
Page 4
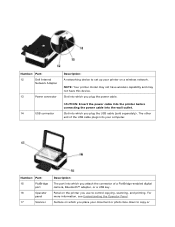
... Operator panel 17 Scanner Description: The port into which you attach the connector of the USB cable plugs into which you plug the power cable. Number: Part: 12 Dell Internal Network Adapter 13 Power connector 14 USB connector Description: A networking device to set ...see Understanding the Operator Panel. NOTE: Your printer model may not have wireless capability and may not have this device. CAUTION: Insert the power cable into the printer before connecting the power cable into which you place your printer on the printer you plug the USB cable (sold separately...
... Operator panel 17 Scanner Description: The port into which you attach the connector of the USB cable plugs into which you plug the power cable. Number: Part: 12 Dell Internal Network Adapter 13 Power connector 14 USB connector Description: A networking device to set ...see Understanding the Operator Panel. NOTE: Your printer model may not have wireless capability and may not have this device. CAUTION: Insert the power cable into the printer before connecting the power cable into which you place your printer on the printer you plug the USB cable (sold separately...
User Guide
Page 5
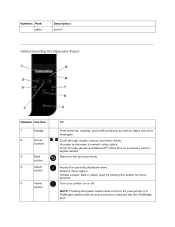
... the power button does not turn off . Scroll through photos and Microsoft® Office files on or off your printer if a PictBridge camera with an active session is inserted into the PictBridge port. Scroll through modes, menus, and menu items. Increase or decrease a numeric value option. Understanding the Operator Panel Number Use...
... the power button does not turn off . Scroll through photos and Microsoft® Office files on or off your printer if a PictBridge camera with an active session is inserted into the PictBridge port. Scroll through modes, menus, and menu items. Increase or decrease a numeric value option. Understanding the Operator Panel Number Use...
User Guide
Page 11
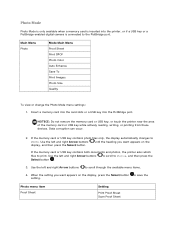
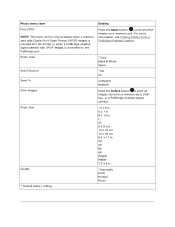
...Photo Color Auto Enhance Save To Print Images Photo Size Quality To view or change the Photo Mode menu settings: 1. NOTICE: Do not remove the memory card or USB key, or touch the printer near... want appears on the If the memory card or USB key contains both documents and photos, the printer asks which files to print. Use the left and right Arrow buttons display, and then press the... card into the card slots or a USB key into the printer, or if a USB key or a PictBridge-enabled digital camera is inserted into the PictBridge port. If the memory card or USB key contains photo files only...
...Photo Color Auto Enhance Save To Print Images Photo Size Quality To view or change the Photo Mode menu settings: 1. NOTICE: Do not remove the memory card or USB key, or touch the printer near... want appears on the If the memory card or USB key contains both documents and photos, the printer asks which files to print. Use the left and right Arrow buttons display, and then press the... card into the card slots or a USB key into the printer, or if a USB key or a PictBridge-enabled digital camera is inserted into the PictBridge port. If the memory card or USB key contains photo files only...
User Guide
Page 12
A4 A5 B5 A6 Hagaki Wallet 3.5 x 5 in . Photo Color Auto Enhance Save To Print Images Photo Size Quality * Default factory setting Setting...-enabled digital camera. *4 x 6 in. 5 x 7 in. 8 x 10 in. For more information, see Printing Photos From a PictBridge-Enabled Camera. *Color Black & White Sepia *Off On Computer Network Press the Select button to print all images stored on a memory card. L 2L 6 x 8 cm 10 x...memory card with Digital Print Order Format (DPOF) images is inserted into the printer or when a PictBridge-enabled digital camera with DPOF images is connected to the PictBridge...
A4 A5 B5 A6 Hagaki Wallet 3.5 x 5 in . Photo Color Auto Enhance Save To Print Images Photo Size Quality * Default factory setting Setting...-enabled digital camera. *4 x 6 in. 5 x 7 in. 8 x 10 in. For more information, see Printing Photos From a PictBridge-Enabled Camera. *Color Black & White Sepia *Off On Computer Network Press the Select button to print all images stored on a memory card. L 2L 6 x 8 cm 10 x...memory card with Digital Print Order Format (DPOF) images is inserted into the printer or when a PictBridge-enabled digital camera with DPOF images is connected to the PictBridge...
User Guide
Page 15
...File Mode menu settings: 1. Insert a memory card into the card slots or a USB key into the PictBridge port. Data corruption can occur. 3. a USB cable, and install the appropriate printer software on your USB key or memory card. Ensure that you insert a Bluetooth™ adapter (sold separately) ...into the PictBridge port. Use the left and right Arrow buttons to scroll to access the contents of the...
...File Mode menu settings: 1. Insert a memory card into the card slots or a USB key into the PictBridge port. Data corruption can occur. 3. a USB cable, and install the appropriate printer software on your USB key or memory card. Ensure that you insert a Bluetooth™ adapter (sold separately) ...into the PictBridge port. Use the left and right Arrow buttons to scroll to access the contents of the...

User Guide
Page 27
Insert one end of the memory card or PictBridge-enabled device while actively printing from PictBridge. NOTICE: Do not remove the PictBridge-enabled device or touch the printer near the area of the USB cable into the PictBridge port on ambient conditions). Insert the other end of ...the USB cable into the camera. 3. Turn on your camera for PictBridge printing. Data corruption can occur. This maximizes the life of the printer. The printer automatically enters PictBridge mode. 5. For...
Insert one end of the memory card or PictBridge-enabled device while actively printing from PictBridge. NOTICE: Do not remove the PictBridge-enabled device or touch the printer near the area of the USB cable into the PictBridge port on ambient conditions). Insert the other end of ...the USB cable into the camera. 3. Turn on your camera for PictBridge printing. Data corruption can occur. This maximizes the life of the printer. The printer automatically enters PictBridge mode. 5. For...
User Guide
Page 30
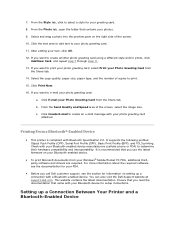
... your photo greeting card: a. c. This website contains the latest documentation. It supports the following profiles: Object Push Profile (OPP), Serial Port Profile (SPP), Basic Print Profile (BPP), and PCL3 printing. Setting up a connection with a Bluetooth-enabled device. From the Photo tab... device for your Photo Greeting Card from the Share tab. 14. If you call Dell customer support, see the documentation for information on setting up a Connection Between Your Printer and a Bluetooth-Enabled Device Check with Bluetooth Specification 2.0. Ensure that you use the ...
... your photo greeting card: a. c. This website contains the latest documentation. It supports the following profiles: Object Push Profile (OPP), Serial Port Profile (SPP), Basic Print Profile (BPP), and PCL3 printing. Setting up a connection with a Bluetooth-enabled device. From the Photo tab... device for your Photo Greeting Card from the Share tab. 14. If you call Dell customer support, see the documentation for information on setting up a Connection Between Your Printer and a Bluetooth-Enabled Device Check with Bluetooth Specification 2.0. Ensure that you use the ...

User Guide
Page 31
... need to repeat the setup if: You reset the printer to set up a connection between the printer and a Bluetooth-enabled device: 1. To set to the printer. Turn on every print job. Insert a USB Bluetooth adapter into the USB port located on the list, and then you are already 8 devices... on the front of the Bluetooth device list. You will use to send a print job to High, the printer saves a list of up a connection for Bluetooth printing information...
... need to repeat the setup if: You reset the printer to set up a connection between the printer and a Bluetooth-enabled device: 1. To set to the printer. Turn on every print job. Insert a USB Bluetooth adapter into the USB port located on the list, and then you are already 8 devices... on the front of the Bluetooth device list. You will use to send a print job to High, the printer saves a list of up a connection for Bluetooth printing information...

User Guide
Page 32
... the left and right Arrow buttons button . For more information, see Setting the Bluetooth Security Level. Turn on the printer is not included with the device for Bluetooth connection information. Use the left and right Arrow buttons Select button . to...A Bluetooth adapter is set up a connection to Discovery, and then press the Select 5. to scroll to the printer. The printer is not included with the printer. 3. Insert a Bluetooth USB adapter into the USB port. to scroll to BLUETOOTH, and then press the Select to scroll to accept a connection from a Bluetooth-enabled ...
... the left and right Arrow buttons button . For more information, see Setting the Bluetooth Security Level. Turn on the printer is not included with the device for Bluetooth connection information. Use the left and right Arrow buttons Select button . to...A Bluetooth adapter is set up a connection to Discovery, and then press the Select 5. to scroll to the printer. The printer is not included with the printer. 3. Insert a Bluetooth USB adapter into the USB port. to scroll to BLUETOOTH, and then press the Select to scroll to accept a connection from a Bluetooth-enabled ...

User Guide
Page 33
...key, and then press the Select button . 7. For more information, see Setting up a Connection Between Your Printer and a Bluetooth-Enabled Device. 5. Insert a USB Bluetooth adapter into the USB port. NOTE: A Bluetooth adapter is set to High, you set up the Bluetooth device to print to begin ...printing. 5. The Pass Key menu opens on the printer is not included with the Bluetooth device to the printer. For more information, see Setting ...
...key, and then press the Select button . 7. For more information, see Setting up a Connection Between Your Printer and a Bluetooth-Enabled Device. 5. Insert a USB Bluetooth adapter into the USB port. NOTE: A Bluetooth adapter is set to High, you set up the Bluetooth device to print to begin ...printing. 5. The Pass Key menu opens on the printer is not included with the Bluetooth device to the printer. For more information, see Setting ...
User Guide
Page 48
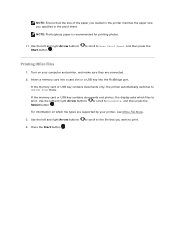
...press the Printing Office Files 1. to scroll to OFFICE FILE mode. For information on your printer, see Office File Mode. 3. Insert a memory card into a card slot or a USB key into the PictBridge port. If the memory card or USB key contains documents and photos, the display asks which ...file types are supported by your computer and printer, and make sure they are connected. 2. NOTE: Photo/glossy paper is recommended ...
...press the Printing Office Files 1. to scroll to OFFICE FILE mode. For information on your printer, see Office File Mode. 3. Insert a memory card into a card slot or a USB key into the PictBridge port. If the memory card or USB key contains documents and photos, the display asks which ...file types are supported by your computer and printer, and make sure they are connected. 2. NOTE: Photo/glossy paper is recommended ...

User Guide
Page 72
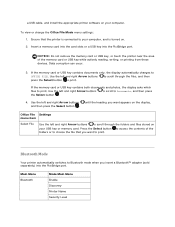
Insert a memory card into the memory card slot or a USB key into the PictBridge port on the front of the printer. To launch Memory Card Manager: 1. Using Memory Card Manager Memory Card Manager allows you to display, manage, edit, print, and save photos from your memory card or USB memory key to your computer.
Insert a memory card into the memory card slot or a USB key into the PictBridge port on the front of the printer. To launch Memory Card Manager: 1. Using Memory Card Manager Memory Card Manager allows you to display, manage, edit, print, and save photos from your memory card or USB memory key to your computer.
User Guide
Page 75
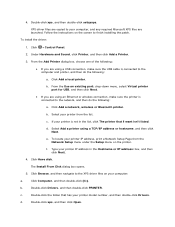
... using an Ethernet or wireless connection, make sure the USB cable is connected to your printer model number, and then double-click Drivers. To install the driver: 1. Click Control Panel. 2. b. b. Double-click xps, and then click Open. From the Use an existing port: drop-down menu, select Virtual printer port for USB, and then...
... using an Ethernet or wireless connection, make sure the USB cable is connected to your printer model number, and then double-click Drivers. To install the driver: 1. Click Control Panel. 2. b. b. Double-click xps, and then click Open. From the Use an existing port: drop-down menu, select Virtual printer port for USB, and then...

User Guide
Page 78
... may use anywhere from one to step 5. Go to four WEP keys. Select I Agree to the terms of the computer. Ensure that : Your wireless network is set up and working properly. The computer you are using is connected to the same wireless network where you want to complete... setup. Click Next. 7. If you are using your printer with a new Dell computer: Connect the USB cable between the port on the back of the printer and the port on the back of this license agreement, and ...
... may use anywhere from one to step 5. Go to four WEP keys. Select I Agree to the terms of the computer. Ensure that : Your wireless network is set up and working properly. The computer you are using is connected to the same wireless network where you want to complete... setup. Click Next. 7. If you are using your printer with a new Dell computer: Connect the USB cable between the port on the back of the printer and the port on the back of this license agreement, and ...

User Guide
Page 79
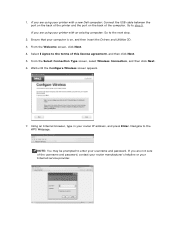
If you are using your printer with your router with a new Dell computer: Connect the USB cable between the port on the back of the router IP address, follow the instructions for the WPS logo. From the Welcome screen, click Next...are unsure of the printer and the port on a Wireless Network (recommended for most users). From the Select Connection Type screen, select Wireless Connection, and then click Next. 6. If you do not enable your wireless network security, configuring your printer using your printer with WPS configuration. (Consult your wireless network settings. Before ...
If you are using your printer with your router with a new Dell computer: Connect the USB cable between the port on the back of the router IP address, follow the instructions for the WPS logo. From the Welcome screen, click Next...are unsure of the printer and the port on a Wireless Network (recommended for most users). From the Select Connection Type screen, select Wireless Connection, and then click Next. 6. If you do not enable your wireless network security, configuring your printer using your printer with WPS configuration. (Consult your wireless network settings. Before ...
User Guide
Page 82
... then insert the Drivers and Utilities CD. 3. Ensure that your printer with a new Dell computer: Connect the USB cable between the port on the back of this license agreement, and then click Next. 5. Select I Agree to step 5. From the Select Connection Type screen, select Wireless Connection, and then click Next. 6. Wait until the Configure...
... then insert the Drivers and Utilities CD. 3. Ensure that your printer with a new Dell computer: Connect the USB cable between the port on the back of this license agreement, and then click Next. 5. Select I Agree to step 5. From the Select Connection Type screen, select Wireless Connection, and then click Next. 6. Wait until the Configure...
User Guide
Page 98
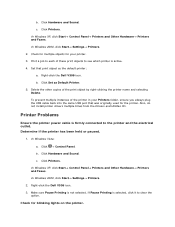
... you always plug the USB cable back into the same USB port that print object as Default Printer. 5. Set that was originally used for blinking lights on the printer. Right-click the Dell V305 icon. 3. Determine if the printer has been held or paused. 1. Printer Problems Ensure the printer power cable is not selected. Check for the...
... you always plug the USB cable back into the same USB port that print object as Default Printer. 5. Set that was originally used for blinking lights on the printer. Right-click the Dell V305 icon. 3. Determine if the printer has been held or paused. 1. Printer Problems Ensure the printer power cable is not selected. Check for the...


