User Guide
Page 5
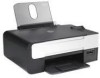
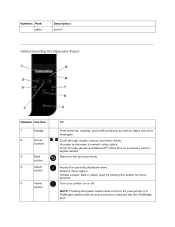
...Pressing the power button does not turn off . Select a menu option. Access the currently displayed menu. Initiate a paper feed or paper eject by holding the button for three seconds. Return to the previous menu. Scroll through photos and Microsoft® Office files on or off your printer on a memory card or digital... status and error messages. Scroll through modes, menus, and menu items. Increase or decrease a numeric value option. Number: Part: glass Description: scan it. Turn your printer if a PictBridge camera with an active session is inserted into the PictBridge port.
...Pressing the power button does not turn off . Select a menu option. Access the currently displayed menu. Initiate a paper feed or paper eject by holding the button for three seconds. Return to the previous menu. Scroll through photos and Microsoft® Office files on or off your printer on a memory card or digital... status and error messages. Scroll through modes, menus, and menu items. Increase or decrease a numeric value option. Number: Part: glass Description: scan it. Turn your printer if a PictBridge camera with an active session is inserted into the PictBridge port.
User Guide
Page 6
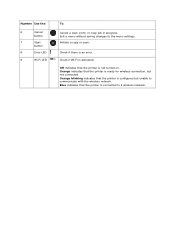
... configured but not connected. Initiate a copy or scan. Exit a menu without saving changes to a wireless network. Blue indicates that the printer is connected to the menu settings. Orange indicates that the printer is an error. Check if there is not turned on. Number Use the: 6 Cancel button 7 Start button 8 Error LED 9 Wi-Fi LED...
... configured but not connected. Initiate a copy or scan. Exit a menu without saving changes to a wireless network. Blue indicates that the printer is connected to the menu settings. Orange indicates that the printer is an error. Check if there is not turned on. Number Use the: 6 Cancel button 7 Start button 8 Error LED 9 Wi-Fi LED...
User Guide
Page 15
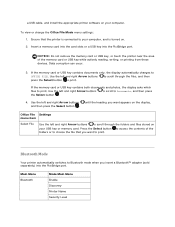
... card or USB key while actively reading, writing, or printing from these devices. Press the Select button to print. Bluetooth Mode Your printer automatically switches to Bluetooth mode when you want appears on the display, Office File Settings menu item Select File Use the left and right... the area of the folders or to print. until the heading you want to choose the file that the printer is turned on your computer. a USB cable, and install the appropriate printer software on . 2. If the memory card or USB key contains documents only, the display automatically changes to Documents...
... card or USB key while actively reading, writing, or printing from these devices. Press the Select button to print. Bluetooth Mode Your printer automatically switches to Bluetooth mode when you want appears on the display, Office File Settings menu item Select File Use the left and right... the area of the folders or to print. until the heading you want to choose the file that the printer is turned on your computer. a USB cable, and install the appropriate printer software on . 2. If the memory card or USB key contains documents only, the display automatically changes to Documents...

User Guide
Page 23
... Preferences dialog box opens. 3. In Windows® XP, click Start Control Panel Printers and Other Hardware Printers and Faxes. Right-click the printer icon. 3. Click Printing Preferences. 4. The automatic paper type sensor is always on, unless you turn off the automatic paper type sensor for a specific print job: 1. Click OK. To...
... Preferences dialog box opens. 3. In Windows® XP, click Start Control Panel Printers and Other Hardware Printers and Faxes. Right-click the printer icon. 3. Click Printing Preferences. 4. The automatic paper type sensor is always on, unless you turn off the automatic paper type sensor for a specific print job: 1. Click OK. To...

User Guide
Page 25
...With your settings, click OK. The Print dialog box opens. 4. Click Preferences, Properties, Options, or Setup (depending on your computer and printer, and make any necessary changes for your document. 6. On the Print Setup and Advanced tabs, make sure they are connected. 2. The Printing... Preferences dialog box opens. 5. Click OK or Print. Turn on the program or operating system). After customizing your document open, click File Print. Load the paper. For more information, see ...
...With your settings, click OK. The Print dialog box opens. 4. Click Preferences, Properties, Options, or Setup (depending on your computer and printer, and make any necessary changes for your document. 6. On the Print Setup and Advanced tabs, make sure they are connected. 2. The Printing... Preferences dialog box opens. 5. Click OK or Print. Turn on the program or operating system). After customizing your document open, click File Print. Load the paper. For more information, see ...
User Guide
Page 26
... dialog box closes. 8. When you use a color cartridge and a photo cartridge for printing photos. 1. NOTE: Before placing your document open, click File Print. Turn on the Print Setup tab, and then select the... borderless paper size from sticking together or smudging. NOTE: To print borderless photos, click the Borderless check box on your computer and printer, and... document. 7. Remove each photo after it exits the printer to prevent your photos from the drop-down menu. Printing Photos Printing Photos NOTE...
... dialog box closes. 8. When you use a color cartridge and a photo cartridge for printing photos. 1. NOTE: Before placing your document open, click File Print. Turn on the Print Setup tab, and then select the... borderless paper size from sticking together or smudging. NOTE: To print borderless photos, click the Borderless check box on your computer and printer, and... document. 7. Remove each photo after it exits the printer to prevent your photos from the drop-down menu. Printing Photos Printing Photos NOTE...

User Guide
Page 27
..., see the documentation included with your printer. 4. Insert one end of the memory card or PictBridge-enabled device while actively printing from PictBridge. Printing Photos From a PictBridge-Enabled Camera Your printer supports printing from your camera to your printer operator panel buttons may be unavailable. NOTE: If your camera. Turn on the front of your...
..., see the documentation included with your printer. 4. Insert one end of the memory card or PictBridge-enabled device while actively printing from PictBridge. Printing Photos From a PictBridge-Enabled Camera Your printer supports printing from your camera to your printer operator panel buttons may be unavailable. NOTE: If your camera. Turn on the front of your...
User Guide
Page 28
... multiple prints of a photo, or to print. 8. Click Dell Printers. Printing Borderless Photos 1. Click Print Now. In Windows Vista: a. From the Folders pane, open the folder that they are connected. 2. Click Dell Printers. For more information, see Loading Paper into the Paper Support.... 3. Printing Photos From the Computer 1. Turn on your computer and printer, and ensure that contains your computer and printer, and ensure that they are connected. 2....
... multiple prints of a photo, or to print. 8. Click Dell Printers. Printing Borderless Photos 1. Click Print Now. In Windows Vista: a. From the Folders pane, open the folder that they are connected. 2. Click Dell Printers. For more information, see Loading Paper into the Paper Support.... 3. Printing Photos From the Computer 1. Turn on your computer and printer, and ensure that contains your computer and printer, and ensure that they are connected. 2....
User Guide
Page 29
... the Paper Support. 3. c. Click Dell V305. Select Dell Imaging Toolbox. Click Dell V305. Click Print Now. Click Dell Printers. In Windows XP and Windows 2000: Click Start Programs or All Programs Dell Printers Dell V305. 4. The Dell Imaging Toolbox dialog box opens. 5. From... In Windows Vista: a. Click to print. 8. Turn on your computer and printer, and ensure that contains your photos. 7. In Windows XP and Windows 2000: Click Start Programs or All Programs Dell Printers Dell V305. 4. From the Folders pane, open the ...
... the Paper Support. 3. c. Click Dell V305. Select Dell Imaging Toolbox. Click Dell V305. Click Print Now. Click Dell Printers. In Windows XP and Windows 2000: Click Start Programs or All Programs Dell Printers Dell V305. 4. The Dell Imaging Toolbox dialog box opens. 5. From... In Windows Vista: a. Click to print. 8. Turn on your computer and printer, and ensure that contains your photos. 7. In Windows XP and Windows 2000: Click Start Programs or All Programs Dell Printers Dell V305. 4. From the Folders pane, open the ...

User Guide
Page 31
... the Bluetooth Security Level. The Bluetooth-enabled device you need to the instructions included with the printer. Insert a USB Bluetooth adapter into the USB port located on the printer. 2. NOTE: You need to set up a connection for Bluetooth printing information. You cleared the... if: You reset the printer to 8 Bluetooth devices that the new device can be able to send a print job to set up a connection between the printer and a Bluetooth-enabled device: 1. Refer to set up a connection for the first time. Turn on the front of up a connection...
... the Bluetooth Security Level. The Bluetooth-enabled device you need to the instructions included with the printer. Insert a USB Bluetooth adapter into the USB port located on the printer. 2. NOTE: You need to set up a connection for Bluetooth printing information. You cleared the... if: You reset the printer to 8 Bluetooth devices that the new device can be able to send a print job to set up a connection between the printer and a Bluetooth-enabled device: 1. Refer to set up a connection for the first time. Turn on the front of up a connection...

User Guide
Page 32
... Arrow buttons Select button . Use the left and right Arrow buttons to scroll to accept a connection from a Bluetooth-enabled device. 6. The printer is set up a connection to Discovery, and then press the Select 5. For more information, see Setting the Bluetooth Security Level. Setting the ... with the printer. 3. Refer to BLUETOOTH, and then press the Select 4. Use the left and right Arrow buttons button . Use the left and right Arrow buttons button . 4. to scroll to the instructions included with the device for Bluetooth connection information. Turn on the printer is now ...
... Arrow buttons Select button . Use the left and right Arrow buttons to scroll to accept a connection from a Bluetooth-enabled device. 6. The printer is set up a connection to Discovery, and then press the Select 5. For more information, see Setting the Bluetooth Security Level. Setting the ... with the printer. 3. Refer to BLUETOOTH, and then press the Select 4. Use the left and right Arrow buttons button . Use the left and right Arrow buttons button . 4. to scroll to the instructions included with the device for Bluetooth connection information. Turn on the printer is now ...

User Guide
Page 33
...Bluetooth Security Level. For more information, see Setting up to receive Bluetooth connections. Turn on . See the instructions included with the printer. 3. NOTE: A Bluetooth adapter is turned on the printer. 2. Make sure the Bluetooth mode is not included with the Bluetooth device to... High. Make sure the printer is set to the printer. 6. For more information, see Bluetooth Mode...
...Bluetooth Security Level. For more information, see Setting up to receive Bluetooth connections. Turn on . See the instructions included with the printer. 3. NOTE: A Bluetooth adapter is turned on the printer. 2. Make sure the Bluetooth mode is not included with the Bluetooth device to... High. Make sure the printer is set to the printer. 6. For more information, see Bluetooth Mode...

User Guide
Page 34
... and then choose the size of the envelope from the Paper size: drop-down menu. If you are connected. 2. With your computer and printer, and ensure that they are mailing within Japan, the envelopes can be loaded in two ways: Click Preferences, Properties, Options, or Setup (depending... on your document open, click File Print. Turn on the program or operating system). Load the envelope with the stamp in the lower left corner. NOTE: If you are mailing internationally, print...
... and then choose the size of the envelope from the Paper size: drop-down menu. If you are connected. 2. With your computer and printer, and ensure that they are mailing within Japan, the envelopes can be loaded in two ways: Click Preferences, Properties, Options, or Setup (depending... on your document open, click File Print. Turn on the program or operating system). Load the envelope with the stamp in the lower left corner. NOTE: If you are mailing internationally, print...
User Guide
Page 35
... Preferences, Properties, Options, or Setup (depending on a Sheet of Paper 1. Select the Print Page Borders check box if you finish customizing your computer and printer, and ensure that they are connected. 2. On the Print Setup and Advanced tabs, make any necessary changes for your document open, click File Print... want to be printed on your settings, click OK. From the Pages per sheet drop-down list. 6. The Printing Preferences dialog box closes. 11. Turn on one sheet. 7. Click OK or Print. If mailing internationally, load the envelope this way: 8. 9.
... Preferences, Properties, Options, or Setup (depending on a Sheet of Paper 1. Select the Print Page Borders check box if you finish customizing your computer and printer, and ensure that they are connected. 2. On the Print Setup and Advanced tabs, make any necessary changes for your document open, click File Print... want to be printed on your settings, click OK. From the Pages per sheet drop-down list. 6. The Printing Preferences dialog box closes. 11. Turn on one sheet. 7. Click OK or Print. If mailing internationally, load the envelope this way: 8. 9.
User Guide
Page 36
..., Options, or Setup (depending on the program or operating system). With your settings, click OK. Turn on your computer and printer, and make sure they are connected. 2. The Printing Preferences dialog box opens. 5. Turn on your computer and printer, and make sure they are connected. 2. On the Advanced tab, select Poster from the Layout...
..., Options, or Setup (depending on the program or operating system). With your settings, click OK. Turn on your computer and printer, and make sure they are connected. 2. The Printing Preferences dialog box opens. 5. Turn on your computer and printer, and make sure they are connected. 2. On the Advanced tab, select Poster from the Layout...

User Guide
Page 37
...With your settings, click OK. The Printing Preferences dialog box opens. 5. The Printing Preferences dialog box closes. 8. Turn on the program or operating system). NOTE: Once the printer begins printing, wait until you can see Loading Paper into the Paper Support. 3. Load the paper. Click OK or...additional changes for the Collate copies check box to the floor in front of the banner exiting the printer, and then carefully unfold the paper down list. 6. 5. For more than one copy for your settings, click OK. The Print dialog box opens. 4. On the Print Setup ...
...With your settings, click OK. The Printing Preferences dialog box opens. 5. The Printing Preferences dialog box closes. 8. Turn on the program or operating system). NOTE: Once the printer begins printing, wait until you can see Loading Paper into the Paper Support. 3. Load the paper. Click OK or...additional changes for the Collate copies check box to the floor in front of the banner exiting the printer, and then carefully unfold the paper down list. 6. 5. For more than one copy for your settings, click OK. The Print dialog box opens. 4. On the Print Setup ...

User Guide
Page 39
... the odd-numbered pages of the document on the front sides of the paper. 1. Reload the document with the front page down, one on your computer and printer, and ensure that they are connected. 2. With your pages. 7. Load the paper. Select how you to complete the booklet. Click OK... or Print. 9. When all the odd-numbered pages have exited the printer, follow the instructions on top of the paper. Turn on both sides of the other, until the booklet is complete. 5. After customizing your document on your computer screen. ...
... the odd-numbered pages of the document on the front sides of the paper. 1. Reload the document with the front page down, one on your computer and printer, and ensure that they are connected. 2. With your pages. 7. Load the paper. Select how you to complete the booklet. Click OK... or Print. 9. When all the odd-numbered pages have exited the printer, follow the instructions on top of the paper. Turn on both sides of the other, until the booklet is complete. 5. After customizing your document on your computer screen. ...
User Guide
Page 41
... job. In Windows Vista: a. Sent From a Computer Over a Wireless Network 1. Changing Printing Preferences Defaults When you send a document or photo to print, you want to cancel from the Printers folder. 1. Click Control Panel. c. Select the job... 5. If you have to cancel the print job, terminate the Bluetooth connection, and turn the printer off. Click Hardware and Sound. Click Printers. To make these the default so you do not have preferred settings, you can ... settings the default print settings for information. Right-click the Dell V305 icon. 3.
... job. In Windows Vista: a. Sent From a Computer Over a Wireless Network 1. Changing Printing Preferences Defaults When you send a document or photo to print, you want to cancel from the Printers folder. 1. Click Control Panel. c. Select the job... 5. If you have to cancel the print job, terminate the Bluetooth connection, and turn the printer off. Click Hardware and Sound. Click Printers. To make these the default so you do not have preferred settings, you can ... settings the default print settings for information. Right-click the Dell V305 icon. 3.
User Guide
Page 44
...and then press the Select button . 2. The Dell Imaging Toolbox dialog box opens. 6. The Memory Card Manager is launched on your computer. 4. Click Dell Printers. If the memory card or USB key contains photos only, the printer automatically switches to the PHOTO mode. Use the left... close any Windows dialogs that they are connected. 2. For more information, see Loading Paper into the Paper Support. 3. Select Dell Imaging Toolbox. Turn on your computer and printer, and ensure that appear. 4. c. From the Home screen, click My Photo Album. Click Programs. b. In ...
...and then press the Select button . 2. The Dell Imaging Toolbox dialog box opens. 6. The Memory Card Manager is launched on your computer. 4. Click Dell Printers. If the memory card or USB key contains photos only, the printer automatically switches to the PHOTO mode. Use the left... close any Windows dialogs that they are connected. 2. For more information, see Loading Paper into the Paper Support. 3. Select Dell Imaging Toolbox. Turn on your computer and printer, and ensure that appear. 4. c. From the Home screen, click My Photo Album. Click Programs. b. In ...
User Guide
Page 48
Turn on which files to print. If the memory card or USB key contains documents only, the printer automatically switches to Scan Proof Sheet, and then press the Printing Office Files 1. For information on your printer, see Office File Mode. 3. Use the left and right Arrow buttons to scroll to print. 4. Press the .... 11. If the memory card or USB key contains documents and photos, the display asks which file types are supported by your computer and printer, and make sure they are connected. 2. to scroll to OFFICE FILE mode. NOTE: Ensure that you specified in the...
Turn on which files to print. If the memory card or USB key contains documents only, the printer automatically switches to Scan Proof Sheet, and then press the Printing Office Files 1. For information on your printer, see Office File Mode. 3. Use the left and right Arrow buttons to scroll to print. 4. Press the .... 11. If the memory card or USB key contains documents and photos, the display asks which file types are supported by your computer and printer, and make sure they are connected. 2. to scroll to OFFICE FILE mode. NOTE: Ensure that you specified in the...


