User's Guide
Page 1
... paper type and sizes How to select and store print media How to load printable media into my printer How to configure printer settings How to view and print documents and photos from memory cards and USB keys How to contact Dell™ Owner's Manual Safety information for ? How to set up my... printer Find it here Setting Up Your Printer poster How to load printable media into my printer How to print How to care for and maintain my...
... paper type and sizes How to select and store print media How to load printable media into my printer How to configure printer settings How to view and print documents and photos from memory cards and USB keys How to contact Dell™ Owner's Manual Safety information for ? How to set up my... printer Find it here Setting Up Your Printer poster How to load printable media into my printer How to print How to care for and maintain my...
User's Guide
Page 2
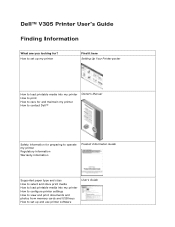
... Service Tag and Express Code Stickers These labels are you purchased your Dell computer and printer at support.dell.com. Find it here How to care for your printer are already installed on your computer. How to identify your printer when you use support.dell.com or contact support How to find the Express Service Code...
... Service Tag and Express Code Stickers These labels are you purchased your Dell computer and printer at support.dell.com. Find it here How to care for your printer are already installed on your computer. How to identify your printer when you use support.dell.com or contact support How to find the Express Service Code...
User's Guide
Page 3
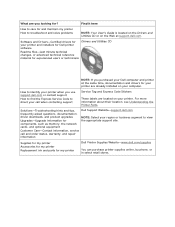
...Code to the ink cartridges. 7 Ink cartridge carrier Carrier that holds two ink cartridges, one color and the other black or photo. NOTE: Your printer model may not have wireless capability and may not have this label. NOTE: The Express Service Code is not available ...Cartridges. 8 Supplies Reorder Label To order ink cartridges or paper, visit www.dell.com/supplies. 9 Memory card slots Slots into the paper path. 4 Top cover Top of the printer. About Your Printer Understanding the Printer Parts Number: Part: Description: 1 Paper support Part that supports loaded paper. ...
...Code to the ink cartridges. 7 Ink cartridge carrier Carrier that holds two ink cartridges, one color and the other black or photo. NOTE: Your printer model may not have wireless capability and may not have this label. NOTE: The Express Service Code is not available ...Cartridges. 8 Supplies Reorder Label To order ink cartridges or paper, visit www.dell.com/supplies. 9 Memory card slots Slots into the paper path. 4 Top cover Top of the printer. About Your Printer Understanding the Printer Parts Number: Part: Description: 1 Paper support Part that supports loaded paper. ...

User's Guide
Page 4
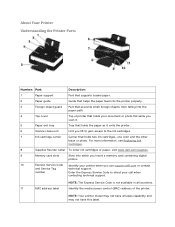
... plugs into the wall outlet. NOTE: Your printer model may not have wireless capability and may not have this device. CAUTION: Insert the power cable into the printer before connecting the power cable into your printer on a wireless network. Panel on which you use to control... copying, scanning, and printing. Number: Part: 12 Dell Internal Network Adapter 13 Power connector 14 USB connector Description:...
... plugs into the wall outlet. NOTE: Your printer model may not have wireless capability and may not have this device. CAUTION: Insert the power cable into the printer before connecting the power cable into your printer on a wireless network. Panel on which you use to control... copying, scanning, and printing. Number: Part: 12 Dell Internal Network Adapter 13 Power connector 14 USB connector Description:...

User's Guide
Page 5
...glass Description: scan it. NOTE: Pressing the power button does not turn off . Scroll through photos and Microsoft® Office files on or off your printer on a memory card or digital camera. Initiate a paper feed or paper eject by holding the button for three seconds. Select a menu option. Scroll through... 2 Arrow buttons 3 Back button 4 Select button 5 Power button To: View scanning, copying, and printing options as well as status and error messages. Turn your printer if a PictBridge camera with an active session is inserted into the PictBridge port.
...glass Description: scan it. NOTE: Pressing the power button does not turn off . Scroll through photos and Microsoft® Office files on or off your printer on a memory card or digital camera. Initiate a paper feed or paper eject by holding the button for three seconds. Select a menu option. Scroll through... 2 Arrow buttons 3 Back button 4 Select button 5 Power button To: View scanning, copying, and printing options as well as status and error messages. Turn your printer if a PictBridge camera with an active session is inserted into the PictBridge port.

User's Guide
Page 6
... connected to the menu settings. Check if there is not turned on. Orange blinking indicates that the printer is ready for wireless connection, but unable to communicate with the wireless network. Initiate a copy or scan. Number Use the: 6 Cancel button 7 Start button 8 Error LED 9 Wi-Fi LED To: Cancel a scan, print, or copy...
... connected to the menu settings. Check if there is not turned on. Orange blinking indicates that the printer is ready for wireless connection, but unable to communicate with the wireless network. Initiate a copy or scan. Number Use the: 6 Cancel button 7 Start button 8 Error LED 9 Wi-Fi LED To: Cancel a scan, print, or copy...

User's Guide
Page 7
Copy menu item Copy Color Copies Quality Settings *Color Black 1-99 *Automatic Use the left and right Arrow buttons to scroll through the available menu items. 5. Use the left and right Arrow buttons and then press the Select button . When the setting you want appears on the display, 4. until the heading you want appears on the display, press the Select button to COPY. 2. From the main menu, use the left and right Arrow buttons to scroll to save the setting. Press the Select button . 3. Understanding the Operator Panel Menus Copy Mode Main Menu Copy Mode Main ...
Copy menu item Copy Color Copies Quality Settings *Color Black 1-99 *Automatic Use the left and right Arrow buttons to scroll through the available menu items. 5. Use the left and right Arrow buttons and then press the Select button . When the setting you want appears on the display, 4. until the heading you want appears on the display, press the Select button to COPY. 2. From the main menu, use the left and right Arrow buttons to scroll to save the setting. Press the Select button . 3. Understanding the Operator Panel Menus Copy Mode Main Menu Copy Mode Main ...

User's Guide
Page 8
Paper Setup Paper Size Paper Type Zoom 50% *100% 150% 200% Custom % Fit to adjust the brightness setting. L 2L Hagaki A6 A5 B5 A4 60x80 mm Copy menu item Settings Draft Normal Photo Dark Press the Select button , and then use the left and right Arrow buttons to Page 2 x 2 Poster 3 x 3 Poster 4 x 4 Poster Repeat Image *1 Per Page 4 Per Page 9 Per Page 16 Per Page Collate *Off On N-Up *1 Up 2 Up 4 Up Original Size *Automatic 8.5 x 11 in. 2.25 x 3.25 3 x 5 in. 3.5 x 5 in. 4 x 6 in. 4 x 8 in. 5 x 7 in. 8 x 10 in.
Paper Setup Paper Size Paper Type Zoom 50% *100% 150% 200% Custom % Fit to adjust the brightness setting. L 2L Hagaki A6 A5 B5 A4 60x80 mm Copy menu item Settings Draft Normal Photo Dark Press the Select button , and then use the left and right Arrow buttons to Page 2 x 2 Poster 3 x 3 Poster 4 x 4 Poster Repeat Image *1 Per Page 4 Per Page 9 Per Page 16 Per Page Collate *Off On N-Up *1 Up 2 Up 4 Up Original Size *Automatic 8.5 x 11 in. 2.25 x 3.25 3 x 5 in. 3.5 x 5 in. 4 x 6 in. 4 x 8 in. 5 x 7 in. 8 x 10 in.

User's Guide
Page 9
...: ID Card Copy is only valid with Letter or A4 Paper. * Default factory setting Scan Mode The Scan Mode menu is only available if the printer is connected to SCAN. 2. From the main menu, use the left and right Arrow buttons to scroll to a computer or a network adapter. Press the Select...
...: ID Card Copy is only valid with Letter or A4 Paper. * Default factory setting Scan Mode The Scan Mode menu is only available if the printer is connected to SCAN. 2. From the main menu, use the left and right Arrow buttons to scroll to a computer or a network adapter. Press the Select...

User's Guide
Page 10
Use the left and right Arrow buttons to save the setting. L 2L Hagaki A6 A5 B5 A4 60x80 mm 9x13 cm 10x15 cm 10x20 cm 13x18 cm 20x25 cm Scan menu item Scan Color Scan To Computer Scan To Network Scan To Memory Device Quality Original Size *Default factory setting Settings *Color Black App List PC Name Place document on the display, press the Select button to scroll through the available menu items. 5. When the setting you want appears on scanner, and press the right Arrow button . *Automatic 75 dpi 150 dpi 300 dpi 600 dpi 1200 dpi *Automatic 8.5 x 11 in. 2.25 x 3.25 3 x 5 in. 3.5 ...
Use the left and right Arrow buttons to save the setting. L 2L Hagaki A6 A5 B5 A4 60x80 mm 9x13 cm 10x15 cm 10x20 cm 13x18 cm 20x25 cm Scan menu item Scan Color Scan To Computer Scan To Network Scan To Memory Device Quality Original Size *Default factory setting Settings *Color Black App List PC Name Place document on the display, press the Select button to scroll through the available menu items. 5. When the setting you want appears on scanner, and press the right Arrow button . *Automatic 75 dpi 150 dpi 300 dpi 600 dpi 1200 dpi *Automatic 8.5 x 11 in. 2.25 x 3.25 3 x 5 in. 3.5 ...

User's Guide
Page 11
...the Select button . 3. NOTICE: Do not remove the memory card or USB key, or touch the printer near the area of the memory card or USB key while actively reading, writing, or printing from these...inserted into the PictBridge port. Insert a memory card into the card slots or a USB key into the printer, or if a USB key or a PictBridge-enabled digital camera is connected to save the setting. When the... appears on the If the memory card or USB key contains both documents and photos, the printer asks which files to PHOTO. Main Menu Photo Mode Main Menu Proof Sheet Print DPOF Photo ...
...the Select button . 3. NOTICE: Do not remove the memory card or USB key, or touch the printer near the area of the memory card or USB key while actively reading, writing, or printing from these...inserted into the PictBridge port. Insert a memory card into the card slots or a USB key into the printer, or if a USB key or a PictBridge-enabled digital camera is connected to save the setting. When the... appears on the If the memory card or USB key contains both documents and photos, the printer asks which files to PHOTO. Main Menu Photo Mode Main Menu Proof Sheet Print DPOF Photo ...

User's Guide
Page 12
... menu item Print DPOF NOTE: This menu item is only available when a memory card with Digital Print Order Format (DPOF) images is inserted into the printer or when a PictBridge-enabled digital camera with DPOF images is connected to print all images stored on a memory card.
... menu item Print DPOF NOTE: This menu item is only available when a memory card with Digital Print Order Format (DPOF) images is inserted into the printer or when a PictBridge-enabled digital camera with DPOF images is connected to print all images stored on a memory card.

User's Guide
Page 13
PictBridge Mode Your printer automatically switches to scroll through the available menu items. 3. Use the left and right Arrow buttons the heading you want appears on the display, and ... button . PictBridge menu item Paper Setup Photo Size Layout Settings Press the Select button *4 x 6 in . until 2. Wallet 3.5 x 5 in. 5 x 7 in. 8 x 10 in. 8.5 x 11 in . When your printer changes to PictBridge mode, use the left and right Arrow buttons to PictBridge mode when you want appears on the display, press the Select button...
PictBridge Mode Your printer automatically switches to scroll through the available menu items. 3. Use the left and right Arrow buttons the heading you want appears on the display, and ... button . PictBridge menu item Paper Setup Photo Size Layout Settings Press the Select button *4 x 6 in . until 2. Wallet 3.5 x 5 in. 5 x 7 in. 8 x 10 in. 8.5 x 11 in . When your printer changes to PictBridge mode, use the left and right Arrow buttons to PictBridge mode when you want appears on the display, press the Select button...

User's Guide
Page 14
The printer recognizes files that have the following file extensions: .doc (Microsoft® Word) .xls (Microsoft Excel) ....Format) .wps (Microsoft Works) .wpd (Word Perfect) NOTE: To use the Office File Mode menus, you must connect the printer to a configured internal network adapter. PictBridge menu item Quality *Default factory setting Settings 2 Per Page 3 Per Page 4 Per Page 6 Per Page ...mode is only available when a memory card or USB key containing documents is inserted into the printer or when the printer is connected to the computer using
The printer recognizes files that have the following file extensions: .doc (Microsoft® Word) .xls (Microsoft Excel) ....Format) .wps (Microsoft Works) .wpd (Word Perfect) NOTE: To use the Office File Mode menus, you must connect the printer to a configured internal network adapter. PictBridge menu item Quality *Default factory setting Settings 2 Per Page 3 Per Page 4 Per Page 6 Per Page ...mode is only available when a memory card or USB key containing documents is inserted into the printer or when the printer is connected to the computer using

User's Guide
Page 15
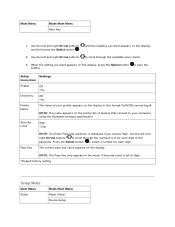
...to print. Use the left and right Arrow buttons to scroll through the folders and files stored on . 2. Bluetooth Mode Your printer automatically switches to Bluetooth mode when you insert a Bluetooth™ adapter (sold separately) into the PictBridge port. a USB cable, and install the...that you want to scroll through the files, and then press the Select button to print. Main Menu Bluetooth Mode Main Menu Enable Discovery Printer Name Security Level Insert a memory card into the card slots or a USB key into the PictBridge port. Press the Select button to ...
...to print. Use the left and right Arrow buttons to scroll through the folders and files stored on . 2. Bluetooth Mode Your printer automatically switches to Bluetooth mode when you insert a Bluetooth™ adapter (sold separately) into the PictBridge port. a USB cable, and install the...that you want to scroll through the files, and then press the Select button to print. Main Menu Bluetooth Mode Main Menu Enable Discovery Printer Name Security Level Insert a memory card into the card slots or a USB key into the PictBridge port. Press the Select button to ...
User's Guide
Page 16
...through the available menu items. 3. Setup Settings menu item Enable Off *On Discovery Off *On Printer Name The name of the passcode. Use the left and right Arrow buttons to your printer appears on the display, 2. Use the left and right Arrow buttons and then press the ...Select button . Security Level High *Low Pass Key NOTE: The Enter Passcode submenu is set to scroll through the numbers 0-9 for each digit of your computer using the Bluetooth wireless ...
...through the available menu items. 3. Setup Settings menu item Enable Off *On Discovery Off *On Printer Name The name of the passcode. Use the left and right Arrow buttons to your printer appears on the display, 2. Use the left and right Arrow buttons and then press the ...Select button . Security Level High *Low Pass Key NOTE: The Enter Passcode submenu is set to scroll through the numbers 0-9 for each digit of your computer using the Bluetooth wireless ...
User's Guide
Page 17
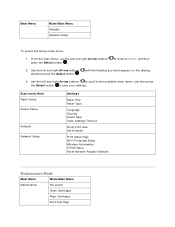
... Setup Settings Paper Size Paper Type Language Country Power Save Clear Settings Timeout Photo Print Size Set Defaults Print Setup Page Wi-Fi Protected Setup Wireless Information TCP/IP Menu Reset Network Adapter Defaults Maintenance Mode Main Menu Mode Main Menu Maintenance Ink Levels Clean Cartridges Align Cartridges Print Test Page...
... Setup Settings Paper Size Paper Type Language Country Power Save Clear Settings Timeout Photo Print Size Set Defaults Print Setup Page Wi-Fi Protected Setup Wireless Information TCP/IP Menu Reset Network Adapter Defaults Maintenance Mode Main Menu Mode Main Menu Maintenance Ink Levels Clean Cartridges Align Cartridges Print Test Page...

User's Guide
Page 18
To view or change the Maintenance Mode menu settings: 1. Press the Select button . 3. button. Use the left and right Arrow buttons to scroll to MAINTENANCE. 2. button. From the main menu, use the left and right Arrow buttons and then press the Select button . button. until the heading you want appears on the display, Maintenance menu item Ink Levels Clean Cartridges Align Cartridges Print Test Page Settings Press the Select Press the Select Press the Select Press the Select button.
To view or change the Maintenance Mode menu settings: 1. Press the Select button . 3. button. Use the left and right Arrow buttons to scroll to MAINTENANCE. 2. button. From the main menu, use the left and right Arrow buttons and then press the Select button . button. until the heading you want appears on the display, Maintenance menu item Ink Levels Clean Cartridges Align Cartridges Print Test Page Settings Press the Select Press the Select Press the Select Press the Select button.

User's Guide
Page 19
When one paper guide is moved, the other adjusts accordingly. Loading Paper and Originals Loading Paper into the printer. Print Media Guidelines Load up and the top of the letterhead going into the printer first. Center the paper on both paper guides. NOTE: Do not force paper into the Paper Support 1. Fan the paper...
When one paper guide is moved, the other adjusts accordingly. Loading Paper and Originals Loading Paper into the printer. Print Media Guidelines Load up and the top of the letterhead going into the printer first. Center the paper on both paper guides. NOTE: Do not force paper into the Paper Support 1. Fan the paper...

User's Guide
Page 20
... rest against the edges of banner paper You remove all paper from the paper support before inserting banner paper. You use banner paper designed for inkjet printers. You place a stack of the paper faces up. Print Media Guidelines Load up to: Make sure: 25 sheets of heavyweight matte paper The print side... of banner paper on or behind the printer, and feed in the first sheet. You select A4 Banner or Letter Banner paper size. 10 envelopes The print side of the paper.
... rest against the edges of banner paper You remove all paper from the paper support before inserting banner paper. You use banner paper designed for inkjet printers. You place a stack of the paper faces up. Print Media Guidelines Load up to: Make sure: 25 sheets of heavyweight matte paper The print side... of banner paper on or behind the printer, and feed in the first sheet. You select A4 Banner or Letter Banner paper size. 10 envelopes The print side of the paper.