
User Guide
Page 7
...on your ink cartridges are low, a Low Ink Warning appears on the Advanced tab of the paper, and whether or not to print an instruction page to print. When one or both sides of the Printing Preferences. If you try to assist in , the Dell Customer Experience...jobs the printer completes. Dell Customer Experience Improvement Program - You can print using portrait or landscape orientation. For more accurate count can be selected if you try to print on both of cartridge use, until printing habits are learned and a more information, see Replacing Ink Cartridges. Media ...
...on your ink cartridges are low, a Low Ink Warning appears on the Advanced tab of the paper, and whether or not to print an instruction page to print. When one or both sides of the Printing Preferences. If you try to assist in , the Dell Customer Experience...jobs the printer completes. Dell Customer Experience Improvement Program - You can print using portrait or landscape orientation. For more accurate count can be selected if you try to print on both of cartridge use, until printing habits are learned and a more information, see Replacing Ink Cartridges. Media ...

User Guide
Page 12
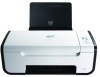
...power outlet, an LED lights up notifying you plug it rests on the power supply. cartridge carrier 12 Express Service Identify your printer, the power will be off when you that holds two ink cartridges, one color ink and the other end of the USB cable plugs connector into which you lift to gain... unit, push the scanner support back towards the rear of the printer. 10 Supplies To order ink cartridges or paper, visit www.dell.com/supplies. supply NOTE: The power supply is still present on the main body of the printer, and then lower the scanner base unit until it back in ...
...power outlet, an LED lights up notifying you plug it rests on the power supply. cartridge carrier 12 Express Service Identify your printer, the power will be off when you that holds two ink cartridges, one color ink and the other end of the USB cable plugs connector into which you lift to gain... unit, push the scanner support back towards the rear of the printer. 10 Supplies To order ink cartridges or paper, visit www.dell.com/supplies. supply NOTE: The power supply is still present on the main body of the printer, and then lower the scanner base unit until it back in ...
User Guide
Page 13
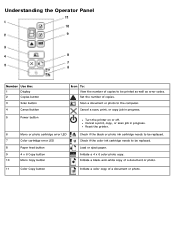
... Icon To: View the number of copies to be replaced. Reset the printer. 6 Mono or photo cartridge error LED 7 Color cartridge error LED 8 Paper feed button 9 4 x 6 Copy button 10 Mono Copy button Check if the black or photo ink cartridge needs to be printed as well as error codes. Check if the color... ink cartridge needs to the computer. Scan a document or photo to be replaced. Cancel a print, copy, or scan job in progress. 5 Power button Turn the printer on or off. Load or eject paper. Cancel a scan, print, or ...
... Icon To: View the number of copies to be replaced. Reset the printer. 6 Mono or photo cartridge error LED 7 Color cartridge error LED 8 Paper feed button 9 4 x 6 Copy button 10 Mono Copy button Check if the black or photo ink cartridge needs to be printed as well as error codes. Check if the color... ink cartridge needs to the computer. Scan a document or photo to be replaced. Cancel a print, copy, or scan job in progress. 5 Power button Turn the printer on or off. Load or eject paper. Cancel a scan, print, or ...

User Guide
Page 14
... phone. Press down on your printer. The ink cartridge carrier moves and stops at www.dell.com/supplies or by Dell. Dell does not provide warranty coverage for your printer. 2. Turn on the ink cartridge lever to raise each ink cartridge lid. 4. Dell™ ink cartridges are available only through Dell. Remove the old ink cartridges. Maintenance Replacing Ink Cartridges Aligning Ink Cartridges Cleaning the Ink Cartridge Nozzles Cleaning the Exterior of the...
... phone. Press down on your printer. The ink cartridge carrier moves and stops at www.dell.com/supplies or by Dell. Dell does not provide warranty coverage for your printer. 2. Turn on the ink cartridge lever to raise each ink cartridge lid. 4. Dell™ ink cartridges are available only through Dell. Remove the old ink cartridges. Maintenance Replacing Ink Cartridges Aligning Ink Cartridges Cleaning the Ink Cartridge Nozzles Cleaning the Exterior of the...

User Guide
Page 15
... until it rests on the bottom of the printer. Snap each ink cartridge. NOTE: For normal printing, use a black cartridge and a color cartridge. For photo printing, replace the black cartridge with your photo cartridge, or dispose of them properly. 6. Store the cartridges in the right ink cartridge carrier. If you received with a photo cartridge. 8. Lift the scanner base unit, and then...
... until it rests on the bottom of the printer. Snap each ink cartridge. NOTE: For normal printing, use a black cartridge and a color cartridge. For photo printing, replace the black cartridge with your photo cartridge, or dispose of them properly. 6. Store the cartridges in the right ink cartridge carrier. If you received with a photo cartridge. 8. Lift the scanner base unit, and then...
User Guide
Page 16
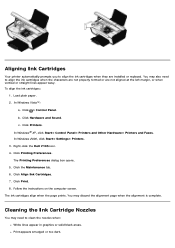
... wavy. In Windows® XP, click Start® Control Panel® Printers and Other Hardware® Printers and Faxes. Click Print. 8. Click the Maintenance tab. 6. The ink cartridges align when the page prints. Right-click the Dell V105 icon. 4. To align the ink cartridges: 1. In Windows 2000, click Start® Settings® Printers. 3. The Printing Preferences dialog box opens. 5.
... wavy. In Windows® XP, click Start® Control Panel® Printers and Other Hardware® Printers and Faxes. Click Print. 8. Click the Maintenance tab. 6. The ink cartridges align when the page prints. Right-click the Dell V105 icon. 4. To align the ink cartridges: 1. In Windows 2000, click Start® Settings® Printers. 3. The Printing Preferences dialog box opens. 5.
User Guide
Page 17
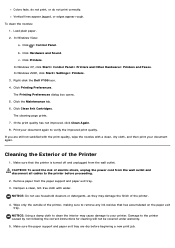
... on the paper exit tray. In Windows XP, click Start® Control Panel® Printers and Other Hardware® Printers and Faxes. Right-click the Dell V105 icon. 4. The Printing Preferences dialog box opens. 5. Click ® Control Panel. Click Clean Ink Cartridges. If the print quality has not improved, click Clean Again. 8. Damage to verify the...
... on the paper exit tray. In Windows XP, click Start® Control Panel® Printers and Other Hardware® Printers and Faxes. Right-click the Dell V105 icon. 4. The Printing Preferences dialog box opens. 5. Click ® Control Panel. Click Clean Ink Cartridges. If the print quality has not improved, click Clean Again. 8. Damage to verify the...

User Guide
Page 24
...Printing is firmly connected to each cartridge. Check for your printer, please visit http://support.dell.com/support. Ensure that you always plug the USB cable back into the same USB port that you have installed the ink cartridges correctly and removed the sticker and... for the printer. Click Printers. Right-click the Dell V105 icon. What Flashing appears lights on the printer. Printer Problems Ensure that print object as Default Printer. 5. In Windows Vista: a. In Windows XP, click Start® Control Panel® Printers and Other Hardware® Printers and Faxes....
...Printing is firmly connected to each cartridge. Check for your printer, please visit http://support.dell.com/support. Ensure that you always plug the USB cable back into the same USB port that you have installed the ink cartridges correctly and removed the sticker and... for the printer. Click Printers. Right-click the Dell V105 icon. What Flashing appears lights on the printer. Printer Problems Ensure that print object as Default Printer. 5. In Windows Vista: a. In Windows XP, click Start® Control Panel® Printers and Other Hardware® Printers and Faxes....
User Guide
Page 25
.... The black or photo ink cartridge Replace the invalid ink cartridge. flash rapidly. The printhead carrier has stopped moving while in the printer. Place the black or photo cartridge in the left cartridge carrier and the color cartridge in its home position, or has not properly rested at www.dell.com/support. flashes slowly. One or both cartridges, had a short circuit...
.... The black or photo ink cartridge Replace the invalid ink cartridge. flash rapidly. The printhead carrier has stopped moving while in the printer. Place the black or photo cartridge in the left cartridge carrier and the color cartridge in its home position, or has not properly rested at www.dell.com/support. flashes slowly. One or both cartridges, had a short circuit...

User Guide
Page 26
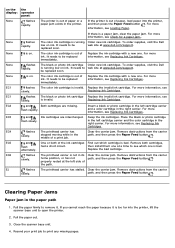
... information, see Loading Paper. Orient the media according to dry: Photo/glossy paper Transparencies Labels For more information, see Replacing Ink Cartridges. Turn on the printer, and print the document again. Do not use creased, damp, or curled paper. Firmly grasp the paper, and gently pull... paper exit tray. Do not overload the input tray. Printing Problems Check the ink levels, and install new print cartridges if necessary. Turn off the printer. 2. Do not remove media from the printer. 4. Avoiding Jams and Misfeeds You can avoid most jams and misfeeds by following...
... information, see Loading Paper. Orient the media according to dry: Photo/glossy paper Transparencies Labels For more information, see Replacing Ink Cartridges. Turn on the printer, and print the document again. Do not use creased, damp, or curled paper. Firmly grasp the paper, and gently pull... paper exit tray. Do not overload the input tray. Printing Problems Check the ink levels, and install new print cartridges if necessary. Turn off the printer. 2. Do not remove media from the printer. 4. Avoiding Jams and Misfeeds You can avoid most jams and misfeeds by following...

User Guide
Page 42
From the Maintenance tab: There are no print settings to set as default. Get information on sharing your printer on a network. Change the default number of copies. Change the default orientation. Print a test page. From the Advanced tab, you can: Specify layouts that you can: Install, clean, and align ink cartridges. Make black and white printing and borderless printing the default setting. From here, you want to set as default from the Maintenance tab.
From the Maintenance tab: There are no print settings to set as default. Get information on sharing your printer on a network. Change the default number of copies. Change the default orientation. Print a test page. From the Advanced tab, you can: Specify layouts that you can: Install, clean, and align ink cartridges. Make black and white printing and borderless printing the default setting. From here, you want to set as default from the Maintenance tab.


