User Guide
Page 1
...Software clause at DFARS 252.227-7013 and in the United States and/or other than its own. Dell™ V105 All-In-One Printer User's Guide To order ink or supplies from Dell: 1. Use, duplication or disclosure by phone. Other trademarks and trade names may be used in ...any proprietary interest in this text: Dell, the DELL logo, and Dell Ink Management System are either registered trademarks or trademarks ...
...Software clause at DFARS 252.227-7013 and in the United States and/or other than its own. Dell™ V105 All-In-One Printer User's Guide To order ink or supplies from Dell: 1. Use, duplication or disclosure by phone. Other trademarks and trade names may be used in ...any proprietary interest in this text: Dell, the DELL logo, and Dell Ink Management System are either registered trademarks or trademarks ...
User Guide
Page 2
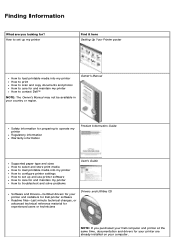
...in your computer. Finding Information What are you purchased your Dell computer and printer at the same time, documentation and drivers for ? Owner's Manual Safety information for preparing to operate my printer Regulatory information Warranty information Product Information Guide Supported paper type and...copy documents and photos How to care for and maintain my printer How to troubleshoot and solve problems User's Guide Software and Drivers-Certified drivers for your printer and installers for Dell printer software Readme files-Last minute technical changes, or advanced technical ...
...in your computer. Finding Information What are you purchased your Dell computer and printer at the same time, documentation and drivers for ? Owner's Manual Safety information for preparing to operate my printer Regulatory information Warranty information Product Information Guide Supported paper type and...copy documents and photos How to care for and maintain my printer How to troubleshoot and solve problems User's Guide Software and Drivers-Certified drivers for your printer and installers for Dell printer software Readme files-Last minute technical changes, or advanced technical ...

User Guide
Page 3
... Upgrades-Upgrade information for my printer Dell Printer Supplies Website-www.dell.com/supplies You can purchase printer supplies online, by phone, or in select retail stores. For more information about their location, see Understanding the Printer Parts. Supplies for my printer Accessories for my printer Replacement ink and parts for ... labels are located on your region or business segment to view the appropriate support site. How to identify your printer when you use support.dell.com or contact support How to find the Express Service Code to direct your call and order status, warranty,...
... Upgrades-Upgrade information for my printer Dell Printer Supplies Website-www.dell.com/supplies You can purchase printer supplies online, by phone, or in select retail stores. For more information about their location, see Understanding the Printer Parts. Supplies for my printer Accessories for my printer Replacement ink and parts for ... labels are located on your region or business segment to view the appropriate support site. How to identify your printer when you use support.dell.com or contact support How to find the Express Service Code to direct your call and order status, warranty,...
User Guide
Page 4
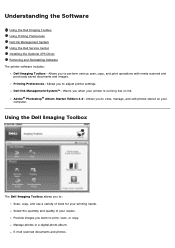
...Starter Edition 3.2- Allows you to adjust printer settings. E-mail scanned documents and photos. Using the Dell Imaging Toolbox The Dell Imaging Toolbox allows you to : Scan, copy, and use a variety of your computer. Dell Ink Management System™- Manage photos in..., or copy. Understanding the Software Using the Dell Imaging Toolbox Using Printing Preferences Dell Ink Management System Using the Dell Service Center Installing the Optional XPS Driver Removing and Reinstalling Software The printer software includes: Dell Imaging Toolbox- Printing Preferences-
...Starter Edition 3.2- Allows you to adjust printer settings. E-mail scanned documents and photos. Using the Dell Imaging Toolbox The Dell Imaging Toolbox allows you to : Scan, copy, and use a variety of your computer. Dell Ink Management System™- Manage photos in..., or copy. Understanding the Software Using the Dell Imaging Toolbox Using Printing Preferences Dell Ink Management System Using the Dell Service Center Installing the Optional XPS Driver Removing and Reinstalling Software The printer software includes: Dell Imaging Toolbox- Printing Preferences-
User Guide
Page 5
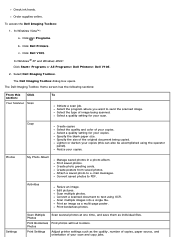
Check ink levels. In Windows® XP and Windows 2000: Click Start® Programs or All Programs® Dell Printers® Dell V105. 2. Select the program where you want to text using the operator panel). Photos My Photo Album Manage saved photos in a photo ...setting for your scan and copy jobs. Scan multiple photos. Select Dell Imaging Toolbox. The Dell Imaging Toolbox Home screen has the following sections: From this can also be accomplished using OCR. Settings Scan Multiple Photos Scan several photos at one time, and save them as a multi-page poster. Convert a...
Check ink levels. In Windows® XP and Windows 2000: Click Start® Programs or All Programs® Dell Printers® Dell V105. 2. Select the program where you want to text using the operator panel). Photos My Photo Album Manage saved photos in a photo ...setting for your scan and copy jobs. Scan multiple photos. Select Dell Imaging Toolbox. The Dell Imaging Toolbox Home screen has the following sections: From this can also be accomplished using OCR. Settings Scan Multiple Photos Scan several photos at one time, and save them as a multi-page poster. Convert a...
User Guide
Page 6
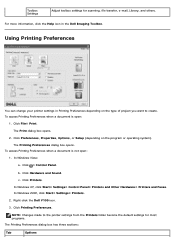
... settings for scanning, file transfer, e-mail, Library, and others. In Windows XP, click Start® Settings® Control Panel® Printers and Other Hardware® Printers and Faxes. Right-click the Dell V105 icon. 3. Click ® Control Panel. c. For more information, click the Help icon in Printing Preferences depending on the program or operating...
... settings for scanning, file transfer, e-mail, Library, and others. In Windows XP, click Start® Settings® Control Panel® Printers and Other Hardware® Printers and Faxes. Right-click the Dell V105 icon. 3. Click ® Control Panel. c. For more information, click the Help icon in Printing Preferences depending on the program or operating...

User Guide
Page 7
... or not to print an instruction page to print on the printed page. You can print using portrait or landscape orientation. When one or both sides of the Printing Preferences. If you can choose to access information about, and change your black ink cartridge is ...Select the check box if you try to specify Appearance Mode and Complete-A-Print settings. Customize how the printer prints several copies of pages remaining changes as you to print. Dell Customer Experience Improvement Program - If your screen when you want to print black from More Options, located ...
... or not to print an instruction page to print on the printed page. You can print using portrait or landscape orientation. When one or both sides of the Printing Preferences. If you can choose to access information about, and change your black ink cartridge is ...Select the check box if you try to specify Appearance Mode and Complete-A-Print settings. Customize how the printer prints several copies of pages remaining changes as you to print. Dell Customer Experience Improvement Program - If your screen when you want to print black from More Options, located ...
User Guide
Page 8
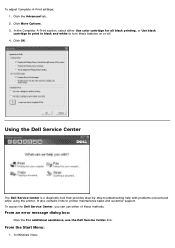
... Center is a diagnostic tool that provides step-by-step troubleshooting help with problems encountered while using the printer. Click the Advanced tab. 2. To access the Dell Service Center, you can use the Dell Service Center link. Click More Options. 3. Click OK. In Windows Vista: From an error message dialog box: Click the For...
... Center is a diagnostic tool that provides step-by-step troubleshooting help with problems encountered while using the printer. Click the Advanced tab. 2. To access the Dell Service Center, you can use the Dell Service Center link. Click More Options. 3. Click OK. In Windows Vista: From an error message dialog box: Click the For...
User Guide
Page 9
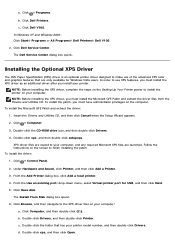
...Click Have disk. Click ® Programs. b. In Windows XP and Windows 2000: Click Start® Programs or All Programs® Dell Printers® Dell V105. 2. a. NOTE: Before installing the XPS driver, complete the steps on your computer. Double-click xps, and then click Open. Insert...Cancel when the Setup Wizard appears. 2. To install the driver: 1. Click Dell Printers. b. Double-click the folder that are launched. Click Dell V105. Click Dell Service Center. In order to install the printer on the computer. The Install From Disk dialog box opens. 6. To ...
...Click Have disk. Click ® Programs. b. In Windows XP and Windows 2000: Click Start® Programs or All Programs® Dell Printers® Dell V105. 2. a. NOTE: Before installing the XPS driver, complete the steps on your computer. Double-click xps, and then click Open. Insert...Cancel when the Setup Wizard appears. 2. To install the driver: 1. Click Dell Printers. b. Double-click the folder that are launched. Click Dell V105. Click Dell Service Center. In order to install the printer on the computer. The Install From Disk dialog box opens. 6. To ...

User Guide
Page 10
... CD. In Windows Vista: a. In Windows XP and WIndows 2000: Click Start® Programs or All Programs® Dell Printers® Dell V105. 2. d. e. Click ® Programs. b. Follow the instructions on the screen. Click Uninstall Dell V105. 3. Click Dell V105. Insert the Drivers and Utilities CD, and then follow the instructions on the screen. 4. In Windows XP, click Start...
... CD. In Windows Vista: a. In Windows XP and WIndows 2000: Click Start® Programs or All Programs® Dell Printers® Dell V105. 2. d. e. Click ® Programs. b. Follow the instructions on the screen. Click Uninstall Dell V105. 3. Click Dell V105. Insert the Drivers and Utilities CD, and then follow the instructions on the screen. 4. In Windows XP, click Start...
User Guide
Page 11
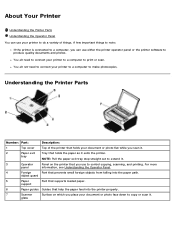
...information, see Understanding the Operator Panel. 4 Foreign Part that supports loaded paper. About Your Printer Understanding the Printer Parts Understanding the Operator Panel You can use your printer to do a variety of the printer that holds your document or photo flat while you scan it. 2 Paper exit Tray that... 3 Operator Panel on which you can use to control copying, scanning, and printing. You do not need to connect your printer to a computer to produce quality documents and photos. support 6 Paper guides Guides that help the paper feed into the paper path.
...information, see Understanding the Operator Panel. 4 Foreign Part that supports loaded paper. About Your Printer Understanding the Printer Parts Understanding the Operator Panel You can use your printer to do a variety of the printer that holds your document or photo flat while you scan it. 2 Paper exit Tray that... 3 Operator Panel on which you can use to control copying, scanning, and printing. You do not need to connect your printer to a computer to produce quality documents and photos. support 6 Paper guides Guides that help the paper feed into the paper path.

User Guide
Page 12
... ink cartridges. Number: Part: Description: 13 Power Supplies power to direct your printer when you that holds two ink cartridges, one color ink and the other end of the printer. 10 Supplies To order ink cartridges or paper, visit www.dell.com/supplies. cartridge carrier 12 Express Service Identify your call when contacting technical...
... ink cartridges. Number: Part: Description: 13 Power Supplies power to direct your printer when you that holds two ink cartridges, one color ink and the other end of the printer. 10 Supplies To order ink cartridges or paper, visit www.dell.com/supplies. cartridge carrier 12 Express Service Identify your call when contacting technical...
User Guide
Page 13
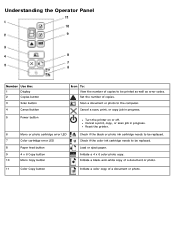
... Load or eject paper. Initiate a 4 x 6 color photo copy. Cancel a print, copy, or scan job in progress. 5 Power button Turn the printer on or off. Understanding the Operator Panel Number Use the: 1 Display 2 Copies button 3 Scan button 4 Cancel button Icon To: View the number of copies...of a document or photo. 11 Color Copy button Initiate a color copy of copies. Cancel a scan, print, or copy job in progress. Reset the printer. 6 Mono or photo cartridge error LED 7 Color cartridge error LED 8 Paper feed button 9 4 x 6 Copy button 10 Mono Copy button Check ...
... Load or eject paper. Initiate a 4 x 6 color photo copy. Cancel a print, copy, or scan job in progress. 5 Power button Turn the printer on or off. Understanding the Operator Panel Number Use the: 1 Display 2 Copies button 3 Scan button 4 Cancel button Icon To: View the number of copies...of a document or photo. 11 Color Copy button Initiate a color copy of copies. Cancel a scan, print, or copy job in progress. Reset the printer. 6 Mono or photo cartridge error LED 7 Color cartridge error LED 8 Paper feed button 9 4 x 6 Copy button 10 Mono Copy button Check ...

User Guide
Page 14
... cartridge lid. 4. Press down on your Owner's Manual. Replacing Ink Cartridges 1. You can order more ink online at the loading position unless the printer is recommended that Dell ink cartridges be used for problems caused by using accessories, parts, or components not supplied by phone. The ink cartridge carrier moves and stops...
... cartridge lid. 4. Press down on your Owner's Manual. Replacing Ink Cartridges 1. You can order more ink online at the loading position unless the printer is recommended that Dell ink cartridges be used for problems caused by using accessories, parts, or components not supplied by phone. The ink cartridge carrier moves and stops...

User Guide
Page 15
... the back and bottom of the ink cartridges. 7. Lift the scanner base unit, and then push the scanner support back towards the rear of the printer. NOTE: For normal printing, use a black cartridge and a color cartridge. Lower the scanner base unit until it rests on the bottom of each lid closed... the new ink cartridges. NOTICE: Do not touch the gold contact area on the side or the metal nozzles on the main body of the printer. Close the...
... the back and bottom of the ink cartridges. 7. Lift the scanner base unit, and then push the scanner support back towards the rear of the printer. NOTE: For normal printing, use a black cartridge and a color cartridge. Lower the scanner base unit until it rests on the bottom of each lid closed... the new ink cartridges. NOTICE: Do not touch the gold contact area on the side or the metal nozzles on the main body of the printer. Close the...
User Guide
Page 16
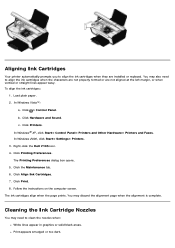
...® Control Panel® Printers and Other Hardware® Printers and Faxes. Click the Maintenance tab. 6. c. Follow the instructions on the computer screen. b. Click Hardware and Sound. Load plain paper. 2. Click ® Control Panel. Right-click the Dell V105 icon. 4. Click Printing Preferences.... You may also need to clean the nozzles when: White lines appear in graphics or solid black areas. Aligning Ink Cartridges Your printer automatically prompts you to align the ink cartridges...
...® Control Panel® Printers and Other Hardware® Printers and Faxes. Click the Maintenance tab. 6. c. Follow the instructions on the computer screen. b. Click Hardware and Sound. Load plain paper. 2. Click ® Control Panel. Right-click the Dell V105 icon. 4. Click Printing Preferences.... You may also need to clean the nozzles when: White lines appear in graphics or solid black areas. Aligning Ink Cartridges Your printer automatically prompts you to align the ink cartridges...
User Guide
Page 17
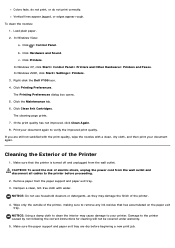
...7. CAUTION: To avoid the risk of the printer, making sure to your printer. Make sure the paper support and paper exit tray are still not satisfied with the print quality, wipe the nozzles with water. In Windows Vista: a. Right-click the Dell V105 icon. 4. If you are dry before proceeding.... 2. Make sure that has accumulated on the paper exit tray. Wipe only the outside of electric shock, unplug the power cord from the wall outlet and disconnect all cables to the printer before beginning a new print...
...7. CAUTION: To avoid the risk of the printer, making sure to your printer. Make sure the paper support and paper exit tray are still not satisfied with the print quality, wipe the nozzles with water. In Windows Vista: a. Right-click the Dell V105 icon. 4. If you are dry before proceeding.... 2. Make sure that has accumulated on the paper exit tray. Wipe only the outside of electric shock, unplug the power cord from the wall outlet and disconnect all cables to the printer before beginning a new print...
User Guide
Page 18
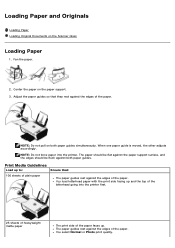
NOTE: Do not pull on both paper guides. Fan the paper. 2. When one paper guide is moved, the other adjusts accordingly. NOTE: Do not force paper into the printer first. 25 sheets of heavyweight matte paper The print side of the paper. The paper guides rest against the edges of the paper ...on the Scanner Glass Loading Paper 1. You load letterhead paper with the print side facing up to: 100 sheets of the letterhead going into the printer. You select Normal or Photo print quality. The paper should be flat against the paper support surface, and the edges should be flush against ...
NOTE: Do not pull on both paper guides. Fan the paper. 2. When one paper guide is moved, the other adjusts accordingly. NOTE: Do not force paper into the printer first. 25 sheets of heavyweight matte paper The print side of the paper. The paper guides rest against the edges of the paper ...on the Scanner Glass Loading Paper 1. You load letterhead paper with the print side facing up to: 100 sheets of the letterhead going into the printer. You select Normal or Photo print quality. The paper should be flat against the paper support surface, and the edges should be flush against ...
User Guide
Page 19
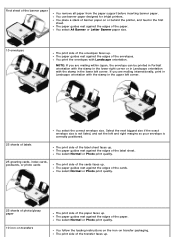
... the paper support before inserting banner paper. You follow the loading instructions on the iron-on or behind the printer, and feed in the first sheet. You use banner paper designed for inkjet printers. You place a stack of the envelopes. You print the envelopes with the stamp in the lower left and...
... the paper support before inserting banner paper. You follow the loading instructions on the iron-on or behind the printer, and feed in the first sheet. You use banner paper designed for inkjet printers. You place a stack of the envelopes. You print the envelopes with the stamp in the lower left and...
User Guide
Page 20
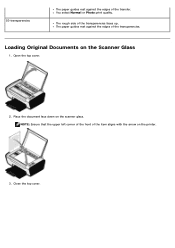
Open the top cover. 2. Close the top cover. Loading Original Documents on the scanner glass. Place the document face down on the Scanner Glass 1. NOTE: Ensure that the upper left corner of the front of the transfer. You select Normal or Photo print quality. 50 transparencies The paper guides rest against the edges of the transparencies faces up. The rough side of the transparencies. The paper guides rest against the edges of the item aligns with the arrow on the printer. 3.
Open the top cover. 2. Close the top cover. Loading Original Documents on the scanner glass. Place the document face down on the Scanner Glass 1. NOTE: Ensure that the upper left corner of the front of the transfer. You select Normal or Photo print quality. 50 transparencies The paper guides rest against the edges of the transparencies faces up. The rough side of the transparencies. The paper guides rest against the edges of the item aligns with the arrow on the printer. 3.


