User Guide
Page 34
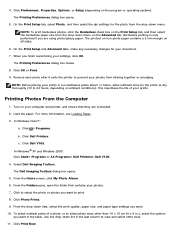
...7. This maximizes the life of a photo, or to select photo sizes other sizes. 11. In Windows® XP and Windows 2000: Click Start® Programs or All Programs® Dell Printers® Dell V105. 4. Click to select the photo or photos you want to prevent your prints. To select multiple...time for the prints to dry thoroughly (12 to view and select other than 10 x 15 cm (4 x 6 in the last column to 24 hours, depending on ambient conditions). Printing Photos From the Computer 1. Select Dell Imaging Toolbox. Click Photo Prints. 9. The Printing Preferences dialog box opens. ...
...7. This maximizes the life of a photo, or to select photo sizes other sizes. 11. In Windows® XP and Windows 2000: Click Start® Programs or All Programs® Dell Printers® Dell V105. 4. Click to select the photo or photos you want to prevent your prints. To select multiple...time for the prints to dry thoroughly (12 to view and select other than 10 x 15 cm (4 x 6 in the last column to 24 hours, depending on ambient conditions). Printing Photos From the Computer 1. Select Dell Imaging Toolbox. Click Photo Prints. 9. The Printing Preferences dialog box opens. ...
User Guide
Page 35
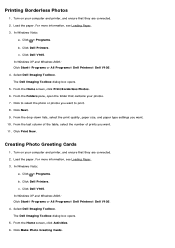
... want to select the photo or photos you want . 10. Click Print Now. Click ® Programs. b. From the Home screen, click Activities. 6. In Windows XP and Windows 2000: Click Start® Programs or All Programs® Dell Printers® Dell V105. 4. Click Next. 9. Turn on your photos. 7. c. The Dell Imaging Toolbox dialog box opens. 5. Click to print. 8. Load...
... want to select the photo or photos you want . 10. Click Print Now. Click ® Programs. b. From the Home screen, click Activities. 6. In Windows XP and Windows 2000: Click Start® Programs or All Programs® Dell Printers® Dell V105. 4. Click Next. 9. Turn on your photos. 7. c. The Dell Imaging Toolbox dialog box opens. 5. Click to print. 8. Load...
User Guide
Page 44
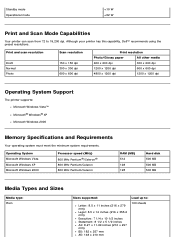
Standby mode Operational mode
Standby mode Operational mode
User Guide
Page 48
...10 x 15 cm) photo card with the print side facing up . Load photo/glossy paper with the print side facing up . For more than one copy, press the Copies button appears on the display. If you want 5. Load your original photo on the scanner glass. In Windows Vista: a. Click ® Programs. b. Click Dell V105. Select Dell...you want to start a black-and-white copy. If you scanning? In Windows XP or Windows 2000: Click Start® Programs or All Programs® Dell Printers® Dell V105. 5. For more information, see Loading Original Documents on the Scanner Glass. 4....
...10 x 15 cm) photo card with the print side facing up . Load photo/glossy paper with the print side facing up . For more than one copy, press the Copies button appears on the display. If you want 5. Load your original photo on the scanner glass. In Windows Vista: a. Click ® Programs. b. Click Dell V105. Select Dell...you want to start a black-and-white copy. If you scanning? In Windows XP or Windows 2000: Click Start® Programs or All Programs® Dell Printers® Dell V105. 5. For more information, see Loading Original Documents on the Scanner Glass. 4....
User Guide
Page 57
...Click Create E-mail to create an e-mail message with your document or photo to an e-mail message. Click Dell V105. Click ® Programs. b. Click Dell Printers. Click Start. In Windows Vista: a. Click to select each photo or document that contains the files you want to attach your file...of all photos and documents in the folder appear in the preview area. 5. In Windows XP and Windows 2000: Click Start® Programs or All Programs® Dell Printers® Dell V105. 2. c. Save your scanned image. 10. Adding a File to send. From the Home screen, click My Photo Album....
...Click Create E-mail to create an e-mail message with your document or photo to an e-mail message. Click Dell V105. Click ® Programs. b. Click Dell Printers. Click Start. In Windows Vista: a. Click to select each photo or document that contains the files you want to attach your file...of all photos and documents in the folder appear in the preview area. 5. In Windows XP and Windows 2000: Click Start® Programs or All Programs® Dell Printers® Dell V105. 2. c. Save your scanned image. 10. Adding a File to send. From the Home screen, click My Photo Album....
User Guide
Page 58
...Windows Vista: a. Click Dell V105. In Windows XP and Windows 2000: Click Start® Programs or All Programs® Dell Printers® Dell V105. 3. Click ® Programs. b. From the Home screen, click My Photo Album. 4. Click Add Another to scan additional images or to begin scanning. 8. b. Select Save all images as one...or Document. 7. Select Add Photo from the Library. 10. Click Create PDF. In Windows XP and Windows 2000: Click Start® Programs or All Programs® Dell Printers® Dell V105. 2. Click Dell Printers. Type a file name for your scan selected, ...
...Windows Vista: a. Click Dell V105. In Windows XP and Windows 2000: Click Start® Programs or All Programs® Dell Printers® Dell V105. 3. Click ® Programs. b. From the Home screen, click My Photo Album. 4. Click Add Another to scan additional images or to begin scanning. 8. b. Select Save all images as one...or Document. 7. Select Add Photo from the Library. 10. Click Create PDF. In Windows XP and Windows 2000: Click Start® Programs or All Programs® Dell Printers® Dell V105. 2. Click Dell Printers. Type a file name for your scan selected, ...
User Guide
Page 59
...your selections. 8. Click Save. Click Dell Printers. Do one PDF file or Save each image as individual PDF file. 9. Click Start. Select Save all images as needed. In Windows XP and Windows 2000: Click Start® Programs or All Programs® Dell Printers® Dell V105. 2. Click Convert to text. ... size from the dropdown list. Click Add Files when you have made your PDF and opens a Save dialog box. 10. Select Dell Imaging Toolbox. The Dell Imaging Toolbox dialog box opens. 3. Size Auto-crop the scanned item. thumbnail. 5. Click Create PDF. Setting Options...
...your selections. 8. Click Save. Click Dell Printers. Do one PDF file or Save each image as individual PDF file. 9. Click Start. Select Save all images as needed. In Windows XP and Windows 2000: Click Start® Programs or All Programs® Dell Printers® Dell V105. 2. Click Convert to text. ... size from the dropdown list. Click Add Files when you have made your PDF and opens a Save dialog box. 10. Select Dell Imaging Toolbox. The Dell Imaging Toolbox dialog box opens. 3. Size Auto-crop the scanned item. thumbnail. 5. Click Create PDF. Setting Options...


