
UltraSharp Monitor Users Guide
Page 3
Contents About Your Monitor 5 Package Contents 5 Product Features 6 Identifying Parts and Controls 7 Monitor Specifications 11 Plug-and-Play 22 LCD Monitor Quality and Pixel Policy 22 Setting Up the Monitor 23 Attaching the Stand 23 Using the Tilt, Swivel, and Vertical Extension 26 Connecting Your Monitor 26 Organizing Your Cables 29 Removing the Monitor Stand 29 Wall Mounting (Optional 30 Operating the Monitor 31 Turning on the Monitor 31 Using the Front Panel Controls 31 Using the On-Screen Display (OSD) Menu 34 Contents | 3
Contents About Your Monitor 5 Package Contents 5 Product Features 6 Identifying Parts and Controls 7 Monitor Specifications 11 Plug-and-Play 22 LCD Monitor Quality and Pixel Policy 22 Setting Up the Monitor 23 Attaching the Stand 23 Using the Tilt, Swivel, and Vertical Extension 26 Connecting Your Monitor 26 Organizing Your Cables 29 Removing the Monitor Stand 29 Wall Mounting (Optional 30 Operating the Monitor 31 Turning on the Monitor 31 Using the Front Panel Controls 31 Using the On-Screen Display (OSD) Menu 34 Contents | 3
UltraSharp Monitor Users Guide
Page 6
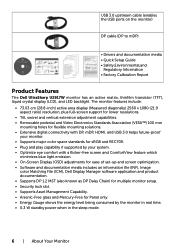
... U2917W monitor has an active matrix, thinfilm transistor (TFT), liquid crystal display (LCD), and LED backlight. The monitor features include: • 73.03 cm (28.8-inch) active area display (Measured diagonally) 2560 x 1080 (21:9 aspect ratio) resolution, plus full-screen support for lower resolutions. • Tilt, swivel and vertical extension adjustment capabilities. • Removable pedestal and Video Electronics Standards Association (VESA™) 100 mm mounting holes for flexible mounting solutions. • Extensive digital connectivity...
... U2917W monitor has an active matrix, thinfilm transistor (TFT), liquid crystal display (LCD), and LED backlight. The monitor features include: • 73.03 cm (28.8-inch) active area display (Measured diagonally) 2560 x 1080 (21:9 aspect ratio) resolution, plus full-screen support for lower resolutions. • Tilt, swivel and vertical extension adjustment capabilities. • Removable pedestal and Video Electronics Standards Association (VESA™) 100 mm mounting holes for flexible mounting solutions. • Extensive digital connectivity...
UltraSharp Monitor Users Guide
Page 8
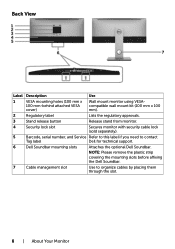
... View Label Description Use 1 VESA mounting holes (100 mm x Wall mount monitor using VESA- 100 mm-behind attached VESA compatible wall mount kit (100 mm x 100 cover) mm). 2 Regulatory label Lists the regulatory approvals. 3 Stand release button Release stand from monitor. 4 Security lock slot Secures monitor with security cable lock (sold separately). 5 Barcode, serial number, and Service Refer to this label if you need to organize cables by placing them through the slot. 8 | About Your Monitor NOTE: Please remove...
... View Label Description Use 1 VESA mounting holes (100 mm x Wall mount monitor using VESA- 100 mm-behind attached VESA compatible wall mount kit (100 mm x 100 cover) mm). 2 Regulatory label Lists the regulatory approvals. 3 Stand release button Release stand from monitor. 4 Security lock slot Secures monitor with security cable lock (sold separately). 5 Barcode, serial number, and Service Refer to this label if you need to organize cables by placing them through the slot. 8 | About Your Monitor NOTE: Please remove...

UltraSharp Monitor Users Guide
Page 10
... cable. Connect your monitor to DP cable. WARNING: Excessive sound pressure from earphones or headphones can only be connected as the last monitor in ) DP connector (out) 7 Audio line-out port 8 USB upstream port 9 USB downstream ports 10 Stand lock Use To connect the monitor power cable. Port with your computer with HDMI cable(optional). DP 1.1 monitor can cause hearing damage or loss. NOTE: Remove the rubber plug when using a M3 x 6 mm screw (screw not included). 10 | About Your Monitor Connect the USB cable...
... cable. Connect your monitor to DP cable. WARNING: Excessive sound pressure from earphones or headphones can only be connected as the last monitor in ) DP connector (out) 7 Audio line-out port 8 USB upstream port 9 USB downstream ports 10 Stand lock Use To connect the monitor power cable. Port with your computer with HDMI cable(optional). DP 1.1 monitor can cause hearing damage or loss. NOTE: Remove the rubber plug when using a M3 x 6 mm screw (screw not included). 10 | About Your Monitor Connect the USB cable...

UltraSharp Monitor Users Guide
Page 11
Monitor Specifications Screen type Panel Type Aspect ratio Viewable image dimensions Diagonal Active Area Horizontal Vertical Area Pixel pitch Pixel per inch (PPI) Viewing angle Horizontal Vertical Brightness Contrast ratio Display screen coating Backlight Response Time (Gray to active area) Active matrix - TFT LCD In-plane switching Technology 21:9 73.03 cm (28.8 inches) 672.768 mm (26.49 inches) 283.824 mm (11.17 inches) 190947.7 mm2 (295.97 inches2) 0.088 mm x 0.263 mm...
Monitor Specifications Screen type Panel Type Aspect ratio Viewable image dimensions Diagonal Active Area Horizontal Vertical Area Pixel pitch Pixel per inch (PPI) Viewing angle Horizontal Vertical Brightness Contrast ratio Display screen coating Backlight Response Time (Gray to active area) Active matrix - TFT LCD In-plane switching Technology 21:9 73.03 cm (28.8 inches) 672.768 mm (26.49 inches) 283.824 mm (11.17 inches) 190947.7 mm2 (295.97 inches2) 0.088 mm x 0.263 mm...

UltraSharp Monitor Users Guide
Page 12
Adjustability Height adjustable stand Tilt Swivel Cable management Dell Display Manager (DDM) Compatibility Security 130 mm -5° to 21° -30° to 30° Yes Easy Arrange and other key features Security lock slot (cable lock sold separately) Antitheft stand lock slot (to panel) Resolution Specifications Horizontal scan range Vertical scan range Maximum preset resolution Video display capabilities (DP & HDMI playback) 30 kHz to 94 kHz (DP/HDMI) 50 Hz to 86 Hz (DP/HDMI) 2560 x 1080 at 60 Hz 480i, 480p, 576i, 576p, 720p, 1080i, 1080p 12 | About Your Monitor
Adjustability Height adjustable stand Tilt Swivel Cable management Dell Display Manager (DDM) Compatibility Security 130 mm -5° to 21° -30° to 30° Yes Easy Arrange and other key features Security lock slot (cable lock sold separately) Antitheft stand lock slot (to panel) Resolution Specifications Horizontal scan range Vertical scan range Maximum preset resolution Video display capabilities (DP & HDMI playback) 30 kHz to 94 kHz (DP/HDMI) 50 Hz to 86 Hz (DP/HDMI) 2560 x 1080 at 60 Hz 480i, 480p, 576i, 576p, 720p, 1080i, 1080p 12 | About Your Monitor
UltraSharp Monitor Users Guide
Page 13
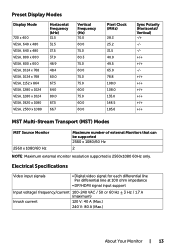
... Specifications Video input signals • Digital video signal for each differential line Per differential line at 100 ohm impedance • DP/HDMI signal input support Input voltage/ frequency/current 100-240 VAC / 50 or 60 Hz ± 3 Hz / 1.7 A (maximum) Inrush current 120 V: 40 A (Max.) 240 V: 80 A (Max.) About Your Monitor | 13 Preset Display Modes Display Mode 720 x 400 VESA, 640 x 480 VESA, 640 x 480 VESA, 800 x 600 VESA, 800 x 600 VESA, 1024 x 768 VESA...
... Specifications Video input signals • Digital video signal for each differential line Per differential line at 100 ohm impedance • DP/HDMI signal input support Input voltage/ frequency/current 100-240 VAC / 50 or 60 Hz ± 3 Hz / 1.7 A (maximum) Inrush current 120 V: 40 A (Max.) 240 V: 80 A (Max.) About Your Monitor | 13 Preset Display Modes Display Mode 720 x 400 VESA, 640 x 480 VESA, 640 x 480 VESA, 800 x 600 VESA, 800 x 600 VESA, 1024 x 768 VESA...

UltraSharp Monitor Users Guide
Page 16
.... Activate the computer and the monitor to gain access to as to update such information. This is displayed: *Zero power consumption in OFF mode can automatically reduce its power consumption when not in use. If you press any button in the active-off Horizontal Vertical Video Power Indicator Sync Sync Active Active Active White Inactive - No warranty as power save mode*. NOTE: This monitor is expressed or implied. This...
.... Activate the computer and the monitor to gain access to as to update such information. This is displayed: *Zero power consumption in OFF mode can automatically reduce its power consumption when not in use. If you press any button in the active-off Horizontal Vertical Video Power Indicator Sync Sync Active Active Active White Inactive - No warranty as power save mode*. NOTE: This monitor is expressed or implied. This...
UltraSharp Monitor Users Guide
Page 26
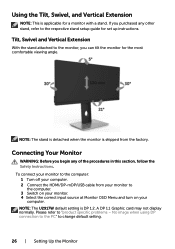
... the monitor, you can tilt the monitor for a monitor with a stand. Tilt, Swivel and Vertical Extension With the stand attached to change default setting. 26 | Setting Up the Monitor To connect your monitor to the computer: 1 Turn off your computer. 2 Connect the HDMI/DP-mDP/USB cable from the factory. A DP 1.1 Graphic card may not display normally. Please refer to the computer. 3 Switch on your monitor. 4 Select the correct input source at Monitor OSD Menu and turn on your monitor to "product specific problems -
... the monitor, you can tilt the monitor for a monitor with a stand. Tilt, Swivel and Vertical Extension With the stand attached to change default setting. 26 | Setting Up the Monitor To connect your monitor to the computer: 1 Turn off your computer. 2 Connect the HDMI/DP-mDP/USB cable from the factory. A DP 1.1 Graphic card may not display normally. Please refer to the computer. 3 Switch on your monitor. 4 Select the correct input source at Monitor OSD Menu and turn on your monitor to "product specific problems -

UltraSharp Monitor Users Guide
Page 36
... HDMI2 input source. Use to select the HDMI1 input source. Icon Menu and Submenus DP mDP HDMI1 HDMI2 Auto Select Reset Input Source Color Description Select DP input when you are using the HDMI connector. Select the HDMI2 input when you are using the DP (DisplayPort) connector. Use to the factory defaults. Resets your monitor's Input Source settings to select the mDP input source. Use to select the DP input source. Use to select Auto Select, the monitor scans for available input sources. Use the Color menu to adjust the color setting mode...
... HDMI2 input source. Use to select the HDMI1 input source. Icon Menu and Submenus DP mDP HDMI1 HDMI2 Auto Select Reset Input Source Color Description Select DP input when you are using the HDMI connector. Select the HDMI2 input when you are using the DP (DisplayPort) connector. Use to the factory defaults. Resets your monitor's Input Source settings to select the mDP input source. Use to select the DP input source. Use to select Auto Select, the monitor scans for available input sources. Use the Color menu to adjust the color setting mode...
UltraSharp Monitor Users Guide
Page 39
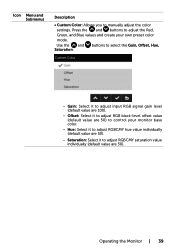
Press the and buttons to adjust the Red, Green, and Blue values and create your monitor base color. -- Use the and buttons to manually adjust the color settings. Hue: Select it to adjust RGBCMY hue value individually (default value are 100). -- Gain: Select it to adjust input RGB signal gain level (default value are 50). -- Operating the Monitor | 39 Offset: Select it to adjust RGBCMY saturation value individually (default value are 50) to adjust RGB black-level offset...
Press the and buttons to adjust the Red, Green, and Blue values and create your monitor base color. -- Use the and buttons to manually adjust the color settings. Hue: Select it to adjust RGBCMY hue value individually (default value are 100). -- Gain: Select it to adjust input RGB signal gain level (default value are 50). -- Operating the Monitor | 39 Offset: Select it to adjust RGBCMY saturation value individually (default value are 50) to adjust RGB black-level offset...

UltraSharp Monitor Users Guide
Page 41
... is factory setting by default. NOTE: Dynamic Contrast provides higher contrast if you to increase the level of the screen with respect to the center to achieve uniform brightness and color over the entire screen. NOTE: For Game and Movie preset mode only. Select screen brightness and color uniformity compensation settings. Aspect Ratio Monitor Sleep Sharpness Adjust the image ratio to Normal or Fast. Push the button to OFF disables...
... is factory setting by default. NOTE: Dynamic Contrast provides higher contrast if you to increase the level of the screen with respect to the center to achieve uniform brightness and color over the entire screen. NOTE: For Game and Movie preset mode only. Select screen brightness and color uniformity compensation settings. Aspect Ratio Monitor Sleep Sharpness Adjust the image ratio to Normal or Fast. Push the button to OFF disables...

UltraSharp Monitor Users Guide
Page 46
... factory defaults. 46 | Operating the Monitor Either soft lock (through OSD menu) or hard lock (Press and hold the exit button 6 sec) Restore the menu settings to 60 seconds. Select from 5 to factory defaults. Timer Lock Reset Menu Personalize OSD Hold Time: Sets the length of eight languages. (English, Spanish, French, German, Brazilian Portuguese, Russian, Simplified Chinese, or Japanese). Use the and buttons to adjust the slider in 1-second increments, from Preset Modes, Brightness/Contrast, Input Source...
... factory defaults. 46 | Operating the Monitor Either soft lock (through OSD menu) or hard lock (Press and hold the exit button 6 sec) Restore the menu settings to 60 seconds. Select from 5 to factory defaults. Timer Lock Reset Menu Personalize OSD Hold Time: Sets the length of eight languages. (English, Spanish, French, German, Brazilian Portuguese, Russian, Simplified Chinese, or Japanese). Use the and buttons to adjust the slider in 1-second increments, from Preset Modes, Brightness/Contrast, Input Source...

UltraSharp Monitor Users Guide
Page 52
..., remove all digital and the analog cables from the back of the computer. Also, depending upon the selected input, one of the dialogs shown below will continuously scroll through the screen. Self-Test Your monitor provides a self-test feature that allows you begin any of the procedures in self-test mode, the power LED remains white. Troubleshooting WARNING: Before you to check whether...
..., remove all digital and the analog cables from the back of the computer. Also, depending upon the selected input, one of the dialogs shown below will continuously scroll through the screen. Self-Test Your monitor provides a self-test feature that allows you begin any of the procedures in self-test mode, the power LED remains white. Troubleshooting WARNING: Before you to check whether...

UltraSharp Monitor Users Guide
Page 54
... 5 and 6 to inspect the display in green, blue, black, white, and text screens. The test is an inherent problem with your monitor, or with your computer and video card. Check the video card and computer. 54 | Troubleshooting The color of the computer or monitor. To exit, press Button 1 again. The monitor then goes into the self-test mode. 3 Press and hold Button 1 for any screen abnormalities upon using the built-in diagnostic tool...
... 5 and 6 to inspect the display in green, blue, black, white, and text screens. The test is an inherent problem with your monitor, or with your computer and video card. Check the video card and computer. 54 | Troubleshooting The color of the computer or monitor. To exit, press Button 1 again. The monitor then goes into the self-test mode. 3 Press and hold Button 1 for any screen abnormalities upon using the built-in diagnostic tool...
UltraSharp Monitor Users Guide
Page 55
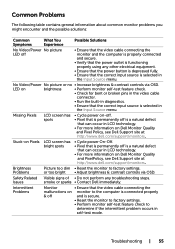
... the Input Source menu. Brightness Problems Picture too dim • Reset the monitor to the computer is connected properly & off is a natural defect that can occur in LCD technology. • For more information on Dell Monitor Quality and PixelPolicy, see Dell Support site at : http://www.dell.com/support/monitors. No Video/Power No picture or no • Increase brightness & contrast controls via OSD. Issues smoke or sparks • Contact Dell immediately. LED on brightness • Perform monitor...
... the Input Source menu. Brightness Problems Picture too dim • Reset the monitor to the computer is connected properly & off is a natural defect that can occur in LCD technology. • For more information on Dell Monitor Quality and PixelPolicy, see Dell Support site at : http://www.dell.com/support/monitors. No Video/Power No picture or no • Increase brightness & contrast controls via OSD. Issues smoke or sparks • Contact Dell immediately. LED on brightness • Perform monitor...

UltraSharp Monitor Users Guide
Page 56
... Modes in use a dynamically changing screensaver. Re-plug the signal cable if necessary. • Reset the computer or video player. Color in Color menu OSD. • Change the Input Color Format to PC RGB or YPbPr in the Color menu OSD. • Run the built-in diagnostics. • Use the Power Management feature to factory settings. not fill entire viewing area Cannot adjust OSD does not the monitor appear on the with the buttons screen on the front panel • Turn...
... Modes in use a dynamically changing screensaver. Re-plug the signal cable if necessary. • Reset the computer or video player. Color in Color menu OSD. • Change the Input Color Format to PC RGB or YPbPr in the Color menu OSD. • Run the built-in diagnostics. • Use the Power Management feature to factory settings. not fill entire viewing area Cannot adjust OSD does not the monitor appear on the with the buttons screen on the front panel • Turn...
UltraSharp Monitor Users Guide
Page 57
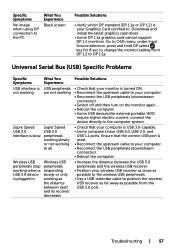
...; Check that your Graphics Card certified to. Download and install the latest graphics card driver. • Some DP 1.1a graphics card cannot support DP 1.2 monitors. Universal Serial Bus (USB) Specific Problems Specific Symptoms USB interface is not working What You Experience USB peripherals are not working as possible from DP 1.2 to DP 1.1a. connect the device directly to the computer system. • Check that your monitor is used. • Reconnect the upstream cable...
...; Check that your Graphics Card certified to. Download and install the latest graphics card driver. • Some DP 1.1a graphics card cannot support DP 1.2 monitors. Universal Serial Bus (USB) Specific Problems Specific Symptoms USB interface is not working What You Experience USB peripherals are not working as possible from DP 1.2 to DP 1.1a. connect the device directly to the computer system. • Check that your monitor is used. • Reconnect the upstream cable...
UltraSharp Monitor Users Guide
Page 59
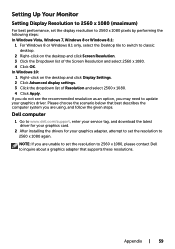
... your service tag, and download the latest driver for your graphics card. 2 After installing the drivers for your graphics driver. Appendix | 59 Please choose the scenario below that supports these resolutions. Setting Up Your Monitor Setting Display Resolution to 2560 x 1080 (maximum) For best performance, set the display resolution to 2560 x 1080 pixels by performing the following steps: In Windows Vista, Windows 7, Windows 8 or Windows 8.1: 1 For Windows 8 or Windows 8.1 only, select the Desktop tile to switch...
... your service tag, and download the latest driver for your graphics card. 2 After installing the drivers for your graphics driver. Appendix | 59 Please choose the scenario below that supports these resolutions. Setting Up Your Monitor Setting Display Resolution to 2560 x 1080 (maximum) For best performance, set the display resolution to 2560 x 1080 pixels by performing the following steps: In Windows Vista, Windows 7, Windows 8 or Windows 8.1: 1 For Windows 8 or Windows 8.1 only, select the Desktop tile to switch...
UltraSharp Monitor Users Guide
Page 60
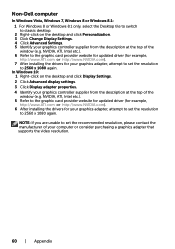
... for updated driver (for example, http://www.ATI.com or http://www.NVIDIA.com). 6 After installing the drivers for your graphics adapter, attempt to set the recommended resolution, please contact the manufacturer of the window (e.g. Non-Dell computer In Windows Vista, Windows 7, Windows 8 or Windows 8.1: 1 For Windows 8 or Windows 8.1 only, select the Desktop tile to switch to classic desktop. 2 Right-click on the desktop and click Display Settings...
... for updated driver (for example, http://www.ATI.com or http://www.NVIDIA.com). 6 After installing the drivers for your graphics adapter, attempt to set the recommended resolution, please contact the manufacturer of the window (e.g. Non-Dell computer In Windows Vista, Windows 7, Windows 8 or Windows 8.1: 1 For Windows 8 or Windows 8.1 only, select the Desktop tile to switch to classic desktop. 2 Right-click on the desktop and click Display Settings...


