

Users Guide
Page 3
... features 8 Identifying parts and controls 9 Front view 9 Back view 10 Side view 11 Bottom view 12 Monitor specifications 14 Resolution specifications 16 Supported video modes 16 Preset display modes 16 Multi-Stream Transport (MST) modes 17 Electrical specifications 17 Physical characteristics 18 Environmental characteristics 19 Power management modes 20 Pin assignments 21 Plug and play capability 24 Universal Serial Bus (USB) interface 24 USB 3.0 downstream connector 25 USB Type-C connector 25 USB ports 26 LCD monitor quality and pixel policy 26...
... features 8 Identifying parts and controls 9 Front view 9 Back view 10 Side view 11 Bottom view 12 Monitor specifications 14 Resolution specifications 16 Supported video modes 16 Preset display modes 16 Multi-Stream Transport (MST) modes 17 Electrical specifications 17 Physical characteristics 18 Environmental characteristics 19 Power management modes 20 Pin assignments 21 Plug and play capability 24 Universal Serial Bus (USB) interface 24 USB 3.0 downstream connector 25 USB Type-C connector 25 USB ports 26 LCD monitor quality and pixel policy 26...

Users Guide
Page 4
... 31 Connecting the HDMI cable (for U2520DR 32 Connecting the USB Type-C cable 33 Connecting the monitor for DP Multi-Stream Transport (MST) function 34 Connecting the monitor for USB-C Multi-Stream Transport (MST) function 34 Organizing your cables 35 Removing the monitor stand 35 VESA wall mounting (optional 36 Operating the monitor 37 Power on the monitor 37 Using the front-panel controls 37 Front-panel button 38 Using the On-Screen Display (OSD) menu 39 Accessing the menu system 39 OSD warning...
... 31 Connecting the HDMI cable (for U2520DR 32 Connecting the USB Type-C cable 33 Connecting the monitor for DP Multi-Stream Transport (MST) function 34 Connecting the monitor for USB-C Multi-Stream Transport (MST) function 34 Organizing your cables 35 Removing the monitor stand 35 VESA wall mounting (optional 36 Operating the monitor 37 Power on the monitor 37 Using the front-panel controls 37 Front-panel button 38 Using the On-Screen Display (OSD) menu 39 Accessing the menu system 39 OSD warning...
Users Guide
Page 8
... set-up and screen optimization. • Power and OSD buttons lock. • Security lock slot. • Stand lock. • 0.3 W standby power when in multi-monitor usage, enabling easier setup with an elegant viewing experience. • Removable stand and Video Electronics Standards Association (VESA™) 100 mm mounting holes for ease of blue light emission from a sitting or standing position. • Color gamut of 99% sRGB with an average Delta E < 2. • Digital connectivity with DisplayPort, USB Type-C and HDMI...
... set-up and screen optimization. • Power and OSD buttons lock. • Security lock slot. • Stand lock. • 0.3 W standby power when in multi-monitor usage, enabling easier setup with an elegant viewing experience. • Removable stand and Video Electronics Standards Association (VESA™) 100 mm mounting holes for ease of blue light emission from a sitting or standing position. • Color gamut of 99% sRGB with an average Delta E < 2. • Digital connectivity with DisplayPort, USB Type-C and HDMI...

Users Guide
Page 12
... rate and the alternate mode with security lock (security lock not included). Secures the monitor with DP 1.4 supports a maximum resolution of Windows prior to Windows 10. 12 │ About your monitor to the monitor using a M3 x 6 mm screw (screw not included). Bottom view Bottom view without monitor stand Label Description 1 Power connector 2 Security lock slot 3 HDMI port 4 DisplayPort (in) 5 Stand lock feature 6 USB Type-C port Use Connect the power cable (shipped with U2520D). Connect your computer with the DisplayPort cable (shipped with your monitor). Connect...
... rate and the alternate mode with security lock (security lock not included). Secures the monitor with DP 1.4 supports a maximum resolution of Windows prior to Windows 10. 12 │ About your monitor to the monitor using a M3 x 6 mm screw (screw not included). Bottom view Bottom view without monitor stand Label Description 1 Power connector 2 Security lock slot 3 HDMI port 4 DisplayPort (in) 5 Stand lock feature 6 USB Type-C port Use Connect the power cable (shipped with U2520D). Connect your computer with the DisplayPort cable (shipped with your monitor). Connect...

Users Guide
Page 13
...: Remove the rubber plug when using DisplayPort out connector. 8 Audio line-out port Connect your speakers.* 9 USB downstream port Connect your USB device.** (2) NOTE: To use this port, you must connect the USB Type-C cable (shipped with your monitor) to the USB Type-C upstream port on the monitor and to your monitor │ 13 To enable MST, see "Connecting the monitor for the audio line out connector. **To avoid signal interference, when a wireless USB device has been connected to a USB...
...: Remove the rubber plug when using DisplayPort out connector. 8 Audio line-out port Connect your speakers.* 9 USB downstream port Connect your USB device.** (2) NOTE: To use this port, you must connect the USB Type-C cable (shipped with your monitor) to the USB Type-C upstream port on the monitor and to your monitor │ 13 To enable MST, see "Connecting the monitor for the audio line out connector. **To avoid signal interference, when a wireless USB device has been connected to a USB...
Users Guide
Page 17
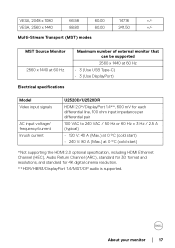
... 147.16 +/- About your monitor │ 17 VESA, 2560 x 1440 88.80 60.00 241.50 +/- Multi-Stream Transport (MST) modes MST Source Monitor 2560 x 1440 at 60 Hz Electrical specifications Maximum number of external monitor that can be supported 2560 x 1440 at 60 Hz • 3 (Use USB Type-C) • 3 (Use DisplayPort) Model Video input signals AC input voltage/ frequency/current Inrush current U2520D/U2520DR HDMI 2.0*/DisplayPort 1.4**, 600 mV for...
... 147.16 +/- About your monitor │ 17 VESA, 2560 x 1440 88.80 60.00 241.50 +/- Multi-Stream Transport (MST) modes MST Source Monitor 2560 x 1440 at 60 Hz Electrical specifications Maximum number of external monitor that can be supported 2560 x 1440 at 60 Hz • 3 (Use USB Type-C) • 3 (Use DisplayPort) Model Video input signals AC input voltage/ frequency/current Inrush current U2520D/U2520DR HDMI 2.0*/DisplayPort 1.4**, 600 mV for...

Users Guide
Page 20
... disconnecting the main cable from the keyboard, mouse, or other features may perform differently, depending on the software, components and peripherals you have no obligation to update such information. Changing the factory default settings or enabling other input devices, the monitor automatically resumes to function. The following table shows the power consumption and signaling of this information in the OSD menu. Your product...
... disconnecting the main cable from the keyboard, mouse, or other features may perform differently, depending on the software, components and peripherals you have no obligation to update such information. Changing the factory default settings or enabling other input devices, the monitor automatically resumes to function. The following table shows the power consumption and signaling of this information in the OSD menu. Your product...
Users Guide
Page 28
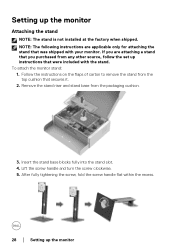
... packaging cushion. 3. To attach the monitor stand: 1. Insert the stand base blocks fully into the stand slot. 4. After fully tightening the screw, fold the screw handle flat within the recess. 28 │ Setting up instructions that secures it. 2. Remove the stand riser and stand base from any other source, follow the set up the monitor Setting up the monitor Attaching the stand NOTE: The stand is not installed at the factory when shipped.
... packaging cushion. 3. To attach the monitor stand: 1. Insert the stand base blocks fully into the stand slot. 4. After fully tightening the screw, fold the screw handle flat within the recess. 28 │ Setting up instructions that secures it. 2. Remove the stand riser and stand base from any other source, follow the set up the monitor Setting up the monitor Attaching the stand NOTE: The stand is not installed at the factory when shipped.

Users Guide
Page 42
... to switch or not. • Yes: Always switches to USB-C video input (without asking) when the USB Type-C cable is connected. • No: Never automatically switches to adjust the color setting mode. 42 │ Operating the monitor Auto Select for USB-C Allows you to set Auto Select for USB-C to: • Prompt for Multiple Inputs: Always displays the "Switch to USB-C Video Input" message for USB-C is available only when Auto Select is on. Reset Input Resets your monitor input settings to the factory Source settings.
... to switch or not. • Yes: Always switches to USB-C video input (without asking) when the USB Type-C cable is connected. • No: Never automatically switches to adjust the color setting mode. 42 │ Operating the monitor Auto Select for USB-C Allows you to set Auto Select for USB-C to: • Prompt for Multiple Inputs: Always displays the "Switch to USB-C Video Input" message for USB-C is available only when Auto Select is on. Reset Input Resets your monitor input settings to the factory Source settings.
Users Guide
Page 44
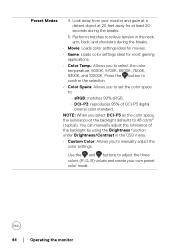
... cd/m2 (typical). Press the button to confirm the selection. • Color Space: Allows you to select the color temperature: 5000K, 5700K, 6500K, 7500K, 9300K, and 10000K. sRGB: matches 99% sRGB. - DCI-P3: reproduces 95% of the backlight defaults to : - You can manually adjust the luminance of the backlight by using the Brightness function under Brightness/Contrast in the neck, arm, back...
... cd/m2 (typical). Press the button to confirm the selection. • Color Space: Allows you to select the color temperature: 5000K, 5700K, 6500K, 7500K, 9300K, and 10000K. sRGB: matches 99% sRGB. - DCI-P3: reproduces 95% of the backlight defaults to : - You can manually adjust the luminance of the backlight by using the Brightness function under Brightness/Contrast in the neck, arm, back...

Users Guide
Page 45
... Game preset mode. Resets your media player supports only YPbPr output. Input Color Format Allows you to set the video input mode to: • RGB: Select this option if your monitor is used to adjust the desired flesh tone color. Press the button to the factory settings. This is connected to a computer (or media player) using the USB Type-C, DisplayPort, or HDMI cable. • YPbPr: Select this option if your monitor's color settings to confirm...
... Game preset mode. Resets your media player supports only YPbPr output. Input Color Format Allows you to set the video input mode to: • RGB: Select this option if your monitor is used to adjust the desired flesh tone color. Press the button to the factory settings. This is connected to a computer (or media player) using the USB Type-C, DisplayPort, or HDMI cable. • YPbPr: Select this option if your monitor's color settings to confirm...

Users Guide
Page 49
Resets all OSD settings to the factory preset values. The default setting is locked and not accessible by the user. • Menu + Power Buttons: Both the Menu/ function & Power buttons are locked and not accessible by -side setup. NOTE: To unlock the button(s), press and hold the Menu/ function button next to the Power button for 4 seconds. Operating the monitor │ 49 Alternative Lock Method [for Menu/function buttons]: You can prevent people from accessing the controls. It...
Resets all OSD settings to the factory preset values. The default setting is locked and not accessible by the user. • Menu + Power Buttons: Both the Menu/ function & Power buttons are locked and not accessible by -side setup. NOTE: To unlock the button(s), press and hold the Menu/ function button next to the Power button for 4 seconds. Operating the monitor │ 49 Alternative Lock Method [for Menu/function buttons]: You can prevent people from accessing the controls. It...
Users Guide
Page 52
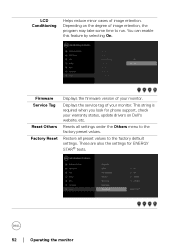
... monitor. LCD Conditioning Helps reduce minor cases of image retention, the program may take some time to the factory preset values. Displays the service tag of your monitor. This string is required when you look for ENERGY STAR® tests. 52 │ Operating the monitor Resets all preset values to the factory default settings. These are also the settings for phone support, check your warranty status, update drivers...
... monitor. LCD Conditioning Helps reduce minor cases of image retention, the program may take some time to the factory preset values. Displays the service tag of your monitor. This string is required when you look for ENERGY STAR® tests. 52 │ Operating the monitor Resets all preset values to the factory default settings. These are also the settings for phone support, check your warranty status, update drivers...

Users Guide
Page 57
... Ensure the DVD player and Game consoles are using a non-Dell computer (portable or desktop): • Go to the support site for PC applications), see 2560 x 1440 as an option, you may need to http://www.dell.com/support, enter your service tag, and download the latest driver for your graphics card. PC games, UltraBluRay players), HDR on your computer...
... Ensure the DVD player and Game consoles are using a non-Dell computer (portable or desktop): • Go to the support site for PC applications), see 2560 x 1440 as an option, you may need to http://www.dell.com/support, enter your service tag, and download the latest driver for your graphics card. PC games, UltraBluRay players), HDR on your computer...

Users Guide
Page 63
... monitor is clean (no dust particles on the surface of the screen). 2. Built-in diagnostics Your monitor has a built-in self-test mode. Ensure that helps you determine if the screen abnormality you use the previous procedure, check your video controller and computer, because your computer and video card. This box also appears during normal system operation, if the video cable becomes disconnected or damaged. 5. Troubleshooting...
... monitor is clean (no dust particles on the surface of the screen). 2. Built-in diagnostics Your monitor has a built-in self-test mode. Ensure that helps you determine if the screen abnormality you use the previous procedure, check your video controller and computer, because your computer and video card. This box also appears during normal system operation, if the video cable becomes disconnected or damaged. 5. Troubleshooting...
Users Guide
Page 64
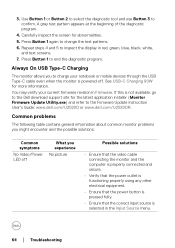
... firmware revision in Firmware. Press Button 1 again to inspect the display in the Input Source menu. 64 │ Troubleshooting See USB-C Charging 90W for abnormalities. 5. Use Button 1 or Button 2 to select the diagnostic tool and use Button 3 to end the diagnostic program. Press Button 1 to confirm. 3. You may verify your notebook or mobile devices through the USB Type-C cable even when the monitor is selected in red, green, blue, black, white, and text screens...
... firmware revision in Firmware. Press Button 1 again to inspect the display in the Input Source menu. 64 │ Troubleshooting See USB-C Charging 90W for abnormalities. 5. Use Button 1 or Button 2 to select the diagnostic tool and use Button 3 to end the diagnostic program. Press Button 1 to confirm. 3. You may verify your notebook or mobile devices through the USB Type-C cable even when the monitor is selected in red, green, blue, black, white, and text screens...

Users Guide
Page 66
... mode. 66 │ Troubleshooting Screen is secure. • Reset the monitor to factory settings. • Perform monitor self-test feature check to determine if the scrambled screen appears in self-test mode. • Check for bent or broken pins in the video cable connector. • Run the built-in diagnostics. too bright • Adjust brightness & contrast controls via OSD. Monitor • Ensure that the video cable malfunctions on & connecting the monitor to the off computer is connected...
... mode. 66 │ Troubleshooting Screen is secure. • Reset the monitor to factory settings. • Perform monitor self-test feature check to determine if the scrambled screen appears in self-test mode. • Check for bent or broken pins in the video cable connector. • Run the built-in diagnostics. too bright • Adjust brightness & contrast controls via OSD. Monitor • Ensure that the video cable malfunctions on & connecting the monitor to the off computer is connected...

Users Guide
Page 67
... video cable connector. • Change the settings of the Preset Modes in the Color menu OSD depending on the application. • Adjust the R/G/B values under Custom Color in Color menu OSD. • Change the Input Color Format to PC RGB or YPbPr in the Color menu OSD. • Run the built-in diagnostics. • Use the Power Management feature to turn off the monitor at all times when not in use (for more information, see Power management modes...
... video cable connector. • Change the settings of the Preset Modes in the Color menu OSD depending on the application. • Adjust the R/G/B values under Custom Color in Color menu OSD. • Change the Input Color Format to PC RGB or YPbPr in the Color menu OSD. • Run the built-in diagnostics. • Use the Power Management feature to turn off the monitor at all times when not in use (for more information, see Power management modes...

Users Guide
Page 68
... entire screen The picture cannot • Due to unlock (for more information, see Lock). No Input Signal No picture, the LED when user controls light is centered on • Check the Aspect Ratio setting in diagnostics. Ensure the computer is not in properly. No video at HDMI/ When connected to factory settings. Re-plug the signal cable if necessary. • Reset the computer or video player. fill entire viewing area • Reset the monitor to DisplayPort/USB...
... entire screen The picture cannot • Due to unlock (for more information, see Lock). No Input Signal No picture, the LED when user controls light is centered on • Check the Aspect Ratio setting in diagnostics. Ensure the computer is not in properly. No video at HDMI/ When connected to factory settings. Re-plug the signal cable if necessary. • Reset the computer or video player. fill entire viewing area • Reset the monitor to DisplayPort/USB...

Display Manager Users Guide
Page 1
... about monitors connected to communicate with your monitor. Dell Display Manager User's Guide │ 1 It allows manual adjustment of the displayed image, assignment of automatic settings, energy management, window organization, image rotation, and other features on the desktop background to manage a monitor or a group of monitors. NOTE: Dell Display Manager needs to use DDC/CI channel to the system is available when hovering over the notification-tray icon. Dell Display Manager User's Guide Overview Dell Display...
... about monitors connected to communicate with your monitor. Dell Display Manager User's Guide │ 1 It allows manual adjustment of the displayed image, assignment of automatic settings, energy management, window organization, image rotation, and other features on the desktop background to manage a monitor or a group of monitors. NOTE: Dell Display Manager needs to use DDC/CI channel to the system is available when hovering over the notification-tray icon. Dell Display Manager User's Guide Overview Dell Display...


