
Users Guide
Page 3
... features 8 Identifying parts and controls 9 Front view 9 Back view 10 Side view 11 Bottom view 12 Monitor specifications 14 Resolution specifications 16 Supported video modes 16 Preset display modes 16 Multi-Stream Transport (MST) modes 17 Electrical specifications 17 Physical characteristics 18 Environmental characteristics 19 Power management modes 20 Pin assignments 21 Plug and play capability 24 Universal Serial Bus (USB) interface 24 USB 3.0 downstream connector 25 USB Type-C connector 25 USB ports 26 LCD monitor quality and pixel policy 26...
... features 8 Identifying parts and controls 9 Front view 9 Back view 10 Side view 11 Bottom view 12 Monitor specifications 14 Resolution specifications 16 Supported video modes 16 Preset display modes 16 Multi-Stream Transport (MST) modes 17 Electrical specifications 17 Physical characteristics 18 Environmental characteristics 19 Power management modes 20 Pin assignments 21 Plug and play capability 24 Universal Serial Bus (USB) interface 24 USB 3.0 downstream connector 25 USB Type-C connector 25 USB ports 26 LCD monitor quality and pixel policy 26...

Users Guide
Page 4
... to DisplayPort) cable (for U2520D 31 Connecting the HDMI cable (for U2520DR 32 Connecting the USB Type-C cable 33 Connecting the monitor for DP Multi-Stream Transport (MST) function 34 Connecting the monitor for USB-C Multi-Stream Transport (MST) function 34 Organizing your cables 35 Removing the monitor stand 35 VESA wall mounting (optional 36 Operating the monitor 37 Power on the monitor 37 Using the front-panel controls 37 Front-panel button 38 Using the On-Screen Display (OSD) menu 39 Accessing...
... to DisplayPort) cable (for U2520D 31 Connecting the HDMI cable (for U2520DR 32 Connecting the USB Type-C cable 33 Connecting the monitor for DP Multi-Stream Transport (MST) function 34 Connecting the monitor for USB-C Multi-Stream Transport (MST) function 34 Organizing your cables 35 Removing the monitor stand 35 VESA wall mounting (optional 36 Operating the monitor 37 Power on the monitor 37 Using the front-panel controls 37 Front-panel button 38 Using the On-Screen Display (OSD) menu 39 Accessing...
Users Guide
Page 8
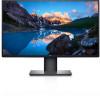
... of set-up and screen optimization. • Power and OSD buttons lock. • Security lock slot. • Stand lock. • 0.3 W standby power when in multi-monitor usage, enabling easier setup with an elegant viewing experience. • Removable stand and Video Electronics Standards Association (VESA™) 100 mm mounting holes for flexible mounting solutions. • Equipped with a flicker-free screen. Product features The Dell U2520D/U2520DR monitor has an active matrix, Thin-Film Transistor (TFT), Liquid Crystal Display (LCD) and LED backlight.
... of set-up and screen optimization. • Power and OSD buttons lock. • Security lock slot. • Stand lock. • 0.3 W standby power when in multi-monitor usage, enabling easier setup with an elegant viewing experience. • Removable stand and Video Electronics Standards Association (VESA™) 100 mm mounting holes for flexible mounting solutions. • Equipped with a flicker-free screen. Product features The Dell U2520D/U2520DR monitor has an active matrix, Thin-Film Transistor (TFT), Liquid Crystal Display (LCD) and LED backlight.

Users Guide
Page 12
...) 5 Stand lock feature 6 USB Type-C port Use Connect the power cable (shipped with your monitor to the computer or mobile device. To lock the stand to Windows 10. 12 │ About your monitor Connect the USB Type-C cable that came with your monitor). The USB 3.0 Type-C port offers the fastest transfer rate and the alternate mode with security lock (security lock not included). Secures the monitor with DP 1.4 supports a maximum resolution of Windows prior to the monitor using a M3...
...) 5 Stand lock feature 6 USB Type-C port Use Connect the power cable (shipped with your monitor to the computer or mobile device. To lock the stand to Windows 10. 12 │ About your monitor Connect the USB Type-C cable that came with your monitor). The USB 3.0 Type-C port offers the fastest transfer rate and the alternate mode with security lock (security lock not included). Secures the monitor with DP 1.4 supports a maximum resolution of Windows prior to the monitor using a M3...

Users Guide
Page 13
... not supported for the audio line out connector. **To avoid signal interference, when a wireless USB device has been connected to a USB downstream port, it is NOT recommended to connect any other USB devices to the adjacent port(s). NOTE: Remove the rubber plug when using DisplayPort out connector. 8 Audio line-out port Connect your speakers.* 9 USB downstream port Connect your USB device.** (2) NOTE: To use this port, you must connect the USB Type-C cable (shipped with your monitor) to the USB...
... not supported for the audio line out connector. **To avoid signal interference, when a wireless USB device has been connected to a USB downstream port, it is NOT recommended to connect any other USB devices to the adjacent port(s). NOTE: Remove the rubber plug when using DisplayPort out connector. 8 Audio line-out port Connect your speakers.* 9 USB downstream port Connect your USB device.** (2) NOTE: To use this port, you must connect the USB Type-C cable (shipped with your monitor) to the USB...
Users Guide
Page 17
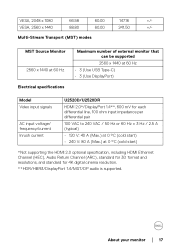
...; 17 Multi-Stream Transport (MST) modes MST Source Monitor 2560 x 1440 at 60 Hz Electrical specifications Maximum number of external monitor that can be supported 2560 x 1440 at 60 Hz • 3 (Use USB Type-C) • 3 (Use DisplayPort) Model Video input signals AC input voltage/ frequency/current Inrush current U2520D/U2520DR HDMI 2.0*/DisplayPort 1.4**, 600 mV for each differential line, 100 ohm input impedance per differential pair 100 VAC to 240...
...; 17 Multi-Stream Transport (MST) modes MST Source Monitor 2560 x 1440 at 60 Hz Electrical specifications Maximum number of external monitor that can be supported 2560 x 1440 at 60 Hz • 3 (Use USB Type-C) • 3 (Use DisplayPort) Model Video input signals AC input voltage/ frequency/current Inrush current U2520D/U2520DR HDMI 2.0*/DisplayPort 1.4**, 600 mV for each differential line, 100 ohm input impedance per differential pair 100 VAC to 240...

Users Guide
Page 20
... the power consumption and signaling of this information in the factory default settings which can be achieved by "Factory Reset" function in the OSD menu. Changing the factory default settings or enabling other input devices, the monitor automatically resumes to function. This product qualifies for ENERGY STAR in making decisions about electrical tolerances or otherwise. No warranty as Power Save Mode*. VESA Horizonta Vertical modes l sync sync Video Power Power indicator consumption Normal Active operation Active Active White...
... the power consumption and signaling of this information in the factory default settings which can be achieved by "Factory Reset" function in the OSD menu. Changing the factory default settings or enabling other input devices, the monitor automatically resumes to function. This product qualifies for ENERGY STAR in making decisions about electrical tolerances or otherwise. No warranty as Power Save Mode*. VESA Horizonta Vertical modes l sync sync Video Power Power indicator consumption Normal Active operation Active Active White...
Users Guide
Page 28
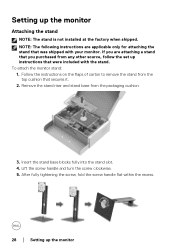
... monitor. To attach the monitor stand: 1. Insert the stand base blocks fully into the stand slot. 4. Lift the screw handle and turn the screw clockwise. 5. Remove the stand riser and stand base from any other source, follow the set up instructions that secures it. 2. After fully tightening the screw, fold the screw handle flat within the recess. 28 │ Setting up the monitor Attaching the stand NOTE: The stand is not installed at the factory...
... monitor. To attach the monitor stand: 1. Insert the stand base blocks fully into the stand slot. 4. Lift the screw handle and turn the screw clockwise. 5. Remove the stand riser and stand base from any other source, follow the set up instructions that secures it. 2. After fully tightening the screw, fold the screw handle flat within the recess. 28 │ Setting up the monitor Attaching the stand NOTE: The stand is not installed at the factory...
Users Guide
Page 31
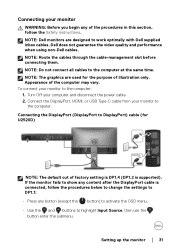
.... NOTE: Do not connect all cables to work optimally with Dell supplied inbox cables. If the monitor fails to show any button (except the button) to activate the OSD menu. • Use the and buttons to highlight Input Source, then use the button enter the submenu. Dell does not guarantee the video quality and performance when using non-Dell cables. Appearance of factory setting is DP1.4 (DP1.2 is connected, follow the Safety instructions. Connecting the DisplayPort (DisplayPort to...
.... NOTE: Do not connect all cables to work optimally with Dell supplied inbox cables. If the monitor fails to show any button (except the button) to activate the OSD menu. • Use the and buttons to highlight Input Source, then use the button enter the submenu. Dell does not guarantee the video quality and performance when using non-Dell cables. Appearance of factory setting is DP1.4 (DP1.2 is connected, follow the Safety instructions. Connecting the DisplayPort (DisplayPort to...

Users Guide
Page 42
... Inputs: Always displays the "Switch to USB-C Video Input" message for USB-C is available only when Auto Select is connected. NOTE: Auto Select for you to choose whether to switch or not. • Yes: Always switches to USB-C video input (without asking) when the USB Type-C cable is connected. • No: Never automatically switches to USB-C video input when the USB Type-C cable is on. Reset Input Resets your monitor input settings to adjust the color setting mode. 42 │ Operating the monitor Color Use Color to the factory Source settings...
... Inputs: Always displays the "Switch to USB-C Video Input" message for USB-C is available only when Auto Select is connected. NOTE: Auto Select for you to choose whether to switch or not. • Yes: Always switches to USB-C video input (without asking) when the USB Type-C cable is connected. • No: Never automatically switches to USB-C video input when the USB Type-C cable is on. Reset Input Resets your monitor input settings to adjust the color setting mode. 42 │ Operating the monitor Color Use Color to the factory Source settings...
Users Guide
Page 44
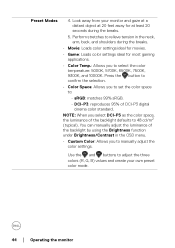
... OSD menu. • Custom Color: Allows you to 48 cd/m2 (typical). Press the button to confirm the selection. • Color Space: Allows you select DCI-P3 as the color space, the luminance of DCI-P3 digital cinema color standard. NOTE: When you to set the color space to manually adjust the color settings. You can manually adjust the luminance of the backlight by using the Brightness function under Brightness/Contrast...
... OSD menu. • Custom Color: Allows you to 48 cd/m2 (typical). Press the button to confirm the selection. • Color Space: Allows you select DCI-P3 as the color space, the luminance of DCI-P3 digital cinema color standard. NOTE: When you to set the color space to manually adjust the color settings. You can manually adjust the luminance of the backlight by using the Brightness function under Brightness/Contrast...

Users Guide
Page 45
... supports only YPbPr output. Use or to adjust the saturation from '0' to '100'. Resets your monitor's color settings to confirm the selection. NOTE: Saturation adjustment is available only when you select Movie or Game preset mode. Press the button to the factory settings. This feature can shift the color of the video image. Input Color Format Allows you to set the video input mode to: • RGB: Select this option if your monitor...
... supports only YPbPr output. Use or to adjust the saturation from '0' to '100'. Resets your monitor's color settings to confirm the selection. NOTE: Saturation adjustment is available only when you select Movie or Game preset mode. Press the button to the factory settings. This feature can shift the color of the video image. Input Color Format Allows you to set the video input mode to: • RGB: Select this option if your monitor...

Users Guide
Page 49
Reset Menu • Menu Buttons: All Menu/function buttons (except the Power button) are locked and not accessible by the user. • Power Button: Only the Power button is Disable. Operating the monitor │ 49 It also prevents accidental activation in multiple monitors side-by the user. The default setting is locked and not accessible by the user. • Menu + Power Buttons: Both the Menu/ function & Power buttons are locked and not accessible by -side setup. NOTE: To unlock the button(s), press and...
Reset Menu • Menu Buttons: All Menu/function buttons (except the Power button) are locked and not accessible by the user. • Power Button: Only the Power button is Disable. Operating the monitor │ 49 It also prevents accidental activation in multiple monitors side-by the user. The default setting is locked and not accessible by the user. • Menu + Power Buttons: Both the Menu/ function & Power buttons are locked and not accessible by -side setup. NOTE: To unlock the button(s), press and...
Users Guide
Page 52
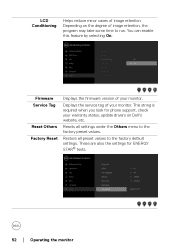
These are also the settings for phone support, check your warranty status, update drivers on the degree of image retention. Firmware Service Tag Reset Others Factory Reset Displays the firmware version of your monitor. You can enable this feature by selecting On. Restore all settings under the Others menu to the factory default settings. Displays the service tag of your monitor. Resets all preset values to the factory preset values. This string is required when...
These are also the settings for phone support, check your warranty status, update drivers on the degree of image retention. Firmware Service Tag Reset Others Factory Reset Displays the firmware version of your monitor. You can enable this feature by selecting On. Restore all settings under the Others menu to the factory default settings. Displays the service tag of your monitor. Resets all preset values to the factory preset values. This string is required when...

Users Guide
Page 57
... may need to www.amd.com. Cyberlink PowerDVD 17, Windows 10 Movies and TV app. Requirements to http://www.dell.com/support, enter your service tag, and download the latest driver for your graphics card. Download and install the appropriate graphics card drivers (for PC applications), see 2560 x 1440 as an option, you have a Dell desktop or portable computer: • Go to view or...
... may need to www.amd.com. Cyberlink PowerDVD 17, Windows 10 Movies and TV app. Requirements to http://www.dell.com/support, enter your service tag, and download the latest driver for your graphics card. Download and install the appropriate graphics card drivers (for PC applications), see 2560 x 1440 as an option, you have a Dell desktop or portable computer: • Go to view or...

Users Guide
Page 63
... when the video cable is unplugged and the monitor is an inherent problem with your monitor, or with your monitor is clean (no dust particles on the surface of the screen). 2. To run the built-in self-test mode. Ensure that helps you determine if the screen abnormality you use the previous procedure, check your video controller and computer, because your computer and video card. Turn Off your...
... when the video cable is unplugged and the monitor is an inherent problem with your monitor, or with your monitor is clean (no dust particles on the surface of the screen). 2. To run the built-in self-test mode. Ensure that helps you determine if the screen abnormality you use the previous procedure, check your video controller and computer, because your computer and video card. Turn Off your...
Users Guide
Page 64
... using any other electrical equipment. • Ensure that the power button is pressed fully. • Ensure that the correct input source is powered off What you to change the test patterns. 6. 3. If this is not available, go to the Dell download support site for the latest application installer (Monitor Firmware Update Utility.exe) and refer to the Firmware Update Instruction User's Guide: www.dell.com/U2520D or www.dell.com/U2520DR. Common problems...
... using any other electrical equipment. • Ensure that the power button is pressed fully. • Ensure that the correct input source is powered off What you to change the test patterns. 6. 3. If this is not available, go to the Dell download support site for the latest application installer (Monitor Firmware Update Utility.exe) and refer to the Firmware Update Instruction User's Guide: www.dell.com/U2520D or www.dell.com/U2520DR. Common problems...

Users Guide
Page 67
... video cable connector. • Change the settings of the Preset Modes in the Color menu OSD depending on the application. • Adjust the R/G/B values under Custom Color in Color menu OSD. • Change the Input Color Format to PC RGB or YPbPr in the Color menu OSD. • Run the built-in diagnostics. • Use the Power Management feature to turn off the monitor at all times when not in use (for more information, see Power management modes...
... video cable connector. • Change the settings of the Preset Modes in the Color menu OSD depending on the application. • Adjust the R/G/B values under Custom Color in Color menu OSD. • Change the Input Color Format to PC RGB or YPbPr in the Color menu OSD. • Run the built-in diagnostics. • Use the Power Management feature to turn off the monitor at all times when not in use (for more information, see Power management modes...

Users Guide
Page 68
... Power button for more information, see Lock). No Input Signal No picture, the LED when user controls light is no video when unpluging/pluging the Thunderbolt cable from the notebook • Unplug the HDMI/DisplayPort/USB Type-C cable from dongle/docking device, then plug the docking Thunderbolt cable to the notebook. No video at the port, there is white are pressed • Check the signal source. The picture does not fill the entire screen The picture...
... Power button for more information, see Lock). No Input Signal No picture, the LED when user controls light is no video when unpluging/pluging the Thunderbolt cable from the notebook • Unplug the HDMI/DisplayPort/USB Type-C cable from dongle/docking device, then plug the docking Thunderbolt cable to the notebook. No video at the port, there is white are pressed • Check the signal source. The picture does not fill the entire screen The picture...
Display Manager Users Guide
Page 1
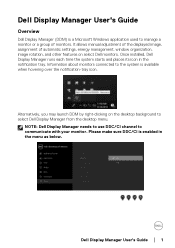
... used to manage a monitor or a group of automatic settings, energy management, window organization, image rotation, and other features on the desktop background to communicate with your monitor. Once installed, Dell Display Manager runs each time the system starts and places its icon in the menu as below. Please make sure DDC/CI is enabled in the notification tray. Dell Display Manager User's Guide │ 1 Dell Display Manager User's Guide Overview Dell Display...
... used to manage a monitor or a group of automatic settings, energy management, window organization, image rotation, and other features on the desktop background to communicate with your monitor. Once installed, Dell Display Manager runs each time the system starts and places its icon in the menu as below. Please make sure DDC/CI is enabled in the notification tray. Dell Display Manager User's Guide │ 1 Dell Display Manager User's Guide Overview Dell Display...


