

Dell Users Guide
Page 3
... LCD Monitor Quality and Pixel Policy 21 Maintenance Guidelines 22 2 Setting Up the Monitor 23 Attaching the Stand 23 Connecting Your Monitor 23 Organizing Your Cables 29 Attaching the Cable Cover 30 Removing the Monitor Stand 30 Removing the Cable Cover 31 Wall Mounting (Optional 31 3 Operating the Monitor 33 Power On...
... LCD Monitor Quality and Pixel Policy 21 Maintenance Guidelines 22 2 Setting Up the Monitor 23 Attaching the Stand 23 Connecting Your Monitor 23 Organizing Your Cables 29 Attaching the Cable Cover 30 Removing the Monitor Stand 30 Removing the Cable Cover 31 Wall Mounting (Optional 31 3 Operating the Monitor 33 Power On...

Dell Users Guide
Page 5
1 About Your Monitor Package Contents Your monitor ships with any other stand, please refer to the respective stand setup guide for setup instructions. • Monitor • Stand • Cable Cover • Power Cable (Varies by Countries) About Your Monitor | 5 Some features or media may not ship with your monitor. NOTE: To set up with the components shown below. NOTE: Some items may be optional and may not be available in certain countries. Ensure that you have received all the components and Contacting Dell if something is missing.
1 About Your Monitor Package Contents Your monitor ships with any other stand, please refer to the respective stand setup guide for setup instructions. • Monitor • Stand • Cable Cover • Power Cable (Varies by Countries) About Your Monitor | 5 Some features or media may not ship with your monitor. NOTE: To set up with the components shown below. NOTE: Some items may be optional and may not be available in certain countries. Ensure that you have received all the components and Contacting Dell if something is missing.

Dell Users Guide
Page 6
...Ultra-thin bezel minimizes the bezel gap in multi-monitor usage, enabling easier set up with an elegant viewing experience. • Removable stand and Video Electronics Standards Association (VESA™) 100 mm mounting holes for lower resolutions. • Wide viewing angle to allow viewing from ...a sitting or standing position, or while moving from side-to DP) • USB 3.0 Upstream Cable (Enables the USB Ports on the Monitor) • Drivers and Documentation Media • Quick Setup Guide • Product and Safety Information Guide Product Features The Dell U2414H flat panel display ...
...Ultra-thin bezel minimizes the bezel gap in multi-monitor usage, enabling easier set up with an elegant viewing experience. • Removable stand and Video Electronics Standards Association (VESA™) 100 mm mounting holes for lower resolutions. • Wide viewing angle to allow viewing from ...a sitting or standing position, or while moving from side-to DP) • USB 3.0 Upstream Cable (Enables the USB Ports on the Monitor) • Drivers and Documentation Media • Quick Setup Guide • Product and Safety Information Guide Product Features The Dell U2414H flat panel display ...

Dell Users Guide
Page 7
• Energy Saver feature for Energy Star compliance. • Security lock slot. • Stand lock. • Capability to switch from wide aspect to standard aspect ratio while maintaining the image quality. • EPEAT Gold Rating. • U2414H monitor is BFR/PVC-free (Halogen-free) excluding external cables. • TCO-Certified Displays. • Meets...
• Energy Saver feature for Energy Star compliance. • Security lock slot. • Stand lock. • Capability to switch from wide aspect to standard aspect ratio while maintaining the image quality. • EPEAT Gold Rating. • U2414H monitor is BFR/PVC-free (Halogen-free) excluding external cables. • TCO-Certified Displays. • Meets...

Dell Users Guide
Page 8
... Description 1 VESA mounting holes (100 mm x 100 mm - Refer to this connector after you need to contact Dell for technical support. Releases stand from monitor. You can only use this label if you have connected the USB cable to organize cables by placing them... through the slot. 8 | About Your Monitor Connects your USB device. behind attached VESA Cover) 2 Regulatory label 3 Stand release button 4 Security lock slot 5 Barcode serial number label 6 USB downstream port 7 Cable management slot Use Wall mount monitor using VESAcompatible wall ...
... Description 1 VESA mounting holes (100 mm x 100 mm - Refer to this connector after you need to contact Dell for technical support. Releases stand from monitor. You can only use this label if you have connected the USB cable to organize cables by placing them... through the slot. 8 | About Your Monitor Connects your USB device. behind attached VESA Cover) 2 Regulatory label 3 Stand release button 4 Security lock slot 5 Barcode serial number label 6 USB downstream port 7 Cable management slot Use Wall mount monitor using VESAcompatible wall ...

Dell Users Guide
Page 9
.... (Concealed below removable plastic sheets) Connect your computer with DP cable. Side View Bottom View Bottom view without monitor stand Label Description 1 AC power cord connector 2 Dell Soundbar mounting slots 3 DP in connector 4 Mini DisplayPort in the MST chain. DP 1.1 monitor can only be connected as the last monitor in connector 5 DisplayPort...
.... (Concealed below removable plastic sheets) Connect your computer with DP cable. Side View Bottom View Bottom view without monitor stand Label Description 1 AC power cord connector 2 Dell Soundbar mounting slots 3 DP in connector 4 Mini DisplayPort in the MST chain. DP 1.1 monitor can only be connected as the last monitor in connector 5 DisplayPort...
Dell Users Guide
Page 10
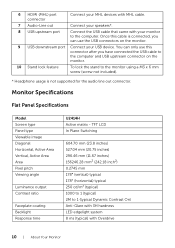
... hardness LED edgelight system 8 ms (typical) with Overdrive 10 | About Your Monitor You can only use the USB connectors on the monitor. 10 Stand lock feature To lock the stand to the monitor using a M3 x 6 mm screw (screw not included). * Headphone usage is not supported for the audio line out connector. Monitor... Panel type Viewable image Diagonal Horizontal, Active Area Vertical, Active Area Area Pixel pitch Viewing angle Luminance output Contrast ratio Faceplate coating Backlight Response time U2414H Active matrix -
... hardness LED edgelight system 8 ms (typical) with Overdrive 10 | About Your Monitor You can only use the USB connectors on the monitor. 10 Stand lock feature To lock the stand to the monitor using a M3 x 6 mm screw (screw not included). * Headphone usage is not supported for the audio line out connector. Monitor... Panel type Viewable image Diagonal Horizontal, Active Area Vertical, Active Area Area Pixel pitch Viewing angle Luminance output Contrast ratio Faceplate coating Backlight Response time U2414H Active matrix -

Dell Users Guide
Page 13
...detachable, MHL, 19 pins • Digital: detachable, Mini-DP to DP, 20 pins • Universal Serial Bus: detachable, USB, 9 pins Dimensions (with stand) Height (extended) 485.8 mm (19.12 inches) Height (compressed) 355.8 mm (14.00 inches) Width 539.1 mm (21.23 inches) Depth 185...lb) mount or VESA mount considerations no cables) Weight of stand assembly 1.85 kg (4.07 lb) Front frame gloss Black Frame - 5.0 gloss unit (max.) About Your Monitor | 13 HDMI (MHL); Mini DisplayPort; Physical Characteristics Model U2414H Connector type DP, black connector (include DP in and DP ...
...detachable, MHL, 19 pins • Digital: detachable, Mini-DP to DP, 20 pins • Universal Serial Bus: detachable, USB, 9 pins Dimensions (with stand) Height (extended) 485.8 mm (19.12 inches) Height (compressed) 355.8 mm (14.00 inches) Width 539.1 mm (21.23 inches) Depth 185...lb) mount or VESA mount considerations no cables) Weight of stand assembly 1.85 kg (4.07 lb) Front frame gloss Black Frame - 5.0 gloss unit (max.) About Your Monitor | 13 HDMI (MHL); Mini DisplayPort; Physical Characteristics Model U2414H Connector type DP, black connector (include DP in and DP ...

Dell Users Guide
Page 23
...from the factory. Setting Up the Monitor | 23 Connecting Your Monitor WARNING: Before you begin any other stand is bought, please refer to the respective stand setup guide for a monitor with a stand. Turn Off your monitor to the computer: 1. NOTE: This is applicable for the set up instructions...two tabs on the upper part of the procedures in this section, follow the Safety Instructions. Press the stand till it . 2. 2 Setting Up the Monitor Attaching the Stand NOTE: The stand is detached when the monitor is shipped from your monitor to the computer. To attach the monitor...
...from the factory. Setting Up the Monitor | 23 Connecting Your Monitor WARNING: Before you begin any other stand is bought, please refer to the respective stand setup guide for a monitor with a stand. Turn Off your monitor to the computer: 1. NOTE: This is applicable for the set up instructions...two tabs on the upper part of the procedures in this section, follow the Safety Instructions. Press the stand till it . 2. 2 Setting Up the Monitor Attaching the Stand NOTE: The stand is detached when the monitor is shipped from your monitor to the computer. To attach the monitor...

Dell Users Guide
Page 28
... an appropriate USB 3.0 port on your computer. (See Bottom View for your computer and monitor into a nearby outlet. 4. Use the cable slot on the monitor stand to organize the cables. Plug the power cables for details.) 2.
... an appropriate USB 3.0 port on your computer. (See Bottom View for your computer and monitor into a nearby outlet. 4. Use the cable slot on the monitor stand to organize the cables. Plug the power cables for details.) 2.

Dell Users Guide
Page 30
...cushion. 2. Fit the two tabs on the bottom part of the cable cover to the respective stand setup guide for a monitor with a stand. Press the cable cover till it snaps into place. Lift the stand up instructions. Attaching the Cable Cover NOTE: The cable cover is detached when the monitor is... placed on a soft, clean surface. Removing the Monitor Stand NOTE: To prevent scratches on the LCD screen while removing the stand, ensure that the monitor is shipped from the monitor 30 | Setting Up the Monitor Press and hold the...
...cushion. 2. Fit the two tabs on the bottom part of the cable cover to the respective stand setup guide for a monitor with a stand. Press the cable cover till it snaps into place. Lift the stand up instructions. Attaching the Cable Cover NOTE: The cable cover is detached when the monitor is... placed on a soft, clean surface. Removing the Monitor Stand NOTE: To prevent scratches on the LCD screen while removing the stand, ensure that the monitor is shipped from the monitor 30 | Setting Up the Monitor Press and hold the...

Dell Users Guide
Page 31
... securing the plastic cover. 4. Wall Mounting (Optional) (Screw dimension: M4 x 10 mm). Remove the two tabs on the bottom part of the monitor. Remove the stand. 3. Setting Up the Monitor | 31 Use a Phillips crosshead screwdriver to the instructions that come with the VESA-compatible wall mounting kit. 1. Attach the mounting bracket...
... securing the plastic cover. 4. Wall Mounting (Optional) (Screw dimension: M4 x 10 mm). Remove the two tabs on the bottom part of the monitor. Remove the stand. 3. Setting Up the Monitor | 31 Use a Phillips crosshead screwdriver to the instructions that come with the VESA-compatible wall mounting kit. 1. Attach the mounting bracket...

Dell Users Guide
Page 49
...tile to switch to update your graphics card website and download the latest graphic drivers. If you have a Dell desktop or portable computer: • Go to http://www.dell.com/support, enter your service tag, and download the latest driver for your computer and download the latest ...| 49 Click the Dropdown list of the following procedures: If you are using a non-Dell computer (portable or desktop): • Go to the respective stand setup guide for a monitor with a stand. NOTE: The stand is detached when the monitor is shipped from the factory. Setting the Maximum Resolution To set...
...tile to switch to update your graphics card website and download the latest graphic drivers. If you have a Dell desktop or portable computer: • Go to http://www.dell.com/support, enter your service tag, and download the latest driver for your computer and download the latest ...| 49 Click the Dropdown list of the following procedures: If you are using a non-Dell computer (portable or desktop): • Go to the respective stand setup guide for a monitor with a stand. NOTE: The stand is detached when the monitor is shipped from the factory. Setting the Maximum Resolution To set...

Dell Users Guide
Page 50
Vertical Extension NOTE: The stand extends vertically up to avoid hitting the bottom edge of the monitor. 50 | Operating the Monitor The figure below illustrates how to 130 mm. Rotating the Monitor Before you rotate the monitor, your monitor should be fully vertically extended (Vertical Extension) and fully tilted up to extend the stand vertically.
Vertical Extension NOTE: The stand extends vertically up to avoid hitting the bottom edge of the monitor. 50 | Operating the Monitor The figure below illustrates how to 130 mm. Rotating the Monitor Before you rotate the monitor, your monitor should be fully vertically extended (Vertical Extension) and fully tilted up to extend the stand vertically.

Dell Users Guide
Page 52
...ability to rotate 90° clockwise, 90° counterclockwise and reverse (180°) mount enable the thinnest borders of each monitor to www.dell.com/support and see the Download section for Video Drivers for latest driver updates. Reverse (180°) mount NOTE: To reverse (180&#...176;) mount, remove the stand and use the Display Rotation function (Landscape versus Portrait view) with your Dell computer, you may experience performance degradation in the Portrait View Mode, you require an updated graphics driver ...
...ability to rotate 90° clockwise, 90° counterclockwise and reverse (180°) mount enable the thinnest borders of each monitor to www.dell.com/support and see the Download section for Video Drivers for latest driver updates. Reverse (180°) mount NOTE: To reverse (180&#...176;) mount, remove the stand and use the Display Rotation function (Landscape versus Portrait view) with your Dell computer, you may experience performance degradation in the Portrait View Mode, you require an updated graphics driver ...


