User's Guide
Page 4
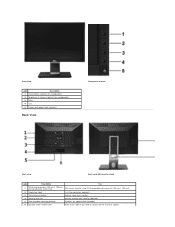
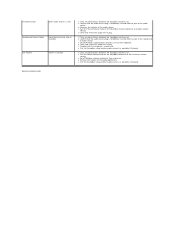
... attached VESA Plate) 2 Regulatory label Lists the regulatory approvals. 3 Stand release button Release stand from monitor. 4 Security lock slot Secures monitor with security cable lock 5 Dell Soundbar mounting brackets Attaches the optional Dell Soundbar. 6 Barcode serial number label Refer to this label if you need to contact...
... attached VESA Plate) 2 Regulatory label Lists the regulatory approvals. 3 Stand release button Release stand from monitor. 4 Security lock slot Secures monitor with security cable lock 5 Dell Soundbar mounting brackets Attaches the optional Dell Soundbar. 6 Barcode serial number label Refer to this label if you need to contact...

User's Guide
Page 5
Connect the power cord for Dell Soundbar. Once this connector after you can use this cable is connected, you have connected the USB cable to the computer and USB upstream connector on ... Right view Bottom view Bottom view with monitor stand Label Description Use 1 AC power cord connector Connect the power cable 2 DC power connector for the soundbar (optional) 3 DisplayPort connector Connect your computer DP cable 4 DVI connector Connect your computer DVI cable 5 VGA connector Connect your computer VGA cable 6 USB upstream port...
Connect the power cord for Dell Soundbar. Once this connector after you can use this cable is connected, you have connected the USB cable to the computer and USB upstream connector on ... Right view Bottom view Bottom view with monitor stand Label Description Use 1 AC power cord connector Connect the power cable 2 DC power connector for the soundbar (optional) 3 DisplayPort connector Connect your computer DP cable 4 DVI connector Connect your computer DVI cable 5 VGA connector Connect your computer VGA cable 6 USB upstream port...
User's Guide
Page 9
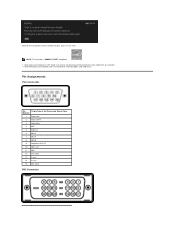
NOTE: This monitor is ENERGY STAR®-compliant. * Zero power consumption in OFF mode can only be achieved by disconnecting the main cable from the monitor. ** Maximum power consumption with max luminance, Dell Soundbar, and USB active. Pin Assignments VGA Connector Pin 15-pin Side of the Connected Signal Cable Number 1 Video-Red 2 Video-Green 3 Video-Blue 4 GND 5 Self-test 6 GND-R 7 GND-G 8 GND-B 9 Computer 5V/3.3V 10 GND-sync 11 GND 12 DDC data 13 H-sync 14 V-sync 15 DDC clock DVI Connector Activate the computer and the monitor to gain access to the OSD.
NOTE: This monitor is ENERGY STAR®-compliant. * Zero power consumption in OFF mode can only be achieved by disconnecting the main cable from the monitor. ** Maximum power consumption with max luminance, Dell Soundbar, and USB active. Pin Assignments VGA Connector Pin 15-pin Side of the Connected Signal Cable Number 1 Video-Red 2 Video-Green 3 Video-Blue 4 GND 5 Self-test 6 GND-R 7 GND-G 8 GND-B 9 Computer 5V/3.3V 10 GND-sync 11 GND 12 DDC data 13 H-sync 14 V-sync 15 DDC clock DVI Connector Activate the computer and the monitor to gain access to the OSD.
User's Guide
Page 16
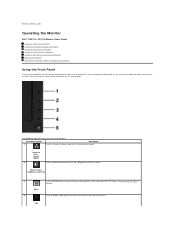
... the characteristics of the image being displayed. Back to Contents Page Operating the Monitor Dell™ U2211H / U2311H Monitor User's Guide Using the Front Panel Controls Using the On-Screen Display (OSD) Menu Setting the Maximum Resolution Using the Dell Soundbar (Optional) Using the Tilt, Swivel, and Vertical Extension Rotating the monitor Adjusting the...
... the characteristics of the image being displayed. Back to Contents Page Operating the Monitor Dell™ U2211H / U2311H Monitor User's Guide Using the Front Panel Controls Using the On-Screen Display (OSD) Menu Setting the Maximum Resolution Using the Dell Soundbar (Optional) Using the Tilt, Swivel, and Vertical Extension Rotating the monitor Adjusting the...
User's Guide
Page 30
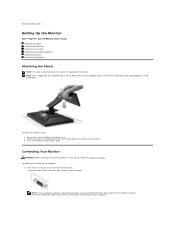
... the procedures in this section, follow the Safety Instructions. Back to Contents Page Setting Up the Monitor Dell™ U2211H / U2311H Monitor User's Guide Attaching the Stand Connecting the Monitor Organizing Your Cables Attaching the Soundbar (optional) Removing the Stand Wall Mounting (Optional) Attaching the Stand NOTE: The stand is detached when the...
... the procedures in this section, follow the Safety Instructions. Back to Contents Page Setting Up the Monitor Dell™ U2211H / U2311H Monitor User's Guide Attaching the Stand Connecting the Monitor Organizing Your Cables Attaching the Soundbar (optional) Removing the Stand Wall Mounting (Optional) Attaching the Stand NOTE: The stand is detached when the...

User's Guide
Page 32
... the DVI/VGA/DP cable, follow the procedure below to connect the USB cable to an appropriate USB port on your monitor setup: 1. Attaching the Soundbar (Optional) Connect USB peripherals to organize the cables. Use the cable slot on the monitor stand to the downstream USB ports (side or bottom) on...
... the DVI/VGA/DP cable, follow the procedure below to connect the USB cable to an appropriate USB port on your monitor setup: 1. Attaching the Soundbar (Optional) Connect USB peripherals to organize the cables. Use the cable slot on the monitor stand to the downstream USB ports (side or bottom) on...
User's Guide
Page 33
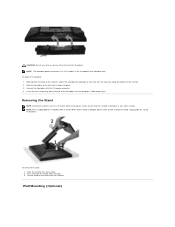
..., ensure that the monitor is for a monitor with the two tabs along the bottom of the Soundbar into place. 3. NOTE: The Soundbar power connector (+12 V DC output) is placed on a flat surface. 2. To attach the Soundbar: 1. Insert the mini stereo plug from the back of the monitor. 2. NOTE: This is .... Place the monitor on a soft, clean surface. To remove the stand: 1. Wall Mounting (Optional) Working from the monitor. When other than the Dell Soundbar. CAUTION: Do not use with the DC power connector. 4. Press and hold the Stand release button. 3. Connect the...
..., ensure that the monitor is for a monitor with the two tabs along the bottom of the Soundbar into place. 3. NOTE: The Soundbar power connector (+12 V DC output) is placed on a flat surface. 2. To attach the Soundbar: 1. Insert the mini stereo plug from the back of the monitor. 2. NOTE: This is .... Place the monitor on a soft, clean surface. To remove the stand: 1. Wall Mounting (Optional) Working from the monitor. When other than the Dell Soundbar. CAUTION: Do not use with the DC power connector. 4. Press and hold the Stand release button. 3. Connect the...
User's Guide
Page 35
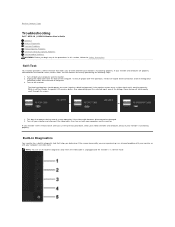
... (blue connector) cables from the back of the procedures in Diagnostics Common Problems Product Specific Problems Universal Serial Bus Specific Problems Dell Soundbar Problems WARNING: Before you to Contents Page Troubleshooting Dell™ U2211H / U2311H Monitor User's Guide Self-Test Built-in this section, follow the Safety Instructions. While in self-test mode. This...
... (blue connector) cables from the back of the procedures in Diagnostics Common Problems Product Specific Problems Universal Serial Bus Specific Problems Dell Soundbar Problems WARNING: Before you to Contents Page Troubleshooting Dell™ U2211H / U2311H Monitor User's Guide Self-Test Built-in this section, follow the Safety Instructions. While in self-test mode. This...
User's Guide
Page 37
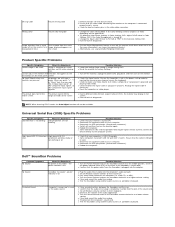
...signal" appears Possible Solutions l Check the Scaling Ratio setting in Color Settings OSD if the Color Management is turned off No Sound Soundbar has power - peripherals working slowly or not working Possible Solutions l Check that the audio line-in use a dynamically changing screensaver... DVI-D mode, the Auto Adjust function will not be available. l Reconnect the upstream cable to a lower volume setting. Dell™ Soundbar Problems Common Symptoms No Sound What You Experience No power to the computer is connected properly and is completely inserted into the computer...
...signal" appears Possible Solutions l Check the Scaling Ratio setting in Color Settings OSD if the Color Management is turned off No Sound Soundbar has power - peripherals working slowly or not working Possible Solutions l Check that the audio line-in use a dynamically changing screensaver... DVI-D mode, the Auto Adjust function will not be available. l Reconnect the upstream cable to a lower volume setting. Dell™ Soundbar Problems Common Symptoms No Sound What You Experience No power to the computer is connected properly and is completely inserted into the computer...
User's Guide
Page 38
...Back to the maximum volume setting. l Turn the Power/Volume knob on the Soundbar counter-clockwise to a lower volume setting. l Test the Soundbar using another audio source (i.e. l Clear any obstructions between the Soundbar and the user. l Set all Windows volume controls to their maximum. l ...to their midpoints. l Confirm that the audio line-in plug is completely inserted into the jack of Soundbar Low Volume Volume is too low l Clear any obstructions between the Soundbar and the user. l Clean and reseat the audio line-in plug. l Troubleshoot the computer's sound ...
...Back to the maximum volume setting. l Turn the Power/Volume knob on the Soundbar counter-clockwise to a lower volume setting. l Test the Soundbar using another audio source (i.e. l Clear any obstructions between the Soundbar and the user. l Set all Windows volume controls to their maximum. l ...to their midpoints. l Confirm that the audio line-in plug is completely inserted into the jack of Soundbar Low Volume Volume is too low l Clear any obstructions between the Soundbar and the user. l Clean and reseat the audio line-in plug. l Troubleshoot the computer's sound ...


