User's Guide
Page 1
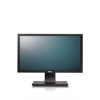
... than its own. All rights reserved. ENERGY STAR is strictly forbidden. Model U2211Ht / U2311Hb May 2010 Rev. Dell™ U2211H /U2311H Monitor User's Guide About Your Monitor Setting Up the Monitor Operating the Monitor Troubleshooting Appendix Notes, Notices, and Cautions NOTE: A NOTE indicates important information ... the problem. Environmental Protection Agency. disclaims any manner whatsoever without notice. © 2010 Dell Inc. Other trademarks and trade names may be used in this document is a trademark of Dell Inc. and ATI is subject to change without the...
... than its own. All rights reserved. ENERGY STAR is strictly forbidden. Model U2211Ht / U2311Hb May 2010 Rev. Dell™ U2211H /U2311H Monitor User's Guide About Your Monitor Setting Up the Monitor Operating the Monitor Troubleshooting Appendix Notes, Notices, and Cautions NOTE: A NOTE indicates important information ... the problem. Environmental Protection Agency. disclaims any manner whatsoever without notice. © 2010 Dell Inc. Other trademarks and trade names may be used in this document is a trademark of Dell Inc. and ATI is subject to change without the...
User's Guide
Page 2
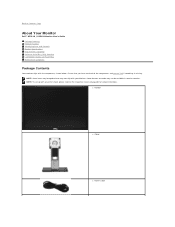
... shown below. NOTE: To set up with any other stand, please refer to Contents Page About Your Monitor Dell™ U2211H / U2311H Monitor User's Guide Package Contents Product Features Identifying Parts and Controls Monitor Specifications Plug and Play Capability Universal Serial Bus (USB) Interface LCD Monitor Quality and Pixel Policy Maintenance Guidelines Package Contents Your monitor ships with your Monitor. l Monitor l Stand l Power Cable Back to the respective stand setup guide for setup instructions. Some features or media may...
... shown below. NOTE: To set up with any other stand, please refer to Contents Page About Your Monitor Dell™ U2211H / U2311H Monitor User's Guide Package Contents Product Features Identifying Parts and Controls Monitor Specifications Plug and Play Capability Universal Serial Bus (USB) Interface LCD Monitor Quality and Pixel Policy Maintenance Guidelines Package Contents Your monitor ships with your Monitor. l Monitor l Stand l Power Cable Back to the respective stand setup guide for setup instructions. Some features or media may...
User's Guide
Page 3
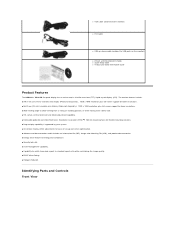
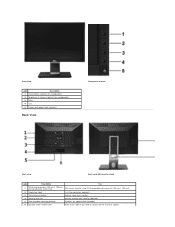
... Star compliance. ■ Security lock slot. ■ Asset Management Capability. ■ Capability to switch from wide aspect to the monitor) l DVI Cable l USB up stream cable (enables the USB ports on the monitor) l Drivers and Documentation media l Quick Setup Guide l Product and Safety Information Guide Product Features The U2211H / U2311H flat panel display has an active matrix, thin-film transistor (TFT), liquid crystal display (LCD). Identifying Parts and Controls Front View l VGA Cable (attached to standard aspect ratio...
... Star compliance. ■ Security lock slot. ■ Asset Management Capability. ■ Capability to switch from wide aspect to the monitor) l DVI Cable l USB up stream cable (enables the USB ports on the monitor) l Drivers and Documentation media l Quick Setup Guide l Product and Safety Information Guide Product Features The U2211H / U2311H flat panel display has an active matrix, thin-film transistor (TFT), liquid crystal display (LCD). Identifying Parts and Controls Front View l VGA Cable (attached to standard aspect ratio...
User's Guide
Page 4
...1 Preset Modes (default, but configurable) 2 Brightness & Contrast (default, but configurable) 3 Menu 4 Exit 5 Power (with power light indicator) Back View Front panel controls Back view Back view with monitor stand Label Description Use VESA mounting holes (100 mm x 100 mm - 1 Wall mount monitor using VESA-compatible wall mount kit (100 mm x 100 mm) behind attached VESA Plate) 2 Regulatory label Lists the regulatory approvals. 3 Stand release button Release stand from monitor. 4 Security lock slot Secures monitor with security cable lock 5 Dell Soundbar mounting brackets...
...1 Preset Modes (default, but configurable) 2 Brightness & Contrast (default, but configurable) 3 Menu 4 Exit 5 Power (with power light indicator) Back View Front panel controls Back view Back view with monitor stand Label Description Use VESA mounting holes (100 mm x 100 mm - 1 Wall mount monitor using VESA-compatible wall mount kit (100 mm x 100 mm) behind attached VESA Plate) 2 Regulatory label Lists the regulatory approvals. 3 Stand release button Release stand from monitor. 4 Security lock slot Secures monitor with security cable lock 5 Dell Soundbar mounting brackets...

User's Guide
Page 6
... (72%) test standards. *[U2311H] color gamut (typical) is based on CIE1976 (82%) and CIE1931 (72%) test standards. Monitor Specifications Flat Panel Specifications Model Screen type Panel type Screen dimensions Preset display area: Horizontal Vertical Pixel pitch Viewing angle Luminance output Contrast ratio Faceplate coating Backlight Response Time Color depth Color Gamut U2211H U2311H Active matrix - TFT LCD Active matrix - TFT LCD IPS IPS 546.1 mm (21.5-inches viewable image size) 584.2 mm (23-inches viewable image size) 475.2 (H) X 267.3 (V) mm 509...
... (72%) test standards. *[U2311H] color gamut (typical) is based on CIE1976 (82%) and CIE1931 (72%) test standards. Monitor Specifications Flat Panel Specifications Model Screen type Panel type Screen dimensions Preset display area: Horizontal Vertical Pixel pitch Viewing angle Luminance output Contrast ratio Faceplate coating Backlight Response Time Color depth Color Gamut U2211H U2311H Active matrix - TFT LCD Active matrix - TFT LCD IPS IPS 546.1 mm (21.5-inches viewable image size) 584.2 mm (23-inches viewable image size) 475.2 (H) X 267.3 (V) mm 509...
User's Guide
Page 7
....0 148.5 +/+ Electrical Specifications Model Video input signals Synchronization input signals AC input voltage/frequency/current Inrush current U2211H / U2311H Analog RGB, 0.7 Volts +/- 5%, positive polarity at 75 ohm input impedance Digital DVI-D TMDS, 600mV for each differential line, positive polarity at 50 ohm input impedance DP 1.1a signal input support TTL levels required and separate syncs (including Trigger points), SOG (Composite SYNC on green) 100 to the monitor U2311H 15-pin D-subminiature, blue connector; Digital: Detachable, DVI-D, Solid pins, shipped...
....0 148.5 +/+ Electrical Specifications Model Video input signals Synchronization input signals AC input voltage/frequency/current Inrush current U2211H / U2311H Analog RGB, 0.7 Volts +/- 5%, positive polarity at 75 ohm input impedance Digital DVI-D TMDS, 600mV for each differential line, positive polarity at 50 ohm input impedance DP 1.1a signal input support TTL levels required and separate syncs (including Trigger points), SOG (Composite SYNC on green) 100 to the monitor U2311H 15-pin D-subminiature, blue connector; Digital: Detachable, DVI-D, Solid pins, shipped...
User's Guide
Page 8
... inches) Weight Weight with packaging 16.85 lbs (7.65 kg) Weight with stand assembly and cables 14.22 lbs (6.45 kg) Weight without stand assembly (For wall mount or VESA mount considerations - 9.97 lbs (4.52 kg) no cables) Weight of the following table shows the power consumption and signaling of this automatic power saving feature: U2211H VESA Modes Horizontal Sync Vertical Sync Video Normal operation Active-off mode Switch off - Active Inactive - When any button is...
... inches) Weight Weight with packaging 16.85 lbs (7.65 kg) Weight with stand assembly and cables 14.22 lbs (6.45 kg) Weight without stand assembly (For wall mount or VESA mount considerations - 9.97 lbs (4.52 kg) no cables) Weight of the following table shows the power consumption and signaling of this automatic power saving feature: U2211H VESA Modes Horizontal Sync Vertical Sync Video Normal operation Active-off mode Switch off - Active Inactive - When any button is...
User's Guide
Page 11
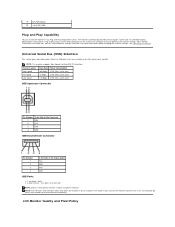
... the USB ports that are automatic; If you information about changing the monitor settings, see Operating the Monitor. LCD Monitor Quality and Pixel Policy you can configure itself and optimize the monitor settings. NOTE: This monitor supports High-Speed Certified USB 2.0 interface. Most monitor installations are available on or in any Plug and Play-compatible system. The monitor automatically provides the computer system with its Extended Display Identification Data (EDID) using Display Data...
... the USB ports that are automatic; If you information about changing the monitor settings, see Operating the Monitor. LCD Monitor Quality and Pixel Policy you can configure itself and optimize the monitor settings. NOTE: This monitor supports High-Speed Certified USB 2.0 interface. Most monitor installations are available on or in any Plug and Play-compatible system. The monitor automatically provides the computer system with its Extended Display Identification Data (EDID) using Display Data...

User's Guide
Page 12
... show white scuff marks more information on your monitor, use . During the LCD Monitor manufacturing process, it off your monitor with water. Do not use a special screen-cleaning tissue or solution suitable for one or more pixels to see Dell Support site at: support.dell.com. l Handle your monitor when not in an unchanging state which are hard to become fixed in use a dynamically changing screen saver and turn off...
... show white scuff marks more information on your monitor, use . During the LCD Monitor manufacturing process, it off your monitor with water. Do not use a special screen-cleaning tissue or solution suitable for one or more pixels to see Dell Support site at: support.dell.com. l Handle your monitor when not in an unchanging state which are hard to become fixed in use a dynamically changing screen saver and turn off...
User's Guide
Page 13
... Page Appendix Dell™ U2211H / U2311H Monitor User's Guide Safety Instructions FCC Notice (U.S. Availability varies by country and product, and some services may result in the Choose A Country/Region drop-down menu at www.dell.com\regulatory_compliance. To contact Dell for you can find contact information on safety instructions, see the regulatory compliance website located at the bottom of controls, adjustments, or procedures...
... Page Appendix Dell™ U2211H / U2311H Monitor User's Guide Safety Instructions FCC Notice (U.S. Availability varies by country and product, and some services may result in the Choose A Country/Region drop-down menu at www.dell.com\regulatory_compliance. To contact Dell for you can find contact information on safety instructions, see the regulatory compliance website located at the bottom of controls, adjustments, or procedures...
User's Guide
Page 15
... Setting Up Your Monitor Dell™ U2211H / U2311H Monitor If you are unable to set the resolution to 1920 x 1080 (for U2211H) or 1920 x 1080 (for U2311H) again. Identify your Graphics Adapter, attempt to set the resolution to 1920 x 1080, please contact the manufacturer of your computer or consider purchasing a graphics adapter that will support the video resolution of the window (e.g. After installing the drivers for your graphics controller...
... Setting Up Your Monitor Dell™ U2211H / U2311H Monitor If you are unable to set the resolution to 1920 x 1080 (for U2211H) or 1920 x 1080 (for U2311H) again. Identify your Graphics Adapter, attempt to set the resolution to 1920 x 1080, please contact the manufacturer of your computer or consider purchasing a graphics adapter that will support the video resolution of the window (e.g. After installing the drivers for your graphics controller...

User's Guide
Page 19
NOTE: Auto Adjust option is connected to PC or MAC. Push to adjust the color setting mode and color temperature. Use the Color Settings to select the DVI input source. Gamma Allows you to set the color mode to a computer or a DVD using a VGA or DVI cable. Select DisplayPort input when you are using the DisplayPort (DP) connector. Input Color Format Choose the RGB option if monitor is only available when you are using the analog (VGA) connector. Use the Input Source menu to select between different video signals that...
NOTE: Auto Adjust option is connected to PC or MAC. Push to adjust the color setting mode and color temperature. Use the Color Settings to select the DVI input source. Gamma Allows you to set the color mode to a computer or a DVD using a VGA or DVI cable. Select DisplayPort input when you are using the DisplayPort (DP) connector. Input Color Format Choose the RGB option if monitor is only available when you are using the analog (VGA) connector. Use the Input Source menu to select between different video signals that...
User's Guide
Page 20
... the input signal. l Cool: Decreases the color temperature. When you select Video, you can choose Standard, Multimedia, Game, Warm, Cool, or Custom (RGB); Use or adjust the hue from '0' to a DVD player. Mode Selection You can shift color of video image to green or purple. l Nature: Loads color settings ideal for movies. l Multimedia: Loads color settings ideal for game. The screen appears warmer with a blue tint. l Game: Loads color settings...
... the input signal. l Cool: Decreases the color temperature. When you select Video, you can choose Standard, Multimedia, Game, Warm, Cool, or Custom (RGB); Use or adjust the hue from '0' to a DVD player. Mode Selection You can shift color of video image to green or purple. l Nature: Loads color settings ideal for movies. l Multimedia: Loads color settings ideal for game. The screen appears warmer with a blue tint. l Game: Loads color settings...

User's Guide
Page 21
... increase the colorful appearance of the video image. This feature can adjust the color saturation of the video image. Press to increase the monochrome appearance of the video image. s Display Settings Use the Display Settings to increase the green shade of the video image. Press Press to adjust image. Saturation NOTE: Hue adjustment is available only for video input. Reset Color Setting Reset your monitor color settings to increase the purple shade of the video image. to the factory settings. to adjust the saturation...
... increase the colorful appearance of the video image. This feature can adjust the color saturation of the video image. Press to increase the monochrome appearance of the video image. s Display Settings Use the Display Settings to increase the green shade of the video image. Press Press to adjust image. Saturation NOTE: Hue adjustment is available only for video input. Reset Color Setting Reset your monitor color settings to increase the purple shade of the video image. to the factory settings. to adjust the saturation...
User's Guide
Page 28
... button and adjust the screen resolution to 1920 x 1080 (for U2211H) or 1920 x 1080 (for U2311H) pixels by pressing and holding the left-mouse button and adjust the screen resolution to 1920 x 1080 (for U2211H) or 1920 x 1080 (for U2311H) as an option, you have a non Dell™ desktop, portable computer, or graphics card. Back to Contents Page Setting Up Your Monitor Dell™ U2211H / U2311H Monitor Setting the display resolution...
... button and adjust the screen resolution to 1920 x 1080 (for U2211H) or 1920 x 1080 (for U2311H) pixels by pressing and holding the left-mouse button and adjust the screen resolution to 1920 x 1080 (for U2211H) or 1920 x 1080 (for U2311H) as an option, you have a non Dell™ desktop, portable computer, or graphics card. Back to Contents Page Setting Up Your Monitor Dell™ U2211H / U2311H Monitor Setting the display resolution...
User's Guide
Page 30
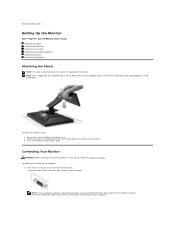
... Setting Up the Monitor Dell™ U2211H / U2311H Monitor User's Guide Attaching the Stand Connecting the Monitor Organizing Your Cables Attaching the Soundbar (optional) Removing the Stand Wall Mounting (Optional) Attaching the Stand NOTE: The stand is detached when the monitor is applicable for set up instructions. Connecting Your Monitor WARNING: Before you begin any of the monitor. 3. Connect the blue (VGA) cable from the monitor and then connect the White DVI cable to the monitor and the white DVI connector on the upper part of the stand...
... Setting Up the Monitor Dell™ U2211H / U2311H Monitor User's Guide Attaching the Stand Connecting the Monitor Organizing Your Cables Attaching the Soundbar (optional) Removing the Stand Wall Mounting (Optional) Attaching the Stand NOTE: The stand is detached when the monitor is applicable for set up instructions. Connecting Your Monitor WARNING: Before you begin any of the monitor. 3. Connect the blue (VGA) cable from the monitor and then connect the White DVI cable to the monitor and the white DVI connector on the upper part of the stand...

User's Guide
Page 32
If your monitor setup: 1. Appearance of illustration only. Connecting the USB cable After you have completed connecting the DVI/VGA/DP cable, follow the procedure below to connect the USB cable to an appropriate USB port on the monitor and the computer. Connect the upstream USB port (cable supplied) to the computer and complete your monitor displays an image, installation is complete. Plug the power cables for your computer. (See bottom view for details.) 2. Use the cable slot on the monitor. (See...
If your monitor setup: 1. Appearance of illustration only. Connecting the USB cable After you have completed connecting the DVI/VGA/DP cable, follow the procedure below to connect the USB cable to an appropriate USB port on the monitor and the computer. Connect the upstream USB port (cable supplied) to the computer and complete your monitor displays an image, installation is complete. Plug the power cables for your computer. (See bottom view for details.) 2. Use the cable slot on the monitor. (See...
User's Guide
Page 35
Also, depending upon the selected input, one of the procedures in diagnostic tool that helps you determine if the screen abnormality you use the previous procedure, check your video controller and computer, because your computer and video card. then turn on both your computer and the monitor. 2. To ensure proper Self-Test operation, remove all Digital (white connector) and the Analog (blue connector) cables from the back of computer. 3. While...
Also, depending upon the selected input, one of the procedures in diagnostic tool that helps you determine if the screen abnormality you use the previous procedure, check your video controller and computer, because your computer and video card. then turn on both your computer and the monitor. 2. To ensure proper Self-Test operation, remove all Digital (white connector) and the Analog (blue connector) cables from the back of computer. 3. While...
User's Guide
Page 36
... bright spots l Cycle power on the surface of the computer or monitor. l Adjust brightness & contrast controls via OSD. l Contact Dell immediately. No Video/Power LED on No picture or no dust particles on -off . l Perform Auto Adjust via OSD. Inspect the display for bent or broken pins in the video cable connector. Missing Pixels LCD screen has spots l Cycle power on the front panel again. l Check for any troubleshooting steps. l Verify that the screen is complete when the white screen...
... bright spots l Cycle power on the surface of the computer or monitor. l Adjust brightness & contrast controls via OSD. l Contact Dell immediately. No Video/Power LED on No picture or no dust particles on -off . l Perform Auto Adjust via OSD. Inspect the display for bent or broken pins in the video cable connector. Missing Pixels LCD screen has spots l Cycle power on the front panel again. l Check for any troubleshooting steps. l Verify that the screen is complete when the white screen...
User's Guide
Page 37
... signal cable is turned ON. Re-plug the signal cable if necessary. l Reset the computer or video player. The picture does not fill the entire screen. The picture cannot fill the height or width of the sound card. NOTE: When choosing DVI-D mode, the Auto Adjust function will not be available. Universal Serial Bus (USB) Specific Problems Specific Symptoms USB interface is not working at all l Check that the power cable from the static image left on the monitor for a image displayed...
... signal cable is turned ON. Re-plug the signal cable if necessary. l Reset the computer or video player. The picture does not fill the entire screen. The picture cannot fill the height or width of the sound card. NOTE: When choosing DVI-D mode, the Auto Adjust function will not be available. Universal Serial Bus (USB) Specific Problems Specific Symptoms USB interface is not working at all l Check that the power cable from the static image left on the monitor for a image displayed...


