User's Guide
Page 2
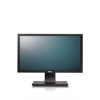
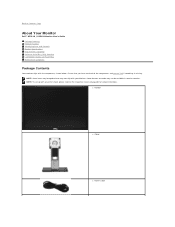
... l Stand l Power Cable Some features or media may not ship with your Monitor. Ensure that you have received all the components and contact Dell if something is missing. NOTE: Some items may be optional and may not be available in certain countries. Back to Contents Page About Your Monitor Dell™ U2211H / U2311H Monitor...
... l Stand l Power Cable Some features or media may not ship with your Monitor. Ensure that you have received all the components and contact Dell if something is missing. NOTE: Some items may be optional and may not be available in certain countries. Back to Contents Page About Your Monitor Dell™ U2211H / U2311H Monitor...
User's Guide
Page 4
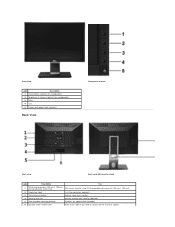
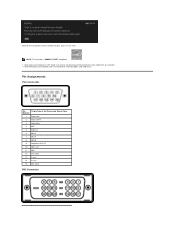
...View Label Description 1 Preset Modes (default, but configurable) 2 Brightness & Contrast (default, but configurable) 3 Menu 4 Exit 5 Power (with power light indicator) Back View Front panel controls Back view Back view with monitor stand Label Description Use VESA mounting holes (100 mm ...Lists the regulatory approvals. 3 Stand release button Release stand from monitor. 4 Security lock slot Secures monitor with security cable lock 5 Dell Soundbar mounting brackets Attaches the optional Dell Soundbar. 6 Barcode serial number label Refer to this label if you need to contact...
...View Label Description 1 Preset Modes (default, but configurable) 2 Brightness & Contrast (default, but configurable) 3 Menu 4 Exit 5 Power (with power light indicator) Back View Front panel controls Back view Back view with monitor stand Label Description Use VESA mounting holes (100 mm ...Lists the regulatory approvals. 3 Stand release button Release stand from monitor. 4 Security lock slot Secures monitor with security cable lock 5 Dell Soundbar mounting brackets Attaches the optional Dell Soundbar. 6 Barcode serial number label Refer to this label if you need to contact...

User's Guide
Page 5
... the Stand to the Monitor Left view Bottom View Right view Bottom view Bottom view with monitor stand Label Description Use 1 AC power cord connector Connect the power cable 2 DC power connector for the soundbar (optional) 3 DisplayPort connector Connect your computer DP cable 4 DVI connector Connect your computer DVI cable 5 VGA connector Connect... and the computer. 7 USB downstream ports 8 Cable management slot Side View Connect your monitor to organize cables by placing them through the slot. Connect the power cord for Dell Soundbar.
... the Stand to the Monitor Left view Bottom View Right view Bottom view Bottom view with monitor stand Label Description Use 1 AC power cord connector Connect the power cable 2 DC power connector for the soundbar (optional) 3 DisplayPort connector Connect your computer DP cable 4 DVI connector Connect your computer DVI cable 5 VGA connector Connect... and the computer. 7 USB downstream ports 8 Cable management slot Side View Connect your monitor to organize cables by placing them through the slot. Connect the power cord for Dell Soundbar.
User's Guide
Page 8
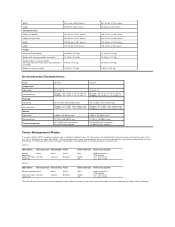
...mount considerations - 9.97 lbs (4.52 kg) no cables) Weight of the following table shows the power consumption and signaling of this automatic power saving feature: U2211H VESA Modes Horizontal Sync Vertical Sync Video Normal operation Active-off mode Switch off mode, one of stand...34 lbs (4.69 kg) 4.06 lbs (1.84 kg) Environmental Characteristics Model Temperature Operating Non-operating Humidity Operating Non-operating Altitude Operating Non-operating Thermal dissipation U2211H U2311H 0° to 40 ° C Storage: -20° to 60° C (-4° to 140° F) Shipping: -20&#...
...mount considerations - 9.97 lbs (4.52 kg) no cables) Weight of the following table shows the power consumption and signaling of this automatic power saving feature: U2211H VESA Modes Horizontal Sync Vertical Sync Video Normal operation Active-off mode Switch off mode, one of stand...34 lbs (4.69 kg) 4.06 lbs (1.84 kg) Environmental Characteristics Model Temperature Operating Non-operating Humidity Operating Non-operating Altitude Operating Non-operating Thermal dissipation U2211H U2311H 0° to 40 ° C Storage: -20° to 60° C (-4° to 140° F) Shipping: -20&#...
User's Guide
Page 9
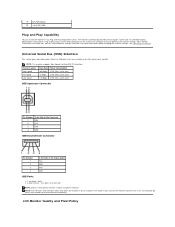
Pin Assignments VGA Connector Pin 15-pin Side of the Connected Signal Cable Number 1 Video-Red 2 Video-Green 3 Video-Blue 4 GND 5 Self-test 6 GND-R 7 GND-G 8 GND-B 9 Computer 5V/3.3V 10 GND-sync 11 GND 12 DDC data 13 H-sync 14 V-sync 15 DDC clock DVI Connector NOTE: This monitor is ENERGY STAR®-compliant. * Zero power consumption in OFF mode can only be achieved by disconnecting the main cable from the monitor. ** Maximum power consumption with max luminance, Dell Soundbar, and USB active. Activate the computer and the monitor to gain access to the OSD.
Pin Assignments VGA Connector Pin 15-pin Side of the Connected Signal Cable Number 1 Video-Red 2 Video-Green 3 Video-Blue 4 GND 5 Self-test 6 GND-R 7 GND-G 8 GND-B 9 Computer 5V/3.3V 10 GND-sync 11 GND 12 DDC data 13 H-sync 14 V-sync 15 DDC clock DVI Connector NOTE: This monitor is ENERGY STAR®-compliant. * Zero power consumption in OFF mode can only be achieved by disconnecting the main cable from the monitor. ** Maximum power consumption with max luminance, Dell Soundbar, and USB active. Activate the computer and the monitor to gain access to the OSD.

User's Guide
Page 10
Pin Number 1 2 3 4 5 6 7 8 9 10 11 12 13 14 15 16 17 18 19 20 21 22 23 24 24-pin Side of the Connected Signal Cable ML0(p) GND ML0(n) ML1(p) GND ML1(n) ML2(p) GND ML2(n) ML3(p) GND ML3(n) GND GND AUX(p) GND AUX(n) HPD DisplayPort Connector Pin Number 1 2 3 4 5 6 7 8 9 10 11 12 13 14 15 16 17 18 20-pin Side of the Connected Signal Cable TMDS RX2TMDS RX2+ TMDS Ground Floating Floating DDC Clock DDC Data Floating TMDS RX1TMDS RX1+ TMDS Ground Floating Floating +5V/+3.3V power Self test Hot Plug Detect TMDS RX0TMDS RX0+ TMDS Ground Floating Floating TMDS Ground TMDS Clock+ TMDS Clock-
Pin Number 1 2 3 4 5 6 7 8 9 10 11 12 13 14 15 16 17 18 19 20 21 22 23 24 24-pin Side of the Connected Signal Cable ML0(p) GND ML0(n) ML1(p) GND ML1(n) ML2(p) GND ML2(n) ML3(p) GND ML3(n) GND GND AUX(p) GND AUX(n) HPD DisplayPort Connector Pin Number 1 2 3 4 5 6 7 8 9 10 11 12 13 14 15 16 17 18 20-pin Side of the Connected Signal Cable TMDS RX2TMDS RX2+ TMDS Ground Floating Floating DDC Clock DDC Data Floating TMDS RX1TMDS RX1+ TMDS Ground Floating Floating +5V/+3.3V power Self test Hot Plug Detect TMDS RX0TMDS RX0+ TMDS Ground Floating Floating TMDS Ground TMDS Clock+ TMDS Clock-
User's Guide
Page 11
... Interface This section gives you information about changing the monitor settings, see Operating the Monitor. Transfer speed High speed Full speed Low speed Data Rate Power Consumption 480 Mbps 2.5W (Max., each port) 12 Mbps 2.5W (Max., each port) 1.5 Mbps 2.5W (Max., each port) USB ...computer system with its Extended Display Identification Data (EDID) using Display Data Channel (DDC) protocols so the system can install the monitor in power save mode. If you can select different settings if desired. Most monitor installations are available on the left side NOTE: USB 2.0 functionality ...
... Interface This section gives you information about changing the monitor settings, see Operating the Monitor. Transfer speed High speed Full speed Low speed Data Rate Power Consumption 480 Mbps 2.5W (Max., each port) 12 Mbps 2.5W (Max., each port) 1.5 Mbps 2.5W (Max., each port) USB ...computer system with its Extended Display Identification Data (EDID) using Display Data Channel (DDC) protocols so the system can install the monitor in power save mode. If you can select different settings if desired. Most monitor installations are available on the left side NOTE: USB 2.0 functionality ...

User's Guide
Page 12
... when you unpack your monitor, use a dynamically changing screen saver and turn off with care as some detergents leave a milky film on Dell Monitor Quality and Pixel Policy, see and do not affect the display quality or usability. WARNING: Before cleaning the monitor, unplug the monitor... power cable from the electrical outlet. Do not use benzene, thinner, ammonia, abrasive cleaners, or compressed air. For more than a lighter-colored monitor. For...
... when you unpack your monitor, use a dynamically changing screen saver and turn off with care as some detergents leave a milky film on Dell Monitor Quality and Pixel Policy, see and do not affect the display quality or usability. WARNING: Before cleaning the monitor, unplug the monitor... power cable from the electrical outlet. Do not use benzene, thinner, ammonia, abrasive cleaners, or compressed air. For more than a lighter-colored monitor. For...

User's Guide
Page 17
... OSD menu to disappear. 1. The Blue LED indicates the monitor is on and off. 5 Use the Power button to turn the monitor on and fully functional. An amber LED indicates DPMS power save mode. Push the button to another menu or exit the OSD menu, the monitor automatically saves those... changes. The changes are also saved if you change the settings and then wait for display (DP) Input Power (with power light indicator) Using the On-Screen Display (OSD) Menu Accessing the Menu System NOTE: If you change the settings and then either proceed ...
... OSD menu to disappear. 1. The Blue LED indicates the monitor is on and off. 5 Use the Power button to turn the monitor on and fully functional. An amber LED indicates DPMS power save mode. Push the button to another menu or exit the OSD menu, the monitor automatically saves those... changes. The changes are also saved if you change the settings and then wait for display (DP) Input Power (with power light indicator) Using the On-Screen Display (OSD) Menu Accessing the Menu System NOTE: If you change the settings and then either proceed ...
User's Guide
Page 30
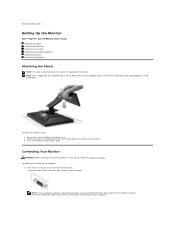
...Connect the blue (VGA) cable from the factory. When other stand is applicable for set up instructions. To connect your computer and disconnect the power cable. To attach the monitor stand: 1. Remove the cover and place the monitor on the back of the monitor. 3. Turn off your monitor...Before you begin any of the stand to the groove on it snaps into its place. Back to Contents Page Setting Up the Monitor Dell™ U2211H / U2311H Monitor User's Guide Attaching the Stand Connecting the Monitor Organizing Your Cables Attaching the Soundbar (optional) Removing the Stand Wall Mounting...
...Connect the blue (VGA) cable from the factory. When other stand is applicable for set up instructions. To connect your computer and disconnect the power cable. To attach the monitor stand: 1. Remove the cover and place the monitor on the back of the monitor. 3. Turn off your monitor...Before you begin any of the stand to the groove on it snaps into its place. Back to Contents Page Setting Up the Monitor Dell™ U2211H / U2311H Monitor User's Guide Attaching the Stand Connecting the Monitor Organizing Your Cables Attaching the Soundbar (optional) Removing the Stand Wall Mounting...

User's Guide
Page 32
... Connecting Your Monitor for cable attachment,) use the cable management slot to the computer and complete your computer. (See bottom view for details.) 2. Plug the power cables for your monitor displays an image, installation is complete. If it does not display an image, see Solving Problems. 5. CAUTION: The Graphics are used...
... Connecting Your Monitor for cable attachment,) use the cable management slot to the computer and complete your computer. (See bottom view for details.) 2. Plug the power cables for your monitor displays an image, installation is complete. If it does not display an image, see Solving Problems. 5. CAUTION: The Graphics are used...
User's Guide
Page 33
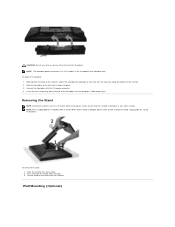
CAUTION: Do not use with the DC power connector. 4. To attach the Soundbar: 1. Insert the mini stereo plug from the back of the monitor. 2. When other than the Dell Soundbar. Place the monitor on a soft, clean surface. Working from the monitor. Slide the Soundbar to the respective stand ...monitor with the two tabs along the bottom of the Soundbar into place. 3. To remove the stand: 1. Wall Mounting (Optional) NOTE: The Soundbar power connector (+12 V DC output) is bought, please refer to the left until it snaps into the computer's audio output jack. NOTE: This is placed...
CAUTION: Do not use with the DC power connector. 4. To attach the Soundbar: 1. Insert the mini stereo plug from the back of the monitor. 2. When other than the Dell Soundbar. Place the monitor on a soft, clean surface. Working from the monitor. Slide the Soundbar to the respective stand ...monitor with the two tabs along the bottom of the Soundbar into place. 3. To remove the stand: 1. Wall Mounting (Optional) NOTE: The Soundbar power connector (+12 V DC output) is bought, please refer to the left until it snaps into the computer's audio output jack. NOTE: This is placed...
User's Guide
Page 35
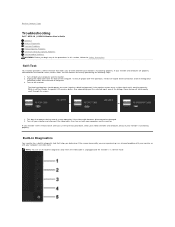
... problem with your monitor, or with your computer and video card. If your monitor screen remains blank after you to Contents Page Troubleshooting Dell™ U2211H / U2311H Monitor User's Guide Self-Test Built-in self-test mode. Also, depending upon the selected input, one of the procedures ...in self-test mode, the power LED remains green. This box also appears during normal system operation if the video cable becomes disconnected or damaged. 2....
... problem with your monitor, or with your computer and video card. If your monitor screen remains blank after you to Contents Page Troubleshooting Dell™ U2211H / U2311H Monitor User's Guide Self-Test Built-in self-test mode. Also, depending upon the selected input, one of the procedures ...in self-test mode, the power LED remains green. This box also appears during normal system operation if the video cable becomes disconnected or damaged. 2....
User's Guide
Page 36
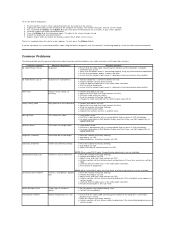
... selected via the Input Source Select button. l Check for 2 seconds. Stuck-on Pixels LCD screen has bright spots l Cycle power on Dell Monitor Quality and Pixel Policy, see Dell Support site at : support.dell.com. l Adjust Phase and Pixel Clock controls via OSD. Screen is selected via the Input Source Select button. Intermittent Problems...
... selected via the Input Source Select button. l Check for 2 seconds. Stuck-on Pixels LCD screen has bright spots l Cycle power on Dell Monitor Quality and Pixel Policy, see Dell Support site at : support.dell.com. l Adjust Phase and Pixel Clock controls via OSD. Screen is selected via the Input Source Select button. Intermittent Problems...
User's Guide
Page 37
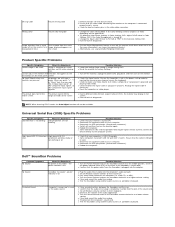
...middle position; l Confirm that your computer. l Test the Soundbar using another audio source (i.e. portable CD player). l Check for more information, see Power Management Modes). Adjust R/G/B value in Color Settings OSD if the Color Management is turned ON. When you press "+", "-" or "Menu" key, ...the upstream cable to a higher volume setting. Dell™ Soundbar Problems Common Symptoms No Sound What You Experience No power to PC RGB or YPbPr in plug is High Speed USB 2.0 slow. the power indicator is USB 2.0-capable. power indicator is plugged in cable into the jack ...
...middle position; l Confirm that your computer. l Test the Soundbar using another audio source (i.e. portable CD player). l Check for more information, see Power Management Modes). Adjust R/G/B value in Color Settings OSD if the Color Management is turned ON. When you press "+", "-" or "Menu" key, ...the upstream cable to a higher volume setting. Dell™ Soundbar Problems Common Symptoms No Sound What You Experience No power to PC RGB or YPbPr in plug is High Speed USB 2.0 slow. the power indicator is USB 2.0-capable. power indicator is plugged in cable into the jack ...
User's Guide
Page 38
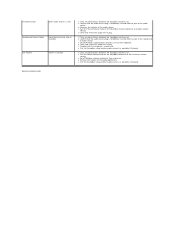
...Clean and reseat the audio line-in plug. l Clean and reseat the audio line-in plug. portable CD player). l Turn the Power/Volume knob on the Soundbar counter-clockwise to a lower volume setting. l Clear any obstructions between the Soundbar and the user. l Set... all Windows audio balance controls (L-R) to the maximum volume setting. l Test the Soundbar using another audio source (i.e. l Turn the Power/Volume knob on the Soundbar clockwise to their maximum. l Troubleshoot the computer's sound card. l Clear any obstructions between the Soundbar and the user. ...
...Clean and reseat the audio line-in plug. l Clean and reseat the audio line-in plug. portable CD player). l Turn the Power/Volume knob on the Soundbar counter-clockwise to a lower volume setting. l Clear any obstructions between the Soundbar and the user. l Set... all Windows audio balance controls (L-R) to the maximum volume setting. l Test the Soundbar using another audio source (i.e. l Turn the Power/Volume knob on the Soundbar clockwise to their maximum. l Troubleshoot the computer's sound card. l Clear any obstructions between the Soundbar and the user. ...


