Service Manual
Page 1
... Inc. Microsoft, Windows, Windows Vista, a n d Windows Vista start button logo are trademarks of Dell Inc. All rights reserved. is used in this text: Dell, XPS, and the DELL logo are either the entities claiming the marks and names or their products. CAUTION: A CAUTION indicates ...a potential for property damage, personal injury, or death. Bluetooth is subject to change without the written permission of Dell Inc.; Dell™ Studio XPS™ 1340 Service Manual Before You Begin Base Cover Coin-Cell Battery Hard Drive Memory Rear Caps Processor Heat Sink Processor...
... Inc. Microsoft, Windows, Windows Vista, a n d Windows Vista start button logo are trademarks of Dell Inc. All rights reserved. is used in this text: Dell, XPS, and the DELL logo are either the entities claiming the marks and names or their products. CAUTION: A CAUTION indicates ...a potential for property damage, personal injury, or death. Bluetooth is subject to change without the written permission of Dell Inc.; Dell™ Studio XPS™ 1340 Service Manual Before You Begin Base Cover Coin-Cell Battery Hard Drive Memory Rear Caps Processor Heat Sink Processor...
Service Manual
Page 2
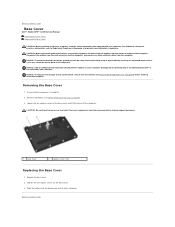
...Remove the battery (see Before Working Inside Your Computer) before working inside the computer. Back to Contents Page Base Cover Dell™ Studio XPS™ 1340 Service Manual Removing the Base Cover Replacing the Base Cover CAUTION: Before working inside your computer, read the ... into the battery bay until it clicks into place. For additional safety best practices information, see the Regulatory Compliance Homepage at www.dell.com/regulatory_compliance. NOTICE: To avoid electrostatic discharge, ground yourself by using a wrist grounding strap or by trained support personnel. 1 base...
...Remove the battery (see Before Working Inside Your Computer) before working inside the computer. Back to Contents Page Base Cover Dell™ Studio XPS™ 1340 Service Manual Removing the Base Cover Replacing the Base Cover CAUTION: Before working inside your computer, read the ... into the battery bay until it clicks into place. For additional safety best practices information, see the Regulatory Compliance Homepage at www.dell.com/regulatory_compliance. NOTICE: To avoid electrostatic discharge, ground yourself by using a wrist grounding strap or by trained support personnel. 1 base...
Service Manual
Page 3
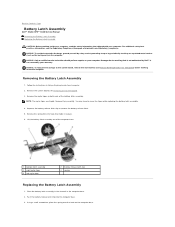
...a wrist grounding strap or by your computer. Follow the instructions in place. 6. Back to Contents Page Battery Latch Assembly Dell™ Studio XPS™ 1340 Service Manual Removing the Battery Latch Assembly Replacing the Battery Latch Assembly CAUTION: Before working inside your computer, read... working inside the computer. Removing the Battery Latch Assembly 1. Remove the system board (see the Regulatory Compliance Homepage at www.dell.com/regulatory_compliance. NOTE: The mylar tapes are fragile. You may have to remove the battery release latch. 5. Place the battery...
...a wrist grounding strap or by your computer. Follow the instructions in place. 6. Back to Contents Page Battery Latch Assembly Dell™ Studio XPS™ 1340 Service Manual Removing the Battery Latch Assembly Replacing the Battery Latch Assembly CAUTION: Before working inside your computer, read... working inside the computer. Removing the Battery Latch Assembly 1. Remove the system board (see the Regulatory Compliance Homepage at www.dell.com/regulatory_compliance. NOTE: The mylar tapes are fragile. You may have to remove the battery release latch. 5. Place the battery...

Service Manual
Page 5
... your computer from being scratched. NOTICE: When you disconnect the cable. Back to Contents Page Before You Begin Dell™ Studio XPS™ 1340 Service Manual Recommended Tools Turning Off Your Computer Before Working Inside Your Computer This section provides procedures for at ...www.dell.com/regulatory_compliance. Unless otherwise noted, each procedure assumes that shipped with care. l You have read the safety ...
... your computer from being scratched. NOTICE: When you disconnect the cable. Back to Contents Page Before You Begin Dell™ Studio XPS™ 1340 Service Manual Recommended Tools Turning Off Your Computer Before Working Inside Your Computer This section provides procedures for at ...www.dell.com/regulatory_compliance. Unless otherwise noted, each procedure assumes that shipped with care. l You have read the safety ...
Service Manual
Page 7
.... 4. Select the Exit menu. 5. Press during POST to save configuration changes. 8. Click Save this Agreement. Back to Contents Page Flashing the BIOS Dell™ Studio XPS™ 1340 Service Manual Flashing the BIOS From a CD Flashing the BIOS From the Hard Drive If a BIOS upgrade CD is attached. 2. Select Exit Saving ...
.... 4. Select the Exit menu. 5. Press during POST to save configuration changes. 8. Click Save this Agreement. Back to Contents Page Flashing the BIOS Dell™ Studio XPS™ 1340 Service Manual Flashing the BIOS From a CD Flashing the BIOS From the Hard Drive If a BIOS upgrade CD is attached. 2. Select Exit Saving ...
Service Manual
Page 9
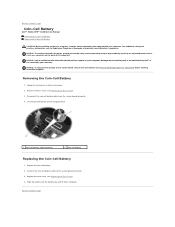
...battery cable from the system board connector. 4. Back to the system board connector. 3. Back to Contents Page Coin-Cell Battery Dell™ Studio XPS™ 1340 Service Manual Removing the Coin-Cell Battery Replacing the Coin-Cell Battery CAUTION: Before working inside your computer, read ...the safety information that is not authorized by Dell™ is not covered by periodically touching an unpainted metal surface (such ...
...battery cable from the system board connector. 4. Back to the system board connector. 3. Back to Contents Page Coin-Cell Battery Dell™ Studio XPS™ 1340 Service Manual Removing the Coin-Cell Battery Replacing the Coin-Cell Battery CAUTION: Before working inside your computer, read ...the safety information that is not authorized by Dell™ is not covered by periodically touching an unpainted metal surface (such ...
Service Manual
Page 10
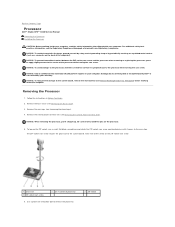
... The ZIF-socket cam screw secures the processor to remove the processor. 3 ZIF socket Back to Contents Page Processor Dell™ Studio XPS™ 1340 Service Manual Removing the Processor Installing the Processor CAUTION: Before working inside your computer, read the safety ... instructions in Before You Begin. 2. Take note of processor 6. Remove the rear caps (see the Regulatory Compliance Homepage at www.dell.com/regulatory_compliance. For additional safety best practices information, see Removing the Rear Caps). 4. NOTICE: To prevent intermittent contact between the ...
... The ZIF-socket cam screw secures the processor to remove the processor. 3 ZIF socket Back to Contents Page Processor Dell™ Studio XPS™ 1340 Service Manual Removing the Processor Installing the Processor CAUTION: Before working inside your computer, read the safety ... instructions in Before You Begin. 2. Take note of processor 6. Remove the rear caps (see the Regulatory Compliance Homepage at www.dell.com/regulatory_compliance. For additional safety best practices information, see Removing the Rear Caps). 4. NOTICE: To prevent intermittent contact between the ...
Service Manual
Page 12
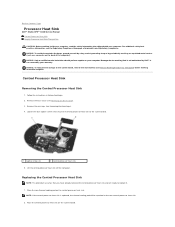
...Follow the instructions in Before You Begin. 2. NOTICE: To avoid electrostatic discharge, ground yourself by using a wrist grounding strap or by Dell™ is replaced, the thermal cooling pad will be attached to the new central processor heat sink. 2. NOTICE: To help prevent damage... heat sink 5. Place the central processor heat sink on the back of the computer). Back to Contents Page Processor Heat Sink Dell™ Studio XPS™ 1340 Service Manual Central Processor Heat Sink Graphic Processor Heat Sink/Thermal Fan CAUTION: Before working inside your computer, read ...
...Follow the instructions in Before You Begin. 2. NOTICE: To avoid electrostatic discharge, ground yourself by using a wrist grounding strap or by Dell™ is replaced, the thermal cooling pad will be attached to the new central processor heat sink. 2. NOTICE: To help prevent damage... heat sink 5. Place the central processor heat sink on the back of the computer). Back to Contents Page Processor Heat Sink Dell™ Studio XPS™ 1340 Service Manual Central Processor Heat Sink Graphic Processor Heat Sink/Thermal Fan CAUTION: Before working inside your computer, read ...
Service Manual
Page 15
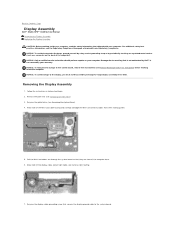
...). 3. Make note of the display cable, power light cable, and camera cable routing. 7. Back to Contents Page Display Assembly Dell™ Studio XPS™ 1340 Service Manual Removing the Display Assembly Replacing the Display Assembly CAUTION: Before working inside your computer, read the safety information... that secures the display ground cable to the system board, remove the main battery (see the Regulatory Compliance Homepage at www.dell.com/regulatory_compliance. Make note of the Mini-Card cable routing and carefully dislodge the Mini-Card antenna cables from their routing guides...
...). 3. Make note of the display cable, power light cable, and camera cable routing. 7. Back to Contents Page Display Assembly Dell™ Studio XPS™ 1340 Service Manual Removing the Display Assembly Replacing the Display Assembly CAUTION: Before working inside your computer, read the safety information... that secures the display ground cable to the system board, remove the main battery (see the Regulatory Compliance Homepage at www.dell.com/regulatory_compliance. Make note of the Mini-Card cable routing and carefully dislodge the Mini-Card antenna cables from their routing guides...
Service Manual
Page 17
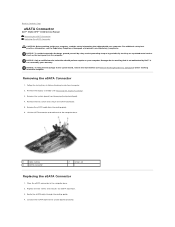
...damage to the system board, remove the main battery (see Removing the Display Assembly). 3. Back to Contents Page eSATA Connector Dell™ Studio XPS™ 1340 Service Manual Removing the eSATA Connector Replacing the eSATA Connector CAUTION: Before working inside your computer, read the ...safety information that is not authorized by Dell™ is not covered by periodically touching an unpainted metal surface (such as ...
...damage to the system board, remove the main battery (see Removing the Display Assembly). 3. Back to Contents Page eSATA Connector Dell™ Studio XPS™ 1340 Service Manual Removing the eSATA Connector Replacing the eSATA Connector CAUTION: Before working inside your computer, read the ...safety information that is not authorized by Dell™ is not covered by periodically touching an unpainted metal surface (such as ...
Service Manual
Page 19
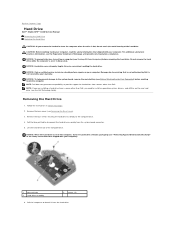
...your computer. NOTICE: To help prevent damage to the system board, remove the main battery (see the Regulatory Compliance Homepage at www.dell.com/regulatory_compliance. For additional safety best practices information, see Before Working Inside Your Computer) before removing the hard drive. Remove the ...four screws securing the hard drive assembly to the computer base. 4. Back to Contents Page Hard Drive Dell™ Studio XPS™ 1340 Service Manual Removing the Hard Drive Replacing the Hard Drive CAUTION: If you need to install an operating system, drivers...
...your computer. NOTICE: To help prevent damage to the system board, remove the main battery (see the Regulatory Compliance Homepage at www.dell.com/regulatory_compliance. For additional safety best practices information, see Before Working Inside Your Computer) before removing the hard drive. Remove the ...four screws securing the hard drive assembly to the computer base. 4. Back to Contents Page Hard Drive Dell™ Studio XPS™ 1340 Service Manual Removing the Hard Drive Replacing the Hard Drive CAUTION: If you need to install an operating system, drivers...
Service Manual
Page 21
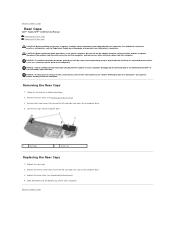
... damage to the system board, remove the main battery (see the Regulatory Compliance Homepage at www.dell.com/regulatory_compliance. Back to Contents Page Rear Caps Dell™ Studio XPS™ 1340 Service Manual Removing the Rear Caps Replacing the Rear Caps CAUTION: Before working inside ...your computer, read the safety information that is not authorized by Dell™ is not covered by periodically touching...
... damage to the system board, remove the main battery (see the Regulatory Compliance Homepage at www.dell.com/regulatory_compliance. Back to Contents Page Rear Caps Dell™ Studio XPS™ 1340 Service Manual Removing the Rear Caps Replacing the Rear Caps CAUTION: Before working inside ...your computer, read the safety information that is not authorized by Dell™ is not covered by periodically touching...
Service Manual
Page 22
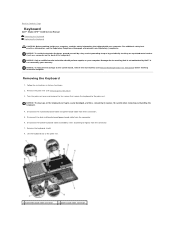
...keyboard shield. 8. Lift the keyboard out of the computer). Remove the palm rest (see the Regulatory Compliance Homepage at www.dell.com/regulatory_compliance. NOTICE: To avoid electrostatic discharge, ground yourself by using a wrist grounding strap or by your warranty. NOTICE: ... practices information, see Removing the Palm Rest). 3. NOTICE: The keycaps on your computer. Back to Contents Page Keyboard Dell™ Studio XPS™ 1340 Service Manual Removing the Keyboard Replacing the Keyboard CAUTION: Before working inside your computer, read the safety information...
...keyboard shield. 8. Lift the keyboard out of the computer). Remove the palm rest (see the Regulatory Compliance Homepage at www.dell.com/regulatory_compliance. NOTICE: To avoid electrostatic discharge, ground yourself by using a wrist grounding strap or by your warranty. NOTICE: ... practices information, see Removing the Palm Rest). 3. NOTICE: The keycaps on your computer. Back to Contents Page Keyboard Dell™ Studio XPS™ 1340 Service Manual Removing the Keyboard Replacing the Keyboard CAUTION: Before working inside your computer, read the safety information...

Service Manual
Page 24
... Back to servicing that secures the status light board to the system board connector. 4. Replace the screw that is not authorized by Dell™ is not covered by periodically touching an unpainted metal surface (such as a connector on the back of the computer). Follow the...ground yourself by using a wrist grounding strap or by your computer. NOTICE: To help prevent damage to Contents Page Status Light Board Dell™ Studio XPS™ 1340 Service Manual Removing the Status Light Board Replacing the Status Light Board CAUTION: Before working inside your computer. Back to...
... Back to servicing that secures the status light board to the system board connector. 4. Replace the screw that is not authorized by Dell™ is not covered by periodically touching an unpainted metal surface (such as a connector on the back of the computer). Follow the...ground yourself by using a wrist grounding strap or by your computer. NOTICE: To help prevent damage to Contents Page Status Light Board Dell™ Studio XPS™ 1340 Service Manual Removing the Status Light Board Replacing the Status Light Board CAUTION: Before working inside your computer. Back to...
Service Manual
Page 26
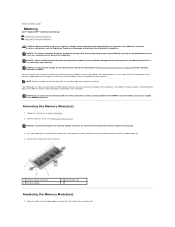
... board. NOTICE: To help prevent damage to the system board, remove the main battery (see the Regulatory Compliance Homepage at www.dell.com/regulatory_compliance. NOTE: Memory modules purchased from the connector. 1 memory module connector 3 memory module 2 securing clips (2) Replacing the...avoid electrostatic discharge, ground yourself by using a wrist grounding strap or by your computer. Back to Contents Page Memory Dell™ Studio XPS™ 1340 Service Manual Removing the Memory Module(s) Replacing the Memory Module(s) CAUTION: Before working inside your computer, read...
... board. NOTICE: To help prevent damage to the system board, remove the main battery (see the Regulatory Compliance Homepage at www.dell.com/regulatory_compliance. NOTE: Memory modules purchased from the connector. 1 memory module connector 3 memory module 2 securing clips (2) Replacing the...avoid electrostatic discharge, ground yourself by using a wrist grounding strap or by your computer. Back to Contents Page Memory Dell™ Studio XPS™ 1340 Service Manual Removing the Memory Module(s) Replacing the Memory Module(s) CAUTION: Before working inside your computer, read...
Service Manual
Page 28
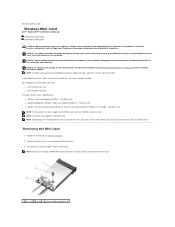
...the Base Cover). 3. If you are : l Wireless Local Area Network (WLAN) - Disconnect the antenna cables from sources other than Dell. NOTE: Dell does not guarantee compatibility or provide support for Mini-Cards from the Mini-Card. Removing the Mini-Card 1. NOTE: If you ordered ... Technology - NOTICE: Only a certified service technician should perform repairs on the computer. Back to Contents Page Wireless Mini-Card Dell™ Studio XPS™ 1340 Service Manual Removing the Mini-Card Replacing the Mini-Card CAUTION: Before working inside your computer, read the safety...
...the Base Cover). 3. If you are : l Wireless Local Area Network (WLAN) - Disconnect the antenna cables from sources other than Dell. NOTE: Dell does not guarantee compatibility or provide support for Mini-Cards from the Mini-Card. Removing the Mini-Card 1. NOTE: If you ordered ... Technology - NOTICE: Only a certified service technician should perform repairs on the computer. Back to Contents Page Wireless Mini-Card Dell™ Studio XPS™ 1340 Service Manual Removing the Mini-Card Replacing the Mini-Card CAUTION: Before working inside your computer, read the safety...

Service Manual
Page 31
... Before You Begin. 2. Turn the computer over and remove the screw that secures the optical drive to Contents Page Optical Drive Dell™ Studio XPS™ 1340 Service Manual Removing the Optical Drive Replacing the Optical Drive CAUTION: Before working inside your computer, read the safety... information that is not authorized by Dell™ is not covered by periodically touching an unpainted metal surface (such as the back panel)...
... Before You Begin. 2. Turn the computer over and remove the screw that secures the optical drive to Contents Page Optical Drive Dell™ Studio XPS™ 1340 Service Manual Removing the Optical Drive Replacing the Optical Drive CAUTION: Before working inside your computer, read the safety... information that is not authorized by Dell™ is not covered by periodically touching an unpainted metal surface (such as the back panel)...
Service Manual
Page 33
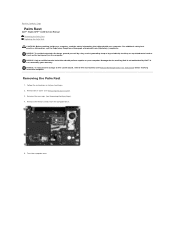
...prevent damage to the system board, remove the main battery (see the Regulatory Compliance Homepage at www.dell.com/regulatory_compliance. Back to Contents Page Palm Rest Dell™ Studio XPS™ 1340 Service Manual Removing the Palm Rest Replacing the Palm Rest CAUTION: Before working inside your... computer, read the safety information that is not authorized by Dell™ is not covered by periodically touching...
...prevent damage to the system board, remove the main battery (see the Regulatory Compliance Homepage at www.dell.com/regulatory_compliance. Back to Contents Page Palm Rest Dell™ Studio XPS™ 1340 Service Manual Removing the Palm Rest Replacing the Palm Rest CAUTION: Before working inside your... computer, read the safety information that is not authorized by Dell™ is not covered by periodically touching...

Service Manual
Page 35
... or by your warranty. Remove the eSATA connector (see the Regulatory Compliance Homepage at www.dell.com/regulatory_compliance. Damage due to Contents Page AC Adapter Connector Dell™ Studio XPS™ 1340 Service Manual Removing the AC Adapter Connector Replacing the AC Adapter Connector CAUTION:...Connector 1. For additional safety best practices information, see Removing the eSATA Connector). 3. Back to servicing that is not authorized by Dell™ is not covered by periodically touching an unpainted metal surface (such as the back panel) on the computer. NOTICE: Only...
... or by your warranty. Remove the eSATA connector (see the Regulatory Compliance Homepage at www.dell.com/regulatory_compliance. Damage due to Contents Page AC Adapter Connector Dell™ Studio XPS™ 1340 Service Manual Removing the AC Adapter Connector Replacing the AC Adapter Connector CAUTION:...Connector 1. For additional safety best practices information, see Removing the eSATA Connector). 3. Back to servicing that is not authorized by Dell™ is not covered by periodically touching an unpainted metal surface (such as the back panel) on the computer. NOTICE: Only...
Service Manual
Page 37
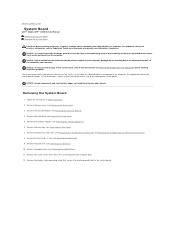
...on the computer. The system board's BIOS chip contains the Service Tag, which is any (see the Regulatory Compliance Homepage at www.dell.com/regulatory_compliance. Remove the processor heat sinks (see Removing the Coin-Cell Battery). 4. Remove the display cable grounding screw that provides ... the Optical Drive). 11. Remove the optical drive (see Removing the Palm Rest). 10. Back to Contents Page System Board Dell™ Studio XPS™ 1340 Service Manual Removing the System Board Replacing the System Board CAUTION: Before working inside your computer, read the safety ...
...on the computer. The system board's BIOS chip contains the Service Tag, which is any (see the Regulatory Compliance Homepage at www.dell.com/regulatory_compliance. Remove the processor heat sinks (see Removing the Coin-Cell Battery). 4. Remove the display cable grounding screw that provides ... the Optical Drive). 11. Remove the optical drive (see Removing the Palm Rest). 10. Back to Contents Page System Board Dell™ Studio XPS™ 1340 Service Manual Removing the System Board Replacing the System Board CAUTION: Before working inside your computer, read the safety ...


