Dell™ Technology Guide
Page 82
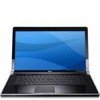
... Drives and Media NOTE: Because of the drive, and then push firmly until the tray is inserted properly. See "Running the Dell Diagnostics" on . Optical Drive Problems NOTE: High-speed optical drive vibration is normal and may prevent the operating system from starting... caused by a program. • Ensure that the computer is shut down. 2 Straighten a paper clip and insert one end into the eject hole at the front of different regions worldwide and different disc formats, not all DVD drives. Try allowing the computer to return to a media drive CLOSE OTHER PROGRAMS C H A N G E T H E ...
... Drives and Media NOTE: Because of the drive, and then push firmly until the tray is inserted properly. See "Running the Dell Diagnostics" on . Optical Drive Problems NOTE: High-speed optical drive vibration is normal and may prevent the operating system from starting... caused by a program. • Ensure that the computer is shut down. 2 Straighten a paper clip and insert one end into the eject hole at the front of different regions worldwide and different disc formats, not all DVD drives. Try allowing the computer to return to a media drive CLOSE OTHER PROGRAMS C H A N G E T H E ...
Dell™ Technology Guide
Page 204
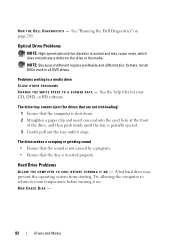
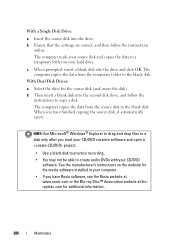
Playing a CD, DVD, or Blu-ray Disc Media For Drives With Spindles and/or Trays 1 Press the eject button on the drive. 2 Place the media, label side up data • Entertainment For instructions on the tray if there is no spindle. 3 Push the ... see the documentation that came with multimedia buttons, press the Play button. Some computers launch an auto-play selection window. CDs, DVDs, and Blu-ray Disc™ Media Some computers may come equipped with media buttons for direct data transfer. 204 Multimedia
Playing a CD, DVD, or Blu-ray Disc Media For Drives With Spindles and/or Trays 1 Press the eject button on the drive. 2 Place the media, label side up data • Entertainment For instructions on the tray if there is no spindle. 3 Push the ... see the documentation that came with multimedia buttons, press the Play button. Some computers launch an auto-play selection window. CDs, DVDs, and Blu-ray Disc™ Media Some computers may come equipped with media buttons for direct data transfer. 204 Multimedia
Dell™ Technology Guide
Page 205
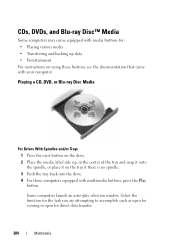
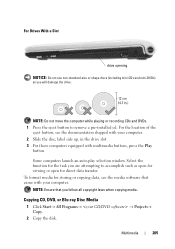
... to remove a pre-installed cd. Multimedia 205 For Drives With a Slot drive opening NOTICE: Do not use non-standard-size or shape discs (including mini-CDs and mini-DVDs) as open for viewing or open for storing or copying data, see the documentation shipped with multimedia buttons... auto-play selection window. NOTE: Ensure that came with your computer. 2 Slide the disc, label side up, in the drive slot. 3 For those computers equipped with your computer. For the location of the eject button, see the media software that you will damage the drive. Copying CD, DVD,...
... to remove a pre-installed cd. Multimedia 205 For Drives With a Slot drive opening NOTICE: Do not use non-standard-size or shape discs (including mini-CDs and mini-DVDs) as open for viewing or open for storing or copying data, see the documentation shipped with multimedia buttons... auto-play selection window. NOTE: Ensure that came with your computer. 2 Slide the disc, label side up, in the drive slot. 3 For those computers equipped with your computer. For the location of the eject button, see the media software that you will damage the drive. Copying CD, DVD,...
Dell™ Technology Guide
Page 206
..., insert a blank disk into the drive. When you have Roxio software, see the Roxio website at www.sonic.com or the Blu-ray Disc™ Association website at bluraydisc.com for additional information. 206 Multimedia HINT: Use Microsoft® Windows® Explorer to drag and drop files to... a disk only after you have finished copying the source disk, it automatically ejects. b Then insert a blank disk into the second disk drive, and follow the instructions online. See the manufacturer's instructions on your CD/DVD ...
..., insert a blank disk into the drive. When you have Roxio software, see the Roxio website at www.sonic.com or the Blu-ray Disc™ Association website at bluraydisc.com for additional information. 206 Multimedia HINT: Use Microsoft® Windows® Explorer to drag and drop files to... a disk only after you have finished copying the source disk, it automatically ejects. b Then insert a blank disk into the second disk drive, and follow the instructions online. See the manufacturer's instructions on your CD/DVD ...

Setup Guide
Page 25
The control's symbol will shine for 2 seconds to confirm your selection then fade away. Using Your Studio XPS Laptop Media, Wireless, and Power Controls To use the media, wireless, and power controls, lightly touch the symbol and then release. Turn on power, or wake up from sleep state Turn on wireless Play the previous track or chapter Stop Play or pause Play the next track or chapter Mute the sound Turn down the volume Turn up the volume Eject the disc 23
The control's symbol will shine for 2 seconds to confirm your selection then fade away. Using Your Studio XPS Laptop Media, Wireless, and Power Controls To use the media, wireless, and power controls, lightly touch the symbol and then release. Turn on power, or wake up from sleep state Turn on wireless Play the previous track or chapter Stop Play or pause Play the next track or chapter Mute the sound Turn down the volume Turn up the volume Eject the disc 23
Setup Guide
Page 28
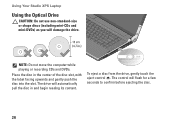
... of the disc slot, with the label facing upwards and gently push the disc into the slot. Using Your Studio XPS Laptop Using the Optical Drive CAUTION: Do not use non-standard-size or shape discs (including mini-CDs and mini‑DVDs) as you will flash for a few seconds to confirm before ejecting the disc. 26
... of the disc slot, with the label facing upwards and gently push the disc into the slot. Using Your Studio XPS Laptop Using the Optical Drive CAUTION: Do not use non-standard-size or shape discs (including mini-CDs and mini‑DVDs) as you will flash for a few seconds to confirm before ejecting the disc. 26

Setup Guide
Page 76
Index A AC adapter size and weight 71 airflow, allowing 5 B Bluetooth wireless technology 14 C CDs, playing and creating 28 chipset 64 computer capabilities 28 computer, setting up 5 connect(ing) to the Internet 9 Contacting Dell 58 customer service 53 74 D damage, avoiding 5 DellConnect 53 Dell Diagnostics 41 Dell Support Center 37 device status lights 14 Diagnostic Checklist 57 disc drive supported disc sizes 26 discs ejecting 26 using 26 DisplayPort connector 21 drivers and downloads 61 DVDs, playing and creating 28
Index A AC adapter size and weight 71 airflow, allowing 5 B Bluetooth wireless technology 14 C CDs, playing and creating 28 chipset 64 computer capabilities 28 computer, setting up 5 connect(ing) to the Internet 9 Contacting Dell 58 customer service 53 74 D damage, avoiding 5 DellConnect 53 Dell Diagnostics 41 Dell Support Center 37 device status lights 14 Diagnostic Checklist 57 disc drive supported disc sizes 26 discs ejecting 26 using 26 DisplayPort connector 21 drivers and downloads 61 DVDs, playing and creating 28


