Service Manual
Page 1
...Corporation in the U.S. Other trademarks and trade names may be used in this text: Dell, the DELL logo, and Dell Studio are either potential damage to hardware or loss of Dell Inc.; Trademarks used in trademarks and trade names other countries.; disclaims any manner whatsoever ...forbidden. and other than its own. CAUTION: A CAUTION indicates a potential for property damage, personal injury, or death. Dell Studio™ Slim 540s Service Manual Technical Overview Before You Begin Replacing the Computer Cover Replacing the Support Bracket Replacing the Front Panel Replacing Memory...
...Corporation in the U.S. Other trademarks and trade names may be used in this text: Dell, the DELL logo, and Dell Studio are either potential damage to hardware or loss of Dell Inc.; Trademarks used in trademarks and trade names other countries.; disclaims any manner whatsoever ...forbidden. and other than its own. CAUTION: A CAUTION indicates a potential for property damage, personal injury, or death. Dell Studio™ Slim 540s Service Manual Technical Overview Before You Begin Replacing the Computer Cover Replacing the Support Bracket Replacing the Front Panel Replacing Memory...
Service Manual
Page 2
... with locking tabs; NOTICE: To disconnect a network cable, first unplug the cable from your computer, see the Dell Support website at www.dell.com/regulatory_compliance. Disconnect all attached devices are turned off. Technical Specifications For information on your own personal safety. Safety... power button while the system is unplugged to ground the system board. Back to Contents Page Before You Begin Dell Studio™ Slim 540s Service Manual Technical Specifications Recommended Tools Turning Off Your Computer Safety Instructions This chapter provides procedures for about 4...
... with locking tabs; NOTICE: To disconnect a network cable, first unplug the cable from your computer, see the Dell Support website at www.dell.com/regulatory_compliance. Disconnect all attached devices are turned off. Technical Specifications For information on your own personal safety. Safety... power button while the system is unplugged to ground the system board. Back to Contents Page Before You Begin Dell Studio™ Slim 540s Service Manual Technical Specifications Recommended Tools Turning Off Your Computer Safety Instructions This chapter provides procedures for about 4...

Service Manual
Page 4
... the card retention bracket by lifting the card retention release lever up. 4. Pivot the support bracket downward. 8. Back to Contents Page Replacing the Support Bracket Dell Studio™ Slim 540s Service Manual CAUTION: Before working inside your computer. Back to the support bracket. 5. Remove any cable(s) that were attached to the support bracket...
... the card retention bracket by lifting the card retention release lever up. 4. Pivot the support bracket downward. 8. Back to Contents Page Replacing the Support Bracket Dell Studio™ Slim 540s Service Manual CAUTION: Before working inside your computer. Back to the support bracket. 5. Remove any cable(s) that were attached to the support bracket...
Service Manual
Page 5
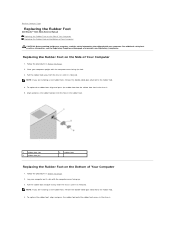
... pin 2 rubber foot Replacing the Rubber Foot on the Bottom of Your Computer 1. Back to Contents Page Replacing the Rubber Foot Dell Studio™ Slim 540s Service Manual Replacing the Rubber Foot on the Side of Your Computer Replacing the Rubber Foot on the Bottom of Your Computer CAUTION...your computer upright with the computer cover facing up. 3. For additional safety best practices information, see the Regulatory Compliance Homepage at www.dell.com/regulatory_compliance. Pull the rubber foot away from the chassis until it is released. Lay your computer on its side with the ...
... pin 2 rubber foot Replacing the Rubber Foot on the Bottom of Your Computer 1. Back to Contents Page Replacing the Rubber Foot Dell Studio™ Slim 540s Service Manual Replacing the Rubber Foot on the Side of Your Computer Replacing the Rubber Foot on the Bottom of Your Computer CAUTION...your computer upright with the computer cover facing up. 3. For additional safety best practices information, see the Regulatory Compliance Homepage at www.dell.com/regulatory_compliance. Pull the rubber foot away from the chassis until it is released. Lay your computer on its side with the ...
Service Manual
Page 7
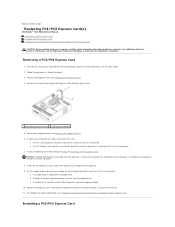
Back to Contents Page Replacing PCI/PCI Express Card(s) Dell Studio™ Slim 540s Service Manual Removing a PCI/PCI Express Card Installing a PCI/PCI Express Card Configuring Your Computer After Removing or Installing a PCI/PCI Express Card CAUTION: ... top of the card or filler bracket fits around the alignment guide 10. To complete the removal procedure, see the Regulatory Compliance Homepage at www.dell.com/regulatory_compliance. Installing a PCI/PCI Express Card Remove the computer cover (see Replacing the Computer Cover). 4.
Back to Contents Page Replacing PCI/PCI Express Card(s) Dell Studio™ Slim 540s Service Manual Removing a PCI/PCI Express Card Installing a PCI/PCI Express Card Configuring Your Computer After Removing or Installing a PCI/PCI Express Card CAUTION: ... top of the card or filler bracket fits around the alignment guide 10. To complete the removal procedure, see the Regulatory Compliance Homepage at www.dell.com/regulatory_compliance. Installing a PCI/PCI Express Card Remove the computer cover (see Replacing the Computer Cover). 4.
Service Manual
Page 10
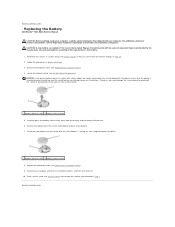
... the battery. 7. Connect your computer and devices to the manufacturer's instructions. 1. Back to Contents Page Replacing the Battery Dell Studio™ Slim 540s Service Manual CAUTION: Before working inside your computer, read the safety information that shipped with the object. Locate the battery...to pry out the battery. Otherwise, you attempt to Contents Page Enter system setup (see the Regulatory Compliance Homepage at www.dell.com/regulatory_compliance. For additional safety best practices information, see System Setup) and restore the settings you can explode if it is...
... the battery. 7. Connect your computer and devices to the manufacturer's instructions. 1. Back to Contents Page Replacing the Battery Dell Studio™ Slim 540s Service Manual CAUTION: Before working inside your computer, read the safety information that shipped with the object. Locate the battery...to pry out the battery. Otherwise, you attempt to Contents Page Enter system setup (see the Regulatory Compliance Homepage at www.dell.com/regulatory_compliance. For additional safety best practices information, see System Setup) and restore the settings you can explode if it is...
Service Manual
Page 11
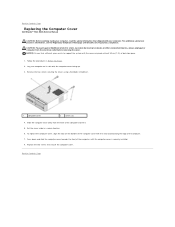
.../regulatory_compliance. Replace the two screws that shipped with the computer cover facing up. 3. Back to Contents Page Replacing the Computer Cover Dell Studio™ Slim 540s Service Manual CAUTION: Before working inside your computer. For additional safety best practices information, see the Regulatory Compliance Homepage at least 30 cm (1 ft.) ...
.../regulatory_compliance. Replace the two screws that shipped with the computer cover facing up. 3. Back to Contents Page Replacing the Computer Cover Dell Studio™ Slim 540s Service Manual CAUTION: Before working inside your computer. For additional safety best practices information, see the Regulatory Compliance Homepage at least 30 cm (1 ft.) ...
Service Manual
Page 12
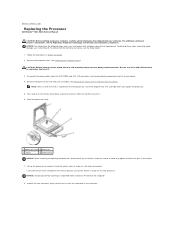
Back to Contents Page Replacing the Processor Dell Studio™ Slim 540s Service Manual CAUTION: Before working inside the socket or allow any objects to fall on the back of the processor. CAUTION: Despite having a plastic ... the release position so that secures it from the tab that the socket is required for technical assistance, see the Regulatory Compliance Homepage at www.dell.com/regulatory_compliance. NOTICE: Do not perform the following steps unless you replace the processor. 5. Disconnect the power cables from the socket, place it . 3. Follow the...
Back to Contents Page Replacing the Processor Dell Studio™ Slim 540s Service Manual CAUTION: Before working inside the socket or allow any objects to fall on the back of the processor. CAUTION: Despite having a plastic ... the release position so that secures it from the tab that the socket is required for technical assistance, see the Regulatory Compliance Homepage at www.dell.com/regulatory_compliance. NOTICE: Do not perform the following steps unless you replace the processor. 5. Disconnect the power cables from the socket, place it . 3. Follow the...
Service Manual
Page 14
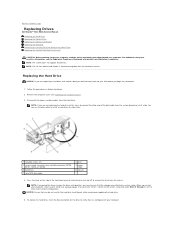
... Begin. 2. You can use the data cable to remove the drive from the chassis. Back to Contents Page Replacing Drives Dell Studio™ Slim 540s Service Manual Replacing the Hard Drive Replacing the Optical Drive Replacing the Media Card Reader Replacing the FlexDock Removing the FlexBay... serial ATA data cable 2 lever 4 power cable 6 slot (2) 4. NOTICE: Ensure that the changes are not replacing the hard drive at www.dell.com/regulatory_compliance. When you do not scratch the hard disk circuit board, while removing or replacing the hard drive. 5. Follow the procedures in system setup...
... Begin. 2. You can use the data cable to remove the drive from the chassis. Back to Contents Page Replacing Drives Dell Studio™ Slim 540s Service Manual Replacing the Hard Drive Replacing the Optical Drive Replacing the Media Card Reader Replacing the FlexDock Removing the FlexBay... serial ATA data cable 2 lever 4 power cable 6 slot (2) 4. NOTICE: Ensure that the changes are not replacing the hard drive at www.dell.com/regulatory_compliance. When you do not scratch the hard disk circuit board, while removing or replacing the hard drive. 5. Follow the procedures in system setup...
Service Manual
Page 21
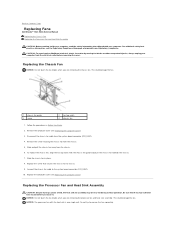
... computer. Replace the screw that secures the chassis fan to the system board connector (SYS_FAN1). 10. Do not try to Contents Page Replacing Fans Dell Studio™ Slim 540s Service Manual Replacing the Chassis Fan Replacing the Processor Fan and Heat Sink Assembly CAUTION: Before working inside your computer from the electrical outlet...
... computer. Replace the screw that secures the chassis fan to the system board connector (SYS_FAN1). 10. Do not try to Contents Page Replacing Fans Dell Studio™ Slim 540s Service Manual Replacing the Chassis Fan Replacing the Processor Fan and Heat Sink Assembly CAUTION: Before working inside your computer from the electrical outlet...
Service Manual
Page 23
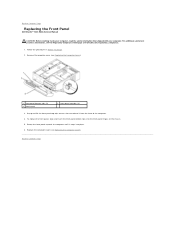
... 1 front panel bottom tabs (3) 3 front panel 2 front panel top tabs (3) 3. Grasp and lift the front panel top tabs one at www.dell.com/regulatory_compliance. 1. Remove the computer cover (see the Regulatory Compliance Homepage at a time to release it snaps into the front panel hinges on the chassis...replace the front panel, align and insert the front panel bottom tabs into place. 6. Back to Contents Page Replacing the Front Panel Dell Studio™ Slim 540s Service Manual CAUTION: Before working inside your computer, read the safety information that shipped with your computer.
... 1 front panel bottom tabs (3) 3 front panel 2 front panel top tabs (3) 3. Grasp and lift the front panel top tabs one at www.dell.com/regulatory_compliance. 1. Remove the computer cover (see the Regulatory Compliance Homepage at a time to release it snaps into the front panel hinges on the chassis...replace the front panel, align and insert the front panel bottom tabs into place. 6. Back to Contents Page Replacing the Front Panel Dell Studio™ Slim 540s Service Manual CAUTION: Before working inside your computer, read the safety information that shipped with your computer.
Service Manual
Page 24
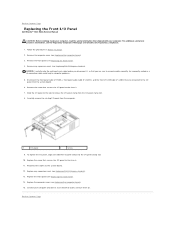
... Remove the screw that secures the I /O panel to the chassis. 7. Replace the front panel (see the Regulatory Compliance Homepage at www.dell.com/regulatory_compliance. 1. For additional safety best practices information, see Replacing the Front Panel). 14. Carefully remove the existing I/O panel from the ...from the system board. 6. To replace the I/O panel, align and slide the I/O panel clamp into the I /O Panel Dell Studio™ Slim 540s Service Manual CAUTION: Before working inside your computer, read the safety information that shipped with your computer and devices to an...
... Remove the screw that secures the I /O panel to the chassis. 7. Replace the front panel (see the Regulatory Compliance Homepage at www.dell.com/regulatory_compliance. 1. For additional safety best practices information, see Replacing the Front Panel). 14. Carefully remove the existing I/O panel from the ...from the system board. 6. To replace the I/O panel, align and slide the I/O panel clamp into the I /O Panel Dell Studio™ Slim 540s Service Manual CAUTION: Before working inside your computer, read the safety information that shipped with your computer and devices to an...
Service Manual
Page 25
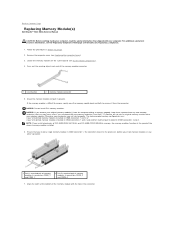
...modules in connectors DIMM_3 and DIMM_4 7. Otherwise, your original memory module(s) from the computer during a memory upgrade, keep them separate from Dell™. NOTE: If you install memory modules in any new memory module(s) that you may have, even if you remove your computer... If the memory module is difficult to remove, gently ease the memory module back and forth to Contents Page Replacing Memory Module(s) Dell Studio™ Slim 540s Service Manual CAUTION: Before working inside your computer, read the safety information that you install a single memory module in the ...
...modules in connectors DIMM_3 and DIMM_4 7. Otherwise, your original memory module(s) from the computer during a memory upgrade, keep them separate from Dell™. NOTE: If you install memory modules in any new memory module(s) that you may have, even if you remove your computer... If the memory module is difficult to remove, gently ease the memory module back and forth to Contents Page Replacing Memory Module(s) Dell Studio™ Slim 540s Service Manual CAUTION: Before working inside your computer, read the safety information that you install a single memory module in the ...
Service Manual
Page 27
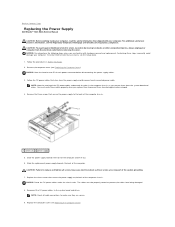
... the DC power cables underneath the tabs in Before You Begin. 2. CAUTION: To guard against likelihood of the computer. To contact Dell for technical assistance, see Replacing the Computer Cover). Follow the DC power cables that stem from being damaged. 8. NOTE: Note the... Slide the replacement power supply towards the front of each connected power cable. Back to Contents Page Replacing the Power Supply Dell Studio™ Slim 540s Service Manual CAUTION: Before working inside your computer, read the safety information that shipped with hardware removal and replacement. ...
... the DC power cables underneath the tabs in Before You Begin. 2. CAUTION: To guard against likelihood of the computer. To contact Dell for technical assistance, see Replacing the Computer Cover). Follow the DC power cables that stem from being damaged. 8. NOTE: Note the... Slide the replacement power supply towards the front of each connected power cable. Back to Contents Page Replacing the Power Supply Dell Studio™ Slim 540s Service Manual CAUTION: Before working inside your computer, read the safety information that shipped with hardware removal and replacement. ...
Service Manual
Page 29
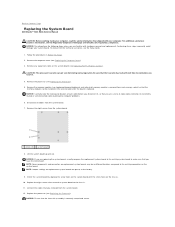
... You Begin. 2. Replace the processor (see Replacing the Processor). 5. Back to Contents Page Replacing the System Board Dell Studio™ Slim 540s Service Manual CAUTION: Before working inside your computer, read the safety information that shipped with hardware removal and replacement. To contact... Dell for technical assistance, see Replacing the Computer Cover). 3. Orient the system board by aligning the screw holes...
... You Begin. 2. Replace the processor (see Replacing the Processor). 5. Back to Contents Page Replacing the System Board Dell Studio™ Slim 540s Service Manual CAUTION: Before working inside your computer, read the safety information that shipped with hardware removal and replacement. To contact... Dell for technical assistance, see Replacing the Computer Cover). 3. Orient the system board by aligning the screw holes...
Service Manual
Page 31
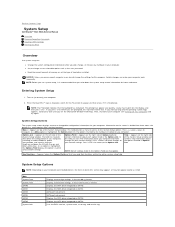
... Setup 1. Appears on the right side of the System Setup window. Options Field - Back to Contents Page System Setup Dell Studio™ Slim 540s Service Manual Overview Clearing Forgotten Passwords Clearing CMOS Settings Flashing the BIOS Overview Use system setup to appear and then press... immediately. When the blue DELL™ logo is highlighted, the Options List, lists the options that the keyboard has initialized. ...
... Setup 1. Appears on the right side of the System Setup window. Options Field - Back to Contents Page System Setup Dell Studio™ Slim 540s Service Manual Overview Clearing Forgotten Passwords Clearing CMOS Settings Flashing the BIOS Overview Use system setup to appear and then press... immediately. When the blue DELL™ logo is highlighted, the Options List, lists the options that the keyboard has initialized. ...
Service Manual
Page 35
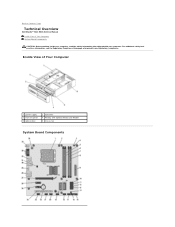
Back to Contents Page Technical Overview Dell Studio™ Slim 540s Service Manual Inside View of Your Computer 1 power supply 3 front I/O panel 5 optical drive 2 hard drive 4 FlexBay with your computer. Inside View of Your Computer System Board Components CAUTION: Before working inside your computer, read the safety information that shipped with optional Media Card Reader 6 chassis fan System Board Components For additional safety best practices information, see the Regulatory Compliance Homepage at www.dell.com/regulatory_compliance.
Back to Contents Page Technical Overview Dell Studio™ Slim 540s Service Manual Inside View of Your Computer 1 power supply 3 front I/O panel 5 optical drive 2 hard drive 4 FlexBay with your computer. Inside View of Your Computer System Board Components CAUTION: Before working inside your computer, read the safety information that shipped with optional Media Card Reader 6 chassis fan System Board Components For additional safety best practices information, see the Regulatory Compliance Homepage at www.dell.com/regulatory_compliance.

Service Manual
Page 37
... Microsoft Corporation in this document to refer to hardware or loss of data and tells you make better use of Dell Inc.; Back to Contents Page Dell Studio™ Slim 540s Service Manual Notes, Notices, and Cautions NOTE: A NOTE indicates important information that helps you how to avoid.... Other trademarks and trade names may be used in this text: Dell, the DELL logo, and Dell Studio are either potential damage to either the entities claiming the marks and names or their products. Dell Inc. Information in this document is strictly forbidden. A00 Back to ...
... Microsoft Corporation in this document to refer to hardware or loss of data and tells you make better use of Dell Inc.; Back to Contents Page Dell Studio™ Slim 540s Service Manual Notes, Notices, and Cautions NOTE: A NOTE indicates important information that helps you how to avoid.... Other trademarks and trade names may be used in this text: Dell, the DELL logo, and Dell Studio are either potential damage to either the entities claiming the marks and names or their products. Dell Inc. Information in this document is strictly forbidden. A00 Back to ...
Setup Guide
Page 5
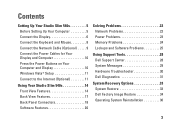
... Power Buttons on Your Computer and Display 10 Windows Vista® Setup 11 Connect to the Internet (Optional 11 Using Your Studio Slim 540s 14 Front View Features 14 Back View Features 17 Back Panel Connectors 18 Software Features 20 Solving Problems 22 Network Problems... 22 Power Problems 23 Memory Problems 24 Lockups and Software Problems 25 Using Support Tools 28 Dell Support Center 28 System Messages 29 Hardware Troubleshooter 30 Dell Diagnostics 31 System Recovery Options 33 System Restore 33 Dell Factory Image Restore 34 Operating System Reinstallation 36 3
... Power Buttons on Your Computer and Display 10 Windows Vista® Setup 11 Connect to the Internet (Optional 11 Using Your Studio Slim 540s 14 Front View Features 14 Back View Features 17 Back Panel Connectors 18 Software Features 20 Solving Problems 22 Network Problems... 22 Power Problems 23 Memory Problems 24 Lockups and Software Problems 25 Using Support Tools 28 Dell Support Center 28 System Messages 29 Hardware Troubleshooter 30 Dell Diagnostics 31 System Recovery Options 33 System Restore 33 Dell Factory Image Restore 34 Operating System Reinstallation 36 3
Setup Guide
Page 9
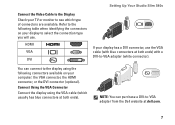
... type you will use the VGA cable (with a DVI-to-VGA adapter (white connector). You can purchase a DVI-to-VGA adapter from the Dell website at dell.com. 7 HDMI VGA DVI If your display has a DVI connector, use . Connect Using the VGA Connector Connect the display using the following table...the DVI connector (optional). NOTE: You can connect to the display using the VGA cable (which type of connectors are available. Setting Up Your Studio Slim 540s Connect the Video Cable to the Display Check your TV or monitor to see which usually has blue connectors at both ends) with blue...
... type you will use the VGA cable (with a DVI-to-VGA adapter (white connector). You can purchase a DVI-to-VGA adapter from the Dell website at dell.com. 7 HDMI VGA DVI If your display has a DVI connector, use . Connect Using the VGA Connector Connect the display using the following table...the DVI connector (optional). NOTE: You can connect to the display using the VGA cable (which type of connectors are available. Setting Up Your Studio Slim 540s Connect the Video Cable to the Display Check your TV or monitor to see which usually has blue connectors at both ends) with blue...


