
Service Manual
Page 45
...onboard Broadcom network controller. Boot Device Configuration Boot Settings Configuration Enable or disable fast boot and Numlock key. CD/DVD; Disabled (CD/DVD by default). Hard Drive; The default is Disabled. BIOS Security Features Supervisor Password User Password Set Supervisor Password Status... supervisor password. Boot Options The items displayed are dynamically updated according to access the computer through any other device. CD/DVD; Indicates the amount of processor. Disabled (Removable by default). AC Recovery Auto Power On Enables you to enable or ...
...onboard Broadcom network controller. Boot Device Configuration Boot Settings Configuration Enable or disable fast boot and Numlock key. CD/DVD; Disabled (CD/DVD by default). Hard Drive; The default is Disabled. BIOS Security Features Supervisor Password User Password Set Supervisor Password Status... supervisor password. Boot Options The items displayed are dynamically updated according to access the computer through any other device. CD/DVD; Indicates the amount of processor. Disabled (Removable by default). AC Recovery Auto Power On Enables you to enable or ...
Service Manual
Page 46
...screen, press . When F2 = Setup, F12 = Boot Menu appears in Before You Begin. 2. Each device has a number next to run the Dell Diagnostics on (or restart) your computer. Turn on the Drivers and Utilities media. NOTE: To boot to a USB device, the device must be ...disconnected from the CD/DVD drive to it . 3. Insert the memory device into a USB port and restart the computer. and down your device is restored. 1. Clearing ...
...screen, press . When F2 = Setup, F12 = Boot Menu appears in Before You Begin. 2. Each device has a number next to run the Dell Diagnostics on (or restart) your computer. Turn on the Drivers and Utilities media. NOTE: To boot to a USB device, the device must be ...disconnected from the CD/DVD drive to it . 3. Insert the memory device into a USB port and restart the computer. and down your device is restored. 1. Clearing ...

Setup Guide
Page 15
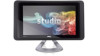
... microphone array for more information. 6 Optical drive eject control - Use this code when you access the Dell Support website or contact technical support. 13 Plays or records only standard-size (12 cm) CDs and DVDs. WARNING: The computer stand should remain installed at all times to 40°. To view the Service... computer Service Tag/ Express Service Code is located on page 17 for video capture, conferencing, and chat. 4 Speakers (2) 5 Optical drive - 3 Camera/microphone (optional) - Using Your Studio One 7 Computer stand -
... microphone array for more information. 6 Optical drive eject control - Use this code when you access the Dell Support website or contact technical support. 13 Plays or records only standard-size (12 cm) CDs and DVDs. WARNING: The computer stand should remain installed at all times to 40°. To view the Service... computer Service Tag/ Express Service Code is located on page 17 for video capture, conferencing, and chat. 4 Speakers (2) 5 Optical drive - 3 Camera/microphone (optional) - Using Your Studio One 7 Computer stand -

Setup Guide
Page 23
...(Optional) Your computer may support multiple disc media formats including CDs, DVDs, and Blu-ray Discs (if the option is only available if you would normally enter this section, see the Dell Technology Guide available on your computer or on your computer to verify your...Communication You can use your computer. NOTE: This software feature is selected at support.dell.com. Entertainment and Multimedia You can use your computer to music and radio stations. Using Your Studio One Software Features NOTE: For more information, click Start → Programs→ FastAccess....
...(Optional) Your computer may support multiple disc media formats including CDs, DVDs, and Blu-ray Discs (if the option is only available if you would normally enter this section, see the Dell Technology Guide available on your computer or on your computer to verify your...Communication You can use your computer. NOTE: This software feature is selected at support.dell.com. Entertainment and Multimedia You can use your computer to music and radio stations. Using Your Studio One Software Features NOTE: For more information, click Start → Programs→ FastAccess....

Setup Guide
Page 36
...system logo appears, continue to wait until you see the Microsoft® Windows® desktop; When the boot device list appears, highlight CD/DVD/CD-RW and press . 4. Shut down your computer and try again. then, shut down and restart the computer. then, shut down...partition on your computer. 7. If multiple versions are listed, select the version appropriate for one time only. Select Diagnostics from the numbered list. NOTE: If you want to proceed. 6. Starting Dell Diagnostics From the Drivers and Utilities Media 1. NOTE: The next steps change the boot sequence...
...system logo appears, continue to wait until you see the Microsoft® Windows® desktop; When the boot device list appears, highlight CD/DVD/CD-RW and press . 4. Shut down your computer and try again. then, shut down and restart the computer. then, shut down...partition on your computer. 7. If multiple versions are listed, select the version appropriate for one time only. Select Diagnostics from the numbered list. NOTE: If you want to proceed. 6. Starting Dell Diagnostics From the Drivers and Utilities Media 1. NOTE: The next steps change the boot sequence...
Setup Guide
Page 41
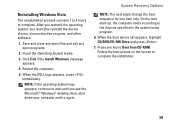
..., you see the Microsoft® Windows® desktop; When the boot device list appears, highlight CD/DVD/CD-RW Drive and press . 7. Click Exit if the Install Windows message appears. 4. then, shut... down your computer and try again. Press any open programs. 2. When the DELL logo appears, press immediately. Insert the Operating System media. 3. Reinstalling Windows Vista The reinstallation process can take 1...Options NOTE: The next steps change the boot sequence for one time only. Follow the instructions on the screen to complete the installation. 39
..., you see the Microsoft® Windows® desktop; When the boot device list appears, highlight CD/DVD/CD-RW Drive and press . 7. Click Exit if the Install Windows message appears. 4. then, shut... down your computer and try again. Press any open programs. 2. When the DELL logo appears, press immediately. Insert the Operating System media. 3. Reinstalling Windows Vista The reinstallation process can take 1...Options NOTE: The next steps change the boot sequence for one time only. Follow the instructions on the screen to complete the installation. 39

Setup Guide
Page 51
... Two side-panel and four back-panel connectors 49 Specifications Drives and devices Available devices Memory Type Connectors Capacities Minimum Maximum Serial ATA hard drive, DVD and CD-RW combo drive (optional...
... Two side-panel and four back-panel connectors 49 Specifications Drives and devices Available devices Memory Type Connectors Capacities Minimum Maximum Serial ATA hard drive, DVD and CD-RW combo drive (optional...

Setup Guide
Page 57
D DellConnect 41 Dell Diagnostics 33 Dell Factory Image Restore 35 Dell Support Center 30 Dell support website 47 Dell Technology Guide for futher information 46 Dell Touch Zone 18 drivers and downloads 47 drives and devices 48 DVDs, playing and creating 21 E email addresses for technical support 42 energy conserving 22 expansion bus 50 F finding more information 46 flick 19 front-side connectors 12 FTP login, anonymous 42 G gestures 19 H hard drive activity light 15 hardware problems diagnosing 33 Hardware Troubleshooter 32 headphone front connector 15 Index 55
D DellConnect 41 Dell Diagnostics 33 Dell Factory Image Restore 35 Dell Support Center 30 Dell support website 47 Dell Technology Guide for futher information 46 Dell Touch Zone 18 drivers and downloads 47 drives and devices 48 DVDs, playing and creating 21 E email addresses for technical support 42 energy conserving 22 expansion bus 50 F finding more information 46 flick 19 front-side connectors 12 FTP login, anonymous 42 G gestures 19 H hard drive activity light 15 hardware problems diagnosing 33 Hardware Troubleshooter 32 headphone front connector 15 Index 55

Windows® 7 Tech Sheet
Page 4
.... After you reinstall the operating system, you wait too long and the operating system logo appears, continue to change the boot sequence for one time only. To reinstall Windows 7: 1 Save and close any open files and exit any proprietary interest in the system setup program. 6... When the boot device list appears, highlight CD/DVD/CD-RW Drive and press . 7 Press any manner whatsoever without notice. © 2009 Dell Inc. Follow the instructions on the screen to either trademarks or registered trademarks of these materials ...
.... After you reinstall the operating system, you wait too long and the operating system logo appears, continue to change the boot sequence for one time only. To reinstall Windows 7: 1 Save and close any open files and exit any proprietary interest in the system setup program. 6... When the boot device list appears, highlight CD/DVD/CD-RW Drive and press . 7 Press any manner whatsoever without notice. © 2009 Dell Inc. Follow the instructions on the screen to either trademarks or registered trademarks of these materials ...


