
Service Manual
Page 1
...: A CAUTION indicates potential damage to change without the written permission of your computer. and is a registered trademark owned by Dell under license; Dell Inc. Trademarks used in any proprietary interest in the United States and/or other than its own. Microsoft, Windows, Windows...the entities claiming the marks and names or their products. A00 Dell Studio™ 1555 Service Manual Before You Begin Base Cover Hard Drive Memory Communication Cards Coin-Cell Battery Center Control Cover Keyboard Display Power Button Board Camera (Optional) Palm Rest Speaker Assembly...
...: A CAUTION indicates potential damage to change without the written permission of your computer. and is a registered trademark owned by Dell under license; Dell Inc. Trademarks used in any proprietary interest in the United States and/or other than its own. Microsoft, Windows, Windows...the entities claiming the marks and names or their products. A00 Dell Studio™ 1555 Service Manual Before You Begin Base Cover Hard Drive Memory Communication Cards Coin-Cell Battery Center Control Cover Keyboard Display Power Button Board Camera (Optional) Palm Rest Speaker Assembly...
Service Manual
Page 16
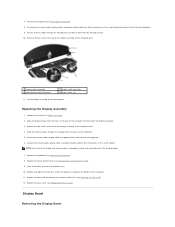
...the display assembly to the computer base. 4. Replace the two screws that secure the display assembly to the bottom of the computer. 5. Replace the keyboard (see Replacing the Mini-Card). 12. Close the display and turn the computer over. 10. Secure the camera cable, display cable, and power... the antenna cables through the routing hole to their connectors on the system board. Display Bezel Removing the Display Bezel Remove the keyboard (see Replacing the Center Control Cover). 9. Replacing the Display Assembly 1. Replace the base cover (see Replacing the Base Cover).
...the display assembly to the computer base. 4. Replace the two screws that secure the display assembly to the bottom of the computer. 5. Replace the keyboard (see Replacing the Mini-Card). 12. Close the display and turn the computer over. 10. Secure the camera cable, display cable, and power... the antenna cables through the routing hole to their connectors on the system board. Display Bezel Removing the Display Bezel Remove the keyboard (see Replacing the Center Control Cover). 9. Replacing the Display Assembly 1. Replace the base cover (see Replacing the Base Cover).
Service Manual
Page 26
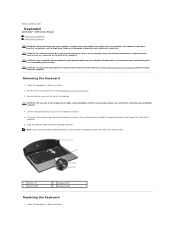
... (see Removing the Center Control Cover). 3. Remove the two screws at www.dell.com/regulatory_compliance. Disconnect the keyboard cable from the keyboard connector on the back of the keyboard connector. Back to Contents Page Keyboard Dell Studio™ 1555 Service Manual Removing the Keyboard Replacing the Keyboard WARNING: Before working inside your computer, read the safety information that shipped...
... (see Removing the Center Control Cover). 3. Remove the two screws at www.dell.com/regulatory_compliance. Disconnect the keyboard cable from the keyboard connector on the back of the keyboard connector. Back to Contents Page Keyboard Dell Studio™ 1555 Service Manual Removing the Keyboard Replacing the Keyboard WARNING: Before working inside your computer, read the safety information that shipped...
Service Manual
Page 27
Back to secure the cable. 4. Press on top of the keyboard. 7. Replace the center control cover (see Replacing the Center Control Cover). Align the tabs along the bottom of the palm rest. 5. Replace the two screws on the corner edges near the top to snap the keyboard into place. 6. 2. Slide the keyboard cable into the slots of the keyboard and slide them into the keyboard connector. 3. Rotate the keyboard connector latch to Contents Page
Back to secure the cable. 4. Press on top of the keyboard. 7. Replace the center control cover (see Replacing the Center Control Cover). Align the tabs along the bottom of the palm rest. 5. Replace the two screws on the corner edges near the top to snap the keyboard into place. 6. 2. Slide the keyboard cable into the slots of the keyboard and slide them into the keyboard connector. 3. Rotate the keyboard connector latch to Contents Page
Service Manual
Page 28
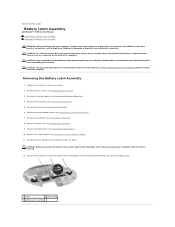
...latch is not covered by periodically touching an unpainted metal surface (such as a connector on your computer. Back to Contents Page Battery Latch Assembly Dell Studio™ 1555 Service Manual Removing the Battery Latch Assembly Replacing the Battery Latch Assembly WARNING: Before working inside your computer, read the safety information that... release latch, observe the orientation of the computer). Remove Mini-Card (see Removing the Hard Drive). 5. Remove the base cover (see Removing the Keyboard). 8. Damage due to servicing that holds it in Before You Begin. 2. Remove the...
...latch is not covered by periodically touching an unpainted metal surface (such as a connector on your computer. Back to Contents Page Battery Latch Assembly Dell Studio™ 1555 Service Manual Removing the Battery Latch Assembly Replacing the Battery Latch Assembly WARNING: Before working inside your computer, read the safety information that... release latch, observe the orientation of the computer). Remove Mini-Card (see Removing the Hard Drive). 5. Remove the base cover (see Removing the Keyboard). 8. Damage due to servicing that holds it in Before You Begin. 2. Remove the...
Setup Guide
Page 5
... Power Button 8 Set Up Windows Vista 9 Connect to the Internet (Optional 9 Using Your Studio Laptop 12 Right Side Features 12 Left Side Features 16 Computer Base and Keyboard Features 18 Media Controls 19 Display Features 21 Removing and Replacing the Battery 22 Using the Optical... Problems 29 Memory Problems 30 Lockups and Software Problems 31 Dell Support Center 33 Using Support Tools 33 System Messages 34 Hardware Troubleshooter 35 Dell Diagnostics 36 Restoring Your Operating System 38 System Restore 38 Dell Factory Image Restore 40 Operating System Reinstallation 41 3
... Power Button 8 Set Up Windows Vista 9 Connect to the Internet (Optional 9 Using Your Studio Laptop 12 Right Side Features 12 Left Side Features 16 Computer Base and Keyboard Features 18 Media Controls 19 Display Features 21 Removing and Replacing the Battery 22 Using the Optical... Problems 29 Memory Problems 30 Lockups and Software Problems 31 Dell Support Center 33 Using Support Tools 33 System Messages 34 Hardware Troubleshooter 35 Dell Diagnostics 36 Restoring Your Operating System 38 System Restore 38 Dell Factory Image Restore 40 Operating System Reinstallation 41 3
Setup Guide
Page 15
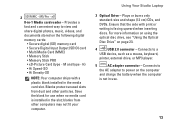
... plastic blank installed in the media card slot. xD 8-in the slot; Provides a fast and convenient way to a USB device, such as a mouse, keyboard, printer, external drive, or MP3 player. 5 AC adapter connector - Save the blank for use . 13 Connects to view and share digital photos, music..., videos, and documents stored on page 23. 4 USB 2.0 connector - MS/Pro - Blanks protect unused slots from other particles. Using Your Studio Laptop 3 Optical Drive - H) • Hi Speed-SD • Hi Density-SD NOTE: Your computer ships with print or writing is not in ...
... plastic blank installed in the media card slot. xD 8-in the slot; Provides a fast and convenient way to a USB device, such as a mouse, keyboard, printer, external drive, or MP3 player. 5 AC adapter connector - Save the blank for use . 13 Connects to view and share digital photos, music..., videos, and documents stored on page 23. 4 USB 2.0 connector - MS/Pro - Blanks protect unused slots from other particles. Using Your Studio Laptop 3 Optical Drive - H) • Hi Speed-SD • Hi Density-SD NOTE: Your computer ships with print or writing is not in ...
Setup Guide
Page 19
...: Before you are using a cabled network, this port connects your computer. 2 HDMI Connector - Connects to a powered speaker or sound system. 1 Security cable slot - Using Your Studio Laptop 5 USB 2.0 connector - Connects to high-speed serial multimedia devices, such as a mouse, keyboard, printer, external drive, or MP3 player. 6 eSATA Connector -
...: Before you are using a cabled network, this port connects your computer. 2 HDMI Connector - Connects to a powered speaker or sound system. 1 Security cable slot - Using Your Studio Laptop 5 USB 2.0 connector - Connects to high-speed serial multimedia devices, such as a mouse, keyboard, printer, external drive, or MP3 player. 6 eSATA Connector -
Setup Guide
Page 20
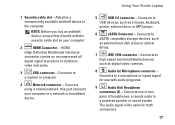
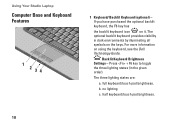
... F6 key has the backlit keyboard icon on using the keyboard, see the Dell Technology Guide. no lighting c. full keyboard/touch pad brightness. Backlit Keyboard Brightness Settings - Using Your Studio Laptop Computer Base and Keyboard Features 1 2 34 1 Keyboard/ Backlit Keyboard (optional) - The three lighting states are: a. half keyboard/touch pad brightness. 18 The optional backlit keyboard provides visibility in the given...
... F6 key has the backlit keyboard icon on using the keyboard, see the Dell Technology Guide. no lighting c. full keyboard/touch pad brightness. Backlit Keyboard Brightness Settings - Using Your Studio Laptop Computer Base and Keyboard Features 1 2 34 1 Keyboard/ Backlit Keyboard (optional) - The three lighting states are: a. half keyboard/touch pad brightness. 18 The optional backlit keyboard provides visibility in the given...
Setup Guide
Page 21
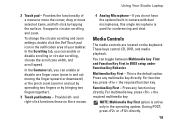
... POST, press or directly. 19 Provides the functionality of your taskbar. To change the circular scrolling and zoom settings, double click the Dell Touch pad icon in the notification area of a mouse to move the cursor, drag or move selected items, and left - For ...Analog Microphone - Press any function key directly. Press any multimedia key directly. Using Your Studio Laptop 2 Touch pad - It supports circular scrolling and zoom. and right-click functions those on the keyboard. You can enable or disable scrolling or circular scrolling, choose the scroll zone width, and...
... POST, press or directly. 19 Provides the functionality of your taskbar. To change the circular scrolling and zoom settings, double click the Dell Touch pad icon in the notification area of a mouse to move the cursor, drag or move selected items, and left - For ...Analog Microphone - Press any function key directly. Press any multimedia key directly. Using Your Studio Laptop 2 Touch pad - It supports circular scrolling and zoom. and right-click functions those on the keyboard. You can enable or disable scrolling or circular scrolling, choose the scroll zone width, and...
Setup Guide
Page 30
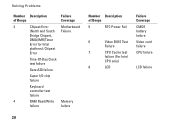
Chipset Error Time-Of-Day Clock test failure Gate A20 failure Super I/O chip failure Keyboard controller test failure 4 RAM Read/Write failure Failure Coverage Motherboard Failure Memory failure Number Description of Beeps 3 Chipset Error (North and South Bridge Chipset, DMA/IMR/Timer Error for Intel platform); Solving Problems Number Description of Beeps 5 RTC Power Fail 6 Video BIOS Test Failure 7 CPU Cache test failure (For Intel CPU only) 8 LCD Failure Coverage CMOS battery failure Video card failure CPU failure LCD failure 28
Chipset Error Time-Of-Day Clock test failure Gate A20 failure Super I/O chip failure Keyboard controller test failure 4 RAM Read/Write failure Failure Coverage Motherboard Failure Memory failure Number Description of Beeps 3 Chipset Error (North and South Bridge Chipset, DMA/IMR/Timer Error for Intel platform); Solving Problems Number Description of Beeps 5 RTC Power Fail 6 Video BIOS Test Failure 7 CPU Cache test failure (For Intel CPU only) 8 LCD Failure Coverage CMOS battery failure Video card failure CPU failure LCD failure 28
Setup Guide
Page 31
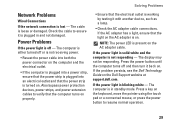
... a power strip, ensure that the power strip is plugged into an electrical outlet and that the light on the AC adapter is turned on the keyboard, move the pointer using the touch pad or a connected mouse, or press the power button to resume normal operation. 29 If the AC adapter ... turns on . The display may not be responding. Press the power button until the computer turns off - The computer is present on the Dell Support website at support.dell.com. Also bypass power protection devices, power strips, and power extension cables to ensure it with another device, such as a lamp. • ...
... a power strip, ensure that the power strip is plugged into an electrical outlet and that the light on the AC adapter is turned on the keyboard, move the pointer using the touch pad or a connected mouse, or press the power button to resume normal operation. 29 If the AC adapter ... turns on . The display may not be responding. Press the power button until the computer turns off - The computer is present on the Dell Support website at support.dell.com. Also bypass power protection devices, power strips, and power extension cables to ensure it with another device, such as a lamp. • ...
Setup Guide
Page 32
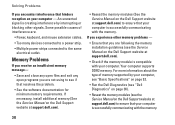
... other memory problems - • Ensure that you are following the memory installation guidelines (see the Service Manual on the Dell Support website at support.dell.com) to see if that resolves the problem. • See the software documentation for minimum memory requirements. If you experience... the Service Manual on the Dell Support website at support.dell.com) to the same electrical outlet. Memory Problems If you receive an insufficient memory message- • Save and close any open files and exit any open programs you are : • Power, keyboard, and mouse extension cables. ...
... other memory problems - • Ensure that you are following the memory installation guidelines (see the Service Manual on the Dell Support website at support.dell.com) to see if that resolves the problem. • See the software documentation for minimum memory requirements. If you experience... the Service Manual on the Dell Support website at support.dell.com) to the same electrical outlet. Memory Problems If you receive an insufficient memory message- • Save and close any open files and exit any open programs you are : • Power, keyboard, and mouse extension cables. ...
Setup Guide
Page 33
... the program that it runs in its documentation or on the screen. 31 If you are unable to get a response by pressing a key on your keyboard or moving your computer. The Program Compatibility Wizard configures a program so that is firmly connected to the computer and to perform an operating system shutdown...
... the program that it runs in its documentation or on the screen. 31 If you are unable to get a response by pressing a key on your keyboard or moving your computer. The Program Compatibility Wizard configures a program so that is firmly connected to the computer and to perform an operating system shutdown...
Setup Guide
Page 34
... manufacturer for troubleshooting information: --Ensure that the program is compatible with the program. --If necessary, uninstall and then reinstall the program Dell Support Center. If you are unable to 10 seconds until the computer turns off . Solving Problems If a solid blue screen appears ... response by pressing a key on your computer. --Ensure that the device drivers do not conflict with the operating system installed on your keyboard or moving your pointer or mouse, press and hold the power button for information. --Ensure that the program is installed and configured properly...
... manufacturer for troubleshooting information: --Ensure that the program is compatible with the program. --If necessary, uninstall and then reinstall the program Dell Support Center. If you are unable to 10 seconds until the computer turns off . Solving Problems If a solid blue screen appears ... response by pressing a key on your computer. --Ensure that the device drivers do not conflict with the operating system installed on your keyboard or moving your pointer or mouse, press and hold the power button for information. --Ensure that the program is installed and configured properly...
Setup Guide
Page 36
... is not listed in your computer has an issue or error, it may display a System Message that was running when the message appeared. Keyboard failure - To replace the keyboard, see "Contacting Dell" on page 48 for assistance. Keyboard failure or loose cable. Using Support Tools System Messages If your hard disk or on the...
... is not listed in your computer has an issue or error, it may display a System Message that was running when the message appeared. Keyboard failure - To replace the keyboard, see "Contacting Dell" on page 48 for assistance. Keyboard failure or loose cable. Using Support Tools System Messages If your hard disk or on the...
Setup Guide
Page 42
... times to access the Vista Advanced Boot Options Window. 2. Select a keyboard layout and click Next. 5. NOTE: Depending upon your operating system. Use Dell Factory Image Restore only as a local user. Click Dell Factory Image Restore. If possible, back up all data on the hard...recovery options, log on . This option restores your computer. If possible, back up the data before using these options. Dell Factory Image Restore 1. The Dell Factory Image Restore welcome screen appears. Turn on the computer. Select Repair Your Computer. 3. The System Recovery Options window ...
... times to access the Vista Advanced Boot Options Window. 2. Select a keyboard layout and click Next. 5. NOTE: Depending upon your operating system. Use Dell Factory Image Restore only as a local user. Click Dell Factory Image Restore. If possible, back up all data on the hard...recovery options, log on . This option restores your computer. If possible, back up the data before using these options. Dell Factory Image Restore 1. The Dell Factory Image Restore welcome screen appears. Turn on the computer. Select Repair Your Computer. 3. The System Recovery Options window ...

Setup Guide
Page 49
You may be asked to type some commands at the keyboard, relay detailed information during operations, or try other troubleshooting steps possible only at or near the computer. Remember to a network? Diagnostic Checklist • Name: • ...: • Service Tag (bar code on the back or bottom of the computer): • Express Service Code: • Return Material Authorization Number (if provided by Dell support technician): • Operating system and version: • Devices: • Expansion cards: • Are you call. Getting Help Before You Call NOTE: Have your computer...
You may be asked to type some commands at the keyboard, relay detailed information during operations, or try other troubleshooting steps possible only at or near the computer. Remember to a network? Diagnostic Checklist • Name: • ...: • Service Tag (bar code on the back or bottom of the computer): • Express Service Code: • Return Material Authorization Number (if provided by Dell support technician): • Operating system and version: • Devices: • Expansion cards: • Are you call. Getting Help Before You Call NOTE: Have your computer...

Setup Guide
Page 57
..., stereo headphones/speakers connector two 4.5-ohm speakers and one 4 ohm subwoofer 2 Watt per channel into 4.5 ohm and 3 Watt per channel subwoofer Software program menus or keyboard buttons 55
..., stereo headphones/speakers connector two 4.5-ohm speakers and one 4 ohm subwoofer 2 Watt per channel into 4.5 ohm and 3 Watt per channel subwoofer Software program menus or keyboard buttons 55

Setup Guide
Page 59
and Canada); 102 (Europe); 105 (Japan); 104 (Brazil) QWERTY/AZERTY/Kanji Basic Specifications Camera (optional) Pixel 2.0 megapixel Video resolution Diagonal viewing angle 320x240 ~1600x1200 (640x480 at 30fps) 66° Touch pad X/Y position resolution (graphics table mode) 240 cpi Size Width Height 73.09 mm (2.87-in) sensoractive area 40.09 mm (1.57-in) rectangle 57 Display Pixel pitch HD with TrueLife Controls 0.252 mm brightness can be controlled through keyboard shortcuts (see the Dell Technology Guide for more information.) Keyboard Number of keys Layout 86 (U.S.
and Canada); 102 (Europe); 105 (Japan); 104 (Brazil) QWERTY/AZERTY/Kanji Basic Specifications Camera (optional) Pixel 2.0 megapixel Video resolution Diagonal viewing angle 320x240 ~1600x1200 (640x480 at 30fps) 66° Touch pad X/Y position resolution (graphics table mode) 240 cpi Size Width Height 73.09 mm (2.87-in) sensoractive area 40.09 mm (1.57-in) rectangle 57 Display Pixel pitch HD with TrueLife Controls 0.252 mm brightness can be controlled through keyboard shortcuts (see the Dell Technology Guide for more information.) Keyboard Number of keys Layout 86 (U.S.


