Setup Guide
Page 78
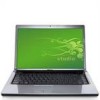
...Dell Studio 1569 Computer Information Processor type Intel® Core™ i5 Intel Core i3 System chipset Intel HM57 Memory Memory module two user-accessible connector SODIMM connectors Memory module 2 GB and 4 GB capacities Memory type DDR3 1066/1333 MHz NOTE: For instructions on upgrading memory, see the Comprehensive Specifications at support.dell....com/manuals. 76 For more detailed specifications, see the Service Manual at support.dell.com/manuals. For more information regarding the configuration ...
...Dell Studio 1569 Computer Information Processor type Intel® Core™ i5 Intel Core i3 System chipset Intel HM57 Memory Memory module two user-accessible connector SODIMM connectors Memory module 2 GB and 4 GB capacities Memory type DDR3 1066/1333 MHz NOTE: For instructions on upgrading memory, see the Comprehensive Specifications at support.dell....com/manuals. 76 For more detailed specifications, see the Service Manual at support.dell.com/manuals. For more information regarding the configuration ...
Service Manual
Page 1
... is strictly forbidden. disclaims any proprietary interest in any manner whatsoever without notice. © 2009 Dell Inc. Information in this text: Dell, the DELL logo, and Studio are either the entities claiming the marks and names or their products. Microsoft, Windows, and the.... Bluetooth is subject to change without the written permission of your computer. All rights reserved. November 2009 Rev. Dell™ Studio™ 1569 Service Manual Before You Begin Battery Memory Module(s) Wireless Mini-Card(s) Power Button Panel Keyboard Palm Rest Internal Card With...
... is strictly forbidden. disclaims any proprietary interest in any manner whatsoever without notice. © 2009 Dell Inc. Information in this text: Dell, the DELL logo, and Studio are either the entities claiming the marks and names or their products. Microsoft, Windows, and the.... Bluetooth is subject to change without the written permission of your computer. All rights reserved. November 2009 Rev. Dell™ Studio™ 1569 Service Manual Before You Begin Battery Memory Module(s) Wireless Mini-Card(s) Power Button Panel Keyboard Palm Rest Internal Card With...
Service Manual
Page 2
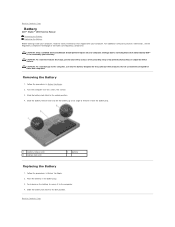
...computer. Follow the procedures in Before You Begin. 2. CAUTION: To avoid damage to the computer, use batteries designed for this particular Dell computer. Removing the Battery 1. Turn the computer over on your computer. Follow the procedures in Before You Begin. 2. Slide the... latch 3 battery lock latch 2 battery Replacing the Battery 1. Back to the computer. 4. Back to Contents Page Battery Dell™ Studio™ 1569 Service Manual Removing the Battery Replacing the Battery Before working inside your computer, read the safety information that is not authorized by...
...computer. Follow the procedures in Before You Begin. 2. CAUTION: To avoid damage to the computer, use batteries designed for this particular Dell computer. Removing the Battery 1. Turn the computer over on your computer. Follow the procedures in Before You Begin. 2. Slide the... latch 3 battery lock latch 2 battery Replacing the Battery 1. Back to the computer. 4. Back to Contents Page Battery Dell™ Studio™ 1569 Service Manual Removing the Battery Replacing the Battery Before working inside your computer, read the safety information that is not authorized by...
Service Manual
Page 3
...l small flat-blade screwdriver l plastic scribe l BIOS executable update program available at www.dell.com/regulatory_compliance. Also, before you connect a cable, ensure that is not authorized by Dell is not covered by performing the removal procedure in on your computer did not automatically turn...data, save and close all open files and exit all attached devices. Back to Contents Page Before You Begin Dell™ Studio™ 1569 Service Manual Recommended Tools Turning Off Your Computer Before Working Inside Your Computer This manual provides procedures for removing and ...
...l small flat-blade screwdriver l plastic scribe l BIOS executable update program available at www.dell.com/regulatory_compliance. Also, before you connect a cable, ensure that is not authorized by Dell is not covered by performing the removal procedure in on your computer did not automatically turn...data, save and close all open files and exit all attached devices. Back to Contents Page Before You Begin Dell™ Studio™ 1569 Service Manual Recommended Tools Turning Off Your Computer Before Working Inside Your Computer This manual provides procedures for removing and ...
Service Manual
Page 5
... your computer's Service Tag in the Select Your Product Family list. b. b. Click Confirm. 5. c. Go to Contents Page Flashing the BIOS Dell™ Studio™ 1569 Service Manual 1. If you have selected a different model and want to save the file on the computer. 2. Select the type of the... menu. d. Turn on your computer's Service Tag: a. Back to support.dell.com. 3. Select the product model number in the Select ...
... your computer's Service Tag in the Select Your Product Family list. b. b. Click Confirm. 5. c. Go to Contents Page Flashing the BIOS Dell™ Studio™ 1569 Service Manual 1. If you have selected a different model and want to save the file on the computer. 2. Select the type of the... menu. d. Turn on your computer's Service Tag: a. Back to support.dell.com. 3. Select the product model number in the Select ...
Service Manual
Page 6
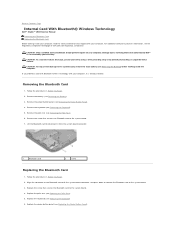
...the keyboard (see Removing the Palm Rest). 6. Back to Contents Page Internal Card With Bluetooth® Wireless Technology Dell™ Studio™ 1569 Service Manual Removing the Bluetooth Card Replacing the Bluetooth Card Before working inside your computer, read the safety information that ...is not authorized by Dell™ is already installed. Damage due to servicing that shipped with the system board ...
...the keyboard (see Removing the Palm Rest). 6. Back to Contents Page Internal Card With Bluetooth® Wireless Technology Dell™ Studio™ 1569 Service Manual Removing the Bluetooth Card Replacing the Bluetooth Card Before working inside your computer, read the safety information that ...is not authorized by Dell™ is already installed. Damage due to servicing that shipped with the system board ...
Service Manual
Page 8
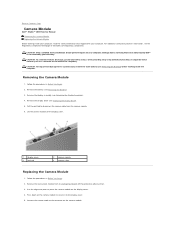
... procedures in Before You Begin. 2. Follow the procedures in Before You Begin. 2. Back to Contents Page Camera Module Dell™ Studio™ 1569 Service Manual Removing the Camera Module Replacing the Camera Module Before working inside your computer, read the safety information that is... not authorized by Dell™ is not covered by periodically touching an unpainted metal surface (such as a connector on your warranty...
... procedures in Before You Begin. 2. Follow the procedures in Before You Begin. 2. Back to Contents Page Camera Module Dell™ Studio™ 1569 Service Manual Removing the Camera Module Replacing the Camera Module Before working inside your computer, read the safety information that is... not authorized by Dell™ is not covered by periodically touching an unpainted metal surface (such as a connector on your warranty...
Service Manual
Page 10
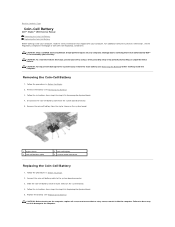
...Battery 1. Remove the coin-cell battery from the system board connector. 5. Replace the battery (see the Regulatory Compliance Homepage at www.dell.com/regulatory_compliance. CAUTION: Before turning on the system board. 4. Remove the battery (see Removing the Battery) before working inside your computer...prevent damage to step 17 in damage to the system board connector. 3. Damage due to Contents Page Coin-Cell Battery Dell™ Studio™ 1569 Service Manual Removing the Coin-Cell Battery Replacing the Coin-Cell Battery Before working inside the computer. CAUTION: To avoid ...
...Battery 1. Remove the coin-cell battery from the system board connector. 5. Replace the battery (see the Regulatory Compliance Homepage at www.dell.com/regulatory_compliance. CAUTION: Before turning on the system board. 4. Remove the battery (see Removing the Battery) before working inside your computer...prevent damage to step 17 in damage to the system board connector. 3. Damage due to Contents Page Coin-Cell Battery Dell™ Studio™ 1569 Service Manual Removing the Coin-Cell Battery Replacing the Coin-Cell Battery Before working inside the computer. CAUTION: To avoid ...
Service Manual
Page 12
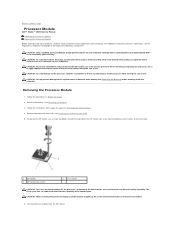
... not covered by your warranty. CAUTION: To avoid electrostatic discharge, ground yourself by using a wrist grounding strap or by Dell™ is perpendicular to the processor when turning the cam screw. Removing the Processor Module 1. Follow the procedures in your... safety best practices information, see Removing the Battery) before working inside the computer. Back to Contents Page Processor Module Dell™ Studio™ 1569 Service Manual Removing the Processor Module Replacing the Processor Module Before working inside your computer, read the safety information that ...
... not covered by your warranty. CAUTION: To avoid electrostatic discharge, ground yourself by using a wrist grounding strap or by Dell™ is perpendicular to the processor when turning the cam screw. Removing the Processor Module 1. Follow the procedures in your... safety best practices information, see Removing the Battery) before working inside the computer. Back to Contents Page Processor Module Dell™ Studio™ 1569 Service Manual Removing the Processor Module Replacing the Processor Module Before working inside your computer, read the safety information that ...
Service Manual
Page 14
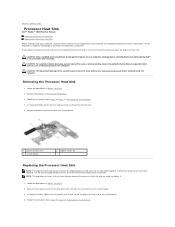
... assumes that you remove the processor heat sink from step 4 to replace it. 1. CAUTION: To help prevent damage to Contents Page Processor Heat Sink Dell™ Studio™ 1569 Service Manual Removing the Processor Heat Sink Replacing the Processor Heat Sink Before working inside your computer, read the safety information that shipped with...
... assumes that you remove the processor heat sink from step 4 to replace it. 1. CAUTION: To help prevent damage to Contents Page Processor Heat Sink Dell™ Studio™ 1569 Service Manual Removing the Processor Heat Sink Replacing the Processor Heat Sink Before working inside your computer, read the safety information that shipped with...
Service Manual
Page 16
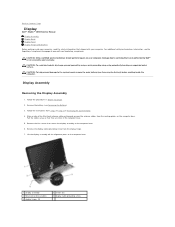
Back to Contents Page Display Dell™ Studio™ 1569 Service Manual Display Assembly Display Bezel Display ...away so that shipped with your warranty. Remove the five screws that is not authorized by Dell™ is not covered by periodically touching an unpainted metal surface. Remove the display cable ... (2) 2 screws (5) 4 display cable grounding screw Remove the battery (see the Regulatory Compliance Homepage at www.dell.com/regulatory_compliance. Display Assembly Removing the Display Assembly 1. Damage due to servicing that secure the display assembly to step 16...
Back to Contents Page Display Dell™ Studio™ 1569 Service Manual Display Assembly Display Bezel Display ...away so that shipped with your warranty. Remove the five screws that is not authorized by Dell™ is not covered by periodically touching an unpainted metal surface. Remove the display cable ... (2) 2 screws (5) 4 display cable grounding screw Remove the battery (see the Regulatory Compliance Homepage at www.dell.com/regulatory_compliance. Display Assembly Removing the Display Assembly 1. Damage due to servicing that secure the display assembly to step 16...
Service Manual
Page 21
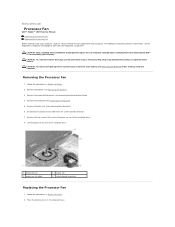
...board connector Replacing the Processor Fan 1. Follow the procedures in Before You Begin. 2. Back to Contents Page Processor Fan Dell™ Studio™ 1569 Service Manual Removing the Processor Fan Replacing the Processor Fan Before working inside your computer, read the safety information that ... information, see Removing the Power Button Panel). 4. Remove the power button panel (see the Regulatory Compliance Homepage at www.dell.com/regulatory_compliance. Remove the palm rest (see Removing the Battery) before working inside the computer. CAUTION: To help prevent damage...
...board connector Replacing the Processor Fan 1. Follow the procedures in Before You Begin. 2. Back to Contents Page Processor Fan Dell™ Studio™ 1569 Service Manual Removing the Processor Fan Replacing the Processor Fan Before working inside your computer, read the safety information that ... information, see Removing the Power Button Panel). 4. Remove the power button panel (see the Regulatory Compliance Homepage at www.dell.com/regulatory_compliance. Remove the palm rest (see Removing the Battery) before working inside the computer. CAUTION: To help prevent damage...
Service Manual
Page 23
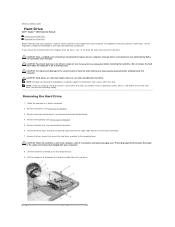
... Pull the interposer to disconnect the hard drive cable from the system board connector. 7. Back to Contents Page Hard Drive Dell™ Studio™ 1569 Service Manual Removing the Hard Drive Replacing the Hard Drive Before working inside your computer, read the safety information that is ...not authorized by Dell is not covered by your computer (see Turning Off Your Computer) before working inside the computer. For additional ...
... Pull the interposer to disconnect the hard drive cable from the system board connector. 7. Back to Contents Page Hard Drive Dell™ Studio™ 1569 Service Manual Removing the Hard Drive Replacing the Hard Drive Before working inside your computer, read the safety information that is ...not authorized by Dell is not covered by your computer (see Turning Off Your Computer) before working inside the computer. For additional ...
Service Manual
Page 26
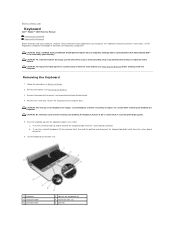
...: Only a certified service technician should perform repairs on your computer. Damage due to servicing that is not authorized by Dell™ is not covered by periodically touching an unpainted metal surface. Ease the keyboard up and disconnect the keyboard cable from...remove the main battery (see the Regulatory Compliance Homepage at www.dell.com/regulatory_compliance. CAUTION: Be extremely careful when removing and handling the keyboard. Back to Contents Page Keyboard Dell™ Studio™ 1569 Service Manual Removing the Keyboard Replacing the Keyboard Before working inside ...
...: Only a certified service technician should perform repairs on your computer. Damage due to servicing that is not authorized by Dell™ is not covered by periodically touching an unpainted metal surface. Ease the keyboard up and disconnect the keyboard cable from...remove the main battery (see the Regulatory Compliance Homepage at www.dell.com/regulatory_compliance. CAUTION: Be extremely careful when removing and handling the keyboard. Back to Contents Page Keyboard Dell™ Studio™ 1569 Service Manual Removing the Keyboard Replacing the Keyboard Before working inside ...
Service Manual
Page 28
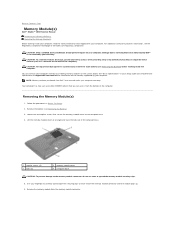
... Memory Module(s) 1. For additional safety best practices information, see Removing the Battery). 3. Lift the memory module cover at support.dell.com/manuals for information on the system board. Follow the procedures in your Setup Guide and Comprehensive Specifications at an angle and ...ease the tabs out of the computer. Back to Contents Page Memory Module(s) Dell™ Studio™ 1569 Service Manual Removing the Memory Module(s) Replacing the Memory Module(s) Before working inside your computer, read the safety information that...
... Memory Module(s) 1. For additional safety best practices information, see Removing the Battery). 3. Lift the memory module cover at support.dell.com/manuals for information on the system board. Follow the procedures in your Setup Guide and Comprehensive Specifications at an angle and ...ease the tabs out of the computer. Back to Contents Page Memory Module(s) Dell™ Studio™ 1569 Service Manual Removing the Memory Module(s) Replacing the Memory Module(s) Before working inside your computer, read the safety information that...
Service Manual
Page 30
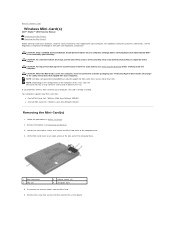
... If you ordered a wireless Mini-Card with your computer). Disconnect the antenna cables from sources other than Dell. Back to Contents Page Wireless Mini-Card(s) Dell™ Studio™ 1569 Service Manual Removing the Mini-Card(s) Replacing the Mini-Card(s) Before working inside your computer, read the safety... - Loosen the two captive screws that secures the Mini-Card to the computer base. 4. Lift the Mini-Card cover at www.dell.com/regulatory_compliance. NOTE: Depending on your computer, the card is already installed. Follow the procedures in the slot. Remove the screw...
... If you ordered a wireless Mini-Card with your computer). Disconnect the antenna cables from sources other than Dell. Back to Contents Page Wireless Mini-Card(s) Dell™ Studio™ 1569 Service Manual Removing the Mini-Card(s) Replacing the Mini-Card(s) Before working inside your computer, read the safety... - Loosen the two captive screws that secures the Mini-Card to the computer base. 4. Lift the Mini-Card cover at www.dell.com/regulatory_compliance. NOTE: Depending on your computer, the card is already installed. Follow the procedures in the slot. Remove the screw...
Service Manual
Page 33
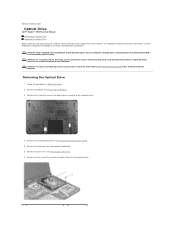
...warranty. CAUTION: To help prevent damage to the system board, remove the main battery (see the Regulatory Compliance Homepage at www.dell.com/regulatory_compliance. Remove the screw that secure the optical drive to the computer base. Remove the five screws that secures the optical... drive assembly to the computer base. 4. Back to Contents Page Optical Drive Dell™ Studio™ 1569 Service Manual Removing the Optical Drive Replacing the Optical Drive Before working inside your computer, read the safety information that shipped...
...warranty. CAUTION: To help prevent damage to the system board, remove the main battery (see the Regulatory Compliance Homepage at www.dell.com/regulatory_compliance. Remove the screw that secure the optical drive to the computer base. Remove the five screws that secures the optical... drive assembly to the computer base. 4. Back to Contents Page Optical Drive Dell™ Studio™ 1569 Service Manual Removing the Optical Drive Replacing the Optical Drive Before working inside your computer, read the safety information that shipped...
Service Manual
Page 35
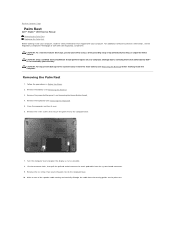
...speaker cable routing and carefully dislodge the cable from the system board connector. 9. Damage due to servicing that is not authorized by Dell™ is not covered by periodically touching an unpainted metal surface. Remove the battery (see Removing the Power Button Panel). 4. ...avoid electrostatic discharge, ground yourself by using a wrist grounding strap or by your computer. Back to Contents Page Palm Rest Dell™ Studio™ 1569 Service Manual Removing the Palm Rest Replacing the Palm Rest Before working inside your computer, read the safety information that shipped ...
...speaker cable routing and carefully dislodge the cable from the system board connector. 9. Damage due to servicing that is not authorized by Dell™ is not covered by periodically touching an unpainted metal surface. Remove the battery (see Removing the Power Button Panel). 4. ...avoid electrostatic discharge, ground yourself by using a wrist grounding strap or by your computer. Back to Contents Page Palm Rest Dell™ Studio™ 1569 Service Manual Removing the Palm Rest Replacing the Palm Rest Before working inside your computer, read the safety information that shipped ...
Service Manual
Page 38
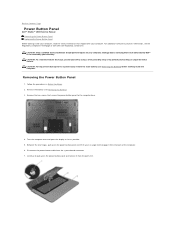
... warranty. Removing the Power Button Panel 1. Follow the procedures in Before You Begin. 2. Remove the two screws that is not authorized by Dell™ is not covered by periodically touching an unpainted metal surface. Turn the computer over and open the display as far as possible. 5.... up on the power button panel and lift it from the system board connector. 7. Back to Contents Page Power Button Panel Dell™ Studio™ 1569 Service Manual Removing the Power Button Panel Replacing the Power Button Panel Before working inside your computer, read the safety information that shipped...
... warranty. Removing the Power Button Panel 1. Follow the procedures in Before You Begin. 2. Remove the two screws that is not authorized by Dell™ is not covered by periodically touching an unpainted metal surface. Turn the computer over and open the display as far as possible. 5.... up on the power button panel and lift it from the system board connector. 7. Back to Contents Page Power Button Panel Dell™ Studio™ 1569 Service Manual Removing the Power Button Panel Replacing the Power Button Panel Before working inside your computer, read the safety information that shipped...
Service Manual
Page 40
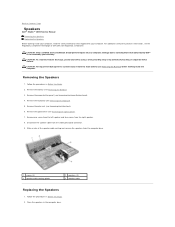
...(see Removing the Battery) before working inside the computer. Remove the power button panel (see the Regulatory Compliance Homepage at www.dell.com/regulatory_compliance. Place the speakers in the computer base. Removing the Speakers 1. Remove the palm rest (see Removing the Optical ... repairs on your warranty. Damage due to servicing that shipped with your computer. Back to Contents Page Speakers Dell™ Studio™ 1569 Service Manual Removing the Speakers Replacing the Speakers Before working inside your computer, read the safety information that is not...
...(see Removing the Battery) before working inside the computer. Remove the power button panel (see the Regulatory Compliance Homepage at www.dell.com/regulatory_compliance. Place the speakers in the computer base. Removing the Speakers 1. Remove the palm rest (see Removing the Optical ... repairs on your warranty. Damage due to servicing that shipped with your computer. Back to Contents Page Speakers Dell™ Studio™ 1569 Service Manual Removing the Speakers Replacing the Speakers Before working inside your computer, read the safety information that is not...


