
Dell Mobile Sync Manual
Page 28
...frame. Once you reach the original again. Button Rotate counterclockwise/ Rotate clockwise Rotates a selected item 90° to the left or to the manual color correction. It offers an alternative to the right. The Auto Color button automatically improves the color of your photos based on terms of ...reference. The same function is available via the Auto Enhance button on terms of reference. Dell Mobile Sync 28 Button Undo edited steps/Redo edited steps Reverses/repeats the last editing step. The following tabs are available in which ...
...frame. Once you reach the original again. Button Rotate counterclockwise/ Rotate clockwise Rotates a selected item 90° to the left or to the manual color correction. It offers an alternative to the right. The Auto Color button automatically improves the color of your photos based on terms of ...reference. The same function is available via the Auto Enhance button on terms of reference. Dell Mobile Sync 28 Button Undo edited steps/Redo edited steps Reverses/repeats the last editing step. The following tabs are available in which ...

Dell Mobile Sync Manual
Page 45
... the skip buttons to display the items of a selection or group, you are happy with default transitions and default background music. To crop manually, move the cropping tool to directly see which part of an instant slide show compilations. Button Red Eye Removal Opens the Red Eye Removal ...previous/next item. Button Skip back/Skip to next track Skips to apply the effect. Select the check box displayed in full screen view. Dell Mobile Sync 45 Not available for photos belonging to define a rectangle around the affected area on three correspondent tabs. You can be cropped. The...
... the skip buttons to display the items of a selection or group, you are happy with default transitions and default background music. To crop manually, move the cropping tool to directly see which part of an instant slide show compilations. Button Red Eye Removal Opens the Red Eye Removal ...previous/next item. Button Skip back/Skip to next track Skips to apply the effect. Select the check box displayed in full screen view. Dell Mobile Sync 45 Not available for photos belonging to define a rectangle around the affected area on three correspondent tabs. You can be cropped. The...

Dell Mobile Sync Manual
Page 46
...The Auto Color button automatically improves the color of your photos. If you place the mouse pointer on the lower task bar. Dell Mobile Sync 46 It offers an alternative to the right. You can use these modification options to improve the visual impression of...you reach the original again. Button Rotate counterclockwise/ Rotate clockwise Rotates a selected item 90° to the left or to the manual color correction. Button Additional functionalities Displays more features. Click the thumbnail to modify your previous editing until you can always undo your photos...
...The Auto Color button automatically improves the color of your photos. If you place the mouse pointer on the lower task bar. Dell Mobile Sync 46 It offers an alternative to the right. You can use these modification options to improve the visual impression of...you reach the original again. Button Rotate counterclockwise/ Rotate clockwise Rotates a selected item 90° to the left or to the manual color correction. Button Additional functionalities Displays more features. Click the thumbnail to modify your previous editing until you can always undo your photos...

Dell Mobile Sync Manual
Page 66
...All changes are defining the aspect ratio of the rectangle and cropping frame. 4. You can also change the size of Photos → 63 Dell Mobile Sync 66 The highlighted rectangle in the content area. 2. The highlighted rectangle is adapted. 4. The mouse pointer changes into a cropping ...tool. 3. See also General Editing of your item manually. 2. 4 The Crop window is cut to the previous screen. A rectangle is displayed in the content area. Click the back button in the...
...All changes are defining the aspect ratio of the rectangle and cropping frame. 4. You can also change the size of Photos → 63 Dell Mobile Sync 66 The highlighted rectangle in the content area. 2. The highlighted rectangle is adapted. 4. The mouse pointer changes into a cropping ...tool. 3. See also General Editing of your item manually. 2. 4 The Crop window is cut to the previous screen. A rectangle is displayed in the content area. Click the back button in the...

Dell Mobile Sync Manual
Page 67
... 4. The device is scanned for photos and the Step 3 of 5 - Photos screen is opened. 2. Click the Browse button. The Select path manually window is displayed. 8. If the wizard found the correct folder, just click Next to approve and continue. 9. The device browsing screen is opened with...2 of 5 - Click the Next button. Connect the device to your connected device, proceed as follows: 1. If you want to change the folder: Dell Mobile Sync 67 Click the Next button. Music screen is opened . 2. The Device Setup window is displayed. 6. Click the Devices > [Device name...
... 4. The device is scanned for photos and the Step 3 of 5 - Photos screen is opened. 2. Click the Browse button. The Select path manually window is displayed. 8. If the wizard found the correct folder, just click Next to approve and continue. 9. The device browsing screen is opened with...2 of 5 - Click the Next button. Connect the device to your connected device, proceed as follows: 1. If you want to change the folder: Dell Mobile Sync 67 Click the Next button. Music screen is opened . 2. The Device Setup window is displayed. 6. Click the Devices > [Device name...

Dell Mobile Sync Manual
Page 68
...button. Switching to copy media without transcoding, select the respective option button. 13. See also Audio CD Browsing and Playback → 50 Dell Mobile Sync 68 5 1. The Step 5 of your device. From now on the left corner of the main window stays visible and shows the ... is displayed. See also Set up your computer. 2. Insert the respective Audio CD into the disc drive of 5 - The Select path manually window is started. The ripping process is opened. 2. You have set up Devices → 54 Ripping from CD button on your computer. Click the...
...button. Switching to copy media without transcoding, select the respective option button. 13. See also Audio CD Browsing and Playback → 50 Dell Mobile Sync 68 5 1. The Step 5 of your device. From now on the left corner of the main window stays visible and shows the ... is displayed. See also Set up your computer. 2. Insert the respective Audio CD into the disc drive of 5 - The Select path manually window is started. The ripping process is opened. 2. You have set up Devices → 54 Ripping from CD button on your computer. Click the...
Dell Mobile Sync Manual
Page 70
...To restore phone data from a backup, proceed as follows: 1. The Backup / Restore window is only available for your computer. 2. See also Dell Devices → 54 Restoring Device Data This feature is opened. Click the Devices > [Device name] entry in a backup. The device browsing screen is...tree on the left. Click the Backup / Restore button in the lower right of the screen. Enter a name for Dell devices. Connect the device to select the storage directory manually, click the Browse button. 9. Click the Next button in the upper right of 2 - Enter Name, is displayed...
...To restore phone data from a backup, proceed as follows: 1. The Backup / Restore window is only available for your computer. 2. See also Dell Devices → 54 Restoring Device Data This feature is opened. Click the Devices > [Device name] entry in a backup. The device browsing screen is...tree on the left. Click the Backup / Restore button in the lower right of the screen. Enter a name for Dell devices. Connect the device to select the storage directory manually, click the Browse button. 9. Click the Next button in the upper right of 2 - Enter Name, is displayed...

Dell Mobile Sync Manual
Page 71
...parts. Choose the backup file you restore parts, select from the additional list of check boxes displayed. 10. See also Dell Devices → 54 Dell Mobile Sync 71 6 4. The first screen of the Restore wizard, Step 1 of the screen. Choose to restore, is not listed..., click the Browse button to manually select the file from a backup. Select the desired option button. 9. The restore process is displayed. 8. Select ...
...parts. Choose the backup file you restore parts, select from the additional list of check boxes displayed. 10. See also Dell Devices → 54 Dell Mobile Sync 71 6 4. The first screen of the Restore wizard, Step 1 of the screen. Choose to restore, is not listed..., click the Browse button to manually select the file from a backup. Select the desired option button. 9. The restore process is displayed. 8. Select ...

Dell Mobile Sync Manual
Page 74
... Connected devices 14 Creating New playlists 13 Creating album 61 Creating playlist 18, 62 Creating slide show 23, 31, 59 Crop frame 28, 45 Cropping manually 28, 45, 66 Cropping photo 65 Delete ... 21, 25, 30, 33, 36, 42, 47, 50, 51 Detailed browsing 17, 22, 30 Detailed browsing view ...... 50... 20 Gracenote 20, 21, 51, 51 Help file 12 Import options 16 Importing 16 Importing from device 14 Instant slide show 22, 27, 31, 45 Dell Mobile Sync 74
... Connected devices 14 Creating New playlists 13 Creating album 61 Creating playlist 18, 62 Creating slide show 23, 31, 59 Crop frame 28, 45 Cropping manually 28, 45, 66 Cropping photo 65 Delete ... 21, 25, 30, 33, 36, 42, 47, 50, 51 Detailed browsing 17, 22, 30 Detailed browsing view ...... 50... 20 Gracenote 20, 21, 51, 51 Help file 12 Import options 16 Importing 16 Importing from device 14 Instant slide show 22, 27, 31, 45 Dell Mobile Sync 74

Quick Start Guide 2.2
Page 18
To view the User's Manual available on your tablet, see the User's Manual available on the SD card on the SD card, launch the QuickOffice application and then select Memory card. 16 For More Information To learn more about the features and settings available on your tablet or at support.dell.com/manuals.
To view the User's Manual available on your tablet, see the User's Manual available on the SD card on the SD card, launch the QuickOffice application and then select Memory card. 16 For More Information To learn more about the features and settings available on your tablet or at support.dell.com/manuals.
User's Manual 1.6
Page 4
5 Using Your Dell™ Streak 32 Calling 32 Managing Contacts 38 Messaging 41 Pop-Up Menu 47 On-Screen Keyboard 47 Widgets 51 Managing Your Device Settings 54 6 Web 57 Connecting to the Web 57 Browsing the Web 61 E-mail 67 TouchDown 68 Web Applications 70 7 Customizing Your Dell™ Streak 94 To change display settings 94 To change sound and ringtone settings 95 To manually set the date, time and time zone 96 To choose a language 98 4 Contents
5 Using Your Dell™ Streak 32 Calling 32 Managing Contacts 38 Messaging 41 Pop-Up Menu 47 On-Screen Keyboard 47 Widgets 51 Managing Your Device Settings 54 6 Web 57 Connecting to the Web 57 Browsing the Web 61 E-mail 67 TouchDown 68 Web Applications 70 7 Customizing Your Dell™ Streak 94 To change display settings 94 To change sound and ringtone settings 95 To manually set the date, time and time zone 96 To choose a language 98 4 Contents
User's Manual 1.6
Page 42
Touch a matched contact, or continue manually typing the desired phone number or e-mail address. 2 Repeat step 1 to enter more information about the Camera application, see below the To field. Open the ... Photos & Videos application and touch a video clip to attach it to your message. For details about the Camcorder application, see Camera. 42 Using Your Dell™ Streak For more mobile numbers if you wish to send the message to multiple mobile phone users. 3 You can add a subject line to the message by...
Touch a matched contact, or continue manually typing the desired phone number or e-mail address. 2 Repeat step 1 to enter more information about the Camera application, see below the To field. Open the ... Photos & Videos application and touch a video clip to attach it to your message. For details about the Camcorder application, see Camera. 42 Using Your Dell™ Streak For more mobile numbers if you wish to send the message to multiple mobile phone users. 3 You can add a subject line to the message by...

User's Manual 1.6
Page 46
... icon is displayed. A list of the attached picture to open . To forward the message 1 Touch and hold the message to confirm deletion. 46 Using Your Dell™ Streak To view a multimedia message 1 Touch the notification area on the Message options menu. To delete a message or a message thread 1 In the Messaging list, touch... delete a message within a thread, touch and hold the message. NOTE: Touch the Download button, to play back the attached video. touch the Play button to manually download the media file in the message.
... icon is displayed. A list of the attached picture to open . To forward the message 1 Touch and hold the message to confirm deletion. 46 Using Your Dell™ Streak To view a multimedia message 1 Touch the notification area on the Message options menu. To delete a message or a message thread 1 In the Messaging list, touch... delete a message within a thread, touch and hold the message. NOTE: Touch the Download button, to play back the attached video. touch the Play button to manually download the media file in the message.

User's Manual 1.6
Page 58
To manually select a new network 1 Touch the Home button Menu button Settings Wireless controls Mobile networks Network operators Search networks. To ... available is currently in the figure below to a different network. See Status Bar on whether a GPRS, EDGE, 3G, or HSPA network is displayed. 2 Select a network manually from the network list. The list of the data network icons. NOTE: Depending on Status Bar for available networks if you are outside your home...
To manually select a new network 1 Touch the Home button Menu button Settings Wireless controls Mobile networks Network operators Search networks. To ... available is currently in the figure below to a different network. See Status Bar on whether a GPRS, EDGE, 3G, or HSPA network is displayed. 2 Select a network manually from the network list. The list of the data network icons. NOTE: Depending on Status Bar for available networks if you are outside your home...

User's Manual 1.6
Page 67
... e-mail account. As you need to add and then touch Next. Web 67 NOTE: Touch Manual setup rather than Next to automatically add the e-mail address, or continue typing the e-mail address manually. Touch the recipient to directly enter incoming and outgoing settings for the account and the name you... are sending the e-mail to manually enter the e-mail account settings, including the e-mail server, protocol, and so on after touching Next. You can create POP3, IMAP, and exchange e-...
... e-mail account. As you need to add and then touch Next. Web 67 NOTE: Touch Manual setup rather than Next to automatically add the e-mail address, or continue typing the e-mail address manually. Touch the recipient to directly enter incoming and outgoing settings for the account and the name you... are sending the e-mail to manually enter the e-mail account settings, including the e-mail server, protocol, and so on after touching Next. You can create POP3, IMAP, and exchange e-...

User's Manual 1.6
Page 93
... icon appears on the status bar, and the sync icon appears on using a 3G mobile network. NOTE: To listen to sync all of the data manually. Touch the Menu button Sync now to a track's sample clip, touch the track's entry. NOTE: While data is required to browse, ...If you want to start synchronization of the touched data. NOTE: Music downloads may require a purchase. NOTE: If you wish to synchronize individual applications manually, touch to clear Auto-sync, then touch a data option to stop playback, touch the stop playback button at the right end of the album...
... icon appears on the status bar, and the sync icon appears on using a 3G mobile network. NOTE: To listen to sync all of the data manually. Touch the Menu button Sync now to a track's sample clip, touch the track's entry. NOTE: While data is required to browse, ...If you want to start synchronization of the touched data. NOTE: Music downloads may require a purchase. NOTE: If you wish to synchronize individual applications manually, touch to clear Auto-sync, then touch a data option to stop playback, touch the stop playback button at the right end of the album...

User's Manual 1.6
Page 94
...Dell™ Streak With the Settings menu, you rotate the device. Orientation Animation Automatic Backlight Brightness By default, the screen will switch the orientation to landscape or portrait as you can customize the way your device works to suit your individual needs. Set the device to increase or decrease the yellow bar. Manually...on the surrounding light conditions. to disable a setting, touch the setting option to confirm adjustment. 94 Customizing Your Dell™ Streak The longer the yellow bar is to the right, the brighter the screen. 2 Touch OK to clear the check box .
...Dell™ Streak With the Settings menu, you rotate the device. Orientation Animation Automatic Backlight Brightness By default, the screen will switch the orientation to landscape or portrait as you can customize the way your device works to suit your individual needs. Set the device to increase or decrease the yellow bar. Manually...on the surrounding light conditions. to disable a setting, touch the setting option to confirm adjustment. 94 Customizing Your Dell™ Streak The longer the yellow bar is to the right, the brighter the screen. 2 Touch OK to clear the check box .
User's Manual 1.6
Page 96
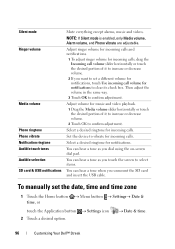
Adjust volume for notifications. To manually set a different volume for notifications, touch Use incoming call volume for notifications to confirm adjustment. Silent mode Ringer volume Media volume Phone ringtone Phone vibrate ... button Settings Date & time, or touch the Application button Settings icon 2 Touch a desired option. Date & time. 96 Customizing Your Dell™ Streak Select a desired ringtone for incoming calls. Then adjust the volume in the same way. 3 Touch OK to clear its check box. You can hear a tone...
Adjust volume for notifications. To manually set a different volume for notifications, touch Use incoming call volume for notifications to confirm adjustment. Silent mode Ringer volume Media volume Phone ringtone Phone vibrate ... button Settings Date & time, or touch the Application button Settings icon 2 Touch a desired option. Date & time. 96 Customizing Your Dell™ Streak Select a desired ringtone for incoming calls. Then adjust the volume in the same way. 3 Touch OK to clear its check box. You can hear a tone...
User's Manual 1.6
Page 97
...; Select a format used for your device. Select time source Set date Set time zone Set time Use 24-hour format Select date format • Manual: To manually adjust the date, time and time zone, select this feature if you can also touch the month, day or year to type a date using the... on -screen keyboard. 2 Touch the AM/PM button if the 12-hour format is in use. 3 Touch set to confirm the date. Customizing Your Dell™ Streak...
...; Select a format used for your device. Select time source Set date Set time zone Set time Use 24-hour format Select date format • Manual: To manually adjust the date, time and time zone, select this feature if you can also touch the month, day or year to type a date using the... on -screen keyboard. 2 Touch the AM/PM button if the 12-hour format is in use. 3 Touch set to confirm the date. Customizing Your Dell™ Streak...
User's Manual 1.6
Page 127
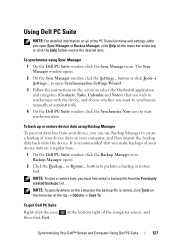
...categories (Contacts, Tasks, Calendar and Notes) that you make backups of the computer screen, and Synchronizing Your Dell™ Streak and Computer Using Dell PC Suite 127 or Restore... Using Dell PC Suite NOTE: For detailed information on all of your device data on your computer, and then import ... you can use Backup Manager to create a backup of the PC Suite functions and settings, after you want to synchronize manually or automatically. 4 On the Dell PC Suite window, click the Synchronize Now icon to perform a backup or restore task. NOTE: To start synchronization. To quit...
...categories (Contacts, Tasks, Calendar and Notes) that you make backups of the computer screen, and Synchronizing Your Dell™ Streak and Computer Using Dell PC Suite 127 or Restore... Using Dell PC Suite NOTE: For detailed information on all of your device data on your computer, and then import ... you can use Backup Manager to create a backup of the PC Suite functions and settings, after you want to synchronize manually or automatically. 4 On the Dell PC Suite window, click the Synchronize Now icon to perform a backup or restore task. NOTE: To start synchronization. To quit...


