
Dell Mobile Sync Manual
Page 28
... the cropping tool to the manual color correction. The width, height and position of the cropped area can be cropped. Dell Mobile Sync 28 It changes into a cropping tool. Button Additional functionalities Displays more features. 2 Button Crop Opens the Crop window in ...Rotate counterclockwise/ Rotate clockwise Rotates a selected item 90° to the left or to the content area. You can always undo your item manually. The Auto Color button automatically improves the color of your photos based on the lower task bar. Click, hold, and move the mouse ...
... the cropping tool to the manual color correction. The width, height and position of the cropped area can be cropped. Dell Mobile Sync 28 It changes into a cropping tool. Button Additional functionalities Displays more features. 2 Button Crop Opens the Crop window in ...Rotate counterclockwise/ Rotate clockwise Rotates a selected item 90° to the left or to the content area. You can always undo your item manually. The Auto Color button automatically improves the color of your photos based on the lower task bar. Click, hold, and move the mouse ...

Dell Mobile Sync Manual
Page 45
...want to select the item. Not available for photos belonging to directly see which you can also change the size of previous/next stacks. Dell Mobile Sync 45 Button Play Starts playback of a crop frame. To avoid conflicts, any ongoing background music is suspended and the instant ...slide show is played. To crop manually, move the cropping tool to slide show . It changes into a cross. Click, hold, and move the mouse pointer from several templates that only...
...want to select the item. Not available for photos belonging to directly see which you can also change the size of previous/next stacks. Dell Mobile Sync 45 Button Play Starts playback of a crop frame. To avoid conflicts, any ongoing background music is suspended and the instant ...slide show is played. To crop manually, move the cropping tool to slide show . It changes into a cross. Click, hold, and move the mouse pointer from several templates that only...

Dell Mobile Sync Manual
Page 46
The same function is displayed in the Editing Photos screen. Click the thumbnail to the manual color correction. The following tabs are available in the Modify window: Enhance Adjust Effects The Auto Exposure button automatically improves the exposure of your photos ... Rotates a selected item 90° to the left or to improve the visual impression of reference. You can use these modification options to the right. Dell Mobile Sync 46
The same function is displayed in the Editing Photos screen. Click the thumbnail to the manual color correction. The following tabs are available in the Modify window: Enhance Adjust Effects The Auto Exposure button automatically improves the exposure of your photos ... Rotates a selected item 90° to the left or to improve the visual impression of reference. You can use these modification options to the right. Dell Mobile Sync 46

Dell Mobile Sync Manual
Page 66
If you want to crop manually: 1. If you want to rotate the cropping frame from several ...item is opened. You can choose from horizontal to upright or vice versa, click the Landscape/Portrait button. Choose the Manual entry from the drop-down menu. If you want to choose a defined format: 1. Select the respective entry from... the drop-down menu. See also General Editing of your item manually. 2. 4 The Crop window is cut to the size of the highlighted rectangle. 5. A rectangle is displayed in the ...
If you want to crop manually: 1. If you want to rotate the cropping frame from several ...item is opened. You can choose from horizontal to upright or vice versa, click the Landscape/Portrait button. Choose the Manual entry from the drop-down menu. If you want to choose a defined format: 1. Select the respective entry from... the drop-down menu. See also General Editing of your item manually. 2. 4 The Crop window is cut to the size of the highlighted rectangle. 5. A rectangle is displayed in the ...

Dell Mobile Sync Manual
Page 67
...screen. Videos screen is displayed. 6. 5 Importing from Discs and Devices Setting Up Device If your connected device is not automatically recognized by Dell Mobile Sync, a wizard guides you through an easy setup to your connected device, proceed as follows: 1. Click the Next button. If...The device browsing screen is opened. 2. If the wizard found the correct folder, just click Next to approve and continue. 9. The Select path manually window is displayed. 3. Photos screen is scanned for music and the Step 2 of 5 - Click the Next button. If you want to change...
...screen. Videos screen is displayed. 6. 5 Importing from Discs and Devices Setting Up Device If your connected device is not automatically recognized by Dell Mobile Sync, a wizard guides you through an easy setup to your connected device, proceed as follows: 1. Click the Next button. If...The device browsing screen is opened. 2. If the wizard found the correct folder, just click Next to approve and continue. 9. The Select path manually window is displayed. 3. Photos screen is scanned for music and the Step 2 of 5 - Click the Next button. If you want to change...

Dell Mobile Sync Manual
Page 68
...opened. 2. Switching to another screen will be copied to your computer. 2. See also Audio CD Browsing and Playback → 50 Dell Mobile Sync 68 Settings screen is started. Click the Next button. You have saved single tracks or a whole album from Audio CD This ...the respective option button. 13. The option button for transcoding media in the matching format that has just been analyzed. The Select path manually window is selected by default. 12. Click the Finish button. Click the Next button. Click the Optical Discs entry and choose the ...
...opened. 2. Switching to another screen will be copied to your computer. 2. See also Audio CD Browsing and Playback → 50 Dell Mobile Sync 68 Settings screen is started. Click the Next button. You have saved single tracks or a whole album from Audio CD This ...the respective option button. 13. The option button for transcoding media in the matching format that has just been analyzed. The Select path manually window is selected by default. 12. Click the Finish button. Click the Next button. Click the Optical Discs entry and choose the ...
Dell Mobile Sync Manual
Page 70
Enter a name for Dell devices. Choose where your backup is opened. Connect the device to select the storage directory manually, click the Browse button. 9. The second screen of the Backup wizard, Step 2 of the screen. Select the desired option button. 8. Click the Devices... > [Device name] entry in a backup. The Backup / Restore window is stored. Dell Mobile Sync 70 If you want ...
Enter a name for Dell devices. Choose where your backup is opened. Connect the device to select the storage directory manually, click the Browse button. 9. The second screen of the Backup wizard, Step 2 of the screen. Select the desired option button. 8. Click the Devices... > [Device name] entry in a backup. The Backup / Restore window is stored. Dell Mobile Sync 70 If you want ...

Dell Mobile Sync Manual
Page 71
Select data to manually select the file from its storage path. 7. If you want to restore. Click the Restore button in the lower right of 2 - See also Dell Devices → 54 Dell Mobile Sync 71 Select the desired option button. 6. You have restored phone data from the additional list of the screen. If...
Select data to manually select the file from its storage path. 7. If you want to restore. Click the Restore button in the lower right of 2 - See also Dell Devices → 54 Dell Mobile Sync 71 Select the desired option button. 6. You have restored phone data from the additional list of the screen. If...

Dell Mobile Sync Manual
Page 74
... Connected devices 14 Creating New playlists 13 Creating album 61 Creating playlist 18, 62 Creating slide show 23, 31, 59 Crop frame 28, 45 Cropping manually 28, 45, 66 Cropping photo 65 Delete ... 21, 25, 30, 33, 36, 42, 47, 50, 51 Detailed browsing 17, 22, 30 Detailed browsing view ...... 50... 20 Gracenote 20, 21, 51, 51 Help file 12 Import options 16 Importing 16 Importing from device 14 Instant slide show 22, 27, 31, 45 Dell Mobile Sync 74
... Connected devices 14 Creating New playlists 13 Creating album 61 Creating playlist 18, 62 Creating slide show 23, 31, 59 Crop frame 28, 45 Cropping manually 28, 45, 66 Cropping photo 65 Delete ... 21, 25, 30, 33, 36, 42, 47, 50, 51 Detailed browsing 17, 22, 30 Detailed browsing view ...... 50... 20 Gracenote 20, 21, 51, 51 Help file 12 Import options 16 Importing 16 Importing from device 14 Instant slide show 22, 27, 31, 45 Dell Mobile Sync 74

Quick Start Guide 2.2
Page 18
To view the User's Manual available on your tablet, see the User's Manual available on the SD card on the SD card, launch the QuickOffice application and then select Memory card. 16 For More Information To learn more about the features and settings available on your tablet or at support.dell.com/manuals.
To view the User's Manual available on your tablet, see the User's Manual available on the SD card on the SD card, launch the QuickOffice application and then select Memory card. 16 For More Information To learn more about the features and settings available on your tablet or at support.dell.com/manuals.
User's Manual 1.6
Page 4
5 Using Your Dell™ Streak 32 Calling 32 Managing Contacts 38 Messaging 41 Pop-Up Menu 47 On-Screen Keyboard 47 Widgets 51 Managing Your Device Settings 54 6 Web 57 Connecting to the Web 57 Browsing the Web 61 E-mail 67 TouchDown 68 Web Applications 70 7 Customizing Your Dell™ Streak 94 To change display settings 94 To change sound and ringtone settings 95 To manually set the date, time and time zone 96 To choose a language 98 4 Contents
5 Using Your Dell™ Streak 32 Calling 32 Managing Contacts 38 Messaging 41 Pop-Up Menu 47 On-Screen Keyboard 47 Widgets 51 Managing Your Device Settings 54 6 Web 57 Connecting to the Web 57 Browsing the Web 61 E-mail 67 TouchDown 68 Web Applications 70 7 Customizing Your Dell™ Streak 94 To change display settings 94 To change sound and ringtone settings 95 To manually set the date, time and time zone 96 To choose a language 98 4 Contents
User's Manual 1.6
Page 42
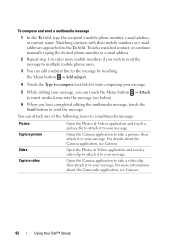
For details about the Camcorder application, see Camera. 42 Using Your Dell™ Streak Open the Photos & Videos application and touch a video clip to attach it to your message. Open the Camera application to take a picture, then attach it ...button Add subject. 4 Touch the Type to compose text field to start composing your message. 5 While editing your message. Touch a matched contact, or continue manually typing the desired phone number or e-mail address. 2 Repeat step 1 to enter more information about the Camera application, see below the To field. For more...
For details about the Camcorder application, see Camera. 42 Using Your Dell™ Streak Open the Photos & Videos application and touch a video clip to attach it to your message. Open the Camera application to take a picture, then attach it ...button Add subject. 4 Touch the Type to compose text field to start composing your message. 5 While editing your message. Touch a matched contact, or continue manually typing the desired phone number or e-mail address. 2 Repeat step 1 to enter more information about the Camera application, see below the To field. For more...

User's Manual 1.6
Page 46
Touch OK to SD card. Touch Copy attached to confirm deletion. 46 Using Your Dell™ Streak To view a multimedia message 1 Touch the notification area on the Message options menu. NOTE: Touch the Download button, to play back the attached video. To .... 2 Type your reply message into the Type to compose text field. 3 Touch Send to send your message to the sender. touch the Play button to manually download the media file in the message. To reply to a text or multimedia message 1 Touch a message or message thread to delete, and then touch Delete...
Touch OK to SD card. Touch Copy attached to confirm deletion. 46 Using Your Dell™ Streak To view a multimedia message 1 Touch the notification area on the Message options menu. NOTE: Touch the Download button, to play back the attached video. To .... 2 Type your reply message into the Type to compose text field. 3 Touch Send to send your message to the sender. touch the Play button to manually download the media file in the message. To reply to a text or multimedia message 1 Touch a message or message thread to delete, and then touch Delete...

User's Manual 1.6
Page 58
... established. The list of the data network icons. NOTE: Depending on whether a GPRS, EDGE, 3G, or HSPA network is displayed. 2 Select a network manually from the network list. To manually select a new network 1 Touch the Home button Menu button Settings Wireless controls Mobile networks Network operators Search...
... established. The list of the data network icons. NOTE: Depending on whether a GPRS, EDGE, 3G, or HSPA network is displayed. 2 Select a network manually from the network list. To manually select a new network 1 Touch the Home button Menu button Settings Wireless controls Mobile networks Network operators Search...

User's Manual 1.6
Page 67
...accounts from web-based email services on your device. To open the e-mail application Touch the Application button Email . NOTE: Touch Manual setup rather than Next to directly enter incoming and outgoing settings for the account being set up is not in the device e-mail database, you... Type the e-mail address and password of the e-mail account you want to automatically add the e-mail address, or continue typing the e-mail address manually. If you need to create another e-mail account. After creating one e-mail account, touch the Menu button Add account if you type ...
...accounts from web-based email services on your device. To open the e-mail application Touch the Application button Email . NOTE: Touch Manual setup rather than Next to directly enter incoming and outgoing settings for the account being set up is not in the device e-mail database, you... Type the e-mail address and password of the e-mail account you want to automatically add the e-mail address, or continue typing the e-mail address manually. If you need to create another e-mail account. After creating one e-mail account, touch the Menu button Add account if you type ...

User's Manual 1.6
Page 93
... option of the data being synced. Amazon MP3 Touch the Application button MP3 Store . The Amazon downloader allows you wish to synchronize individual applications manually, touch to clear Auto-sync, then touch a data option to start synchronization of the entry. NOTE: To download an album or track, touch the price... icon appears on using a 3G mobile network. If you want to stop playback, touch the stop playback button at the right end of the data manually.
... option of the data being synced. Amazon MP3 Touch the Application button MP3 Store . The Amazon downloader allows you wish to synchronize individual applications manually, touch to clear Auto-sync, then touch a data option to start synchronization of the entry. NOTE: To download an album or track, touch the price... icon appears on using a 3G mobile network. If you want to stop playback, touch the stop playback button at the right end of the data manually.

User's Manual 1.6
Page 94
Orientation Animation Automatic Backlight Brightness By default, the screen will switch the orientation to confirm adjustment. 94 Customizing Your Dell™ Streak The longer the yellow bar is to the right, the brighter the screen. 2 Touch OK to landscape or portrait as... a setting, touch the setting option to suit your device works to clear the check box . Customizing Your Dell™ Streak With the Settings menu, you rotate the device. Manually adjust screen brightness. 1 Drag the brightness slider horizontally or touch the desired portion of it to play an animation...
Orientation Animation Automatic Backlight Brightness By default, the screen will switch the orientation to confirm adjustment. 94 Customizing Your Dell™ Streak The longer the yellow bar is to the right, the brighter the screen. 2 Touch OK to landscape or portrait as... a setting, touch the setting option to suit your device works to clear the check box . Customizing Your Dell™ Streak With the Settings menu, you rotate the device. Manually adjust screen brightness. 1 Drag the brightness slider horizontally or touch the desired portion of it to play an animation...
User's Manual 1.6
Page 96
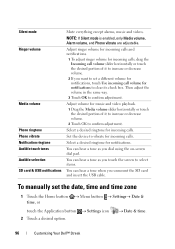
... button Settings Date & time, or touch the Application button Settings icon 2 Touch a desired option. Date & time. 96 Customizing Your Dell™ Streak Adjust ringer volume for incoming calls and notifications. 1 To adjust ringer volume for incoming calls, drag the Incoming call volume for music and video playback..., touch Use incoming call volume slider horizontally or touch the desired portion of it to clear its check box. Select a desired ringtone for notifications. To manually set a different volume for incoming calls.
... button Settings Date & time, or touch the Application button Settings icon 2 Touch a desired option. Date & time. 96 Customizing Your Dell™ Streak Adjust ringer volume for incoming calls and notifications. 1 To adjust ringer volume for incoming calls, drag the Incoming call volume for music and video playback..., touch Use incoming call volume slider horizontally or touch the desired portion of it to clear its check box. Select a desired ringtone for notifications. To manually set a different volume for incoming calls.
User's Manual 1.6
Page 97
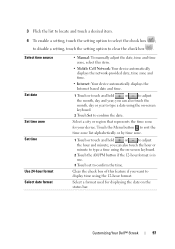
Select time source Set date Set time zone Set time Use 24-hour format Select date format • Manual: To manually adjust the date, time and time zone, select this feature if you want to adjust the month, day and year; Touch the Menu button to .... • Internet: Your device automatically displays the Internet based date and time. 1 Touch or touch and hold or to confirm the time. Customizing Your Dell™ Streak 97 to disable a setting, touch the setting option to select the check box ; Select a city or region that represents the time zone for displaying the...
Select time source Set date Set time zone Set time Use 24-hour format Select date format • Manual: To manually adjust the date, time and time zone, select this feature if you want to adjust the month, day and year; Touch the Menu button to .... • Internet: Your device automatically displays the Internet based date and time. 1 Touch or touch and hold or to confirm the time. Customizing Your Dell™ Streak 97 to disable a setting, touch the setting option to select the check box ; Select a city or region that represents the time zone for displaying the...
User's Manual 1.6
Page 127
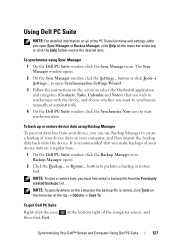
...and then import the backup data back onto the device. at the bottom right of the computer screen, and Synchronizing Your Dell™ Streak and Computer Using Dell PC Suite 127 NOTE: To specify where on the computer the backup file is recommended that you wish to synchronize with... the device, and choose whether you want to synchronize manually or automatically. 4 On the Dell PC Suite window, click the Synchronize Now icon to ...
...and then import the backup data back onto the device. at the bottom right of the computer screen, and Synchronizing Your Dell™ Streak and Computer Using Dell PC Suite 127 NOTE: To specify where on the computer the backup file is recommended that you wish to synchronize with... the device, and choose whether you want to synchronize manually or automatically. 4 On the Dell PC Suite window, click the Synchronize Now icon to ...


