Setup Guide
Page 5
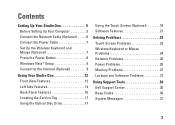
... Your Computer 5 Connect the Network Cable (Optional 6 Connect the Power Cable 7 Set Up the Wireless Keyboard and Mouse (Optional 7 Press the Power Button 8 Windows Vista® Setup 9 Connect to the Internet (Optional 9 Using Your Studio One 12 Front View Features 12 Left Side Features 14 Back Panel Features... Features 21 Solving Problems 23 Touch Screen Problems 23 Wireless Keyboard or Mouse Problems 24 Network Problems 25 Power Problems 26 Memory Problems 27 Lockups and Software Problems 27 Using Support Tools 30 Dell Support Center 30 Beep Codes 30 System Messages 31 3
... Your Computer 5 Connect the Network Cable (Optional 6 Connect the Power Cable 7 Set Up the Wireless Keyboard and Mouse (Optional 7 Press the Power Button 8 Windows Vista® Setup 9 Connect to the Internet (Optional 9 Using Your Studio One 12 Front View Features 12 Left Side Features 14 Back Panel Features... Features 21 Solving Problems 23 Touch Screen Problems 23 Wireless Keyboard or Mouse Problems 24 Network Problems 25 Power Problems 26 Memory Problems 27 Lockups and Software Problems 27 Using Support Tools 30 Dell Support Center 30 Beep Codes 30 System Messages 31 3

Setup Guide
Page 7
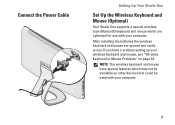
...ensure that shipped with your Studio One and connecting peripherals. You should never place your Studio One may cause it is powered on. 5 To prevent overheating ensure that you allow easy access to a power source, controls and connections... on all the sides. WARNING: Before you begin any of 5.1 cm (2 inches) on the left side, adequate ventilation, and a stable level surface to overheat. For additional safety best practices information, see the Regulatory Compliance Homepage at www.dell.com/ regulatory_compliance. Setting Up Your Studio One...
...ensure that shipped with your Studio One and connecting peripherals. You should never place your Studio One may cause it is powered on. 5 To prevent overheating ensure that you allow easy access to a power source, controls and connections... on all the sides. WARNING: Before you begin any of 5.1 cm (2 inches) on the left side, adequate ventilation, and a stable level surface to overheat. For additional safety best practices information, see the Regulatory Compliance Homepage at www.dell.com/ regulatory_compliance. Setting Up Your Studio One...
Setup Guide
Page 9
... mouse, see "Wireless Keyboard or Mouse Problems" on other devices that could be available on page 24. Connect the Power Cable Setting Up Your Studio One Set Up the Wireless Keyboard and Mouse (Optional) Your Studio One supports a special wireless (non-Bluetooth) keyboard and mouse which may not be used with your computer. 7 If you...
... mouse, see "Wireless Keyboard or Mouse Problems" on other devices that could be available on page 24. Connect the Power Cable Setting Up Your Studio One Set Up the Wireless Keyboard and Mouse (Optional) Your Studio One supports a special wireless (non-Bluetooth) keyboard and mouse which may not be used with your computer. 7 If you...

Setup Guide
Page 10
Setting Up Your Studio One Press the Power Button 8
Setting Up Your Studio One Press the Power Button 8
Setup Guide
Page 17
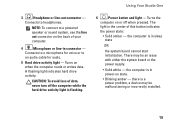
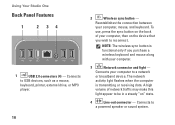
Using Your Studio One 3 Headphone or line-out connector - Connects to an audio cable for voice or...the center of this button indicates the power state: • Solid amber - there is a power problem, a device may be malfunctioning or incorrectly installed. 15 the computer is flashing. 6 Power button and light - NOTE: To connect to a powered speaker or sound system, use the ...line out connector on state. • Blinking amber - the computer is in power-on the back of data, never turn off when pressed. Connects to a microphone for audio. 5 ...
Using Your Studio One 3 Headphone or line-out connector - Connects to an audio cable for voice or...the center of this button indicates the power state: • Solid amber - there is a power problem, a device may be malfunctioning or incorrectly installed. 15 the computer is flashing. 6 Power button and light - NOTE: To connect to a powered speaker or sound system, use the ...line out connector on state. • Blinking amber - the computer is in power-on the back of data, never turn off when pressed. Connects to a microphone for audio. 5 ...
Setup Guide
Page 18
... keyboard and mouse along with your computer, then on " state. 4 Line-out connector - Connects your computer, mouse, and keyboard. Using Your Studio One Back Panel Features 1 2 34 1 USB 2.0 connectors (4) - Connects to a powered speaker or sound system. Reestablishes the connection between your computer to reconnect. Connects to USB devices, such as a mouse, keyboard, printer...
... keyboard and mouse along with your computer, then on " state. 4 Line-out connector - Connects your computer, mouse, and keyboard. Using Your Studio One Back Panel Features 1 2 34 1 USB 2.0 connectors (4) - Connects to a powered speaker or sound system. Reestablishes the connection between your computer to reconnect. Connects to USB devices, such as a mouse, keyboard, printer...
Setup Guide
Page 24
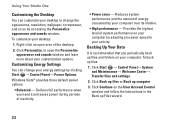
...Backing Up Your Data It is recommended that you need it and saves power during periods of energy consumed by adapting processor speed to open area of system performance on your computer by your desktop: 1. Click Personalize, to your customization options. Click Start → ... of the desktop. 2. Right-click an open the Personalize appearance and sounds window and learn more about your activity. Click Back up files or Back up files: 1. To customize your computer over its lifetime. • High performance - Using Your Studio One Customizing the Desktop You can ...
...Backing Up Your Data It is recommended that you need it and saves power during periods of energy consumed by adapting processor speed to open area of system performance on your computer by your desktop: 1. Click Personalize, to your customization options. Click Start → ... of the desktop. 2. Right-click an open the Personalize appearance and sounds window and learn more about your activity. Click Back up files or Back up files: 1. To customize your computer over its lifetime. • High performance - Using Your Studio One Customizing the Desktop You can ...
Setup Guide
Page 25
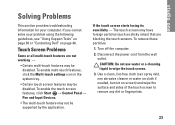
... Problems This section provides troubleshooting information for your problem using the following guidelines, see "Using Support Tools" on page 30 or "Contacting Dell" on screen) and wipe the surface and sides of the touch screen to wipe the touch screen. 3. To enable the touch screen...Panel→ Pen and Input Devices. • The multi-touch feature may be supported by the application. To remove these particles: 1. Disconnect the power cord from the wall outlet. To enable multi-touch features, click the Multi-touch settings icon in the system tray. • Certain touch screen...
... Problems This section provides troubleshooting information for your problem using the following guidelines, see "Using Support Tools" on page 30 or "Contacting Dell" on screen) and wipe the surface and sides of the touch screen to wipe the touch screen. 3. To enable the touch screen...Panel→ Pen and Input Devices. • The multi-touch feature may be supported by the application. To remove these particles: 1. Disconnect the power cord from the wall outlet. To enable multi-touch features, click the Multi-touch settings icon in the system tray. • Certain touch screen...

Setup Guide
Page 26
... keyboard and mouse have lost their connection with the computer. • Check the batteries in the keyboard and mouse to ensure that they have enough power and are installed correctly. • Re-establish a connection with the computer - Solving Problems Wireless Keyboard or Mouse Problems If the mouse and keyboard stop communicating...
... keyboard and mouse have lost their connection with the computer. • Check the batteries in the keyboard and mouse to ensure that they have enough power and are installed correctly. • Re-establish a connection with the computer - Solving Problems Wireless Keyboard or Mouse Problems If the mouse and keyboard stop communicating...

Setup Guide
Page 27
... Wireless Connections The network activity light on the integrated network connector lets you verify that your connection to the network. If the network connection is powered on and connected to your wireless router to ensure it is lost - Save and close any open files, and exit any open programs. 2. Click Start...
... Wireless Connections The network activity light on the integrated network connector lets you verify that your connection to the network. If the network connection is powered on and connected to your wireless router to ensure it is lost - Save and close any open files, and exit any open programs. 2. Click Start...
Setup Guide
Page 28
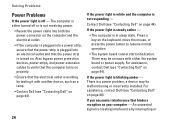
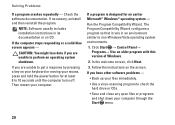
...that hinders reception on page 44). An unwanted signal is in sleep state. For assistance, contact Dell (see "Contacting Dell" on your computer - If the power light is steady amber - • The computer is creating interference by testing it with either ...If you encounter interference that the electrical outlet is a power problem, a device may be malfunctioning or incorrectly installed. For assistance, contact Dell (see "Contacting Dell" on . Also bypass power protection devices, power strips, and power extension cables to resume normal operation • The system...
...that hinders reception on page 44). An unwanted signal is in sleep state. For assistance, contact Dell (see "Contacting Dell" on your computer - If the power light is steady amber - • The computer is creating interference by testing it with either ...If you encounter interference that the electrical outlet is a power problem, a device may be malfunctioning or incorrectly installed. For assistance, contact Dell (see "Contacting Dell" on . Also bypass power protection devices, power strips, and power extension cables to resume normal operation • The system...

Setup Guide
Page 29
... resolves the problem. • See the software documentation for minimum memory requirements. A program stops responding - Ensure that the power cable is supported by your computer. If you experience other signals. Click the program that is no longer responding 4. End ... are: • Power, keyboard, and mouse extension cables. • Too many devices connected to a power strip. • Multiple power strips connected to the electrical outlet. For assistance, contact Dell (see "Contacting Dell" on page 44). • Run Dell Diagnostics (see "Dell Diagnostics" on page 33...
... resolves the problem. • See the software documentation for minimum memory requirements. A program stops responding - Ensure that the power cable is supported by your computer. If you experience other signals. Click the program that is no longer responding 4. End ... are: • Power, keyboard, and mouse extension cables. • Too many devices connected to a power strip. • Multiple power strips connected to the electrical outlet. For assistance, contact Dell (see "Contacting Dell" on page 44). • Run Dell Diagnostics (see "Dell Diagnostics" on page 33...
Setup Guide
Page 30
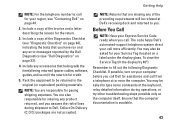
... your computer through the Start menu. 28 Follow the instructions on your keyboard or moving your mouse, press and hold the power button for an earlier Microsoft® Windows® operating system - CAUTION: You might lose data if you have other software problems - • Back up your ... operating system environments. 1. Click Start → Control Panel→ Programs→ Use an older program with this version of Windows. 2. Run the Program Compatibility Wizard. NOTE: Software usually includes installation instructions in an environment similar to check the hard drive ...
... your computer through the Start menu. 28 Follow the instructions on your keyboard or moving your mouse, press and hold the power button for an earlier Microsoft® Windows® operating system - CAUTION: You might lose data if you have other software problems - • Back up your ... operating system environments. 1. Click Start → Control Panel→ Programs→ Use an older program with this version of Windows. 2. Run the Program Compatibility Wizard. NOTE: Software usually includes installation instructions in an environment similar to check the hard drive ...

Setup Guide
Page 34
... Alert! To start the Hardware Troubleshooter: 1. CMOS checksum error - See "Contacting Dell" on page 44 for assistance. Disconnect the USB device. Use an external power source to function properly. See "Contacting Dell" on page 44 for the same error. Alternatively you can use the Hardware Troubleshooter ...to complete the boot routine three consecutive times for assistance. Your USB device needs more power for assistance. See "Contacting Dell" on page 44 for it to connect the USB device, or if your device has two USB cables, connect ...
... Alert! To start the Hardware Troubleshooter: 1. CMOS checksum error - See "Contacting Dell" on page 44 for assistance. Disconnect the USB device. Use an external power source to function properly. See "Contacting Dell" on page 44 for the same error. Alternatively you can use the Hardware Troubleshooter ...to complete the boot routine three consecutive times for assistance. Your USB device needs more power for assistance. See "Contacting Dell" on page 44 for it to connect the USB device, or if your device has two USB cables, connect ...
Setup Guide
Page 45
...itself. You may be refused at Dell's receiving dock and returned to you assume the risk of loss during operations, or try other troubleshooting steps possible only at or near the computer. NOTE: Returns that belong with the item(s) being returned (power cables, software, guides, and so... on) if the return is available. 43 To view the Service Tag tilt the display by the Dell Diagnostics (see "Dell Diagnostics" on page 44), indicating the tests that the computer ...
...itself. You may be refused at Dell's receiving dock and returned to you assume the risk of loss during operations, or try other troubleshooting steps possible only at or near the computer. NOTE: Returns that belong with the item(s) being returned (power cables, software, guides, and so... on) if the return is available. 43 To view the Service Tag tilt the display by the Dell Diagnostics (see "Dell Diagnostics" on page 44), indicating the tests that the computer ...

Setup Guide
Page 52
one back-panel connector for microphone/line-in and headphone/ line-out; Specifications External connectors Audio Two side-panel connectors for line-out Audio Type Power Frequency response Integrated speakers 4W x 2 150 Hz to 15 kHz Video Type LCD interface nVIDIA MCP7A LVDS Display Type (active-matrix TFT) Maximum resolution Luminance ...
one back-panel connector for microphone/line-in and headphone/ line-out; Specifications External connectors Audio Two side-panel connectors for line-out Audio Type Power Frequency response Integrated speakers 4W x 2 150 Hz to 15 kHz Video Type LCD interface nVIDIA MCP7A LVDS Display Type (active-matrix TFT) Maximum resolution Luminance ...
Setup Guide
Page 53
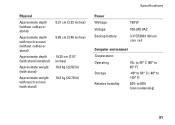
... (with stand) Approximate weight with touch screen (with stand) 8.21 cm (3.23 inches) 8.85 cm (3.48 inches) 19.25 cm (7.57 inches) 10.4 kg (22.92 lb) 10.3 kg (22.70 lb) Specifications Power Wattage Voltage Backup battery 190 W 100-240 VAC 3-V CR2032 lithium coin cell Computer environment Temperature: Operating Storage Relative...
... (with stand) Approximate weight with touch screen (with stand) 8.21 cm (3.23 inches) 8.85 cm (3.48 inches) 19.25 cm (7.57 inches) 10.4 kg (22.92 lb) 10.3 kg (22.70 lb) Specifications Power Wattage Voltage Backup battery 190 W 100-240 VAC 3-V CR2032 lithium coin cell Computer environment Temperature: Operating Storage Relative...

Setup Guide
Page 58
Index help getting assistance and support 40 I Internet connection 9 ISP Internet Service Provider 9 L line-in connector 15 M media card reader 14 memory minimum and maximum 49 memory problems solving 27 Memory Stick reader 14 memory support 49 56 microphone connector 15 MMC 14 Multi Media Card reader 14 N network connection fixing 25 network connector location 16 network speed testing 25 P physical specifications 50 ports and connectors 49 power button and light 15 power problems, solving 26 power specifications 51 problems, solving 23
Index help getting assistance and support 40 I Internet connection 9 ISP Internet Service Provider 9 L line-in connector 15 M media card reader 14 memory minimum and maximum 49 memory problems solving 27 Memory Stick reader 14 memory support 49 56 microphone connector 15 MMC 14 Multi Media Card reader 14 N network connection fixing 25 network connector location 16 network speed testing 25 P physical specifications 50 ports and connectors 49 power button and light 15 power problems, solving 26 power specifications 51 problems, solving 23


