Service Manual
Page 1
... Service Dell SP2009Wc Horizontal Frequency 30 kHz to 83 kHz Table Of Contents Description Page Description Page Table Of Contents 1 Revision List 2 ECN History 3 Important Safety Notice 4 1.Monitor Specifications 5 2.LCD Monitor Description 6 3.Operation Instructions 7 3.1.General Instructions 7 3.2.Control Buttons 8 3.3 Adjusting the Picture 9 4.Input/Output Specification 20 4.1.Input Signal Connector 20 4.2.Factory Preset Display Modes 21 4.3.Power Supply Requirements 21 4.4.Panel Specification 22 4.5.Definition of Pixel Defects 23 5.Block Diagram 25 5.1.Software...
... Service Dell SP2009Wc Horizontal Frequency 30 kHz to 83 kHz Table Of Contents Description Page Description Page Table Of Contents 1 Revision List 2 ECN History 3 Important Safety Notice 4 1.Monitor Specifications 5 2.LCD Monitor Description 6 3.Operation Instructions 7 3.1.General Instructions 7 3.2.Control Buttons 8 3.3 Adjusting the Picture 9 4.Input/Output Specification 20 4.1.Input Signal Connector 20 4.2.Factory Preset Display Modes 21 4.3.Power Supply Requirements 21 4.4.Panel Specification 22 4.5.Definition of Pixel Defects 23 5.Block Diagram 25 5.1.Software...
Service Manual
Page 4
..., USE ONLY ORIGINAL MANUFACTURER'S REPLACEMENT PARTS, WHICH ARE LISTED WITH THEIR PART NUMBERS IN THE PARTS LIST SECTION OF THIS SERVICE MANUAL. 20" LCD Color Monitor Important Safety Notice Dell SP2009Wc Proper service and repair is important to the safe, reliable operation of all liability. AOC assumes no circumstances should be carefully read in which service might be used when and as AOC. CAUTION-Use of controls or adjustments...
..., USE ONLY ORIGINAL MANUFACTURER'S REPLACEMENT PARTS, WHICH ARE LISTED WITH THEIR PART NUMBERS IN THE PARTS LIST SECTION OF THIS SERVICE MANUAL. 20" LCD Color Monitor Important Safety Notice Dell SP2009Wc Proper service and repair is important to the safe, reliable operation of all liability. AOC assumes no circumstances should be carefully read in which service might be used when and as AOC. CAUTION-Use of controls or adjustments...
Service Manual
Page 5
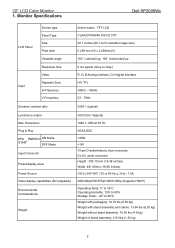
..., 160° (horizontal) typ Input Response time Video Separate Sync H-Frequency V-Frequency 2 ms typical (Grey to Grey) R, G, B Analog Interface, DVI digital Interface H/V TTL 30kHz - 83kHz 53 - 76Hz Dynamic contrast ratio 2000:1 (typical) Luminance output Max. Resolution Plug & Play EPA ENERGY ON Mode STAR® OFF Mode Input Connector Preset display area: Power Source Video display capabilities (DVI playback) Environmental Considerations Weight 300 CD/m ²(typical) 1680 x 1050 at 60 Hz VESA DDC 20" LCD Color Monitor 1.
..., 160° (horizontal) typ Input Response time Video Separate Sync H-Frequency V-Frequency 2 ms typical (Grey to Grey) R, G, B Analog Interface, DVI digital Interface H/V TTL 30kHz - 83kHz 53 - 76Hz Dynamic contrast ratio 2000:1 (typical) Luminance output Max. Resolution Plug & Play EPA ENERGY ON Mode STAR® OFF Mode Input Connector Preset display area: Power Source Video display capabilities (DVI playback) Environmental Considerations Weight 300 CD/m ²(typical) 1680 x 1050 at 60 Hz VESA DDC 20" LCD Color Monitor 1.
Service Manual
Page 6
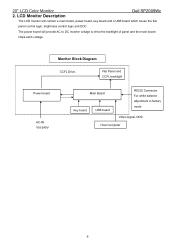
The power board will contain a main board, power board, key board and a USB board which house the flat panel control logic, brightness control logic and DDC. 20" LCD Color Monitor 2. Monitor Block Diagram CCFL Drive. Flat Panel and CCFL backlight Power board AC-IN 100-240V Main Board Key board USB board RS232 Connector For white balance adjustment in factory mode Video signal, DDC Host Computer 6 LCD Monitor Description Dell SP2009Wc The LCD monitor will provide AC to DC Inverter voltage to drive the backlight of panel and the main board chips each voltage.
The power board will contain a main board, power board, key board and a USB board which house the flat panel control logic, brightness control logic and DDC. 20" LCD Color Monitor 2. Monitor Block Diagram CCFL Drive. Flat Panel and CCFL backlight Power board AC-IN 100-240V Main Board Key board USB board RS232 Connector For white balance adjustment in factory mode Video signal, DDC Host Computer 6 LCD Monitor Description Dell SP2009Wc The LCD monitor will provide AC to DC Inverter voltage to drive the backlight of panel and the main board chips each voltage.

Service Manual
Page 7
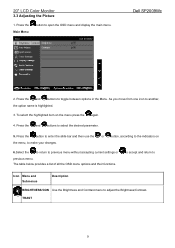
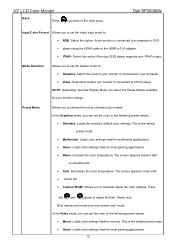
... A Preset modes B Description Use the Preset modes button to adjust the image settings. 20" LCD Color Monitor 3. Operation instructions 3.1 Using the Front Panel Controls Use the buttons on -screen display(OSD). Input source D Use the Menu button to open the on the front of the monitor to choose from menu and sub-menus. C Use the Input source button to select different video signals that may be connected to the "Brightness" and "Contrast" control menu. Menu E Use the Exit button to adjust the image settings. 7 Brightness / Contrast Use the Brightness / Contrast button to...
... A Preset modes B Description Use the Preset modes button to adjust the image settings. 20" LCD Color Monitor 3. Operation instructions 3.1 Using the Front Panel Controls Use the buttons on -screen display(OSD). Input source D Use the Menu button to open the on the front of the monitor to choose from menu and sub-menus. C Use the Input source button to select different video signals that may be connected to the "Brightness" and "Contrast" control menu. Menu E Use the Exit button to adjust the image settings. 7 Brightness / Contrast Use the Brightness / Contrast button to...
Service Manual
Page 9
... slide bar and then use the the menu, to previous menu without accepting current settings or previous menu. Dell SP2009Wc 2. or button, according to the indicators on the menu press the again. 4. to accept and return to Icon Menu and Submenus Description BRIGHTNESS/CON Use the Brightness and Contrast menu to open the OSD menu and display the main menu. Press the Main Menu button to adjust the Brightness/Contrast. As you move from...
... slide bar and then use the the menu, to previous menu without accepting current settings or previous menu. Dell SP2009Wc 2. or button, according to the indicators on the menu press the again. 4. to accept and return to Icon Menu and Submenus Description BRIGHTNESS/CON Use the Brightness and Contrast menu to open the OSD menu and display the main menu. Press the Main Menu button to adjust the Brightness/Contrast. As you move from...
Service Manual
Page 10
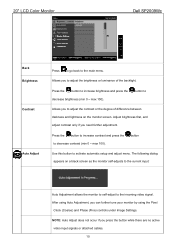
... automatic setup and adjust menu. Allows you press the button while there are no active video input signals or attached cables. 10 button Use this button to decrease contrast (min 0 ~ max 100). 20" LCD Color Monitor Dell SP2009Wc Back Brightness Contrast Auto Adjust Press to go back to increase brightness and press the decrease brightness (min 0 ~ max 100). button to Allows you to adjust the contrast or the degree of difference between darkness and lightness on a black screen...
... automatic setup and adjust menu. Allows you press the button while there are no active video input signals or attached cables. 10 button Use this button to decrease contrast (min 0 ~ max 100). 20" LCD Color Monitor Dell SP2009Wc Back Brightness Contrast Auto Adjust Press to go back to increase brightness and press the decrease brightness (min 0 ~ max 100). button to Allows you to adjust the contrast or the degree of difference between darkness and lightness on a black screen...
Service Manual
Page 11
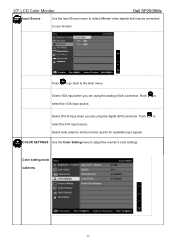
... to let the monitor search for available input signals. Select Auto select to select the DVI input source. 20" LCD Color Monitor Dell SP2009Wc Input Source Use the Input Source menu to select different video signals that may be connected to adjust the monitor's color settings. Select DVI-D input when you are using the analog (VGA) connector. Color setting mode submenu 11 COLOR SETTINGS Use the Color Setting menu to your monitor. Push to the main menu Select VGA input when you are using the digital (DVI) connector. Push to go back to select the VGA input source.
... to let the monitor search for available input signals. Select Auto select to select the DVI input source. 20" LCD Color Monitor Dell SP2009Wc Input Source Use the Input Source menu to select different video signals that may be connected to adjust the monitor's color settings. Select DVI-D input when you are using the analog (VGA) connector. Color setting mode submenu 11 COLOR SETTINGS Use the Color Setting menu to your monitor. Push to the main menu Select VGA input when you are using the digital (DVI) connector. Push to go back to select the VGA input source.
Service Manual
Page 12
... DVI adapter. • YPbPr: Select this option if your monitor change. Press the and buttons to choose from a list of preset color modes. This is the default preset mode. • Multimedia: Loads color settings ideal for multimedia applications. • Game: Loads color settings ideal for most gaming applications. 12 Preset Mode Allows you can set the color to the main menu. In the Video mode, you to adjust the Red, Green, and Blue...
... DVI adapter. • YPbPr: Select this option if your monitor change. Press the and buttons to choose from a list of preset color modes. This is the default preset mode. • Multimedia: Loads color settings ideal for multimedia applications. • Game: Loads color settings ideal for most gaming applications. 12 Preset Mode Allows you can set the color to the main menu. In the Video mode, you to adjust the Red, Green, and Blue...

Service Manual
Page 13
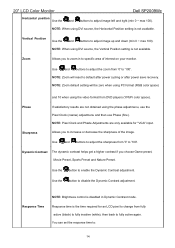
... factory defaults. NOTE: Wide Mode is available only in the Video mode. Color Reset NOTE: Saturation adjustment is not available at video resolutions greater than 1680x1050. 20" LCD Color Monitor • Sports: Loads color settings ideal for nature. Use or to adjust the saturation from '0' to adjust the skin tone of the image. Resets your monitor's color settings to the main menu. Use or to adjust the hue from '0' to adjust the color saturation of the image. DISPLAY SETTINGS Display setting mode submenu Use the Displays Settings menu to change...
... factory defaults. NOTE: Wide Mode is available only in the Video mode. Color Reset NOTE: Saturation adjustment is not available at video resolutions greater than 1680x1050. 20" LCD Color Monitor • Sports: Loads color settings ideal for nature. Use or to adjust the saturation from '0' to adjust the skin tone of the image. Resets your monitor's color settings to the main menu. Use or to adjust the hue from '0' to adjust the color saturation of the image. DISPLAY SETTINGS Display setting mode submenu Use the Displays Settings menu to change...
Service Manual
Page 14
... Adjustments are not obtained using the video format from fully active (black) to fully inactive (white), then back to change from DVD players (YPbPr color space). Use the button to : 14 You can set the response time to enable the Dynamic Contrast adjustment. 20" LCD Color Monitor Dell SP2009Wc Horizontal position Use the and buttons to default after power cycling or after power save recovery. Use and buttons to adjust the zoom from '0' to specific area of the image...
... Adjustments are not obtained using the video format from fully active (black) to fully inactive (white), then back to change from DVD players (YPbPr color space). Use the button to : 14 You can set the response time to enable the Dynamic Contrast adjustment. 20" LCD Color Monitor Dell SP2009Wc Horizontal position Use the and buttons to default after power cycling or after power save recovery. Use and buttons to adjust the zoom from '0' to specific area of the image...

Service Manual
Page 15
... Off - Exit Menu Press to exit the OSD main menu and press to the sound bar during monitor standby. Dell SP2009Wc Display Reset Resets the monitor's display settings to the factory defaults. Reset Audio Setting Resets your monitor audio settings to the factory defaults. Allows you to turn off the power to the audio during monitor standby. AUDIO SETTINGS Use the Audio Settings to the sound bar during the audio power save mode. Audio Setting mode submenu Power Save Audio Allows you to turn on the power to accept changes. On - 20" LCD Color Monitor •...
... Off - Exit Menu Press to exit the OSD main menu and press to the sound bar during monitor standby. Dell SP2009Wc Display Reset Resets the monitor's display settings to the factory defaults. Reset Audio Setting Resets your monitor audio settings to the factory defaults. Allows you to turn off the power to the audio during monitor standby. AUDIO SETTINGS Use the Audio Settings to the sound bar during the audio power save mode. Audio Setting mode submenu Power Save Audio Allows you to turn on the power to accept changes. On - 20" LCD Color Monitor •...
Service Manual
Page 16
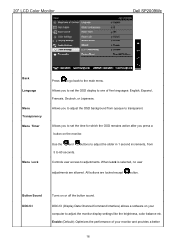
... monitor and provides a better 16 All buttons are allowed. Enable (Default): Optimizes the performance of five languages: English, Espanol, Francais, Deutsch, or Japanese. Allows you to set the time for which the OSD remains active after you to adjust the OSD background from 5 to adjustments. DDC/CI (Display Data Channel/Command Interface) allows a software on or off the button sound. 20" LCD Color Monitor Dell SP2009Wc Back Language Menu Transparency Menu Timer Menu Lock...
... monitor and provides a better 16 All buttons are allowed. Enable (Default): Optimizes the performance of five languages: English, Espanol, Francais, Deutsch, or Japanese. Allows you to set the time for which the OSD remains active after you to adjust the OSD background from 5 to adjustments. DDC/CI (Display Data Channel/Command Interface) allows a software on or off the button sound. 20" LCD Color Monitor Dell SP2009Wc Back Language Menu Transparency Menu Timer Menu Lock...
Service Manual
Page 18
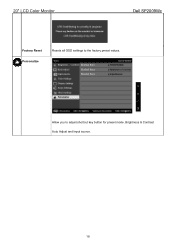
Allow you to the factory preset values. Brightness & Contrast Auto Adjust and Input source. 18 20" LCD Color Monitor Dell SP2009Wc Factory Reset Personalize Resets all OSD settings to adjust shortcut key button for preset mode.
Allow you to the factory preset values. Brightness & Contrast Auto Adjust and Input source. 18 20" LCD Color Monitor Dell SP2009Wc Factory Reset Personalize Resets all OSD settings to adjust shortcut key button for preset mode.
Service Manual
Page 26
Turn on the LED and set it to show the coming mode. 18) Process the OSD display. 19) Read the keyboard. Is the power key pressed? 26 Scalar initializes. 10) In standby mode? 11) Update the lifetime of brightness from analog port? 16) Display "No connection Check Signal Cable" message. And go into EEprom. Dell SP2009Wc 2) Is the EEprom blank? 3) Program the EEprom by default values. 4) Get the PWM value...
Turn on the LED and set it to show the coming mode. 18) Process the OSD display. 19) Read the keyboard. Is the power key pressed? 26 Scalar initializes. 10) In standby mode? 11) Update the lifetime of brightness from analog port? 16) Display "No connection Check Signal Cable" message. And go into EEprom. Dell SP2009Wc 2) Is the EEprom blank? 3) Program the EEprom by default values. 4) Get the PWM value...

Service Manual
Page 29
torque B=6 kgF. Mechanical Instruction Dell SP2009Wc Tools: 2 Power screwdrivers(φ=5mm、L=60mm); 1 small cross screwdriver; Setting: Power screwdriver torque A=11 kgF. Cm; Pull out the hinge cover follow the arrowhead direction and remove it, then remove the hinge. 29 turnbuckle driver; 20" LCD Color Monitor 6. Cm Fig Remark Remove stand: Remove the two screws and remove the stand by Torque A. 1.
torque B=6 kgF. Mechanical Instruction Dell SP2009Wc Tools: 2 Power screwdrivers(φ=5mm、L=60mm); 1 small cross screwdriver; Setting: Power screwdriver torque A=11 kgF. Cm; Pull out the hinge cover follow the arrowhead direction and remove it, then remove the hinge. 29 turnbuckle driver; 20" LCD Color Monitor 6. Cm Fig Remark Remove stand: Remove the two screws and remove the stand by Torque A. 1.

Service Manual
Page 32
Panel Symbol 10 11 12 13 TPV Part Number CBPC8CMUDLQ1 PWPC8A42CQA1 095G 82012D507 750GLCA1WAA33Z000D 32 Description Main Board PWPC Board WIRE HARNESS Panel(CPT) Install: the cable doesn't touch the capacitances and don't be laid above the capacitances. 20" LCD Color Monitor Power Board Main Board Dell SP2009Wc Remove the Power Board, Main Board: Remove the screws by torque B Disconnect connector remarked in green to remove the Power Board, Main Board.
Panel Symbol 10 11 12 13 TPV Part Number CBPC8CMUDLQ1 PWPC8A42CQA1 095G 82012D507 750GLCA1WAA33Z000D 32 Description Main Board PWPC Board WIRE HARNESS Panel(CPT) Install: the cable doesn't touch the capacitances and don't be laid above the capacitances. 20" LCD Color Monitor Power Board Main Board Dell SP2009Wc Remove the Power Board, Main Board: Remove the screws by torque B Disconnect connector remarked in green to remove the Power Board, Main Board.

Service Manual
Page 54
NG Check Q802, Q803,D810, D812, Q801 ,Q804,Q811andQ812 OK Check the output of square wave at short time. 20" LCD Color Monitor No Backlight Check CN902 pin7, 8 = 5V OK NG Check ON/OFF signal OK NG Check IC801 PIN12=13V Dell SP2009Wc Check adapter or MB Check Interface board NG OK Change Q802, Q803 Check IC801 PIN10, 9 have the output of square wave at short time NG OK Change IC801 Check Q803,Q802 PIN5, 6, 7, 8 have the output of T801,T802 NG OK Check connecter & lamp Change T801,T802 54
NG Check Q802, Q803,D810, D812, Q801 ,Q804,Q811andQ812 OK Check the output of square wave at short time. 20" LCD Color Monitor No Backlight Check CN902 pin7, 8 = 5V OK NG Check ON/OFF signal OK NG Check IC801 PIN12=13V Dell SP2009Wc Check adapter or MB Check Interface board NG OK Change Q802, Q803 Check IC801 PIN10, 9 have the output of square wave at short time NG OK Change IC801 Check Q803,Q802 PIN5, 6, 7, 8 have the output of T801,T802 NG OK Check connecter & lamp Change T801,T802 54

Service Manual
Page 56
... AUTO-ADJUST button during press Power button will show x = 328 ±28, y = 344 ±28, Ymin=200 cd/m2 18. Adjust the BLUE on OSD, until chroma 7120 indicator reached B=100 7. Adjust the RED on chroma 7120 will activate the factory mode, Gain adjustment: Move cursor to "-Factory Setting-" and press MENU key to Channel 3 (with up before proceeding White-Balance adjustment. Adjust Color1 (93000K) color-temperature 8. The LCD-indicator on OSD window...
... AUTO-ADJUST button during press Power button will show x = 328 ±28, y = 344 ±28, Ymin=200 cd/m2 18. Adjust the BLUE on OSD, until chroma 7120 indicator reached B=100 7. Adjust the RED on chroma 7120 will activate the factory mode, Gain adjustment: Move cursor to "-Factory Setting-" and press MENU key to Channel 3 (with up before proceeding White-Balance adjustment. Adjust Color1 (93000K) color-temperature 8. The LCD-indicator on OSD window...

Service Manual
Page 57
Turn the POWER-button off to on OSD, until chroma 7120 indicator reached G=100 Dell SP2009Wc 20. Adjust the GREEN on to the min. 57 Max Brightness measurement: >300 cd/㎡ Test conditions: a. b. 20" LCD Color Monitor 19. Move cursor to " Exit/Save" sub-menu and press MENU key to the full white pattern, in user mode main menu: 1. Switch to save adjust value and exit. Set Brightness, Contrast to the max. 2. Set Red, Green, and Blue to the...
Turn the POWER-button off to on OSD, until chroma 7120 indicator reached G=100 Dell SP2009Wc 20. Adjust the GREEN on to the min. 57 Max Brightness measurement: >300 cd/㎡ Test conditions: a. b. 20" LCD Color Monitor 19. Move cursor to " Exit/Save" sub-menu and press MENU key to the full white pattern, in user mode main menu: 1. Switch to save adjust value and exit. Set Brightness, Contrast to the max. 2. Set Red, Green, and Blue to the...


