
Users Guide
Page 2
..., and warnings NOTE: A NOTE indicates important information that helps you make better use of their respective companies. 2017-04 Rev. All other jurisdictions. All rights reserved. CAUTION: A CAUTION indicates potential damage to hardware or loss of data if instructions are trademarks of Dell Inc. Dell™ and the Dell logo are not followed. A00 and international copyright...
..., and warnings NOTE: A NOTE indicates important information that helps you make better use of their respective companies. 2017-04 Rev. All other jurisdictions. All rights reserved. CAUTION: A CAUTION indicates potential damage to hardware or loss of data if instructions are trademarks of Dell Inc. Dell™ and the Dell logo are not followed. A00 and international copyright...

Users Guide
Page 3
Contents Safety instructions 4 About your monitor 5 Package contents 5 Setting up the monitor 6 Attaching the stand 6 Removing the stand 6 Connecting Your Monitor 7 Parts and controls 8 Front view 8 Back view 8 Using On Screen Display (OSD) Functions 9 The main menu 9 Technical specifications 13 Monitor specifications 13 Supported resolutions and refresh rates 13 Maintenance guidelines 15 Care 15 Troubleshooting 15 Appendix 16 Contacting Dell 16 3
Contents Safety instructions 4 About your monitor 5 Package contents 5 Setting up the monitor 6 Attaching the stand 6 Removing the stand 6 Connecting Your Monitor 7 Parts and controls 8 Front view 8 Back view 8 Using On Screen Display (OSD) Functions 9 The main menu 9 Technical specifications 13 Monitor specifications 13 Supported resolutions and refresh rates 13 Maintenance guidelines 15 Care 15 Troubleshooting 15 Appendix 16 Contacting Dell 16 3
Users Guide
Page 4
... instructions This monitor is manufactured and tested on a flat, soft, and clean surface. WARNING: Before you clean your power service provider. WARNING: When you are avoided. Use the following safety guidelines to remove any cover or touch the inside of the monitor. WARNING: Place the monitor on a ground principle that only a qualified service technician installs it checked by other light sources are using the monitor if the cover is not covered by Dell...
... instructions This monitor is manufactured and tested on a flat, soft, and clean surface. WARNING: Before you clean your power service provider. WARNING: When you are avoided. Use the following safety guidelines to remove any cover or touch the inside of the monitor. WARNING: Place the monitor on a ground principle that only a qualified service technician installs it checked by other light sources are using the monitor if the cover is not covered by Dell...
Users Guide
Page 5
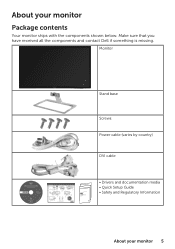
Monitor Stand base Screws Power cable (varies by country) DVI cable • Drivers and documentation media • Quick Setup Guide • Safety and Regulatory Information About your monitor Package contents Your monitor ships with the components shown below. About your monitor 5 Make sure that you have received all the components and contact Dell if something is missing.
Monitor Stand base Screws Power cable (varies by country) DVI cable • Drivers and documentation media • Quick Setup Guide • Safety and Regulatory Information About your monitor Package contents Your monitor ships with the components shown below. About your monitor 5 Make sure that you have received all the components and contact Dell if something is missing.
Users Guide
Page 6
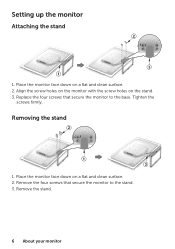
Align the screw holes on the monitor with the screw holes on a flat and clean surface. 2. Remove the stand. 6 About your monitor Place the monitor face down on a flat and clean surface. 2. Tighten the screws firmly. Removing the stand 2 1 3 1. Remove the four screws that secure the monitor to the stand. 3. Replace the four screws that secure the monitor to the base. Place the monitor face down on the stand. 3. Setting up the monitor Attaching the stand 2 3 1 1.
Align the screw holes on the monitor with the screw holes on a flat and clean surface. 2. Remove the stand. 6 About your monitor Place the monitor face down on a flat and clean surface. 2. Tighten the screws firmly. Removing the stand 2 1 3 1. Remove the four screws that secure the monitor to the stand. 3. Replace the four screws that secure the monitor to the base. Place the monitor face down on the stand. 3. Setting up the monitor Attaching the stand 2 3 1 1.
Users Guide
Page 7
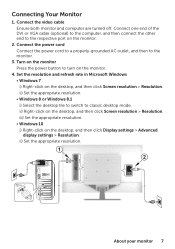
... the DVI or VGA cable (optional) to the computer, and then connect the other end to turn on the monitor. 4. ii) Set the appropriate resolution. 1 2 About your monitor 7 Set the resolution and refresh rate in Microsoft Windows • Windows 7 i) Right-click on the desktop, and then click Screen resolution > Resolution. Connecting Your Monitor 1. iii) Set the appropriate resolution. • Windows 10 i) Right-click on the monitor. 2. Turn on the monitor Press the power button to the respective port on...
... the DVI or VGA cable (optional) to the computer, and then connect the other end to turn on the monitor. 4. ii) Set the appropriate resolution. 1 2 About your monitor 7 Set the resolution and refresh rate in Microsoft Windows • Windows 7 i) Right-click on the desktop, and then click Screen resolution > Resolution. Connecting Your Monitor 1. iii) Set the appropriate resolution. • Windows 10 i) Right-click on the monitor. 2. Turn on the monitor Press the power button to the respective port on...
Users Guide
Page 8
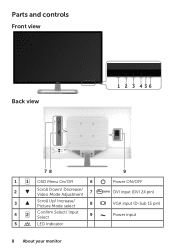
Parts and controls Front view Back view 1 2 3 4 56 78 1 OSD Menu On/Off 6 2 Scroll Down/ Decrease/ Video Mode Adjustment 7 3 Scroll Up/ Increase/ Picture Mode select 8 4 Confirm Select/ Input Select 9 5 LED Indicator 8 About your monitor 9 Power ON/OFF DVI input (DVI 24 pin) VGA input (D-Sub 15 pin) Power input
Parts and controls Front view Back view 1 2 3 4 56 78 1 OSD Menu On/Off 6 2 Scroll Down/ Decrease/ Video Mode Adjustment 7 3 Scroll Up/ Increase/ Picture Mode select 8 4 Confirm Select/ Input Select 9 5 LED Indicator 8 About your monitor 9 Power ON/OFF DVI input (DVI 24 pin) VGA input (D-Sub 15 pin) Power input
Users Guide
Page 9
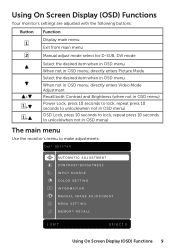
... in OSD menu, directly enters Picture Mode Select the desired item when in OSD menu When not in OSD menu, directly enters Video Mode Adjustment + Recall both Contrast and Brightness (when not in OSD menu) Power Lock, press 10 seconds to lock, repeat press 10 + seconds to unlock(when not in OSD menu) OSD Lock, press 10 seconds to lock, repeat press 10 seconds + to unlock(when not in OSD menu) The main menu Use the monitor's menu to make adjustments: Dell SE3218H AUTOMATIC ADJUSTMENT CONTRAST/BRIGHTNESS INPUT SOURCE COLOR SETTING INFORMATION MANUAL IMAGE ADJUSTMENT MENU SETTING...
... in OSD menu, directly enters Picture Mode Select the desired item when in OSD menu When not in OSD menu, directly enters Video Mode Adjustment + Recall both Contrast and Brightness (when not in OSD menu) Power Lock, press 10 seconds to lock, repeat press 10 + seconds to unlock(when not in OSD menu) OSD Lock, press 10 seconds to lock, repeat press 10 seconds + to unlock(when not in OSD menu) The main menu Use the monitor's menu to make adjustments: Dell SE3218H AUTOMATIC ADJUSTMENT CONTRAST/BRIGHTNESS INPUT SOURCE COLOR SETTING INFORMATION MANUAL IMAGE ADJUSTMENT MENU SETTING...
Users Guide
Page 10
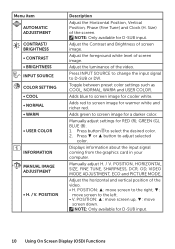
.... Menu item AUTOMATIC ADJUSTMENT CONTRAST/ BRIGHTNESS • CONTRAST • BRIGHTNESS INPUT SOURCE COLOR SETTING • COOL • NORMAL • WARM • USER COLOR INFORMATION MANUAL IMAGE ADJUSTMENT • H. / V. Press INPUT SOURCE to change the input signal to select the desired color. 2. Adjust the horizontal and vertical position of the screen. Size) of the video. • H. Press ▼ or ▲ button to screen image for RED (R), GREEN (G), BLUE (B). 1. POSITION: ▲: move screen to screen image for D-SUB input. 10 Using On Screen Display...
.... Menu item AUTOMATIC ADJUSTMENT CONTRAST/ BRIGHTNESS • CONTRAST • BRIGHTNESS INPUT SOURCE COLOR SETTING • COOL • NORMAL • WARM • USER COLOR INFORMATION MANUAL IMAGE ADJUSTMENT • H. / V. Press INPUT SOURCE to change the input signal to select the desired color. 2. Adjust the horizontal and vertical position of the screen. Size) of the video. • H. Press ▼ or ▲ button to screen image for RED (R), GREEN (G), BLUE (B). 1. POSITION: ▲: move screen to screen image for D-SUB input. 10 Using On Screen Display...
Users Guide
Page 11
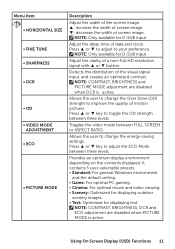
... change the energy-saving settings. Detects the distribution of screen image. Menu item • HORIZONTAL SIZE • FINE TUNE • SHARPNESS • DCR • OD • VIDEO MODE ADJUSTMENT • ECO • PICTURE MODE Description Adjust the width of the screen image. ▲: increase the width of screen image, ▼: decrease the width of the visual signal input, and creates an optimized contrast. NOTE: Only available for D-SUB input. NOTE: CONTRAST, BRIGHTNESS and PICTURE MODE adjustment are disabled when PICTURE MODE...
... change the energy-saving settings. Detects the distribution of screen image. Menu item • HORIZONTAL SIZE • FINE TUNE • SHARPNESS • DCR • OD • VIDEO MODE ADJUSTMENT • ECO • PICTURE MODE Description Adjust the width of the screen image. ▲: increase the width of screen image, ▼: decrease the width of the visual signal input, and creates an optimized contrast. NOTE: Only available for D-SUB input. NOTE: CONTRAST, BRIGHTNESS and PICTURE MODE adjustment are disabled when PICTURE MODE...
Users Guide
Page 12
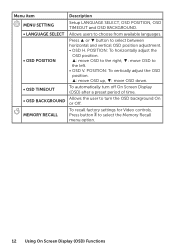
... vertical OSD position adjustment. • OSD H. MEMORY RECALL To recall factory settings for Video controls. POSITION: To vertically adjust the OSD position. ▲: move OSD up, ▼: move OSD to turn off On Screen Display (OSD) after a preset period of time. • OSD BACKGROUND Allows the user to the left. • OSD V. POSITION: To horizontally adjust the OSD position. ▲: move OSD to the right, ▼: move OSD down. • OSD TIMEOUT To automatically turn the OSD background On or Off. Menu item Description MENU SETTING Setup LANGUAGE...
... vertical OSD position adjustment. • OSD H. MEMORY RECALL To recall factory settings for Video controls. POSITION: To vertically adjust the OSD position. ▲: move OSD up, ▼: move OSD to turn off On Screen Display (OSD) after a preset period of time. • OSD BACKGROUND Allows the user to the left. • OSD V. POSITION: To horizontally adjust the OSD position. ▲: move OSD to the right, ▼: move OSD down. • OSD TIMEOUT To automatically turn the OSD background On or Off. Menu item Description MENU SETTING Setup LANGUAGE...
Users Guide
Page 13
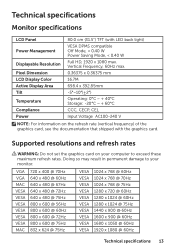
... these maximum refresh rates. Vertical Frequency, 60Hz max. 0.36375 x 0.36375 mm 16.7M 698.4 x 392.85mm -5°~10°(±2°) Operating: 0°C ~ + 40°C Storage: -20°C ~ + 60°C CCC, CECP, CEL Input Voltage AC100-240 V NOTE: For information on your monitor. Technical specifications Monitor specifications LCD Panel Power Management Displayable Resolution Pixel Dimension LCD Display Color Active Display Area Tilt Temperature Compliance Power 80.0 cm (31.5") TFT (with the graphics card.
... these maximum refresh rates. Vertical Frequency, 60Hz max. 0.36375 x 0.36375 mm 16.7M 698.4 x 392.85mm -5°~10°(±2°) Operating: 0°C ~ + 40°C Storage: -20°C ~ + 60°C CCC, CECP, CEL Input Voltage AC100-240 V NOTE: For information on your monitor. Technical specifications Monitor specifications LCD Panel Power Management Displayable Resolution Pixel Dimension LCD Display Color Active Display Area Tilt Temperature Compliance Power 80.0 cm (31.5") TFT (with the graphics card.
Users Guide
Page 14
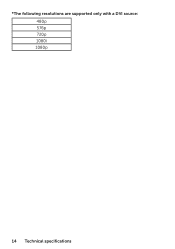
*The following resolutions are supported only with a DVI source: 480p 576p 720p 1080i 1080p 14 Technical specifications
*The following resolutions are supported only with a DVI source: 480p 576p 720p 1080i 1080p 14 Technical specifications
Users Guide
Page 15
... . • Adjust brightness. Place your monitor away from the sun to the video output port on back of your monitor. • Ensure your monitor is installed in a clean and moisture-free area. • Keep your monitor in the video cable connector. • Connect the monitor to verify that the outlet is supplying proper voltage. • Ensure that the power cable connecting the monitor and the wall outlet is properly connected and secure. No video/power light turned on...
... . • Adjust brightness. Place your monitor away from the sun to the video output port on back of your monitor. • Ensure your monitor is installed in a clean and moisture-free area. • Keep your monitor in the video cable connector. • Connect the monitor to verify that the outlet is supplying proper voltage. • Ensure that the power cable connecting the monitor and the wall outlet is properly connected and secure. No video/power light turned on...
Users Guide
Page 16
NOTE: If you do not have an active internet connection, you can find contact information on your country. Appendix Contacting Dell To contact Dell for sales, technical support, or customer service issues, see www.dell.com/contactdell. NOTE: Availability varies by country and product, and some services may not be available in your purchase invoice, packing slip, bill, or Dell product catalog. 16 Appendix
NOTE: If you do not have an active internet connection, you can find contact information on your country. Appendix Contacting Dell To contact Dell for sales, technical support, or customer service issues, see www.dell.com/contactdell. NOTE: Availability varies by country and product, and some services may not be available in your purchase invoice, packing slip, bill, or Dell product catalog. 16 Appendix


