

Dell Users Guide
Page 8
Lists the regulatory approvals. Lists the regulatory approvals. 8 About Your Monitor To connect your computer to the monitor using a VGA cable. Label Description 1 AC power connector 2 VGA connector 3 Regulatory rating label Use To connect the monitor power cable. To connect your computer to the monitor using a VGA cable. Side View Bottom View Label Description 1 AC power connector 2 HDMI connector 3 VGA connector 4 Regulatory rating label Use To connect the monitor power cable. Connect your computer with HDMI cable.
Lists the regulatory approvals. Lists the regulatory approvals. 8 About Your Monitor To connect your computer to the monitor using a VGA cable. Label Description 1 AC power connector 2 VGA connector 3 Regulatory rating label Use To connect the monitor power cable. To connect your computer to the monitor using a VGA cable. Side View Bottom View Label Description 1 AC power connector 2 HDMI connector 3 VGA connector 4 Regulatory rating label Use To connect the monitor power cable. Connect your computer with HDMI cable.

Dell Users Guide
Page 12
HDMI connector Pin Number 19-pin Side of the Connected Signal Cable 1 TMDS DATA 2+ 2 TMDS DATA 2 SHIELD 3 TMDS DATA 2 4 TMDS DATA 1+ 5 TMDS DATA 1 SHIELD 6 TMDS DATA 1 7 TMDS DATA 0+ 8 TMDS DATA 0 SHIELD 9 TMDS DATA 0 10 TMDS CLOCK 11 TMDS CLOCK SHIELD 12 TMDS CLOCK- 13 No Connection 14 No Connection 15 DDC CLOCK (SDA) 16 DDC DATA (SDA) 17 GND 18 +5 V POWER 19 HOT PLUG DETECT 12 About Your Monitor
HDMI connector Pin Number 19-pin Side of the Connected Signal Cable 1 TMDS DATA 2+ 2 TMDS DATA 2 SHIELD 3 TMDS DATA 2 4 TMDS DATA 1+ 5 TMDS DATA 1 SHIELD 6 TMDS DATA 1 7 TMDS DATA 0+ 8 TMDS DATA 0 SHIELD 9 TMDS DATA 0 10 TMDS CLOCK 11 TMDS CLOCK SHIELD 12 TMDS CLOCK- 13 No Connection 14 No Connection 15 DDC CLOCK (SDA) 16 DDC DATA (SDA) 17 GND 18 +5 V POWER 19 HOT PLUG DETECT 12 About Your Monitor
Dell Users Guide
Page 14
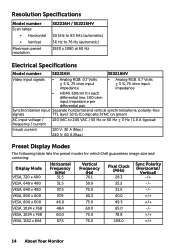
... 1080 at 60 Hz Electrical Specifications Model number SE2216H SE2216HV Video input signals • Analog RGB: 0.7 Volts ± 5 %, 75 ohm input impedance • Analog RGB: 0.7 Volts ± 5 %, 75 ohm input impedance • HDMI, 600mV for each differential line, 100 ohm input... / current Inrush current 120 V: 30 A (Max.) 240 V: 60 A (Max.) Preset Display Modes The following table lists the preset modes for which Dell guarantees image size and centering: Display Mode VESA, 720 x 400 Horizontal Frequency (kHz) 31.5 Vertical Frequency (Hz) 70.1 Pixel Clock (MHz) 28.3...
... 1080 at 60 Hz Electrical Specifications Model number SE2216H SE2216HV Video input signals • Analog RGB: 0.7 Volts ± 5 %, 75 ohm input impedance • Analog RGB: 0.7 Volts ± 5 %, 75 ohm input impedance • HDMI, 600mV for each differential line, 100 ohm input... / current Inrush current 120 V: 30 A (Max.) 240 V: 60 A (Max.) Preset Display Modes The following table lists the preset modes for which Dell guarantees image size and centering: Display Mode VESA, 720 x 400 Horizontal Frequency (kHz) 31.5 Vertical Frequency (Hz) 70.1 Pixel Clock (MHz) 28.3...

Dell Users Guide
Page 15
..., 15 pins; • Digital: HDMI, 19 pins (cable not included) 15-pin D-subminiature (Black connector) Analog: D-Sub, 15 pins Height Width Depth Dimensions: (without stand assembly ( no cables) 2.78 kg ... +/+ VESA, 1600 x 900 60.0 60.0 108.0 +/+ VESA, 1920 x 1080 67.5 60.0 148.5 +/+ Physical Characteristics The following table lists the monitor's physical characteristics: Model Number SE2216H SE2216HV Connector type • • Signal cable type • • Dimensions: (with stand assembly and cables 3.61 kg (7.96 lb) Weight without stand) Height 395.7 mm...
..., 15 pins; • Digital: HDMI, 19 pins (cable not included) 15-pin D-subminiature (Black connector) Analog: D-Sub, 15 pins Height Width Depth Dimensions: (without stand assembly ( no cables) 2.78 kg ... +/+ VESA, 1600 x 900 60.0 60.0 108.0 +/+ VESA, 1920 x 1080 67.5 60.0 148.5 +/+ Physical Characteristics The following table lists the monitor's physical characteristics: Model Number SE2216H SE2216HV Connector type • • Signal cable type • • Dimensions: (with stand assembly and cables 3.61 kg (7.96 lb) Weight without stand) Height 395.7 mm...

Dell Users Guide
Page 19
Connect the black VGA or HDMI cable to the corresponding video port on the back of the procedures in this section, follow the Safety Instructions. Do not use all cables only when they are connected to the computer: 1. Turn off your computer. Use the all cables at the same time. To connect your monitor to different computers with appropriate video systems. Connecting VGA Cable SE2216H: SE2216HV: Setting Up the Monitor 19 Connecting Your Monitor WARNING: Before you begin any of your computer and disconnect the power cable. 2.
Connect the black VGA or HDMI cable to the corresponding video port on the back of the procedures in this section, follow the Safety Instructions. Do not use all cables only when they are connected to the computer: 1. Turn off your computer. Use the all cables at the same time. To connect your monitor to different computers with appropriate video systems. Connecting VGA Cable SE2216H: SE2216HV: Setting Up the Monitor 19 Connecting Your Monitor WARNING: Before you begin any of your computer and disconnect the power cable. 2.

Dell Users Guide
Page 20
Connecting HDMI cable (Optional Purchase) (for SE2216H) NOTE: The graphics are used for cable attachment), organize all necessary cables to your monitor and computer, (See Connecting Your Monitor for the purpose of illustration only. Organizing Your Cables After attaching all cables as shown above. 20 Setting Up the Monitor Appearance on the computer may vary.
Connecting HDMI cable (Optional Purchase) (for SE2216H) NOTE: The graphics are used for cable attachment), organize all necessary cables to your monitor and computer, (See Connecting Your Monitor for the purpose of illustration only. Organizing Your Cables After attaching all cables as shown above. 20 Setting Up the Monitor Appearance on the computer may vary.

Dell Users Guide
Page 22
Use the Input Source key to select between different video signals that may be connected to your monitor. • VGA input • HDMI input Use the Menu key to open the on the front of preset color modes. Use the Exit key to exit on the monitor. See ...
Use the Input Source key to select between different video signals that may be connected to your monitor. • VGA input • HDMI input Use the Menu key to open the on the front of preset color modes. Use the Exit key to exit on the monitor. See ...

Dell Users Guide
Page 28
Input Source Use the Input Source menu to select between different video (for available input signals. Auto Select VGA HDMI Select Auto Select to scan for SE2216H) signals that may be connected to your monitor. Push to select the HDMI Input Source . 28 Operating the Monitor Push to select the VGA Input Source . Select HDMI input when you are using the analog (VGA) connector. Select VGA input when you are using the HDMI connector.
Input Source Use the Input Source menu to select between different video (for available input signals. Auto Select VGA HDMI Select Auto Select to scan for SE2216H) signals that may be connected to your monitor. Push to select the HDMI Input Source . 28 Operating the Monitor Push to select the VGA Input Source . Select HDMI input when you are using the analog (VGA) connector. Select VGA input when you are using the HDMI connector.

Dell Users Guide
Page 29
Color Use the Color menu to DVI adapter. • YPbPr: Select this option if your DVD player supports only YPbPr output. Operating the Monitor 29 Input Color Format Allows you to set the video input mode to: • RGB: Select this option if your monitor is connected to a computer or DVD player using the HDMI to adjust the monitor's color settings.
Color Use the Color menu to DVI adapter. • YPbPr: Select this option if your DVD player supports only YPbPr output. Operating the Monitor 29 Input Color Format Allows you to set the video input mode to: • RGB: Select this option if your monitor is connected to a computer or DVD player using the HDMI to adjust the monitor's color settings.

Dell Users Guide
Page 42
See Solving Problems for more information. 42 Operating the Monitor The monitor will enter Power Save Mode after 5 minutes if left at this state. If VGA or HDMI cable is not connected, a floating dialog box as shown below appears.
See Solving Problems for more information. 42 Operating the Monitor The monitor will enter Power Save Mode after 5 minutes if left at this state. If VGA or HDMI cable is not connected, a floating dialog box as shown below appears.

Dell Users Guide
Page 46
... check whether your monitor is working correctly. If your monitor and reconnect the video cable; To ensure proper Self-Test operation, remove both VGA and HDMI cables from the back of the procedures in selftest mode, the power LED remains white. Turn on both your computer and the monitor. While in...
... check whether your monitor is working correctly. If your monitor and reconnect the video cable; To ensure proper Self-Test operation, remove both VGA and HDMI cables from the back of the procedures in selftest mode, the power LED remains white. Turn on both your computer and the monitor. While in...
Dell Users Guide
Page 49
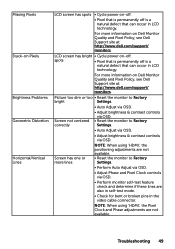
... Stuck-on Pixels Brightness Problems Geometric Distortion Horizontal/Vertical Lines LCD screen has spots • Cycle power on -off. NOTE: When using 'HDMI', the positioning adjustments are not available. • Reset the monitor to Factory Settings. • Perform Auto Adjust via OSD. • Adjust... Quality and Pixel Policy, see Dell Support site at : http://www.dell.com/support/ monitors. spots • Pixel that is permanently off is a natural defect that can occur in LCD technology. For more lines NOTE: When using 'HDMI', the Pixel Clock and Phase adjustments are also in...
... Stuck-on Pixels Brightness Problems Geometric Distortion Horizontal/Vertical Lines LCD screen has spots • Cycle power on -off. NOTE: When using 'HDMI', the positioning adjustments are not available. • Reset the monitor to Factory Settings. • Perform Auto Adjust via OSD. • Adjust... Quality and Pixel Policy, see Dell Support site at : http://www.dell.com/support/ monitors. spots • Pixel that is permanently off is a natural defect that can occur in LCD technology. For more lines NOTE: When using 'HDMI', the Pixel Clock and Phase adjustments are also in...

Dell Users Guide
Page 51
...", "down" mode by moving the mouse or or "Menu" key, the pressing any key on the keyboard. When computer is not available. NOTE: When choosing HDMI mode, the Auto Adjust function is not in diagnostics. Troubleshooting 51
...", "down" mode by moving the mouse or or "Menu" key, the pressing any key on the keyboard. When computer is not available. NOTE: When choosing HDMI mode, the Auto Adjust function is not in diagnostics. Troubleshooting 51


