User Guide
Page 3
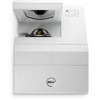
Contents 1 Your Dell Projector 7 About Your Projector 9 About Your Interactive Pen (for S500wi only) . . . . 10 2 Connecting Your Projector 12 Installing the Optional Wireless Dongle 13 Install the Cable Cover 14 Connecting to a Computer 15 Connecting a Computer Using a VGA Cable . . . . 15 Monitor Loop-Through Connection Using VGA Cables 16 Connecting a Computer Using a ...
Contents 1 Your Dell Projector 7 About Your Projector 9 About Your Interactive Pen (for S500wi only) . . . . 10 2 Connecting Your Projector 12 Installing the Optional Wireless Dongle 13 Install the Cable Cover 14 Connecting to a Computer 15 Connecting a Computer Using a VGA Cable . . . . 15 Monitor Loop-Through Connection Using VGA Cables 16 Connecting a Computer Using a ...
User Guide
Page 4
Professional Installation Options: Installation for Driving Automatic Screen 25 Connection With Commercial RS232 Control Box . 26 Connecting With Your Interactive Pen (for S500wi only 27 3 Using Your Projector 29 Turning Your Projector On 29 Turning Your Projector Off 29 Adjusting the ...Remote Control 36 Using the Interactive Pen (for S500wi only) 44 4 Contents out of range 40 Combinations of buttons 40 Using the Wrist Strap (for S500wi only 42 Installing the Remote Control Batteries 43 Charging the Interactive Pen Battery (for S500wi only 39 OSD warning messages - low battery...
Professional Installation Options: Installation for Driving Automatic Screen 25 Connection With Commercial RS232 Control Box . 26 Connecting With Your Interactive Pen (for S500wi only 27 3 Using Your Projector 29 Turning Your Projector On 29 Turning Your Projector Off 29 Adjusting the ...Remote Control 36 Using the Interactive Pen (for S500wi only) 44 4 Contents out of range 40 Combinations of buttons 40 Using the Wrist Strap (for S500wi only 42 Installing the Remote Control Batteries 43 Charging the Interactive Pen Battery (for S500wi only 39 OSD warning messages - low battery...
User Guide
Page 5
...Charging the Interactive Pen Battery by Docking Charger 47 Operating Range with Remote Control 49 Operating Range with Interactive Pen (for S500wi only 50 Using the On-Screen Display 51 INPUT SOURCE 51 AUTO ADJUST 52 BRIGHTNESS/CONTRAST 53 VIDEO MODE 53 VOLUME ... 54 ADVANCED SETTINGS 54 LANGUAGE 72 HELP 72 Wireless Networking Installation 73 Enable Wireless on the Projector 74 Install the Wireless Application Software on Your Computer 75 S500 or S500wi Wireless Application Software . . 78 Presentation to Go (PtG) Installation 82 PtG Viewer 83 Photo Viewer 83 PtG/Photo Function...
...Charging the Interactive Pen Battery by Docking Charger 47 Operating Range with Remote Control 49 Operating Range with Interactive Pen (for S500wi only 50 Using the On-Screen Display 51 INPUT SOURCE 51 AUTO ADJUST 52 BRIGHTNESS/CONTRAST 53 VIDEO MODE 53 VOLUME ... 54 ADVANCED SETTINGS 54 LANGUAGE 72 HELP 72 Wireless Networking Installation 73 Enable Wireless on the Projector 74 Install the Wireless Application Software on Your Computer 75 S500 or S500wi Wireless Application Software . . 78 Presentation to Go (PtG) Installation 82 PtG Viewer 83 Photo Viewer 83 PtG/Photo Function...

User Guide
Page 11
...the wireless projector near medical equipment. 11 Do not use the wireless projector near microwave ovens. It should be used indoors. Your Dell Projector 11 NOTE: • Do not attempt to wall mount the projector by a qualified technician. • Recommended Projector Wall... Mount Kit (P/N: N4MYM). For more information, see the Dell Support website at support.dell.com. • For more information, see the Safety Information that shipped with your projector. • The S500/S500wi projector can only be installed by yourself.
...the wireless projector near medical equipment. 11 Do not use the wireless projector near microwave ovens. It should be used indoors. Your Dell Projector 11 NOTE: • Do not attempt to wall mount the projector by a qualified technician. • Recommended Projector Wall... Mount Kit (P/N: N4MYM). For more information, see the Dell Support website at support.dell.com. • For more information, see the Safety Information that shipped with your projector. • The S500/S500wi projector can only be installed by yourself.
User Guide
Page 13
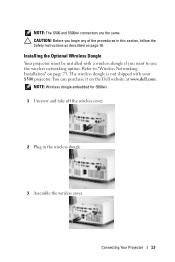
... NOTE: Wireless dongle embedded for S500wi. 1 Unscrew and take off the wireless cover. 2 Plug in this section, follow the Safety Instructions as described on the Dell website at www.dell.com. Installing the Optional Wireless Dongle Your projector must be installed with your S500 projector. NOTE:... The S500 and S500wi connectors are the same. Connecting Your Projector 13 CAUTION: Before you...
... NOTE: Wireless dongle embedded for S500wi. 1 Unscrew and take off the wireless cover. 2 Plug in this section, follow the Safety Instructions as described on the Dell website at www.dell.com. Installing the Optional Wireless Dongle Your projector must be installed with your S500 projector. NOTE:... The S500 and S500wi connectors are the same. Connecting Your Projector 13 CAUTION: Before you...

User Guide
Page 14
You can find cable cover in the projector's box. 2 Assemble the cable cover to your projector's box. Install the Cable Cover Your projector comes with a cable cover. Follow the following steps to assemble the cable cover and your projector. 1 Locate the cable cover in your projector at the Right. 14 Connecting Your Projector
You can find cable cover in the projector's box. 2 Assemble the cable cover to your projector's box. Install the Cable Cover Your projector comes with a cable cover. Follow the following steps to assemble the cable cover and your projector. 1 Locate the cable cover in your projector at the Right. 14 Connecting Your Projector
User Guide
Page 17
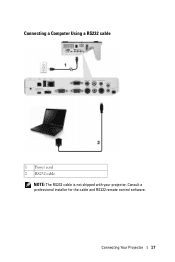
Consult a professional installer for the cable and RS232 remote control software. Connecting a Computer Using a RS232 cable 1 Power cord 2 RS232 cable NOTE: The RS232 cable is not shipped with your projector. Connecting Your Projector 17
Consult a professional installer for the cable and RS232 remote control software. Connecting a Computer Using a RS232 cable 1 Power cord 2 RS232 cable NOTE: The RS232 cable is not shipped with your projector. Connecting Your Projector 17
User Guide
Page 19
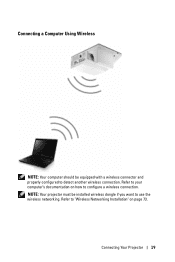
Connecting Your Projector 19 NOTE: Your projector must be equipped with a wireless connector and properly configured to use the wireless networking. Connecting a Computer Using Wireless NOTE: Your computer should be installed wireless dongle if you want to detect another wireless connection. Refer to "Wireless Networking Installation" on how to your computer's documentation on page 73. Refer to configure a wireless connection.
Connecting Your Projector 19 NOTE: Your projector must be equipped with a wireless connector and properly configured to use the wireless networking. Connecting a Computer Using Wireless NOTE: Your computer should be installed wireless dongle if you want to detect another wireless connection. Refer to "Wireless Networking Installation" on how to your computer's documentation on page 73. Refer to configure a wireless connection.
User Guide
Page 25
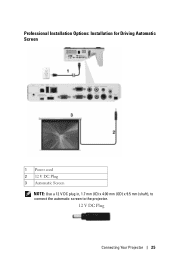
Professional Installation Options: Installation for Driving Automatic Screen 1 Power cord 2 12 V DC Plug 3 Automatic Screen NOTE: Use a 12 V DC plug in, 1.7 mm (ID) x 4.00 mm (OD) x 9.5 mm (shaft), to connect the automatic screen to the projector. 12 V DC Plug Connecting Your Projector 25
Professional Installation Options: Installation for Driving Automatic Screen 1 Power cord 2 12 V DC Plug 3 Automatic Screen NOTE: Use a 12 V DC plug in, 1.7 mm (ID) x 4.00 mm (OD) x 9.5 mm (shaft), to connect the automatic screen to the projector. 12 V DC Plug Connecting Your Projector 25
User Guide
Page 28
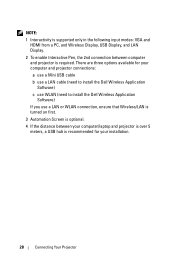
There are three options available for your computer and projector connections: a use a Mini USB cable b use a LAN cable (need to install the Dell Wireless Application Software) c use WLAN (need to install the Dell Wireless Application Software) If you use a LAN or WLAN connection, ensure that Wireless/LAN is turned on first. 3 Automation Screen is optional...
There are three options available for your computer and projector connections: a use a Mini USB cable b use a LAN cable (need to install the Dell Wireless Application Software) c use WLAN (need to install the Dell Wireless Application Software) If you use a LAN or WLAN connection, ensure that Wireless/LAN is turned on first. 3 Automation Screen is optional...
User Guide
Page 35
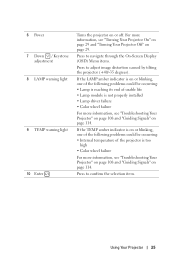
... indicator is on or blinking, one of the following problems could be occurring: • Lamp is reaching its end of the projector is not properly installed • Lamp driver failure • Color wheel failure For more information, see "Troubleshooting Your Projector" on page 108 and "Guiding Signals" on page 114. 6 Power...
... indicator is on or blinking, one of the following problems could be occurring: • Lamp is reaching its end of the projector is not properly installed • Lamp driver failure • Color wheel failure For more information, see "Troubleshooting Your Projector" on page 108 and "Guiding Signals" on page 114. 6 Power...

User Guide
Page 43
Installing the Remote Control Batteries NOTE: Remove the batteries from the remote control when not in use. 1 Press the tab to lift the battery compartment cover. 1 2 Check the polarity (+/-) marking on the batteries. 2 3 Insert the batteries and align their polarity correctly 3 according to the marking in the battery compartment. NOTE: Avoid mixing different types of batteries or using new and old batteries together. 4 Slip the battery cover back. 4 Using Your Projector 43
Installing the Remote Control Batteries NOTE: Remove the batteries from the remote control when not in use. 1 Press the tab to lift the battery compartment cover. 1 2 Check the polarity (+/-) marking on the batteries. 2 3 Insert the batteries and align their polarity correctly 3 according to the marking in the battery compartment. NOTE: Avoid mixing different types of batteries or using new and old batteries together. 4 Slip the battery cover back. 4 Using Your Projector 43
User Guide
Page 47
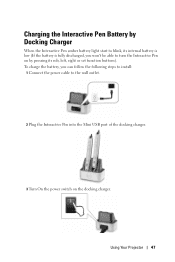
Charging the Interactive Pen Battery by pressing its internal battery is low (If the battery is fully discharged, you won't be able to turn the Interactive Pen on the docking charger. To charge the battery, you can follow the following steps to install: 1 Connect the power cable to the wall outlet. 2 Plug the Interactive Pen into the Mini USB port of the docking charger. 3 Turn On the power switch on by Docking Charger When the Interactive Pen amber battery light start to blink, its nib, left, right or set function buttons). Using Your Projector 47
Charging the Interactive Pen Battery by pressing its internal battery is low (If the battery is fully discharged, you won't be able to turn the Interactive Pen on the docking charger. To charge the battery, you can follow the following steps to install: 1 Connect the power cable to the wall outlet. 2 Plug the Interactive Pen into the Mini USB port of the docking charger. 3 Turn On the power switch on by Docking Charger When the Interactive Pen amber battery light start to blink, its nib, left, right or set function buttons). Using Your Projector 47
User Guide
Page 52
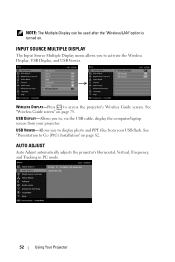
See "Presentation to access the projector's Wireless Guide screen. WIRELESS DISPLAY-Press to Go (PtG) Installation" on page 82. USB DISPLAY-Allows you to, via the USB cable, display the computer/laptop screen from your projector. AUTO ADJUST Auto Adjust automatically ...
See "Presentation to access the projector's Wireless Guide screen. WIRELESS DISPLAY-Press to Go (PtG) Installation" on page 82. USB DISPLAY-Allows you to, via the USB cable, display the computer/laptop screen from your projector. AUTO ADJUST Auto Adjust automatically ...
User Guide
Page 73
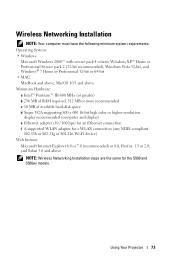
Using Your Projector 73 Wireless Networking Installation NOTE: Your computer must have the following minimum system requirements: Operating System: • Windows Microsoft Windows 2000™ with service pack 4 or later, Windows XP&#... 802.11g or 802.11n Wi-Fi device) Web browser Microsoft Internet Explorer 6.0 or 7.0 (recommended) or 8.0, Firefox 1.5 or 2.0, and Safari 3.0 and above NOTE: Wireless Networking Installation steps are the same for the S500 and S500wi models.
Using Your Projector 73 Wireless Networking Installation NOTE: Your computer must have the following minimum system requirements: Operating System: • Windows Microsoft Windows 2000™ with service pack 4 or later, Windows XP&#... 802.11g or 802.11n Wi-Fi device) Web browser Microsoft Internet Explorer 6.0 or 7.0 (recommended) or 8.0, Firefox 1.5 or 2.0, and Safari 3.0 and above NOTE: Wireless Networking Installation steps are the same for the S500 and S500wi models.

User Guide
Page 74
..., you need to complete the steps below: 1 Install the optional wireless dongle (Optional in Wireless Mode)" on page 64. 5 Access the INPUT SOURCE menu, select Multuple Display and then select Wireless Display on page 52. 74 Using Your Projector NOTE: Wireless dongle embedded for S500wi. 2 Connect the power cable to the wall... sub-menu. NOTE: Use , , and buttons to navigate and to use your projector control panel or remote control. See "Wireless/LAN Settings (in S500). See "Installing the Optional Wireless Dongle" on page 13.
..., you need to complete the steps below: 1 Install the optional wireless dongle (Optional in Wireless Mode)" on page 64. 5 Access the INPUT SOURCE menu, select Multuple Display and then select Wireless Display on page 52. 74 Using Your Projector NOTE: Wireless dongle embedded for S500wi. 2 Connect the power cable to the wall... sub-menu. NOTE: Use , , and buttons to navigate and to use your projector control panel or remote control. See "Wireless/LAN Settings (in S500). See "Installing the Optional Wireless Dongle" on page 13.

User Guide
Page 75
... automatically switched to wireless screen when wireless option is disabled, then follow these information to use your wireless projector, you must install the software on your system. Using Your Projector 75 Install the Wireless Application Software on Your Computer In order to log in in this step. 6 Take note of the LOGIN...
... automatically switched to wireless screen when wireless option is disabled, then follow these information to use your wireless projector, you must install the software on your system. Using Your Projector 75 Install the Wireless Application Software on Your Computer In order to log in in this step. 6 Take note of the LOGIN...
User Guide
Page 78
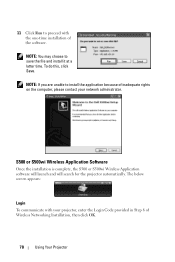
The below screen appears: Login To communicate with the one-time installation of Wireless Networking Installation, then click OK. 78 Using Your Projector 11 Click Run to install the application because of inadequate rights on the computer, please contact your projector, enter the Login Code ..., click Save. NOTE: If you are unable to proceed with your network administrator. S500 or S500wi Wireless Application Software Once the installation is complete, the S500 or S500wi Wireless Application software will launch and will search for the projector automatically. NOTE: You may choose ...
The below screen appears: Login To communicate with the one-time installation of Wireless Networking Installation, then click OK. 78 Using Your Projector 11 Click Run to install the application because of inadequate rights on the computer, please contact your projector, enter the Login Code ..., click Save. NOTE: If you are unable to proceed with your network administrator. S500 or S500wi Wireless Application Software Once the installation is complete, the S500 or S500wi Wireless Application software will launch and will search for the projector automatically. NOTE: You may choose ...
User Guide
Page 82
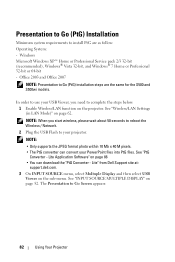
Presentation to Go (PtG) Installation Minimum system requirements to install PtG are the same for the S500 and S500wi models. Office 2003 and Office 2007 NOTE: Presentation to complete the steps below: 1 Enable Wireless/LAN function on the projector. See "Wireless/LAN ... System: - See "PtG Converter - See "INPUT SOURCE MULTIPLE DISPLAY" on page 62. Lite Application Software" on the sub-menu. Lite" from Dell Support site at: support.dell.com. 3 On INPUT SOURCE menu, select Multuple Display and then select USB Viewer on page 86 • You can convert your projector. In...
Presentation to Go (PtG) Installation Minimum system requirements to install PtG are the same for the S500 and S500wi models. Office 2003 and Office 2007 NOTE: Presentation to complete the steps below: 1 Enable Wireless/LAN function on the projector. See "Wireless/LAN ... System: - See "PtG Converter - See "INPUT SOURCE MULTIPLE DISPLAY" on page 62. Lite Application Software" on the sub-menu. Lite" from Dell Support site at: support.dell.com. 3 On INPUT SOURCE menu, select Multuple Display and then select USB Viewer on page 86 • You can convert your projector. In...

User Guide
Page 87
NOTE: 1 If your computer does not have MS PowerPoint installed, file convert will fail. 2 PtG converter only supports up to 20 pages. 3 PtG converter only supports conversion of .ppt files to select the storage location and then press OK. 3 Click Browse button to .PtG files. Using Your Projector 87
NOTE: 1 If your computer does not have MS PowerPoint installed, file convert will fail. 2 PtG converter only supports up to 20 pages. 3 PtG converter only supports conversion of .ppt files to select the storage location and then press OK. 3 Click Browse button to .PtG files. Using Your Projector 87


